
project_description
Explore the docs »
View Demo
·
Report Bug
·
Request Feature
This project is part of my home automation series using Node-RED, ESP32s, Telegram and more.. This repository describes the steps required to get the ESP32 to control a relay over WIFI using MQTT.
To get a local copy up and running follow these simple steps.
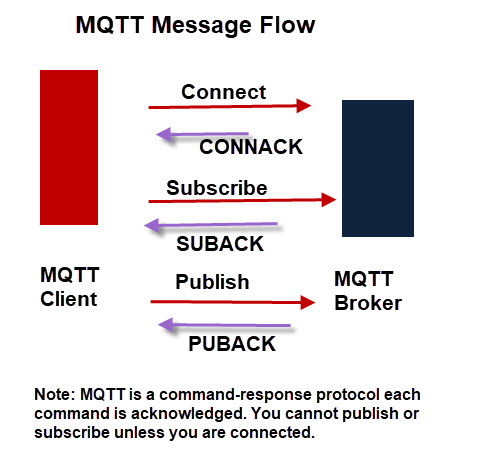
MQTT is a machine-to-machine (M2M)/"Internet of Things" connectivity protocol. It was designed as an extremely lightweight publish/subscribe messaging transport. It is useful for connections with remote locations where a small code footprint is required and/or network bandwidth is at a premium [mqtt.org]. The Mosquitto broker will be installed on your Raspberry Pi as the broker and your ESP devices will be clients. Learn more here.
Navigate to the terminal and follow these steps for the installation.
- Update your Raspberry Pi
sudo apt-get update - Install Mosquitto
sudo apt-get install mosquitto - Install Mosquitto Client
sudo apt-get install mosquitto-clients
‡: Note for later: Port of your Mosquitto Broker, most likely 1883; Server Mosquitto Broker is running on, most likely the ip address of your Raspberry Pi
Install ESP-IDF for Windows, Linux or Mac OS.
- Clone the repo
git clone https://github.com/Alextros00/ESP32-MQTT-Relay-Control.git
- Install NPM packages
npm install
- Plug in your ESP32 to your laptop and open your command line.
cdinto the project directory.- Open the configuration menu. It may take a minute to load.
idf.py menuconfig - Go to
Serial flasher config- Set the
Default baud rateto115200 baudfor the ESP32 - Set
Default serial portand set the port in which your ESP32 is connected†‡
†:Your serial port can be found using this guide.
‡:One problem I had was that it is not clearly documented that if using windows the port should be configured in the COMX for example COM0
- Set the
- Click
Save->Ok->Exit->Exitto get back to the main configuration screen - Go to
Example Configuration- Set
WiFI SSIDandWiFi passwordto that of your local 2.4GHz network - Set
Broker URLto your mqtt server:port. It will look something likemqtt://@192.168.1.142:1883if you have no username and password configured for Mosquitto - Enter the
ESP32-X Numberthat you are using. This can be left blank and has no impact on the functionality of the code besides messages sent. - Enter the
Relay GPIO Numberor the GPIO that will control the relay. What pin you can use can be found on your device specific pinout. - Select
enter 1 or 2to decide between subscribing to 1 or 2 relay. Default is 1. - Set the
MQTT Topic to Subscribe Toor recieve messages from - Set the
2nd MQTT Topic to Subscribe To. Can be left alone if not using. - Set the
MQTT Topic to Publish Toor send messages to
- Set
- Once done configuring the project exit out of the menu by clicking
Save->Ok->Exit->Exit->Exitto go back to the terminal
Build and flash the project onto your device.
idf.py build & flash
Monitor the logs of your device
idf.py monitor
To exit the monitor us Ctrl + ] or Ctrl and ] at the same time
Wire the ESP32 such that
The relay connected to the ESP32 can now be controlled over WIFI using an MQTT client sending messages on the previously selected topic in the configuration section.
See the open issues for a list of proposed features (and known issues).
Distributed under the MIT License. See LICENSE for more information but basically you can take my code but I would appreciate a coffee!
