- This is a Python program that uses the "face recognition" facial recognition library. It allows you to add photos to be detected by the camera, delete people's records, and activate the scanner mode, which displays the person's name when they step in front of the camera. The program can be used for security purposes or access control if properly adapted.
- Email: [email protected] "Most used"
- Telegram: @Davicjc
- 📢 "Just for Windows because it's an '.exe'"
- Click here: "DOWNLOAD"
- This version does not require any steps to run, just download and open it!
- "Remember that this version does not allow the editable 'KEY' function because it is not possible to edit the code, but everything works.
- If any error occurs, which is very rare, execute this code in the cmd:
pip install dlib && pip install face_recognition && pip install numpy && pip install opencv-pythonand try again! - "Camera required! Please note that depending on your PC, it may take a while to run 100% when opening".
-
📢 "For Linux, you should download all the dependencies that will be shown below, except for the "Visual Studio" instruction. And remember that the installation method on Linux for each step may be different from the way it's done on Windows. If you have any questions, consult ChatGPT, and if you still can't figure it out, get in touch."
-
Go to the Microsoft Store and download the latest available version of Python. If you want to use the same version used in this code, just access this link: "Py-3.11".
-
As a second step, download this program: "Visual Studio". When you run it, it will open a download page. On that page, select the option "Desktop development with C++," which is usually the first option, and click install.
-
As a third step, you need to download this program: "CMake". During the installation, make sure to check the option "Add CMake to the system PATH for all users" to avoid problems. After that, you can continue with the program download. Note: Once the program is downloaded, it is important to open it at least once, and then you can close it. Download the file corresponding to your operating system and make sure to install the "Installer" version of the program. For example, if you are using Windows, download the installer for Windows x64.
-
After completing the previous steps, it is recommended to restart your PC. To do this, open your CMD and execute the following command:
pip install dlib && pip install face_recognition && pip install numpy && pip install opencv-python -
After following all these steps, you can open the program file "Face Safety.py".
-
"If an error occurs, it may be an isolated problem related to your current system. If you have any questions, contact me via 'ctt no perfil'."
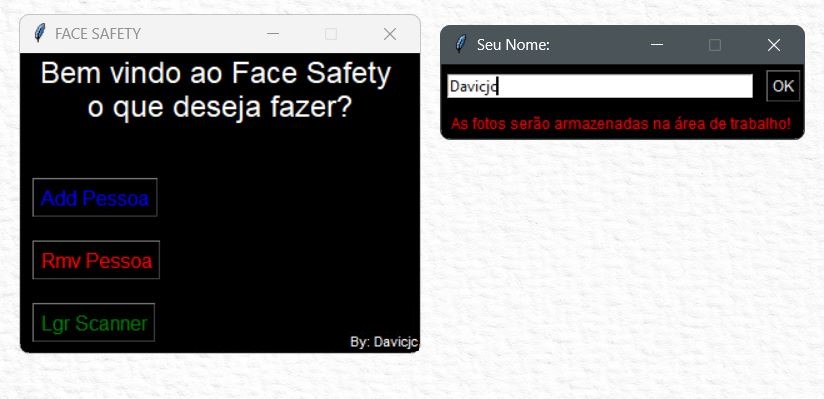
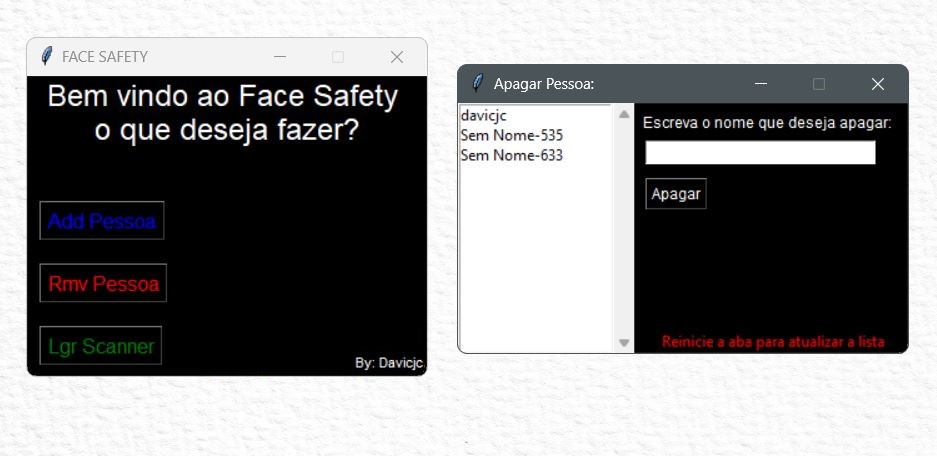
- This is the home page where you can access the program options.

- This is the screen that appears when you click the 'Add Person' button. In this blank field, you will enter the name of the person you want to register. After that, the camera will open and wait for you to press any key to take the photo. If the face is not found in the image, the scanner will not work, and you should delete the registration in the 'Remove Person' option. Then, you can re-register the person in 'Add Person'. Reminder: it is important not to use duplicate names.
- In this part, you can choose which person to remove, which are the "photos" saved on your desktop. To delete a person through the program, it will present a list of registrations. When you find the person you want to delete, simply write the name exactly as it was registered and then click the "delete" button. The person's name will be removed at this point in the process. When you exit the "Remove Person" tab and enter it again, the person will no longer appear in the list if you have completed this step correctly.
- Finally, this is the scanner. When you press it, it will automatically load the registered people and start checking faces with their respective names. If there is any error, it may be due to a registration where the person's face is difficult to access, such as wearing hats or lack of lighting, for example.

- This part is only for those who will use the code to manage something like electronic doors, monitoring systems, among others. There will also be support for the Raspberry Pi. In these two tabs, you can add a person as an administrator. Thus, at the end of the code, there will be a "Def Key". When a person stands in front of the camera, and their name is on the list of administrators, it will call this function and execute what is inside it "in a loop". Otherwise, if a person without administrative privileges or someone who is not registered stands in front of the camera, it will not be called. In this way, whoever uses this code can perform an action, such as unlocking or locking a door, for example, through this variable. Remember that within this function, it can be fully customized if you have knowledge of what you are doing.
