
The entire training process of DeepSeek R1 is nothing but using different way of reinforcement learning on top of their base model (i.e. deepseek V3)
To make everything easy to understand we will use hand drawn flowcharts along with the code and will follow the step by step implementation of deepseek technical report and will build our own model using a tiny base model that you can also run locally.
We will also be covering theory next to each step, so in case you are not aware of DeepSeek R1 this blog will cover that too.
I explained DeepSeek R1 with hand-drawn diagrams for non-tech folks. Read here.
The codebase is organized as follows:
train-deepseek-r1/
├── code.ipynb         # Jupyter notebook with code implementation
├── requirements.txt   # List of required libraries
└── r1_for_dummies.md # DeepSeek R1 explanation for non-tech folks- Setting up the Stage
- Our Training Dataset
- DeepSeek R1 Training Quick Overview
- Choosing our Base Model
- Policy Model (R) In RL Setup
- GRPO Algorithm for R1 Zero
- Prompt Template
- Preprocessing Training Data
- Reward Functions
- Training Configurations for R1 Zero
- GRPO Training Loop
- Saving Tiny R1 Zero LLM
- Two main problems with R1 Zero
- Preparing Cold Start Data for SFT
- Few-shot Prompting with Long CoT
- Direct Prompting
- Post Processing Refinement
- SFT Stage 1 With Cold Start Data
- Stage 1 SFT Trainer Configs for R1
- Stage 1 STF Training Loop
- Saving Tiny R1 LLM
- Reasoning-Oriented RL
- Rejection Sampling
- SFT Stage 2 Training
- Distillation
Clone the repository and install the required libraries using the following commands:
git clone https://github.com/FareedKhan-dev/train-deepseek-r1.git
cd train-deepseek-r1
pip install -r requirements.txt
Now, let’s import the required libraries and set up the environment for our training.
# Import necessary libraries
import logging
import os
import sys
import re
import math
from dataclasses import dataclass, field
from typing import List, Optional

# Import PyTorch and Hugging Face Transformers
import torch
import transformers
from transformers import (
    AutoModelForCausalLM,
    AutoTokenizer,
    HfArgumentParser,
    TrainingArguments,
    set_seed,
    TrainerCallback,
    TrainerControl,
    TrainerState,
)
from transformers.trainer_utils import get_last_checkpoint

# Import dataset utilities
import datasets
from datasets import load_dataset

# Import libraries from TRL (Transformers Reinforcement Learning)
from trl import (
    AutoModelForCausalLMWithValueHead,
    PPOConfig,
    PPOTrainer,
    GRPOTrainer,
    GRPOConfig,
    SFTTrainer
)

# Import math-related utilities
from latex2sympy2_extended import NormalizationConfig
from math_verify import LatexExtractionConfig, parse, verifyAlthough the paper doesn’t specify the exact initial dataset for RL pre-training, we assume it should be reasoning focused.
So to stay as close as possible to the original replication, we will use these two open-source reasoning Hugging Face datasets:
-
NuminaMath-TIR (For R1 Zero Training)
-
Bespoke-Stratos-17k (For R1 Training)
AI-MO/NuminaMath-TIR contains 70K math problems with messages column showing the COT (chain of though) reasoning behind the solution.
| Field | Description |
|---|---|
| problem | The math problem |
| solution | Step-by-step solution |
| messages | Chat to solve the problem |
Take a look at its sample:
# Load the "AI-MO/NuminaMath-TIR" dataset from DigitalLearningGmbH
MATH_le = load_dataset("AI-MO/NuminaMath-TIR", "default")

# Access the first sample in the training set
MATH_le['train'][0]


#### OUTPUT ####
{
'problem': 'What is the degree of the polynomial 4 +5x^3 ... ',
'solution': 'This polynomial is not written in ...',
'messages': [{'from': 'user', 'value': 'The problem ...'}]
}
#### OUTPUT ####
While Bespoke-Stratos contains 17K problems focused on math and code.
| Field | Description |
|---|---|
| system | Guidelines for math and code problems |
| conversation | Chat to solve the problem |
And its sample looks like:
# Load the "Bespoke-Stratos-17k" dataset from bespokelabs
bespoke_rl = load_dataset("bespokelabs/Bespoke-Stratos-17k", "default")

# Access the first sample in the training set
bespoke_rl['train'][0]


#### OUTPUT ####
{
'system': 'Your role as an assistant involves ... ',
'conversations': [{'from': 'user', 'value': 'Return your ...'}]
}
 #### OUTPUT ####
It’s not necessary to choose these datasets only, you can select any of your choice as long as it is reasoning focused (a problem and its step-by-step solution).
So, before going into the technical implementation, a quick overview is that DeepSeek-R1 isn’t trained from scratch, like, from nothing. Instead, they started with a pretty smart LLM they already had DeepSeek-V3 but they wanted to make it a reasoning superstar.
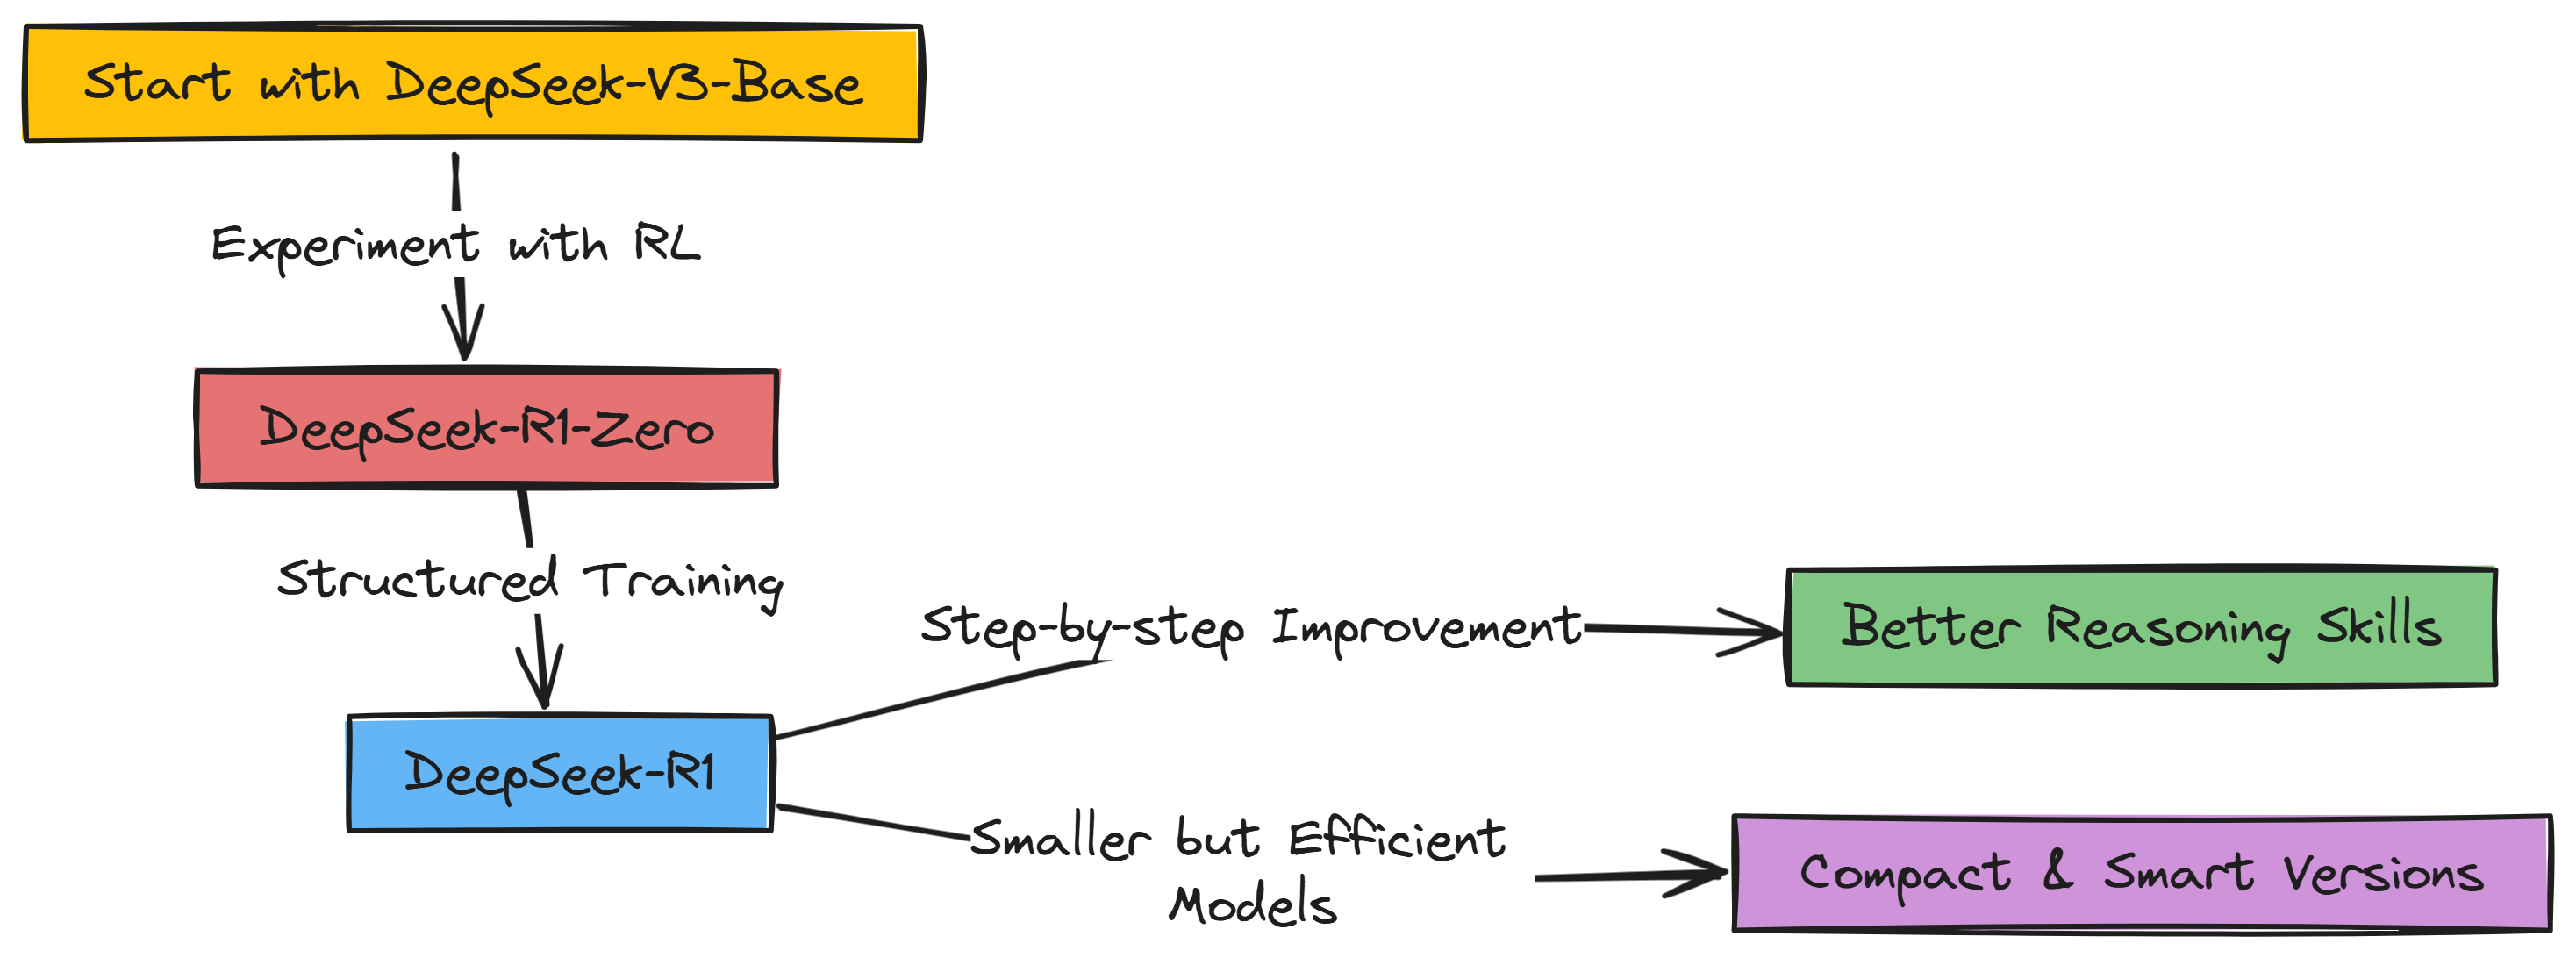
To do that, they used Reinforcement Learning, or RL for short where you reward the LLM when it does something good for reasoning while punish it otherwise.
But it’s not just one simple training session. It’s like a whole bunch of steps, a pipeline they call it. They first tried just pure RL to see if reasoning would pop up by itself that was DeepSeek-R1-Zero, kinda an experiment. Then for the real DeepSeek-R1, they made it more organized with different stages. They give it some starting data to get it going, then do RL, then more data, then more RL… it’s like leveling up, step by step!
The whole point is to make these language models way better at thinking through problems.
So yeah, that’s the super short version before we look into the crazy details of each step
Since DeepSeek team chose DeepSeek-V3 as their base model to create R1 Zero and R1, but it’s quite huge 685 GB 💀 in size which is obviously not in our reach.
To keep it simple, we will use a much smaller base model Qwen/Qwen2.5–0.5B-Instruct (0.9 GB in size). If you have a higher GPU RAM that can even load unquantized LLMs, you can go for a bigger model, such as Qwen/Qwen2.5–7B-Instruct.
Let’s take a look at some of the specification of our base model:
MODEL_NAME = "Qwen/Qwen2.5-0.5B-Instruct"
OUTPUT_DIR = "data/Qwen-GRPO-training" # For saving our trained model

# Create output directory if it doesn't exist
os.makedirs(OUTPUT_DIR, exist_ok=True)

# Initialize tokenizer with chat template
tokenizer = AutoTokenizer.from_pretrained(
    MODEL_NAME,
    trust_remote_code=True,
    padding_side="right"
)

# Set pad token if not set
if tokenizer.pad_token is None:
    tokenizer.pad_token = tokenizer.eos_token

print(f"Vocabulary size: {len(tokenizer)}")
print(f"Model max length: {tokenizer.model_max_length}")
print(f"Pad token: {tokenizer.pad_token}")
print(f"EOS token: {tokenizer.eos_token}")


#### OUTPUT ####
Vocabulary size: 151665
Model max length: 131072
Pad token: <|endoftext|>
EOS token: <|im_end|>
#### OUTPUT ####
These are some basic info about the model, take a look at the total number of parameters our base model has.
# Initialize base model
model = AutoModelForCausalLM.from_pretrained(
  MODEL_NAME,
  trust_remote_code=True,
  torch_dtype=torch.bfloat16
)

print(f"Model parameters: {model.num_parameters():,}")


#### OUTPUT ####
Model parameters: 494,032,768
#### OUTPUT ####
Close to 0.5B params, let’s print a simple response from it and then we will move on to next step.
# Check CUDA availability
device = torch.device("cuda" if torch.cuda.is_available() else "cpu")
print(f"Using device: {device}")

# Move model to the appropriate device
model.to(device)

# Test basic inference
def test_model_inference(user_input: str):
    """Test basic model inference with the loaded model and tokenizer."""
    messages = [
        {"role": "system", "content": "You are Qwen, a helpful assistant."},
        {"role": "user", "content": user_input}
    ]

    # Apply chat template
    text = tokenizer.apply_chat_template(
        messages,
        tokenize=False,
        add_generation_prompt=True
    )

    # Tokenize and generate
    inputs = tokenizer(text, return_tensors="pt").to(device)
    outputs = model.generate(
        **inputs,
        max_new_tokens=100,
        do_sample=True,
        temperature=0.7
    )

    response = tokenizer.decode(outputs[0], skip_special_tokens=True)
    return response

# Test the model
test_input = "how are you?"
response = test_model_inference(test_input)
print(f"Test Input: {test_input}")
print(f"Model Response: {response}")


#### OUTPUT ####
"Test Input: how are you?
Model Response: As an AI language model I dont have feelings ..."
#### OUTPUT ####
So, the output of this tiny model is quite reliable and suitable for our DeepSeek lookalike model training for sure.
Now that we have selected our base model, next we need to understand how a basic RL setup works for training an LLM.
For DeepSeek R1 their starting point was (DeepSeek V3) base model and in our case we are starting with Qwen2.5–0.5B-Instruct. By a starting point I meant that it has created the DeepSeek R1 zero version, an initial version which has some errors in it before the final version was created.
The initial version (R1 Zero) was created using Reinforcement Learning where (DeepSeek v3/Qwen2.5–0.5B) acts as an RL agent (actor who takes action). Let’s first visualize how it works.
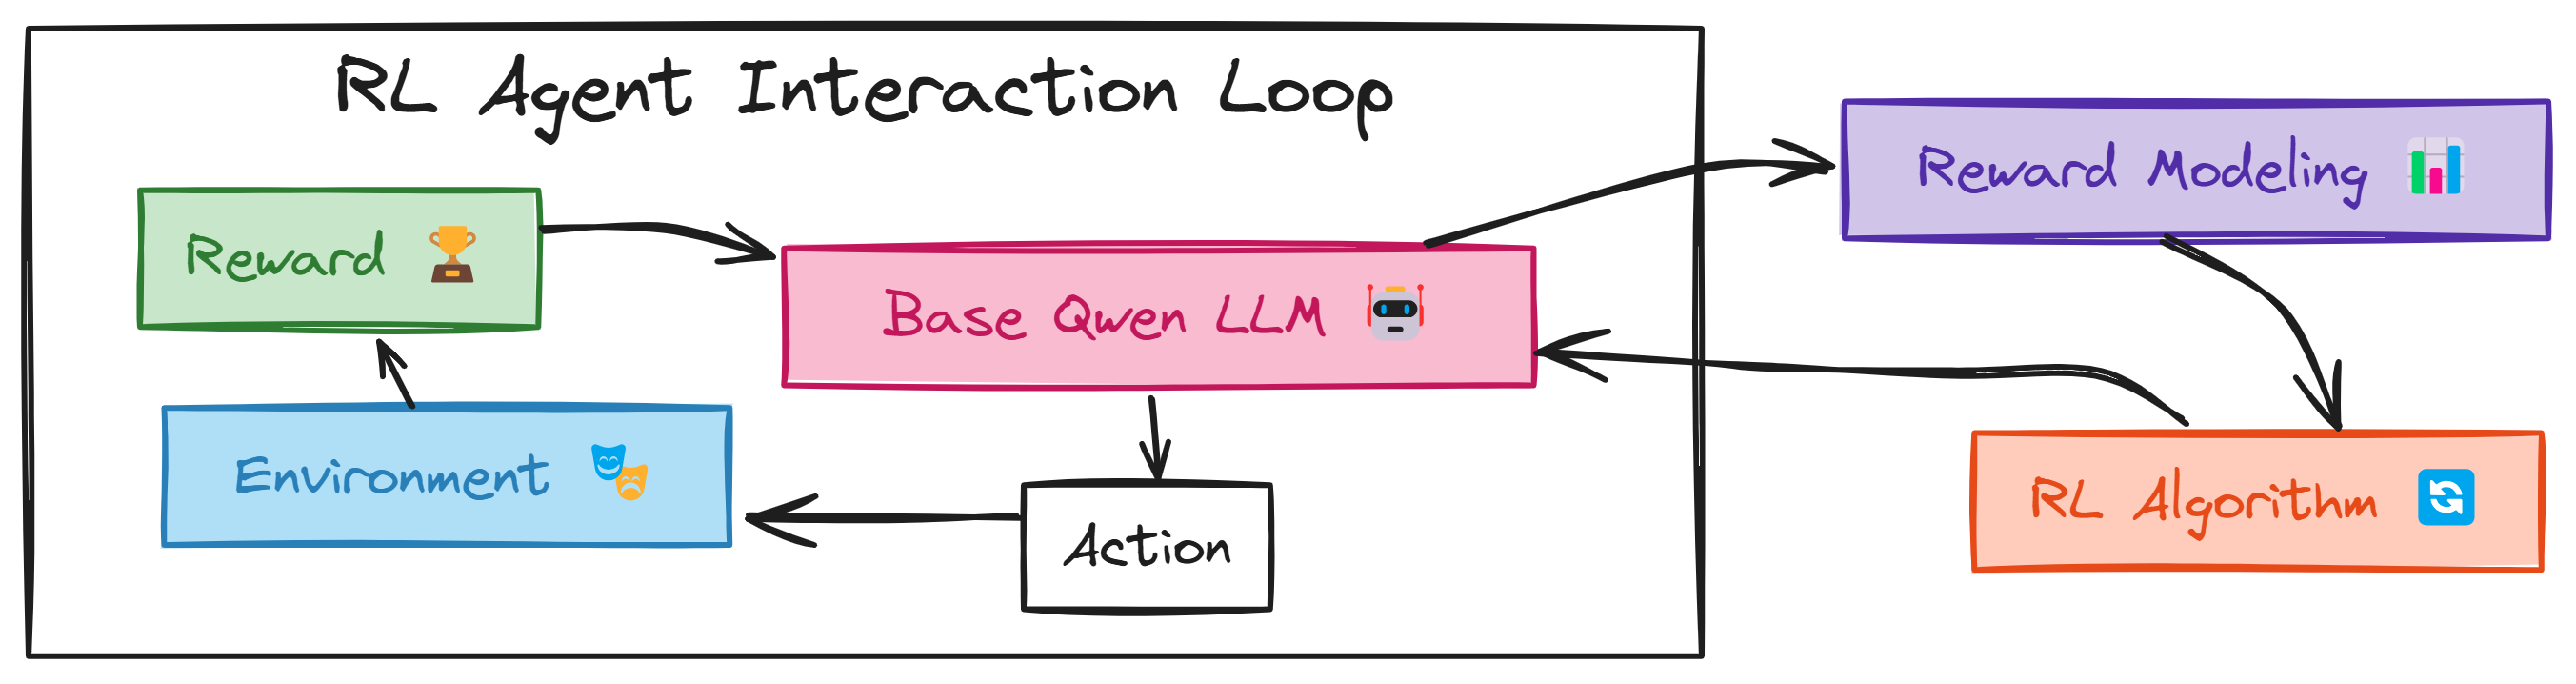
The RL agent (DeepSeek V3/Qwen2–0.5B) starts by taking an Action, which means it generates an answer and some reasoning for a given problem that’s put into its Environment. The Environment, in this case, is simply the reasoning task itself.
After taking an action, the Environment gives back a Reward. This Reward is like feedback, it tells our base model (DeepSeek V3/Qwen2–0.5B) how good its action was. A positive Reward means it did something right, maybe got the answer correct or reasoned well. This feedback signal then goes back to our base model, helping it learn and adjust how it takes actions in the future to get even better Rewards.
In the next section, we will be discussing this methodology in more detail
So that we have understand a basic RL flow now we need to learn what exact RL algorithm DeepSeek uses for R1-Zero.
There are many RL algos available, but traditional RL use something called a **“critic” **to help the main decision making part (“actor” i.e. DeepSeek-V3/Qwen2-0.5B). This critic is usually just as big and complex as the actor itself, which basically doubles the amount of computational cost.
But DeepSeek uses GRPO for training their initial (R1 Zero), GRPO does things differently because it figures out a baseline, a kind of reference point for good actions directly from the results it gets from a group of actions. Because of this, GRPO doesn’t need a separate critic model at all. This saves a lot of computation and makes things more efficient.
Let’s draw a flowchart of how GRPO is being used for R1 Zero training, and then we will interpretate it.

Let’s understand how DeepSeek GRPO implementation works with our base model (Qwen2–0.5B).
First, the Problem Input (A) is given to the Qwen Model (B), Qwen attempts to generate an answer through Generate Completion (C). The final result, called the Completion Output (D), includes reasoning steps in tags and the final solution in tags.
Next, the Problem Input (A) and the Ground Truth Solution (E) are fed into the Reward Functions (F), acting as intelligent graders. These functions compare Qwen Completion Output (D) with the correct solution and evaluate different aspects such as:
-
Accuracy (is the answer correct?)
-
Format (are the and tags used properly?)
-
Reasoning Steps (is the logic clear?)
-
Cosine Scaling (is the response concise?)
-
Repetition Penalty (is there unnecessary repetition?).
These evaluations produce Reward Scores (G), which are then passed to the GRPO Trainer (H). The trainer uses gradients to adjust the Qwen Model (B), fine-tuning how it generates answers. This process is called Gradient Reward Policy Optimization because it optimizes Qwen responses using gradients, reward feedback, and policy adjustments to maximize performance.
Finally, the updated Qwen Model (B) is tested again on new problems, continuously refining itself through repeated cycles. With each iteration, Qwen becomes a better problem solver.
In the upcoming section we will start preprocessing our training dataset for GRPO training
We are using the same thinking prompt template that DeepSeek uses for the GRPO algorithm to build R1 Zero, so let’s define that:
# DeepSeek system prompt for GRPO based training
SYSTEM_PROMPT = (
  f"""A conversation between User and Assistant. The user asks a question,
      and the Assistant solves it. The assistant
      first thinks about the reasoning process in the mind and
      then provides the user with the answer. The reasoning
      process and answer are enclosed within <think> </think>
      and <answer> </answer> tags, respectively, i.e.,
      <think> reasoning process here </think><answer> answer here </answer>
   """
)
This system prompt tells the base model (Qwen2–0.5B) its role as a helpful assistant who reasons step-by-step before answering.
The <think> and <answer> tags are used to structure the model response, separating its internal reasoning from the final answer for better evaluation and reward.
Now that we have our system prompt ready, we need to transform our training data according to our template.
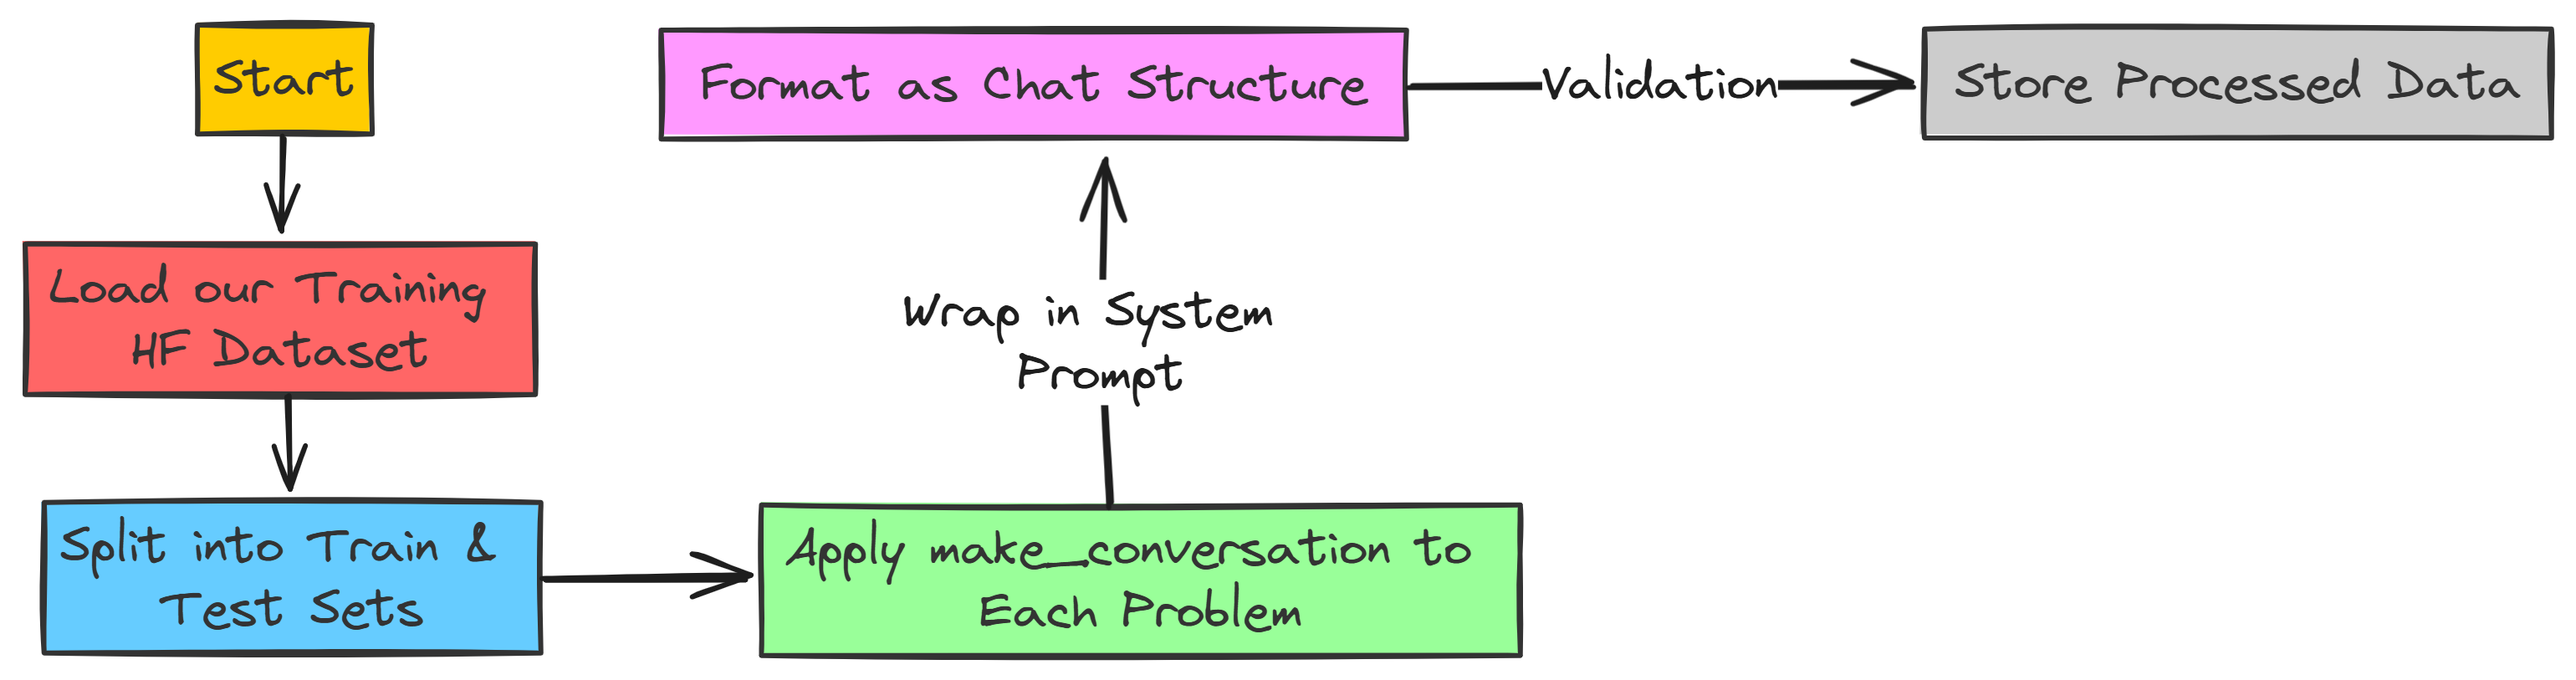
We need to create the make_conversation function that will handle the conversation for us.
# Function to structure the training data
def make_conversation(example):
  """Convert dataset examples into conversation format."""
  return {
      "prompt": [
          {"role": "system", "content": SYSTEM_PROMPT},
          {"role": "user", "content": example["problem"]},
      ],
  }
It will take each problem column value from our training dataset and return a dictionary with the system prompt and the appended problem question for each row. Let’s create this function that will prepare our dataset.
# Load and prepare dataset
def load_math_dataset():
    """Load and prepare the mathematics dataset."""
    dataset = load_dataset(
        "AI-MO/NuminaMath-TIR",
        name="default",
        split=['train', 'test']
    )

    # Convert splits into dictionary
    dataset = {
        'train': dataset[0],
        'test': dataset[1]
    }

    # Apply conversation format
    for split in dataset:
        dataset[split] = dataset[split].map(make_conversation)

        # Remove 'messages' column if exists
        if "messages" in dataset[split].column_names:
            dataset[split] = dataset[split].remove_columns("messages")

    return dataset
We have everything ready, let’s transform our training data into the required format and print the training and test size.
# Load our training dataset and printing train/test size
dataset = load_math_dataset()

print(f"Train set size: {len(dataset['train'])}")
print(f"Test set size: {len(dataset['test'])}")


#### OUTPUT ####
Train set size: 72441
Test set size: 99
#### OUTPUT ####
Now that we have split our training dataset, we need to validate our dataset (Check if user/assistant conversation exist) before moving to the next step.
def validate_dataset(dataset):
    """Perform basic validation checks on the dataset."""

    # Define the required fields for the dataset
    required_fields = ["problem", "prompt"]

    # Loop through the 'train' and 'test' splits of the dataset
    for split in ['train', 'test']:
        print(f"\nValidating {split} split:")

        # Retrieve column names from the dataset
        fields = dataset[split].column_names

        # Check if any required fields are missing
        missing = [field for field in required_fields if field not in fields]
        if missing:
            print(f"Warning: Missing fields: {missing}")  # Warn if fields are missing
        else:
            print("✓ All required fields present")  # Confirm all fields are present

        # Retrieve the first sample from the dataset split
        sample = dataset[split][0]

        # Extract the 'prompt' field, which contains a list of messages
        messages = sample['prompt']

        # Validate the prompt format:
        # - It should contain at least two messages
        # - The first message should be from the 'system' role
        # - The second message should be from the 'user' role
        if (len(messages) >= 2 and
            messages[0]['role'] == 'system' and
            messages[1]['role'] == 'user'):
            print("✓ Prompt format is correct")  # Confirm correct format
        else:
            print("Warning: Incorrect prompt format")  # Warn if format is incorrect

# Validate dataset
validate_dataset(dataset)
It output this:
Validating train split:

✓ All required fields present
✓ Prompt format is correct

Validating test split:

✓ All required fields present
✓ Prompt format is correct
Our training dataset is validated successfully 🙌, it means we have successfully transformed our dataset for training.
We already saw in GRPO section that it evaluate the answer of base model through five different ways:

-
Accuracy (is the answer correct?)
-
Format (are the
<think>and<answer>tags used properly?) -
Reasoning Steps (is the logic clear?)
-
Cosine Scaling (is the response concise?)
-
Repetition Penalty (is there unnecessary repetition?).
Each of these are functions will calculate the reward for each response, and we need to code them. So, let’s do that first.
Accuracy reward is the most easy to understand but requires a bit complex code. In this reward model we want to check if mathematically our base model response is equivalent to the ground truth solution.

If the model answer is mathematically correct, we assign a reward of 1.0. If it is incorrect, the reward is 0.0. In cases where the ground truth solution cannot be parsed, we assign a neutral reward of 0.5 to avoid unfair penalties.
Now, let’s implement the function.
def accuracy_reward(completions, solution, **kwargs):
    """
    Reward function to check if the model's response is mathematically
    equivalent to the ground truth solution.
    Uses latex2sympy2 for parsing and math_verify for validation.
    """

    # Extract responses
    contents = [completion[0]["content"] for completion in completions]
    rewards = []

    for content, sol in zip(contents, solution):
        # Parse the ground truth solution
        gold_parsed = parse(sol, extraction_mode="first_match",
                            extraction_config=[LatexExtractionConfig()])

        if gold_parsed:  # Check if parsing was successful
            # Parse the model's answer with relaxed normalization
            answer_parsed = parse(
                content,
                extraction_config=[
                    LatexExtractionConfig(
                        normalization_config=NormalizationConfig(
                            nits=False,
                            malformed_operators=False,
                            basic_latex=True,
                            equations=True,
                            boxed="all",
                            units=True,
                        ),
                        boxed_match_priority=0,
                        try_extract_without_anchor=False,
                    )
                ],
                extraction_mode="first_match",
            )

            # Reward 1.0 if correct, 0.0 if incorrect
            reward = float(verify(answer_parsed, gold_parsed))
        else:
            # If ground truth cannot be parsed, assign neutral reward (0.5)
            reward = 0.5
            print("Warning: Failed to parse gold solution:", sol)

        rewards.append(reward)

    return rewards
In this function, we check whether the model response is equivalent to the correct answer. Instead of comparing raw text, we:
-
Convert the solution into a structured mathematical format using latex2sympy2.
-
If parsing fails, assign a neutral reward of 0.5.
-
Extract the model output and normalize it for better robustness.
-
Use math_verify to check if the parsed response matches the parsed solution.
-
If correct assign 1, if incorrect assign 0.
This ensures that accuracy evaluation is not just about textual similarity but true mathematical correctness.
Format Reward is all about making sure our model follows instructions and structures its output correctly. We asked it to put its reasoning in <think> tags and the final answer in <answer> tags, right? This reward function checks exactly that!

If the model uses those tags correctly, we give it a reward of 1. If it messes up the format, it gets 0. Simple as that! This encourages the model to pay attention to the output structure we want.
Let’s code this up:
# Implement Format Reward Function
def format_reward(completions, **kwargs):
  """
  Reward function to check if the completion has the correct format:
  <think>...</think> <answer>...</answer>.
  """
  # Define the regex pattern for the desired format
  pattern = r"^<think>.*?</think>\s*<answer>.*?</answer>$"

  # Extract the content from each completion
  completion_contents = [completion[0]["content"] for completion in completions]

  # Check if each completion matches the pattern
  matches = [re.match(pattern, content, re.DOTALL | re.MULTILINE)
             for content in completion_contents]

  # Reward 1.0 for correct format, 0.0 otherwise
  return [1.0 if match else 0.0 for match in matches]
In this function:
-
We define a pattern using regular expressions (regex). This pattern basically says “the content should start with , have anything inside until , then some spaces, then , anything inside until , and then end there”.
-
We get the actual text content from each model completion.
-
Then we use use re.match to see if each content perfectly matches our pattern. re.DOTALL helps the . in regex match newlines too, and re.MULTILINE makes ^ and $ match the start/end of the whole string, not just lines.
-
Finally, we give a reward 1 if it matched the format perfectly, 0 if it didn’t. This is a strict on/off reward for format correctness.
Reasoning Steps Reward is a bit clever. We want to encourage our model to show its “thinking process”. So, we are going to reward it for including things that look like reasoning steps.

We will look for keywords and patterns that usually show up in step-by-step reasoning, like:
-
Step 1, Step 2, etc.
-
Numbered lists like 1, 2
-
Bullet points like - or *
-
Transition words like First, Second, Next, Finally
The more of these it includes, the better the reward. It’s like giving points for showing its work!
Let’s code this reasoning encouraging function:
def reasoning_steps_reward(completions, **kwargs):
    r"""
    Reward function to encourage clear step-by-step reasoning.
    It looks for patterns like "Step 1:", numbered lists, bullet points,
    and transition words.
    """
    # Regex pattern to find indicators of reasoning steps
    pattern = r"(Step \d+:|^\d+\.|\n-|\n\*|First,|Second,|Next,|Finally,)"

    # Extract completion contents
    completion_contents = [completion[0]["content"] for completion in completions]

    # Count the number of reasoning step indicators in each completion
    matches = [len(re.findall(pattern, content, re.MULTILINE))
               for content in completion_contents]

    # Reward is proportional to the number of reasoning steps, maxing out at 1.0
    # We're using a "magic number" 3 here - encourage at least 3 steps for full reward
    return [min(1.0, count / 3) for count in matches]
We create a pattern that’s a bit more complex regex. It looks for all those reasoning indicator things we listed above.
We use re.findall to find all the matches of our pattern within each content. len(re.findall(…)) then gives us the count of these indicators.
The reward is calculated as min(1.0, count / 3). This means
-
If it finds 3 or more reasoning indicators ( count >= 3), the reward is 1.0 (max reward).
-
If it finds fewer (e.g., count = 1 or 2), it gets a partial reward (like 1/3 or 2/3).
-
If it finds none (count = 0), the reward is 0.0.
The / 3 is a bit of a magic number here. We’re saying “aim for about 3 reasoning steps to get full credit” You can tweak this number if you want to encourage more or fewer steps.
Cosine Scaled Reward is a bit more advanced. It’s about encouraging conciseness in correct answers and being less harsh on longer incorrect answers.

Think of it like this:
-
For correct answers: We want to reward shorter, more direct solutions more than long, rambling ones. A short, correct answer is often better.
-
For incorrect answers: A short, wrong answer is probably worse than a longer, wrong answer that at least tried to reason. So, we want to penalize short wrong answers more than long wrong answers.
Let’s see the code that does this clever scaling:
# Implement Cosine Scaled Reward Function
def get_cosine_scaled_reward(
    min_value_wrong: float = -0.5,
    max_value_wrong: float = -0.1,
    min_value_correct: float = 0.8,
    max_value_correct: float = 1.0,
    max_len: int = 1000,
):
    """
    Returns a cosine scaled reward function. This function scales the accuracy reward
    based on completion length. Shorter correct solutions get higher rewards,
    longer incorrect solutions get less penalty.
    """
    def cosine_scaled_reward(completions, solution, accuracy_rewards, **kwargs):
        """
        Cosine scaled reward function that adjusts accuracy rewards based on completion length.
        """
        contents = [completion[0]["content"] for completion in completions]
        rewards = []

        for content, sol, acc_reward in zip(contents, solution, accuracy_rewards):
            gen_len = len(content)  # Length of the generated answer
            progress = gen_len / max_len # How far we are to max length
            cosine = math.cos(progress * math.pi) # Cosine value based on progress

            if acc_reward > 0.5: # Assuming accuracy_reward gives ~1.0 for correct answers
                min_value = min_value_correct
                max_value = max_value_correct
            else: # Incorrect answer
                min_value = max_value_wrong  # Note the swap!
                max_value = min_value_wrong

            # Cosine scaling formula!
            reward = min_value + 0.5 * (max_value - min_value) * (1.0 + cosine)
            rewards.append(float(reward))
        return rewards
    return cosine_scaled_reward
get_cosine_scaled_reward(...) generates a reward function for training, customizing scaling with parameters like min_value_wrong/max_value_wrong (penalty range for incorrect answers) and min_value_correct/max_value_correct (reward range for correct ones). max_len sets the maximum length for scaling.
Inside, cosine_scaled_reward(...) we calculate rewards based on completions, solution, and accuracy_rewards.
It computes gen_len, normalizes it as progress = gen_len / max_len, and derives a cosine value that starts at 1 (short answers) and decreases to -1 (long answers).
If acc_reward > 0.5, it uses the correct reward range, otherwise it applies the incorrect range but swaps min/max values to penalize longer wrong answers less.
Repetition Penalty Reward is all about discouraging our model from getting stuck in loops and repeating itself. We want it to generate fresh, varied reasoning and answers, not just copy-paste the same phrases over and over!

This reward function penalizes the model if it uses the same sequences of words (n-grams) too many times. We’ll use n-grams of size 3 (trigrams) in our example, but you can adjust this.
If the model repeats itself a lot, it gets a negative reward (penalty). If it’s more diverse and avoids repetition, the penalty is less.
Let’s implement the code to penalize repetition:
def get_repetition_penalty_reward(ngram_size: int = 3, max_penalty: float = -0.1):
    """
    Returns a repetition penalty reward function. Penalizes repetitions of n-grams
    in the generated text.
    """
    if max_penalty > 0:
        raise ValueError(f"max_penalty {max_penalty} should not be positive")

    def zipngram(text: str, ngram_size: int):
        """Helper function to generate n-grams from text."""
        words = text.lower().split() # Lowercase and split into words
        return zip(*[words[i:] for i in range(ngram_size)]) # Create n-grams

    def repetition_penalty_reward(completions, **kwargs) -> float:
        """
        Repetition penalty reward function.
        """
        contents = [completion[0]["content"] for completion in completions]
        rewards = []
        for completion in contents:
            if completion == "": # No penalty for empty completions
                rewards.append(0.0)
                continue
            if len(completion.split()) < ngram_size: # No penalty for short completions
                rewards.append(0.0)
                continue

            ngrams = set() # Use a set to store unique n-grams
            total = 0
            for ng in zipngram(completion, ngram_size): # Generate n-grams
                ngrams.add(ng) # Add n-gram to the set (duplicates are ignored)
                total += 1 # Count total n-grams

            # Calculate scaling factor: more repetition -> higher scaling
            scaling = 1 - len(ngrams) / total
            reward = scaling * max_penalty # Apply penalty based on scaling
            rewards.append(reward)
        return rewards
    return get_repetition_penalty_reward
Our get_repetition_penalty_reward(...) creates a reward function to penalize repetition, with parameters like ngram_size (default 3, for trigrams) and max_penalty (a negative value, e.g., -0.1).
A helper function, zipngram(text, ngram_size), generates n-grams by converting text to lowercase, splitting it into words, and using zip(*[words[i:] for i in range(ngram_size)]) for efficient extraction.
Inside, repetition_penalty_reward(...) computes the penalty for each completion. If it's empty or too short, it gets a reward of 0.0.
The penalty scales as scaling = 1 - len(ngrams) / total, where total is the number of n-grams and len(ngrams) is the unique count. More repetition makes scaling approach 1, increasing the penalty.
The final reward is scaling * max_penalty, meaning less repetition results in a smaller penalty, while high repetition leads to a stronger negative reward.
We have implemented all five reward functions, Let’s move on to next stage where we define our training args
Now we to code a configuration where we can fine-tune how our reward functions actually work. So, Let’s define that configuration class:
# Define GRPOScriptArguments for reward function parameters
@dataclass
class GRPOScriptArguments:
    """
    Script arguments for GRPO training, specifically related to reward functions.
    """

    reward_funcs: list[str] = field(
        default_factory=lambda: ["accuracy", "format"],
        metadata={
            "help": "List of reward functions. Possible values: 'accuracy', 'format', 'reasoning_steps', 'cosine', 'repetition_penalty'"
        },
    )
    cosine_min_value_wrong: float = field(
        default=-0.5,
        metadata={"help": "Minimum reward for cosine scaling for wrong answers"},
    )
    cosine_max_value_wrong: float = field(
        default=-0.1,
        metadata={"help": "Maximum reward for cosine scaling for wrong answers"},
    )
    cosine_min_value_correct: float = field(
        default=0.8,
        metadata={"help": "Minimum reward for cosine scaling for correct answers"},
    )
    cosine_max_value_correct: float = field(
        default=1.0,
        metadata={"help": "Maximum reward for cosine scaling for correct answers"},
    )
    cosine_max_len: int = field(
        default=1000,
        metadata={"help": "Maximum length for cosine scaling"},
    )

    repetition_n_grams: int = field(
        default=3,
        metadata={"help": "Number of n-grams for repetition penalty reward"},
    )
    repetition_max_penalty: float = field(
        default=-0.1,
        metadata={"help": "Maximum (negative) penalty for for repetition penalty reward"},
    )
Our @dataclass decorator makes it easy to create a class for storing data. WhileGRPOScriptArguments class holds reward settings.
The reward_funcs list decides which rewards to use, starting with ["accuracy", "format"], but you can add more like "reasoning_steps", "cosine", "repetition_penalty".
Some settings control how the cosine_scaled_reward and repetition_penalty_reward work, letting you adjust how rewards are given.
Next up, we have TrainingArguments from the transformers library. This is the main configuration object that controls almost everything about the training process.
# Define TrainingArguments from transformers
training_args = TrainingArguments(
    output_dir=OUTPUT_DIR,          # Output directory for checkpoints and logs
    overwrite_output_dir=True,
    num_train_epochs=1,             # Total number of training epochs
    per_device_train_batch_size=8,  # Batch size per device during training
    per_device_eval_batch_size=16,   # Batch size for evaluation
    gradient_accumulation_steps=2,  # Accumulate gradients to simulate larger batch size
    learning_rate=5e-5,            # Initial learning rate for AdamW optimizer
    warmup_ratio=0.1,              # Linear warmup over warmup_ratio fraction of training steps
    weight_decay=0.01,             # Apply weight decay to all layers except bias and LayerNorm weights
    logging_steps=10,              # Log every X updates steps
    evaluation_strategy="steps",    # Evaluate every `eval_steps`
    eval_steps=50,                 # Evaluation and logging steps
    save_strategy="steps",         # Save checkpoint every `save_steps`
    save_steps=50,                 # Save checkpoint every X updates steps
    save_total_limit=2,            # Limit the total amount of checkpoints. Deletes the older checkpoints.
    dataloader_num_workers=2,      # Number of subprocesses to use for data loading
    seed=42,                       # Random seed for reproducibility
    bf16=True,                     # Use mixed precision BFP16 training
    push_to_hub=False,             # Whether to push the final model to Hugging Face Hub
    gradient_checkpointing=True,   # Enable gradient checkpointing
    report_to="none",              # Reporting to no one
)
Finally, we need to have a ModelConfig. This is where we put settings that are specific to the model itself, like which pre-trained model to use, what data type to use (like bfloat16), and whether to trust remote code or not and so.
Let’s define our ModelConfig:
@dataclass
class ModelConfig:
    """
    Configuration for the model.
    """
    model_name_or_path: str = field(
        default=MODEL_NAME, metadata={"help": "Path to pretrained model or model identifier from huggingface.co/models"}
    )
    model_revision: Optional[str] = field(
        default="main", metadata={"help": "The specific model version to use (can be a branch name, tag name or commit id)."}
    )
    torch_dtype: Optional[str] = field(
        default="bfloat16", metadata={"help": "Override the default `torch_dtype` and load the model under this dtype."}
    )
    trust_remote_code: bool = field(
        default=True, metadata={"help": "Trust remote code when loading model and tokenizer."}
    )
    attn_implementation: Optional[str] = field(
        default="flash_attention_2", metadata={"help": "Attention implementation to use. 'flash_attention_2' or None"}
    )
Our ModelConfig class holds key settings, including model_name_or_path, which defaults to Qwen 0.5B Instruct. We use torch_dtype="bfloat16" for efficiency and set trust_remote_code=True for safe remote loading. Additionally, attn_implementation="flash_attention_2" is enabled for potentially faster training if supported.
Now we need to actually create instances of these configuration classes so we can use them:
# Instantiate configuration objects
script_args = GRPOScriptArguments()
model_args = ModelConfig()
Next, we need to get our list of reward functions and any “callbacks” we want to use during training.
Callbacks are like little helpers that can do things at different points in the training process (like logging progress, saving models, etc.). For now, we’ll just use a simple logging callback.
Getting our reward functions in one place.
# Utility function to get reward functions based on script arguments
def get_reward_functions(script_args):
    """
    Returns a list of reward functions based on the script arguments.
    """
    reward_funcs_list = []
    reward_funcs_registry = {
        "accuracy": accuracy_reward,  # Assuming accuracy_reward is defined in previous steps
        "format": format_reward,      # Assuming format_reward is defined in previous steps
        "reasoning_steps": reasoning_steps_reward, # Assuming reasoning_steps_reward is defined
        "cosine": get_cosine_scaled_reward( # Assuming get_cosine_scaled_reward is defined
            min_value_wrong=script_args.cosine_min_value_wrong,
            max_value_wrong=script_args.cosine_max_value_wrong,
            min_value_correct=script_args.cosine_min_value_correct,
            max_value_correct=script_args.cosine_max_value_correct,
            max_len=script_args.cosine_max_len,
        ),
        "repetition_penalty": get_repetition_penalty_reward( # Assuming get_repetition_penalty_reward is defined
            ngram_size=script_args.repetition_n_grams,
            max_penalty=script_args.repetition_max_penalty,
        ),
    }

    for func_name in script_args.reward_funcs:
        if func_name not in reward_funcs_registry:
            raise ValueError(f"Reward function '{func_name}' not found in registry.")
        reward_funcs_list.append(reward_funcs_registry[func_name])

    return reward_funcs_list
Our callback function which will track loss and other important info.
logger = logging.getLogger(__name__)

class LoggingCallback(TrainerCallback):
    """
    A simple callback for logging training information at specific steps.
    """
    def on_step_end(self, args: TrainingArguments, state: TrainerState, control: TrainerControl, **kwargs):
        if state.global_step % args.logging_steps == 0:
            logger.info(f"Step {state.global_step}: Loss = {state.log_history[-1].get('loss', None)}, Learning Rate = {state.log_history[-1].get('learning_rate', None)}")

def get_callbacks(training_args, model_args, script_args):
    """
    Returns a list of callbacks to be used during training.
    For now, it includes only the LoggingCallback. You can extend this to add more callbacks.
    """
    callbacks = [LoggingCallback()] # Instantiate our LoggingCallback
    return callbacks
Finally, initializing these function.
# Get reward functions and callbacks
reward_functions = get_reward_functions(script_args)
callbacks = get_callbacks(training_args, model_args, script_args)This is the engine that will actually drive our GRPO training. We need to initialize it, giving it all the pieces we’ve prepared: our model, reward functions, training arguments, dataset, and callbacks!
Let’s initialize the GRPOTrainer:
# Create GRPOConfig from TrainingArguments
grpo_config = GRPOConfig(
    **training_args.to_dict(), # Convert TrainingArguments to dictionary and unpack
    **{
       # REMOVED model_init_kwargs here
       # We are passing the instantiated 'model' object, so GRPOTrainer doesn't need model_init_kwargs
    }
)

grpo_trainer = GRPOTrainer(
    model=model,                      # Our initialized Qwen model
    reward_funcs=reward_functions,    # List of reward functions from previous step
    args=grpo_config,                # GRPOConfig (created from TrainingArguments)
    train_dataset=dataset['train'],   # Training dataset
    eval_dataset=dataset['test'],    # Evaluation dataset
    callbacks=callbacks              # List of callbacks
)
We can now start the Training Loop! This is as simple as calling the train() method on our grpo_trainer.
# Start the GRPO Training Loop
train_result = grpo_trainer.train()
When you run this cell, you should see the training process begin.
...
INFO:__main__:Step 10: Loss = ..., Learning Rate = ...
INFO:__main__:Step 20: Loss = ..., Learning Rate = ...
...
Training will take some time but we set num_train_epochs = 1 and are using a small model, it shouldn’t take too long for this example.
But for real-world GRPO DeepSeek R1 Zero training, you’d likely train for many more epochs and steps.
Once the training completed, we can save our trained model which can be used for inferencing.
# Define the path to your trained model (same as OUTPUT_DIR)
TRAINED_MODEL_PATH = "data/Qwen-GRPO-training"

# Save the tokenizer
tokenizer.save_pretrained(TRAINED_MODEL_PATH)

# Save the trained model
grpo_trainer.save_model(TRAINED_MODEL_PATH)

print(f"GRPO Trained model saved to {TRAINED_MODEL_PATH}")
Then we can simply load the trained model using:
# Load the tokenizer - make sure to use trust_remote_code=True if needed
tokenizer = AutoTokenizer.from_pretrained(
    TRAINED_MODEL_PATH,
    trust_remote_code=True, # If your model config requires it
    padding_side="right" # Ensure consistent padding side
)

# Set pad token if it wasn't saved or loaded correctly
if tokenizer.pad_token is None:
    tokenizer.pad_token = tokenizer.eos_token

# Load the trained model itself
trained_model = AutoModelForCausalLM.from_pretrained(
    TRAINED_MODEL_PATH,
    trust_remote_code=True, # If your model architecture requires it
    torch_dtype=torch.bfloat16 # Keep the same dtype as training for consistency
)

# Move the loaded model to your device (GPU if available)
trained_model.to(device) # 'device' is still our CUDA device from before
In order to use it for inference:
# Testing Inference with the Trained Model
def test_trained_model_inference(user_input: str):
    """Test inference with the loaded trained model and tokenizer."""
    messages = [
        {"role": "system", "content": SYSTEM_PROMPT}, # Re-use our system prompt
        {"role": "user", "content": user_input}
    ]

    # Apply chat template using our tokenizer
    text = tokenizer.apply_chat_template(
        messages,
        tokenize=False,
        add_generation_prompt=True
    )

    # Tokenize the input text
    inputs = tokenizer(text, return_tensors="pt").to(device)

    # Generate output using our *trained_model*
    outputs = trained_model.generate(
        **inputs,
        max_new_tokens=200, # Maybe generate a bit longer now
        do_sample=True,
        temperature=0.7
    )

    # Decode the generated tokens back to text
    response = tokenizer.decode(outputs[0], skip_special_tokens=True)
return responseNow that we have completed our R1 zero training approach using our base model Qwen2–0.5B instead of their DeepSeek V3 (original base model).
We cannot identify our trained model problems but researches of DeepSeek saw the R1 Zero model performed really well on reasoning tests, even scoring similarly to more advanced models like OpenAI-01–0912 on tasks like AIME 2024.
This showed that using reinforcement learning (RL) to encourage reasoning in language models is a promising approach.
But they also noticed DeepSeek-R1-Zero had some key issues that needed fixing for real world use and wider research.

Researchers of DeepSeek states that the template is intentionally simple and structurally focused. It avoids imposing any content-specific constraints on the reasoning process itself. For example, it doesn’t say:
-
“You must use step-by-step reasoning” (It just says “reasoning process” leaving it open to the model to define what that means).
-
“You must use reflective reasoning”
-
“You must use a specific problem-solving strategy”
The main problem was that the reasoning processes inside the <think> tags were hard to read, making it tough for humans to follow and analyze.
Another issue was language mixing, when asked multi-lingual questions, the model sometimes mixed languages in the same response, leading to inconsistent and confusing outputs.
If you asked it questions in, say, Spanish. Suddenly, its “thinking” would be a jumbled mix of **English and Spanish, **not exactly polished! These problems, messy reasoning and language confusion, were the clear roadblocks.
These are the two main reasons they transformed their initial R1 Zero Model into the R1
So to fix R1 Zero issues and really get DeepSeek reasoning properly, researchers performed a Cold Start Data Collection and included Supervised Fine Tuning.
You can think of it as giving the model a good foundation in reasoning before the really intense RL training. Basically, they wanted to teach DeepSeek-V3 Base what good reasoning looks like and how to present it clearly.
One of the example of cold start data is Bespoke-Stratos-17k that we see earlier and will be using for creating R1, but we need to understand how cold dataset is created so we wont skip any part from the actual training.
One technique is Few-shot Prompting with Long Chain-of-Thought (CoT), in which we try to show DeepSeek-V3 Base (or in our case, Qwen2–0.5B) few examples of questions paired with super detailed, step-by-step solutions. This is Chain-of-Thought (CoT).

Goal of this approach is to make the model learn by example and start mimicking this thorough reasoning style.
For our example problem “What is 2 + 3 * 4?”, we can create prompts that include a few solved problems as examples. Let’s see how this looks in Python:
# Loading Model and Tokenizer
MODEL_NAME = "Qwen/Qwen2.5-0.5B-Instruct"
tokenizer = AutoTokenizer.from_pretrained(MODEL_NAME, trust_remote_code=True, padding_side="right")
if tokenizer.pad_token is None:
    tokenizer.pad_token = tokenizer.eos_token
model = AutoModelForCausalLM.from_pretrained(MODEL_NAME, trust_remote_code=True, torch_dtype=torch.bfloat16).to("cuda" if torch.cuda.is_available() else "cpu")

# Generate Long COT Response
def generate_response(prompt_text):
    messages = [
        {"role": "system", "content": "You are a helpful assistant that provides step-by-step solutions."},
        {"role": "user", "content": prompt_text}
    ]
    text = tokenizer.apply_chat_template(messages, tokenize=False, add_generation_prompt=True)
    inputs = tokenizer(text, return_tensors="pt").to(model.device)
    outputs = model.generate(**inputs, max_new_tokens=200, do_sample=False) # Keep it deterministic for example
    response = tokenizer.decode(outputs[0], skip_special_tokens=True)
    return response.split("<|im_start|>assistant\n")[-1].strip() # Extract assistant's response
Let’s define the few shot examples accordingly for our asked question:
# Example problems with solutions (using | special_token | as delimiter)
few_shot_prompt = """
Problem: What's the square root of 9 plus 5?
Solution: <|special_token|> First, find the square root of 9, which is 3. Then, add 5 to 3.  3 + 5 equals 8. <|special_token|> Summary: The answer is 8.

Problem: Train travels at 60 mph for 2 hours, how far?
Solution: <|special_token|> Use the formula: Distance = Speed times Time. Speed is 60 mph, Time is 2 hours. Distance = 60 * 2 = 120 miles. <|special_token|> Summary: Train travels 120 miles.

Problem: What is 2 + 3 * 4?
Solution:
"""
Now using our base model our sample generations looks like this:
# Generate response for the target problem using few-shot examples
target_problem_prompt = few_shot_prompt + "What is 2 + 3 * 4?"
model_response_few_shot = generate_response(target_problem_prompt)

print("Few-shot Prompt:")
print(target_problem_prompt)
print("\nModel Response (Few-shot CoT):")
print(model_response_few_shot)
It output this structured data
Few-shot Prompt:
Problem: What's the square root of 9 plus 5?
Solution: <|special_token|> First, find the square root of 9,
which is 3. Then, add 5 to 3.  3 + 5 equals 8.
<|special_token|> Summary: The answer is 8.

Problem: Train travels at 60 mph for 2 hours, how far?
Solution: <|special_token|> Use the formula: Distance = Speed times Time.
Speed is 60 mph, Time is 2 hours. Distance = 60 * 2 = 120 miles.
<|special_token|> Summary: Train travels 120 miles.

Problem: What is 2 + 3 * 4?
Solution:

Model Response (Few-shot CoT):
<|special_token|> To solve 2 + 3 * 4, we need to follow the order
of operations (PEMDAS/BODMAS). Multiplication should be performed
before addition.
Step 1: Multiply 3 by 4, which equals 12.
Step 2: Add 2 to the result from Step 1: 2 + 12 = 14.
<|special_token|> Summary: The answer is 14.
See how the model, after seeing examples, starts to structure its answer with <|special_token|> delimiters and provides step-by-step reasoning leading to the summary and final answer!
This is the power of few-shot learning guiding the model towards the desired output format.
Another method is Direct Prompting. Here, we directly instruct the model to not just solve the problem, but also to explicitly show its reasoning step-by-step and then verify its answer.
This is about encouraging a more deliberate and thoughtful problem-solving approach.

Let’s craft a prompt for “What is 2 + 3 * 4?” that explicitly asks for reasoning and verification. Here’s the Python code to see it in action:
# Direct prompting example
direct_prompt_text = """
Problem: Solve this, show reasoning step-by-step, and verify:
What is 2 + 3 * 4?
"""

model_response_direct = generate_response(direct_prompt_text)

print("Direct Prompt:")
print(direct_prompt_text)
print("\nModel Response (Direct Prompting):")
print(model_response_direct)
The direct prompting output is very easy to understand and this is what it looks like:
Direct Prompt:
Problem: Solve this, show reasoning step-by-step, and verify:
What is 2 + 3 * 4?

Model Response (Direct Prompting):
<|special_token|> Reasoning: To solve 2 + 3 * 4, I need to follow
the order of operations, which states that multiplication should
be done before addition.
Step 1: Multiply 3 by 4, which equals 12.
Step 2: Add 2 to the result from Step 1: 2 + 12 = 14.
Verification: To verify the answer, I can double-check the
order of operations and the calculations. Multiplication is
indeed performed before addition, and the calculations are correct.
<|special_token|> Summary: The answer is 14.
As you can see, by directly asking for reasoning and verification, the model provides a more comprehensive output, including a “Verification” section.
This method directly guides the model to produce the kind of detailed reasoning we are looking for.
The final technique involves Post-Processing Refinement. Interestingly, they even used the outputs from the already trained R1 Zero model for this!
Even with its issues, R1 Zero could reason somewhat. So, they took R1 Zero outputs and had human annotators refine them, making them cleaner, more structured, and correcting any mistakes.

Imagine a messy R1 Zero output like this:
<think>  ummm... multiply 3 and 4... get 12... then add 2...</think>
<answer> 14 </answer>
Human annotators would then refine it to something much clearer and better formatted:
<|special_token|> Reasoning: To solve this, we use order of operations, doing multiplication before addition.
Step 1: Multiply 3 by 4, which is 12.
Step 2: Add 2 to the result: 2 + 12 = 14.
<|special_token|> Summary: The answer is 14.
While we can’t perfectly simulate human refinement in code, we can demonstrate a basic idea of how you might programmatically reformat and structure a potentially messy output.
Let’s take a simulated “messy” output and show how we could refine it:
# Simulated messy R1 Zero output
messy_output = "<think>  ummm... multiply 3 and 4... get 12... then add 2...</think>\n<answer> 14 </answer>"

def refine_output(messy_text):
    think_content = messy_text.split("<think>")[1].split("</think>")[0].strip()
    answer_content = messy_text.split("<answer>")[1].split("</answer>")[0].strip()

    refined_text = f"""<|special_token|> Reasoning: {think_content.replace('umm...', '').strip().capitalize()}.
<|special_token|> Summary: The answer is {answer_content}."""
    return refined_text

refined_output_text = refine_output(messy_output)

print("Messy Output (Simulated R1 Zero):")
print(messy_output)
print("\nRefined Output:")
print(refined_output_text)
This will output:
Messy Output (Simulated R1 Zero):
<think>  ummm... multiply 3 and 4... get 12... then add 2...</think>
<answer> 14 </answer>

Refined Output:
<|special_token|> Reasoning: Multiply 3 and 4... get 12... then add 2.
<|special_token|> Summary: The answer is 14.
This simple refine_output function is just a basic example. Real refinement by humans involves much more nuanced understanding and correction of reasoning steps.
However, it shows the core idea: taking initial model outputs and improving their quality and structure to create better training data.
After generating this Cold Start Data, the next crucial step was Supervised Fine-Tuning (SFT), which we’ll explore in the next section!
To generate proper cold start data to build R1 using Supervised fine-tuning, we obviously need a proper team along with an excessive amount of code, but thankfully, we already have data (Bespoke-Stratos-17k) that is similar to the cold start form.
We need to know what and how training happens inside the SFT Trainer as it processes our training data?
SFT is a form of supervised learning. This means we’re giving the model pairs of inputs and desired outputs.
In our case, the input might be a problem prompt, and the desired output is the well-reasoned, step-by-step solution from our training dataset. I hope this point gives a clear view of why there is a need of cold data.
It takes our tokenized training data and feeds it to the model in batches. For each batch, a important set of operations happens, Let’s visualize this internal process:

First, the model takes an input, a problem prompt, for instance. It processes this input and generates its best guess for the solution, token by token. These are the predicted tokens.
Next, the SFT Trainer needs to know how good (or bad) these predictions are. It uses a loss function, typically Cross-Entropy Loss. This function mathematically compares the model’s predicted tokens to the correct tokens from our training data. Think of it as calculating the “error” of the model’s answer.
This “error” isn’t just discarded. It’s the crucial signal for learning. Through a process called backpropagation, this error is used to calculate gradients. Gradients are like guides, pointing in the direction of parameter adjustments that would reduce the error.
Finally, an optimizer, like AdamW uses these gradients to subtly tweak the model’s internal settings — its parameters. These tweaks are designed to make the model’s next prediction a little bit closer to the correct answer.
Remember those problems we had with R1 Zero messy reasoning and language mixing? SFT is designed to fix exactly that. By training on high-quality, refined data, we’re teaching the model:
-
Clear Reasoning Style: To structure its “thinking” in a way that’s easy to read and follow.
-
Consistent Language: To stick to one language within a response, avoiding confusing mixes.
We’re using the Bespoke-Stratos-17k dataset for SFT. As we saw earlier, it’s got 17,000 problems focused on math and code, with a format that looks pretty good for our needs.
Let’s quickly remind ourselves of a sample from Bespoke-Stratos-17k:
# Load the "Bespoke-Stratos-17k" dataset from bespokelabs
bespoke_rl = load_dataset("bespokelabs/Bespoke-Stratos-17k", "default")

# Access the first sample in the training set
bespoke_rl['train'][0]


#### OUTPUT ####
{
  'system': 'Your role as an assistant involves ... ',
  'conversations': [{'from': 'user', 'value': 'Return your ...'}]
}
#### OUTPUT ####
This dataset, with its system prompts and user-assistant conversations, is perfect for showing our model how conversations with reasoning should look.
We’ll use the trl library again, which makes SFT training super easy.
First, we need to set up our configurations, similar to what we did for GRPO, but this time for SFT.
# Model and Output Configuration (same as before, or adjust as needed)
MODEL_NAME = "Qwen/Qwen2.5-0.5B-Instruct"
OUTPUT_DIR = "data/Qwen-SFT-training" # New output directory for SFT model
os.makedirs(OUTPUT_DIR, exist_ok=True)

# Training Arguments - similar to GRPO, but adjust for SFT
training_args = TrainingArguments(
    output_dir=OUTPUT_DIR,
    overwrite_output_dir=True,
    num_train_epochs=1,         # Adjust epochs as needed
    per_device_train_batch_size=8,
    per_device_eval_batch_size=16,
    gradient_accumulation_steps=2,
    learning_rate=2e-5,        # Adjust learning rate for SFT
    warmup_ratio=0.1,
    weight_decay=0.01,
    logging_steps=10,
    evaluation_strategy="no",
    eval_steps=50,
    save_strategy="steps",
    save_steps=50,
    save_total_limit=2,
    dataloader_num_workers=2,
    seed=42,
    bf16=True,
    push_to_hub=False,
    gradient_checkpointing=True,
    report_to="none",
    packing=True, # Enable data packing for efficiency
    max_seq_length=4096 # Set max sequence length
)

# Model Configuration - same as before
model_args = ModelConfig(
    model_name_or_path=MODEL_NAME,
    model_revision="main",
    torch_dtype="bfloat16",
    trust_remote_code=True,
    attn_implementation="flash_attention_2"
)
These TrainingArguments and ModelConfig are quite similar to what we used for GRPO, but with a few tweaks that are more suitable for SFT (like a slightly different learning rate, and importantly, packing=True and max_seq_length=4096 for efficient training on longer sequences).
Now, let’s load our dataset and tokenizer:
# Load Bespoke-Stratos-17k dataset
dataset_sft = load_dataset("HuggingFaceH4/Bespoke-Stratos-17k", split='train') # Only using train split for simplicity

# Initialize tokenizer - same as before
tokenizer = AutoTokenizer.from_pretrained(
    MODEL_NAME,
    trust_remote_code=True,
    padding_side="right"
)
if tokenizer.pad_token is None:
    tokenizer.pad_token = tokenizer.eos_token
And finally, we initialize the SFTTrainer and start training!
# Initialize base model for SFT - same as before
model_sft = AutoModelForCausalLM.from_pretrained(
    MODEL_NAME,
    trust_remote_code=True,
    torch_dtype=torch.bfloat16
)

# Initialize the SFT Trainer
sft_trainer = SFTTrainer(
    model=model_sft,                     # Our initialized Qwen model
    train_dataset=dataset_sft,           # Bespoke-Stratos-17k dataset
    tokenizer=tokenizer,                 # Tokenizer
    args=training_args,                  # Training arguments
    dataset_text_field="conversations",  # Field in dataset containing text - IMPORTANT for SFT
    packing=True,                        # Enable data packing
    max_seq_length=4096                 # Max sequence length
)

# Start the SFT Training Loop
sft_train_result = sft_trainer.train()
When you run this code, you’ll see the SFT training process start. It will look similar to the GRPO training output, showing loss and learning rate at each logging step.
...
INFO:__main__:Step 10: Loss = ..., Learning Rate = ...
INFO:__main__:Step 20: Loss = ..., Learning Rate = ...
...
Just like with GRPO, training time will depend on your hardware and chosen epochs. Since we’re still using a small model and only 1 epoch for this example, it should be reasonably quick.
After SFT is done, we save our newly fine-tuned model (R1).
# Saving the Trained SFT Model
TRAINED_SFT_MODEL_PATH = "data/Qwen-SFT-training" # Same as OUTPUT_DIR

# Save the tokenizer
tokenizer.save_pretrained(TRAINED_SFT_MODEL_PATH)

# Save the trained model
sft_trainer.save_model(TRAINED_SFT_MODEL_PATH)

print(f"SFT Trained model saved to {TRAINED_SFT_MODEL_PATH}")
And that’s it for the SFT part! We’ve now taken our base model, shown it lots of examples of good reasoning, and fine-tuned it to be better at producing clear, structured responses.
This finetuned model using SFT is what we called R1 after SFT stage 1
The steps after SFT, especially the RL stages and rejection sampling, are complex to implement from scratch in Python. Focusing on the theoretical understanding is key to understand the overall process.
After SFT, the model can reason better, but we want to really focus on reasoning quality and fix language mixing. This stage uses RL again, but with a smarter reward system.
This new reward checks if the model reasoning and answer are in the same language as the question. If you ask in English, the whole response should be in English. This fixes language mixing issues.

It adds a Language Consistency Reward alongside accuracy to ensure the SFT model reasons and answers in the same language as the input.
The GRPO algorithm and training loop from R1 Zero are reused, but the reward signals are improved to specifically target better reasoning and consistent language output.
To get super high-quality reasoning data, DeepSeek uses Rejection Sampling. Think of it as a filter to keep only the best examples.

The model generates many reasoning examples. These are then evaluated for correctness and reasoning quality (often using a generative reward model and human checks).
Only the best, high-quality reasoning examples are kept. Combined with non-reasoning data, this refined dataset is used for a second SFT Stage 2, further improving reasoning and general abilities.
The final RL stage focuses on making the model a helpful and safe AI assistant for all situations, not just reasoning problems. This is about alignment with human values.
Key Focus: Helpfulness & Harmlessness Rewards
Not just accuracy, the reward system now includes:
-
Helpfulness: Is the response useful and informative?
-
Harmlessness: Is the response safe, unbiased, and ethical?

The training data becomes diverse, including reasoning tasks and human preference data (which output is better — more helpful, less harmful?).
The reward system now balances accuracy with helpfulness and harmlessness. Iterative RL training (likely GRPO again) optimizes the model to be not just good at reasoning, but also a safe and helpful AI assistant for general use, resulting in DeepSeek R1.
To make DeepSeek R1 accessible, they distilled its knowledge into smaller models.
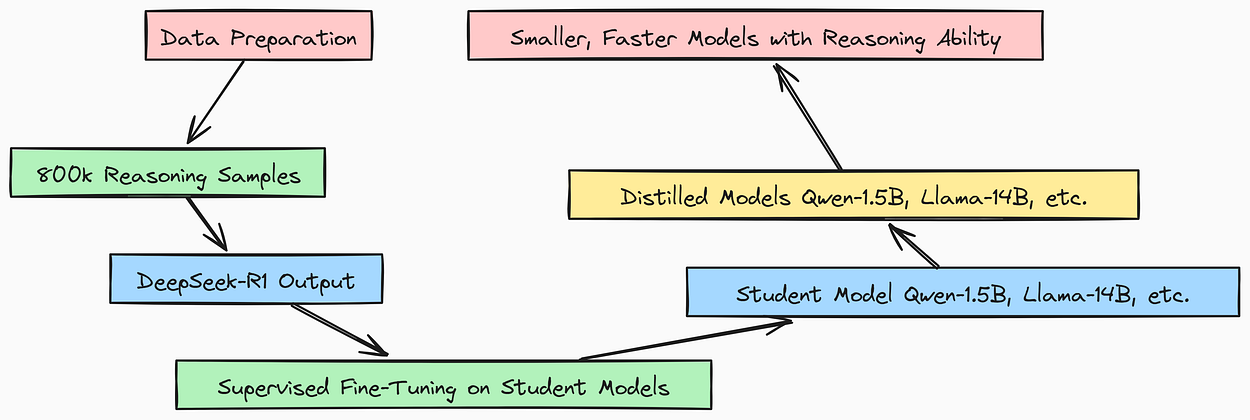
Distillation takes the knowledge of a large, powerful “teacher” model (DeepSeek R1) and transfers it to smaller “student” models. Using a large dataset of reasoning examples, the outputs of DeepSeek R1 are used as the target answers.
Smaller models are then trained (SFT) to mimic these outputs. This results in smaller, faster models that retain a significant portion of DeepSeek R1’s reasoning abilities, making them more practical for wider use.
Happy reading!