-
Notifications
You must be signed in to change notification settings - Fork 23
New issue
Have a question about this project? Sign up for a free GitHub account to open an issue and contact its maintainers and the community.
By clicking “Sign up for GitHub”, you agree to our terms of service and privacy statement. We’ll occasionally send you account related emails.
Already on GitHub? Sign in to your account
Flutter的项目实践 #35
Comments
什么是FlutterFlutter 是一个跨平台(Android 和 iOS)的移动开发框架,使用的是 Dart 语言。 Flutter 的目标是用来创建高性能、高稳定性、高帧率、低延迟的 Android 和 iOS 应用。并且开发出来的应用在不同的平台用起来跟原生应用具有一样的体验。不同的平台的原生体验应该得到保留,让该应用看起来同整个系统更加协调。不同平台的滚动操作、字体、图标 等特殊的特性 应该和该平台上的其他应用保持一致,让用户感觉就像操作原生应用一样。 为何选择使用 Flutter?
Flutter&ReactNativeReactNative –> Facebook,Flutter–> Google
|
Flutter 与React Native 对比
[关于性能]跨平台开发第一个考虑的就是性能问题
Flutter 和 ReactNative 的区别从实现原理上来讲 ReactNative 提供的组件都是继承自原生 Native 的 View 组件,比如ReactNative 中的 ListView 在 Android 中就是继承自 ListView ,还有 RecycleView。然而 Flutter 则不同,它的所有 UI 组件都是一帧一帧画出来的。这样也能够很准确,也很灵活的做出你想要的 UI 。其次它还非常人性化的贴近了平台的特性,比如 Android 的 Material Design 在 Flutter 就默认支持了进去。其实话说回来,在开发者角度来讲这两个跨平台都是一样的使用效果,毕竟都是通过一套语言来搭建可运行不同平台的应用。然而,Flutter 使用 Dart 语言开发而 ReactNative 则使用 JS 结合 XML 来开发的。这就有问题了。 React Native VS Flutter评测React Native较小的安装包带来的优势不仅是降低了下载门槛、减少了磁盘占用, 而且对于混合开发的压力也更小. 试想一个原生App因为几个页面使用了Flutter, 一行代码没写安装包就凭空增加了30MB, 这样的结果不是开发人员希望看到的. 流言终结者- Flutter和RN谁才是更好的跨端开发方案?
高频数据交换下Flutter与ReactNative的对比
总结Flutter与React Native
|
DartDart是Google于2011年发布的一门开源编程语言,旨在帮助开发者克服JavaScript的缺点,当然现在Dart已经是一门全平台的语音,不仅可以开发服务端,现在借助于flutter也可以开发原生Android和Is应用。 Dart语言特点
var name ="flyou";
String name1="flyou";

var age =25;
int age1 =25;

void main(){
print(name);
 	print(name1);
	print(age);
 	print(age1);
}
// console
/*
flyou
flyou
25
25
*/
常量使用 内置类型
方法(函数)Dart是完全面向对象的语言,函数在Dart中也是一种对象,也就是说函数也可以像其他参数一样在函数间传递。 bool isEvenNumber(int num) {
return num % 2 == 0;
}
void main() {
print(isEvenNumber(11));
}控制台输出: 上面是函数定义的最基本的方法,和其他语言定义函数的方法基本一致。 对于只包含一个表达式的函数可以简写为以下的方式 bool isEvenNumber(int num) => num % 2 == 0;可以使用=>替换原来的 return和{} 类似 => expr{ return expr; } 可选参数void printStr1([String name,int age]){
print("Name is $name age is $age");
}在调用这个函数的时候我们可以选择只输入name或者只输入age,当然上面的函数如果我们只输入一个函数值另一个函数的值就会被赋为null printStr1("flyou");输出: 如果我输入一个int类型的值,Dart会将它自动赋值给第一个符合该类型的入参上 printStr1(25); 输出: Name is null age is 25 如果函数有多个相同类型的函数参数,这个时候只输入一个值,它默认会赋值给第一个参数如: void printStr2([String name,String sex,String address]){
print("Name is $name age is $sex address is $address");
}
printStr2("男");
输出: 当然这并不是我们想要的,所以就需要看下可选择名称的函数 可选择名称的函数(具名函数) void printStr3({String name,int age}){
print3("Name is $name age is $age");
}使用{}包括函数参数就可以把原来的函数变成可选择名称函数,在调用时可以直接指定参数名传值。 输出: 同样如果有多和相同类型的入参,我们可以根据声明参数名调用的方式来调用函数如: void printStr3({String name,String sex,String address}){
print("Name is $name sex is $sex address is $address");
}
printStr3(sex: "男"); 当然,就算我们少输入了一个参数但是每次都给我输出个null也非常的不友好啊,当然在Dart中你可以使用参数默认值来解决这个问题。 函数参数的默认值函数的默认值,顾名思义就是你就算不输入这个参数我也会默认给你一个值的,当然前提是这个参数你可以省略的前提下(上面两类函数啊) 可选参数void printStr1([String name,int age=25]){
print("Name is $name age is $age");
}
printStr2("男");
输出: 具名函数void printStr3({String name,int age=25}){
print3("Name is $name age is $age");
}
printStr3("男");
```输出:
Name is 男 sex is null address is 25 输出: |
操作符描述 操作者 异常处理使用 Throw可以向上层抛出一个异常 例如: void throwException(){
throw new FormatException("异常了");
}
这样就可以将一个异常跑向上层调用处,如果上层不处理这个异常则会引发崩溃
void main() {
throwException();
}异常信息 Unhandled exception:
FormatException: 异常了
#0 throwException (file:///D:/Learn1/learn/Learn4.dart:15:3)
#1 main (file:///D:/Learn1/learn/Learn4.dart:8:3)
#2 _startIsolate.<anonymous closure> (dart:isolate-patch/dart:isolate/isolate_patch.dart:277)
#3 _RawReceivePortImpl._handleMessage (dart:isolate-patch/dart:isolate/isolate_patch.dart:163)
try catch
和其他语言类似Dart可以使用try catch未处理的异常 void main() {
try {
throwException();
} catch (e) {
print(e);
}
}控制台输出: 无论是否异常,都会执行的语句块 |
Widget
Text在前面的例子中我们已经用了许多次Text,顾名思义Text就是用来展示文本的类似于Android上的TextView。 构造方法如下: const Text(this.data//内容, {
Key key,
this.style//样式
this.textAlign//对齐方式,
this.textDirection//文本方向,
//是否换行显示,
this.overflow//超出文本的处理方式,
this.textScaleFactor//每个逻辑像素的字体像素数,控制字体大小,
this.maxLines//最大行数,
})
Image在Flutter中系统为我们提供了可以加载图片的控件Image,Image 控件提供了如下几种用于加载不同方式的图片。
从asset获取图片Image.asset(String name, {
Key key,
AssetBundle bundle,
double scale,
this.width,
this.height,
this.color,
this.colorBlendMode,
this.fit,
this.alignment: Alignment.center,
this.repeat: ImageRepeat.noRepeat,
this.centerSlice,
this.matchTextDirection: false,
this.gaplessPlayback: false,
String package,
})从network获取图片Image.network(String src, {
Key key,
double scale: 1.0,//缩小倍数
this.width,//宽
this.height,//高
this.color,
this.colorBlendMode,
this.fit,
this.alignment: Alignment.center,
this.repeat: ImageRepeat.noRepeat,
this.centerSlice,
this.matchTextDirection: false,
this.gaplessPlayback: false,
Map<String, String> headers,
})Iconconst Icon(this.icon//IconDate, {
Key key,
this.size,//大小
this.color,//颜色
this.semanticLabel,//标志位
this.textDirection,//绘制方向,一般使用不到
}) IconData const IconData(
this.codePoint,//必填参数,fonticon对应的16进制Unicode {
this.fontFamily,//字体库系列
this.fontPackage,//字体在那个包中,不填仅在自己程序包中查找
this.matchTextDirection: false,图标是否按照图标绘制方向显示
});ContainerContainer({
Key key,
this.alignment,//内部widget对齐方式
this.padding,//内边距
Color color,//背景颜色,与decoration只能存在一个
Decoration decoration,//背景装饰,与decoration只能存在一个
this.foregroundDecoration//前景装饰,
double width,//容器的宽
double height,//容器的高
BoxConstraints constraints//,
this.margin,
this.transform,
this.child,
})
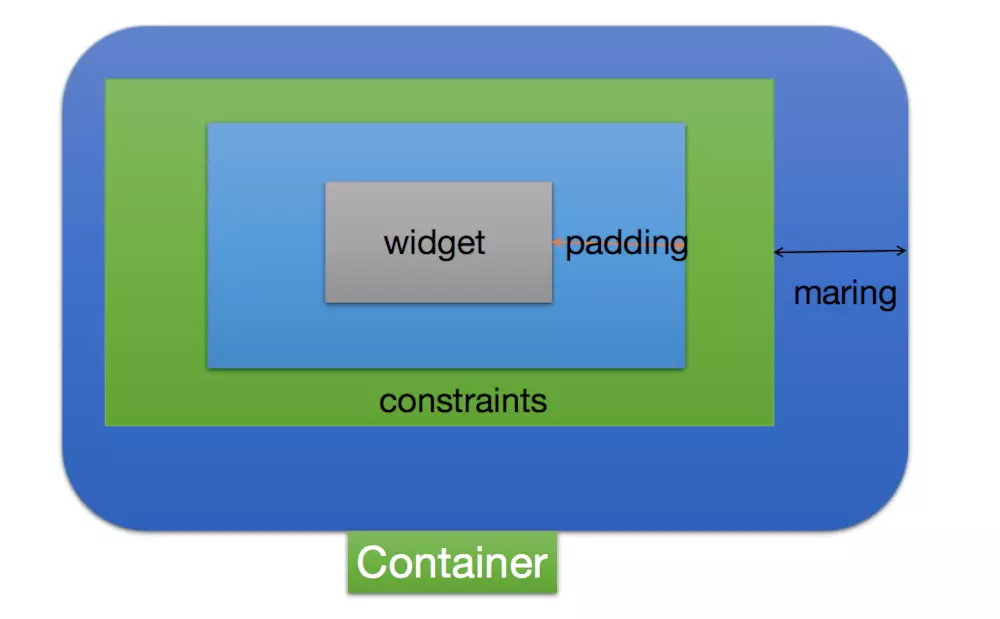
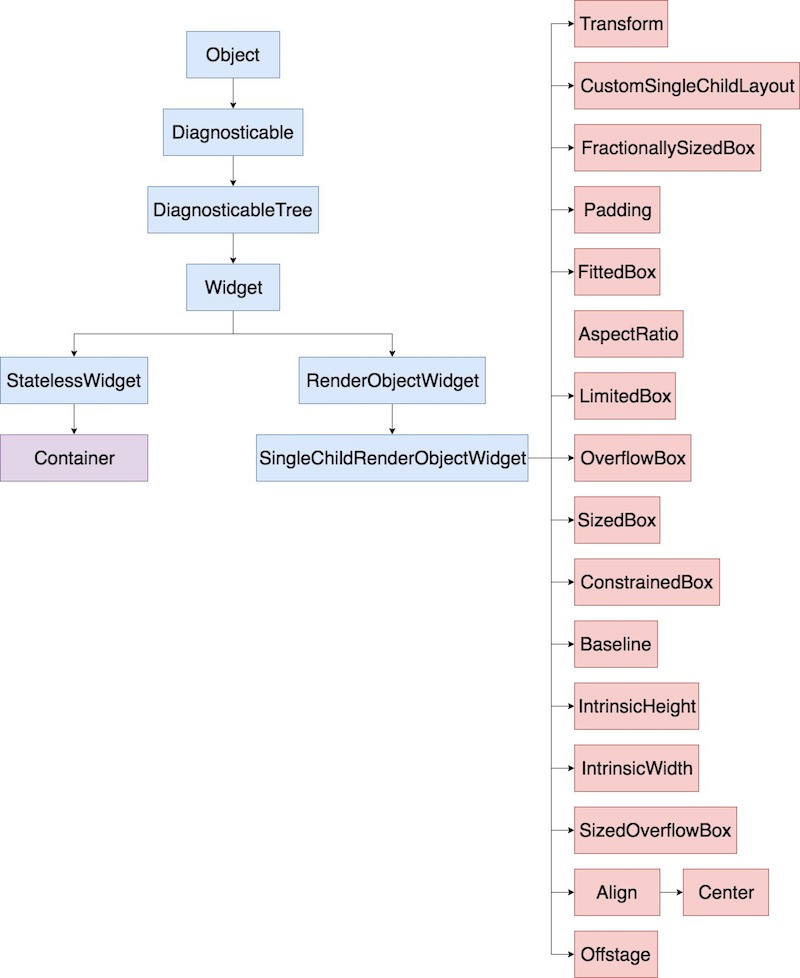
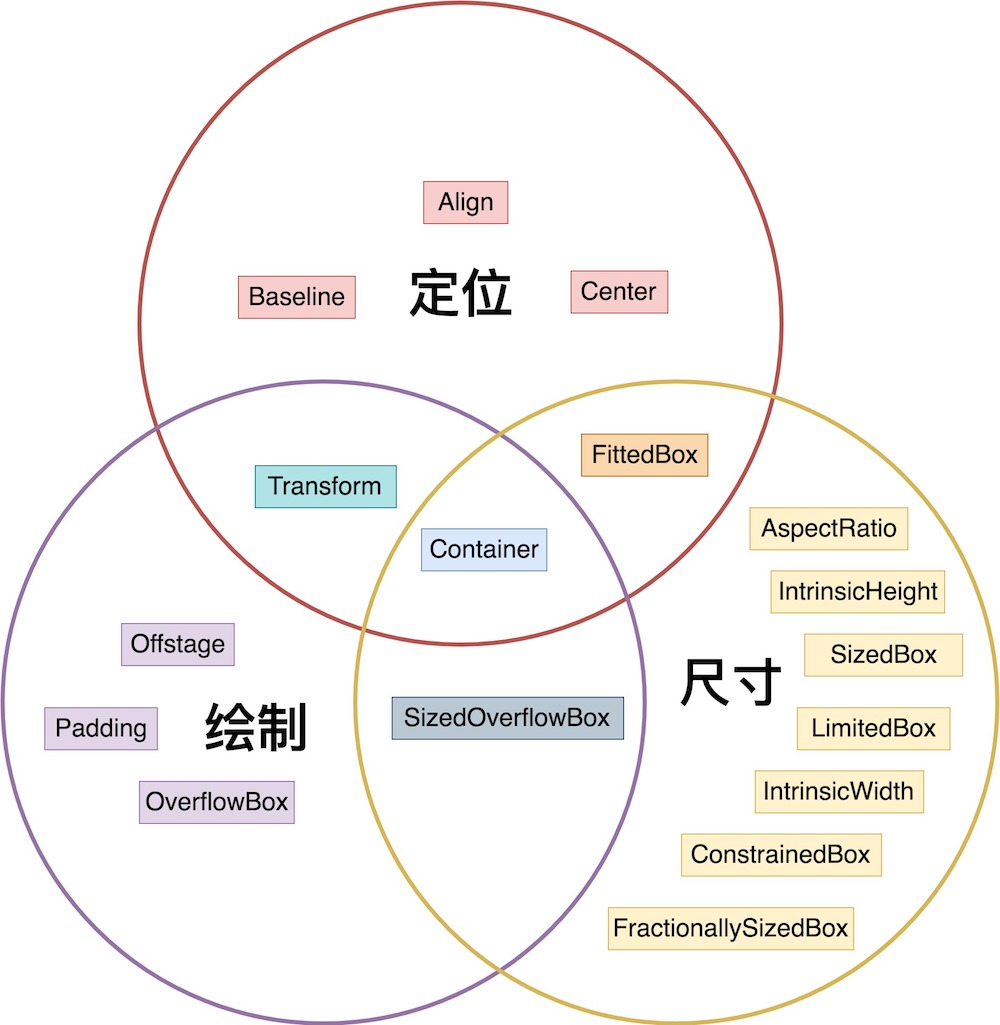
Container构成以及绘制过程Container作为Flutter中的用来布局的Widget,可以对子widget进行 绘制(painting)、定位(positioning)、调整大小(sizing)操作。 绘制过程(painting)
调整大小(sizing)看下Container 构造方法,下面的大小约束会更好理解。 Container({
Key key,
this.alignment,
this.padding,
Color color,
Decoration decoration,
this.foregroundDecoration,
double width,
double height,
BoxConstraints constraints,
this.margin,
this.transform,
this.child,
})
布局策略顺序Container tries, in order: to honor alignment, to size itself to the child, to honor the width, height, and constraints, to expand to fit the parent, to be as small as possible. 也就是说,Container会按照下面的这个顺序去进行布局操作:
总结
|
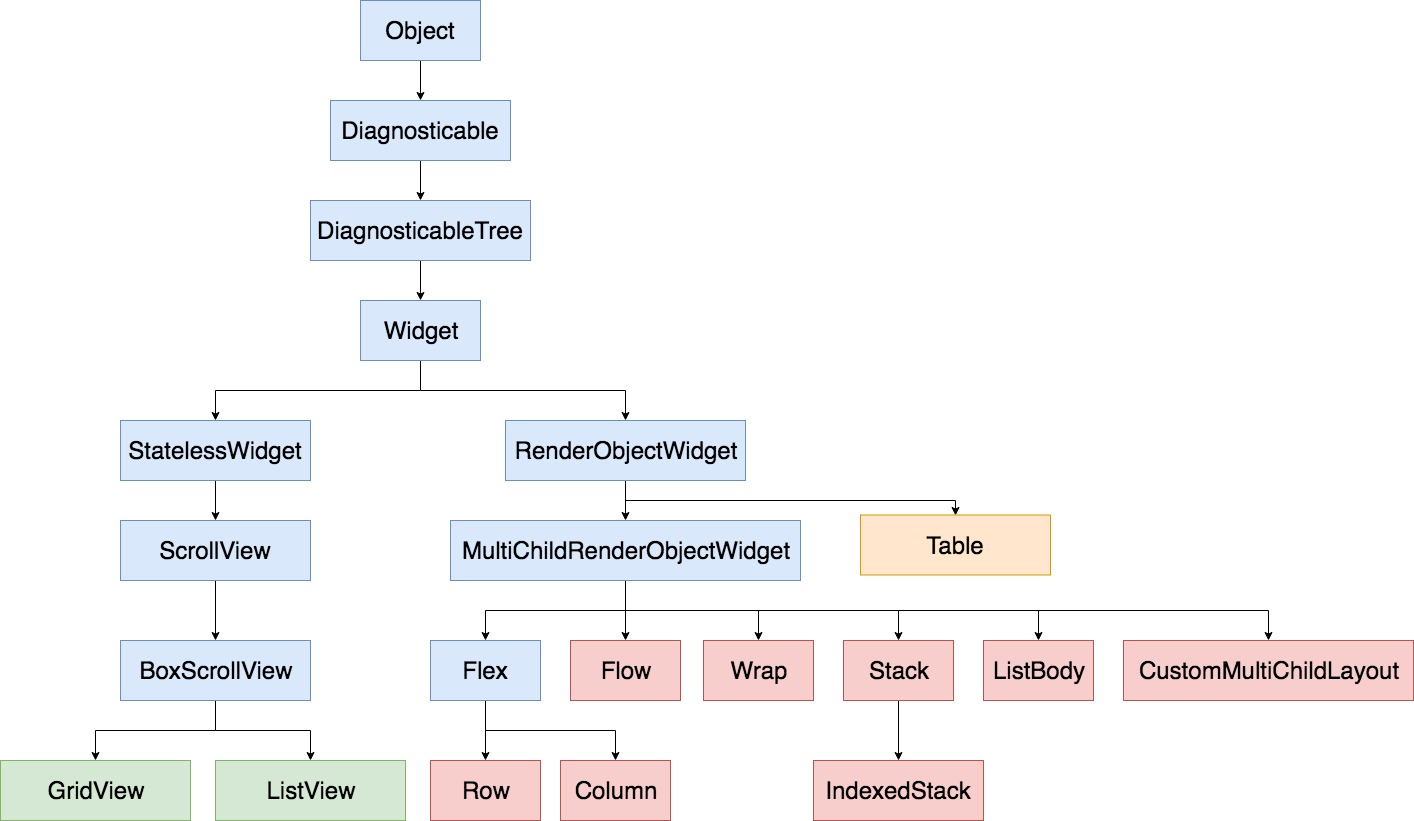
Layout在前面,学习了很多Flutter中最基本的Widget,可能会发现,这些Widget可以传入一个child对象有的不能传入child对象,但是都不能传入多个child,这样一来可就大大限制了我们的想象力。所以,今天我们就来讲讲可以传入多个child(children)的Widget,Row和Column。
body: new Row(
        children: <Widget>[
          new Expanded(child:  new Text("Flutter is Google’s mobile UI framework ||"),),
          new Expanded(child:  new Text("Hello flyou||"),),
          new Expanded(child:  new Text("Hello Flutter"),),

        ],
在前面我们说过,可以实现child按照比例分配所占空间,那么是怎么实现的呢?对的,就是flex这个参数,在构造方法中这个参数的默认值是“1”,也就是这个Expanded内部child所占row(Column、Flex)的比例是1/N,这个N是布局中每个孩子flex属性的总和。 Table在上面介绍了类似表格布局的组件,那么今天我们就来正式介绍下Flutter中的表格布局Table Table({
Key key,
this.children: const <TableRow>[],
this.columnWidths,//列宽
this.defaultColumnWidth: const FlexColumnWidth(1.0),
this.textDirection,//文字方向
this.border,//边框
this.defaultVerticalAlignment: TableCellVerticalAlignment.top,//对齐方式
this.textBaseline//基线
})可以看到和Row、Column一样同样需要传入一个children对象,只不过Table传入的children要求是多个TableRow对象而不是Widget对象。 TableRow({ this.key, this.decoration, this.children })Stack按照翻译来讲的话是栈布局的意思,其实也很贴切,最先放入的必然在最下面显示。 Stack({
Key key,
this.alignment: AlignmentDirectional.topStart,//对齐方式
this.textDirection,
this.fit: StackFit.loose,//是否按照父类宽高处理自己大小
this.overflow: Overflow.clip,//溢出处理方式
List<Widget> children: const <Widget>[],
})IndexedStack在上面我们看了下Stack,基本上知道了Stack的用法,其实IndexedStack的用法和Stack一样,只不过IndexedStack只显示指定位置的Widget,其他的位置的Widget不会显示。 其实这个IndexedStack还是很有用的,比如说你的应用现实的额多个状态(加载中、加载完成、网络错误)可以使用这个组件来很好的完成控制。 Scaffoldconst Scaffold({
Key key,
this.appBar,//标题栏
this.body,//内容
this.floatingActionButton,//悬浮按钮
this.persistentFooterButtons,底部持久化现实按钮
this.drawer,//侧滑菜单左
this.endDrawer,//侧滑菜单右
this.bottomNavigationBar,//底部导航
this.backgroundColor,//背景颜色
this.resizeToAvoidBottomPadding: true,//自动适应底部padding
this.primary: true,试用使用primary主色
})
Drawerconst Drawer({
Key key,
this.elevation: 16.0,
this.child,
})好吧,构造方法足够的简单霸气,elevation设置阴影宽度,child就是菜单区域 BottomNavigationBar接下来我们来看下 bottomNavigationBar底部导航按钮,相比大家都用过有类似功能的app这个底部导航按钮在Ios和Android中都非常的常见,所以今天也要给大家好好介绍下。 BottomNavigationBar({
Key key,
@required this.items,//List<BottomNavigationBarItem>
this.onTap,//tap事件
this.currentIndex: 0,//当前位置
BottomNavigationBarType type,//底部item类型,fixed自适应,shifting选择放大
this.fixedColor,选中颜色
this.iconSize: 24.0,//图标大小
})BottomNavigationBarItemconst BottomNavigationBarItem({
@required this.icon,
@required this.title,
this.backgroundColor,
}) |
StatefulWidgetStatefulWidget又被称为有状态组件,开发者可以根据用户的操作来选择性的更新界面上的组件。
|
Flutter中手势事件处理在Flutter中的手势事件分为两层,
指针Pointers在指针向下时,框架对您的应用程序执行命中测试,以确定指针与屏幕相接的位置存在哪些小部件。指针向下事件(以及该指针的后续事件)然后被分派到由命中测试发现的最内部的小部件。 从那里开始,这些事件会冒泡到树中(事件分发),并被分派到从最内部的小部件到树根的路径上的所有小部件。没有任何机制可以取消或停止进一步调度指针事件。 由于指针不能直接用于控件的监听,所以我们在开发中一般使用Gesture来监听用户的各种事件。 手势Gestures手势表示可以从多个单独的指针事件识别的语义动作(例如,轻敲,拖动和缩放),甚至可能是多个单独的指针。手势可以分派多个事件,对应于手势的生命周期(例如,拖动开始,拖动更新和拖动结束): GestureDetector要让Gesture可以监听Widget的各种事件需要使用GestureDetector来处理这些事件。 GestureDetector({
Key key,
this.child,
this.onTapDown,
this.onTapUp,
this.onTap,
this.onTapCancel,
this.onDoubleTap,
this.onLongPress,
this.onVerticalDragDown,
this.onVerticalDragStart,
this.onVerticalDragUpdate,
this.onVerticalDragEnd,
this.onVerticalDragCancel,
this.onHorizontalDragDown,
this.onHorizontalDragStart,
this.onHorizontalDragUpdate,
this.onHorizontalDragEnd,
this.onHorizontalDragCancel,
this.onPanDown,
this.onPanStart,
this.onPanUpdate,
this.onPanEnd,
this.onPanCancel,
this.onScaleStart,
this.onScaleUpdate,
this.onScaleEnd,
this.behavior,
this.excludeFromSemantics: false
})事件冲突处理正常情况下,我们仅仅会在一个方向上操作界面,但是是也不排除用户在横向和竖向操作界面(或者是多个手势),这样一来屏幕就会给底层发来多个手势识别器,这样一样就会存在手势的冲突。
|
Flutter中的操作提示在原生客户端有着几种常用的用户提醒方式,如Dialog、Snackbar、BottomSheet等,今天我们就来介绍下Flutter中几种常用的提醒方式。 SnackBarSnackBar是用户操作后,显示提示信息的一个控件,类似Toast,会自动隐藏。它还可以添加操作按钮,等等。SnackBar是通过Scaffold的showSnackBar方法来显示的。所以要显示一个SnackBar,要先拿到Scaffold。 const SnackBar({
Key key,
@required this.content,//内容
this.backgroundColor,//背景
this.action,//其他操作
this.duration: _kSnackBarDisplayDuration,//显示时长
this.animation,//进出动画
})Dialog对话框在Ios和Android客户端中都很常见,在Flutter中常用的AlertDialog、SimpleDialog和AboutDialog。 今天我们就来介绍下这几种Dialog的用法 。 SimpleDialog就是最简单的对话框,当然也是最灵活的对话框,对话框显示区域完全由你自己自定义,你可以根据自己的需要绘制自己想要的界面。 const SimpleDialog({
Key key,
this.title,//标题
this.titlePadding,标题padding
this.children,//内容
this.contentPadding,内容padding
})AlertDialogAlertDialog其实就是simpleDialog的封装,更加方便开发者使用,只不过在simpeDialog的基础上新增了action操作而已 AboutDialogAboutDialog也是在SimpleDialog基础上的封装,可以很方便的显示关于应用的Dialog。由于跟上面的用法类似,这里就不在介绍它的够造方法了。 BottomSheet也被称为底部菜单,通常情况下分享操作界面使用的比较多。 如果要显示BottomSheet我们可以调用,showBottomSheet()或者showModalBottomSheet()方法。这两种方法都可以显示BottomSheet,只不过第一个是从新打开了一个界面来显示,第二个方法是直接在当前界面的下面来显示。 小结
|
ListView&GirdViewListViewListView就是我们常见的列表组件,在平时的应用开发中十分的常见,无论你做的是什么类型的应用都会多多少少会用到ListView ListView({
Key key,
Axis scrollDirection: Axis.vertical,//滚动方向
bool reverse: false,//十分反向显示数据
ScrollController controller,
bool primary,
ScrollPhysics physics,//物理滚动
bool shrinkWrap: false,
EdgeInsetsGeometry padding,
this.itemExtent,//item有效范围
bool addAutomaticKeepAlives: true,//自动保存视图缓存
bool addRepaintBoundaries: true,//添加重绘边界
List<Widget> children: const <Widget>[],
})那么,我们可以尝试下ListView.builder()和ListView.custom()。 ListView.builder()和ListView.custom()的用法基本相同,只不过custom可以根据自己的需要控制Item显示方式,如Item显示大小。 我们今天来看下ListView.builder() ListView.builder({
Key key,
Axis scrollDirection: Axis.vertical,
bool reverse: false,
ScrollController controller,
bool primary,
ScrollPhysics physics,
bool shrinkWrap: false,
EdgeInsetsGeometry padding,
this.itemExtent,
@required IndexedWidgetBuilder itemBuilder,//item构建者
int itemCount,//item数量
bool addAutomaticKeepAlives: true,
bool addRepaintBoundaries: true,
})GridViewGirView的用法和ListView类似,只不过由于GridView可以在一列或者一行显示多个Item,所以在构造方法中就多了个参数来配置一行(列)有几个Item和Item的间隔 GridView({
Key key,
Axis scrollDirection: Axis.vertical,
bool reverse: false,
ScrollController controller,
bool primary,
ScrollPhysics physics,
bool shrinkWrap: false,
EdgeInsetsGeometry padding,
@required this.gridDelegate,//没错,它就是控制GridView的
bool addAutomaticKeepAlives: true,
bool addRepaintBoundaries: true,
List<Widget> children: const <Widget>[],
})看下gridDelegate参数 可以传入SliverGridDelegateWithFixedCrossAxisCount对象和SliverGridDelegateWithMaxCrossAxisExtent对象。 其中SliverGridDelegateWithFixedCrossAxisCount可以直接指定每行(列)显示多少个Item,SliverGridDelegateWithMaxCrossAxisExtent会根据GridView的宽度和你设置的每个的宽度来自动计算没行显示多少个Item 国际惯例,我们还是只介绍一个,那就SliverGridDelegateWithFixedCrossAxisCount吧。 看下代码,怎么用 class MyApp extends StatelessWidget {
@override
Widget build(BuildContext context) {
return new Scaffold(
appBar: new AppBar(
title: new Text("GridView"),
),
body: new GridView(
children: <Widget>[
new Container(
child: new Icon(
Icons.cake,
size: 50.0,
),
color: Colors.blue,
),
new Container(
child: new Icon(
Icons.cake,
size: 50.0,
),
color: Colors.blue,
),
],
reverse: false,
gridDelegate: new SliverGridDelegateWithFixedCrossAxisCount(
crossAxisCount: 2,
mainAxisSpacing: 10.0,
crossAxisSpacing: 10.0,
childAspectRatio: 1.0),
),
);
}
}当然,GridView你也可以使用builder()和custom()的方式实现 @override
Widget build(BuildContext context) {
return new Scaffold(
appBar: new AppBar(
title: new Text("ListView"),
),
body: new GridView.builder(
gridDelegate: new SliverGridDelegateWithFixedCrossAxisCount(
crossAxisCount: 2,
mainAxisSpacing: 10.0,
crossAxisSpacing: 10.0,
childAspectRatio: 1.0),
itemBuilder: (BuildContext context, int index) {
return new ListItemWidget(listData[index]);
},
itemCount: listData.length,
),
);
}
}
class ListItem {
final String title;
final IconData iconData;
ListItem(this.title, this.iconData);
}
class ListItemWidget extends StatelessWidget {
final ListItem listItem;
ListItemWidget(this.listItem);
@override
Widget build(BuildContext context) {
return new GestureDetector(
child: new Container(
color: Colors.blue,
child: new Column(
mainAxisAlignment: MainAxisAlignment.center,
children: <Widget>[
new Icon(listItem.iconData, size: 50.0),
new Text(listItem.title)
],
),
),
onTap: () {
Scaffold.of(context).showSnackBar(new SnackBar(
content: new Text(listItem.title),
));
},
);
}
}小结
|
Flutter中的路由跳转在Flutter中有着两种路由跳转的方式,
静态路由在runApp方法中需要传入一个MaterialApp的Widget,但是我们基本用到的都是home属性,但是其实MaterialApp方法里面有着很多的参数,其中routes参数就是定义路由的参数。 routes: const {}routes需要传入类型的Map,第一个参数是目标路由的名称,第二个参数就是你要跳转的页面。 嗯,还是来个例子看看怎么用 第一个页面: import 'package:flutter/material.dart';
import 'package:test1/route/Page2.dart';
void main() {
runApp(new MaterialApp(
home: new MyApp(),
routes: <String, WidgetBuilder>{
'/page2': (BuildContext context) => new Page2(),
},
));
}
class MyApp extends StatelessWidget {
@override
Widget build(BuildContext context) {
return new Scaffold(
appBar: new AppBar(
title: new Text("Page1"),
),
body: new Center(
child: new RaisedButton(
onPressed: () {
Navigator.of(context).pushNamed("/page2");
},
child: new Text("点我跳转"),
color: Colors.blue,
highlightColor: Colors.lightBlue,
),
),
);
}
}在第一个页面在Main方法中我们定义了我们需要跳转的页面名称为“Page2”,要跳转的页面是Page2,每当我们点击屏幕正中央的button都会触发调用 Navigator.of(context).pushNamed(“/page2”);Navigator就是在在Flutter中负责页面导航的,相信了解Android的童鞋都知道这个玩意。 import 'package:flutter/material.dart';
class Page2 extends StatelessWidget {
@override
Widget build(BuildContext context) {
return new Scaffold(
appBar: new AppBar(
title: new Text("Page2"),
),
body: new Center(
child: new Text(
"Page2",
style: new TextStyle(fontSize: 25.0),
),
),
);
}
}好吧,那么尝试下往下个页面传递数据,其实也很简单,我们给第二个页面加一个构造函数,并且把从第一个页面传递过来的值赋给Text import 'package:flutter/material.dart';
class Page2 extends StatelessWidget {
final title;
Page2(this.title);
@override
Widget build(BuildContext context) {
return new Scaffold(
appBar: new AppBar(
title: new Text("Page2"),
),
body: new Center(
child: new Text(
title,
style: new TextStyle(fontSize: 25.0),
),
),
);
}
}在第一个页面定义路由时就需要把你需要传递的参数定义出来。 routes: <String, WidgetBuilder>{
'/page2': (BuildContext context) => new Page2("I am from Page1"),
},这种定义路由并使用的方式非常的简单,但是大家肯定会发现一个问题,就是如果我需要传递给第二个页面的数据不是已知的话我就无法使用这种方式,因为我们无法动态改变上面定义的值。 所以,我们就需要了解下Flutter中的动态路由了。 动态路由在Navigator中还有一个方法是push()方法,需要传入一个Route对象,在Flutter中我们可以使用PageRouteBuilder来构建这个Route对象。 Navigator.of(context).push(new PageRouteBuilder(
pageBuilder: (BuildContext context,
Animation<double> animation,
Animation<double> secondaryAnimation) {
return new Page2("some attrs you like ");
}))这样的话,我们就可以把用户操作与交互的数据传递给下个页面。 还是结合前面的讲过的来举个例子。 在前面的文章中,我们使用TextField举过一个例子,对用户输入的用户名密码进行判断,当用户名是“flyou”,密码是“admin”时提示登录成功,否则提示登录失败。 今天我们稍微改动下以前这个例子,当用户名与密码相同时提示正确,否则就提示用户名密码有误。输入正确则直接跳转到第二个页面,并把登录成功的用户名给传递过去。 下面代码提到的DynamicPage就是我们第二个页面。 import 'package:flutter/material.dart';
import 'package:test1/route/DynamicPage.dart';
void main() {
runApp(new MaterialApp(
home: new MyApp(),
));
}
class MyApp extends StatefulWidget {
@override
State<StatefulWidget> createState() {
return new MyAppState();
}
}
class MyAppState extends State<MyApp> {
TextEditingController _userNameController = new TextEditingController();
TextEditingController _userPasswordController = new TextEditingController();
void onTextClear() {
setState(() {
_userNameController.text = "";
_userPasswordController.text = "";
});
}
@override
Widget build(BuildContext context) {
return new Scaffold(
appBar: new AppBar(
title: new Text("TextField"),
),
body: new Column(
children: <Widget>[
new TextField(
controller: _userNameController,
decoration: new InputDecoration(
contentPadding: const EdgeInsets.only(top: 10.0),
icon: new Icon(Icons.perm_identity),
labelText: "请输入用户名",
helperText: "注册时填写的名字"),
),
new TextField(
controller: _userPasswordController,
decoration: new InputDecoration(
contentPadding: const EdgeInsets.only(top: 10.0),
icon: new Icon(Icons.lock),
labelText: "请输入密码",
helperText: "登录密码"),
obscureText: true,
),
new Builder(builder: (BuildContext context) {
return new RaisedButton(
onPressed: () {
var userName= _userNameController.text.toString();
var passWord= _userPasswordController.text.toString();
if (userName == passWord ) {
Navigator.of(context).push(new PageRouteBuilder(
pageBuilder: (BuildContext context,
Animation<double> animation,
Animation<double> secondaryAnimation) {
return new DynamicPage(userName);
}));
} else {
Scaffold.of(context).showSnackBar(
new SnackBar(content: new Text("登录失败,用户名密码有误")));
}
onTextClear();
},
color: Colors.blue,
highlightColor: Colors.lightBlueAccent,
disabledColor: Colors.lightBlueAccent,
child: new Text(
"登录",
style: new TextStyle(color: Colors.white),
));
})
],
));
}
}每当我们点击登录按钮时都会判断用户名密码是否相等,如果相等则把用户输入的用户名传递给二个页面并显示出来。 第二个页面的代码非常的简单 import 'package:flutter/material.dart';
class DynamicPage extends StatelessWidget {
final userName;
DynamicPage(this.userName);
@override
Widget build(BuildContext context) {
return new Scaffold(
appBar: new AppBar(
title: new Text("DynamicPage"),
),
body: new Center(
child: new Text("登录成功,欢迎新用户:$userName")),
);
}
}页面出栈在Flutter中我们可以使用Navigator.of(context).pop()进行出栈操作,但是值得注意的时如果页面上有Dialog、BottomSheet、popMenu类似的Widget使用pop()方法会优先进行这些Widget的关闭操作。 小结
|
Dart中的异步操作在前面的文章中我们很多次提到了Future这个东西,这个单词翻译过来的意思是‘未来’的意思。在flutter中它表示一个未来某些时候返回数据的一个对象。 借助Future我们可以在Flutter实现异步操作,今天我们就来正式了解下Future。 为什么要用异步首先我们知道Dart这门语言是单线程的。同步代码的执行会让我们的程序处于过长时间的等待状态终止ANR。 对于耗时的操作(I/O、网络操作等)我们必须要使用异步来处理它们,只有这样,才不会因为这些耗时的操作来影响程序的正常运行。 什么是FutureFuture是在未来某个时间获得想要对象的一种手段。 当调用Future后系统会将使用Future的操作放入一个队列中去排队执行,并返回一个未完成的Future对象,当事件完成后或者有一个可用的值时Future就会调用自己的then回调让调用者去处理这个对象。 在Flutter中我们可以使用如下两种方式来获取Future。
试一下 asyncTODO: async未介绍 void main() {
print(enterRestaurant());
Future<String> waitDinnerFuture= waitForDinner();
waitDinnerFuture.then((str){
print(str);
});
print( startChat());
print( playPhone());
}Future的其他用法考虑三个功能expensiveA(),expensiveB()以及expensiveC()都返回Future对象 使用then()链接函数调用 当Future-returning函数需要按顺序运行时,请使用链式then() 调用: expensiveA()
.then((aValue) => expensiveB())
.then((bValue) => expensiveC())
.then((cValue) => doSomethingWith(cValue));Future.wait()等待多个Future以完成使用Future.wait() 如果功能的执行顺序不重要,可以使用 Future.wait()。 这些功能快速连续触发; 当他们都完成一个价值,Future.wait()返回一个新的未来。这个未来完成了包含每个函数产生的值的列表。 Future
.wait([expensiveA(), expensiveB(), expensiveC()])
.then((List responses) => chooseBestResponse(responses))
.catchError((e) => handleError(e));小结
|
Flutter中的本地存储Flutter本地存储 Preferences存储 打开 https://github.com/flutter/plugins 或者 https://pub.dartlang.org/flutter 小结可以在https://pub.dartlang.org/flutter获取第三发插件 |
网络操作在前面的文章中我们在Flutter中的本地存储,我们可以将用户的数据存储在移动设备上,但是当用户清空设备或者更换设置这些用户存储的信息就会面临丢失的问题。那么,我们就不得不考虑将用户的信息存储一个第三方的地方,没错就是服务器。 那么,今天我们就来看下Flutter中的网络操作。 import 'package:flutter/material.dart';
import 'package:http/http.dart' as http;
void main() {
runApp(new MaterialApp(home: new MyApp(),));
}
class MyApp extends StatelessWidget {
void httpGet() {
print("请求开始");
http.get("https://api.github.com/users/flyou").then((response) {
print("请求内容:"+response.body);
}).catchError((error) {
print("请求出错:" + error.toString());
}).whenComplete(() {
print("请求完成");
});
}
@override
Widget build(BuildContext context) {
return Scaffold(
appBar: AppBar(
title: Text("网络操作"),
),
body: Center(
child: RaisedButton(
onPressed: () {httpGet();},
child: Text("获取用户信息"),
),
),
);
}
}上面的代码很简单,页面上只有一个很简单的RaisedButton,当用户点击时便会触发上,上面的httpGet方法。 httpGet方法里面会调用http的get请求,请求github api,使用then来接收正常的返回信息,使用catchError来接受异常的信息,当请求完成时会触发whenComplete 返回数据处理现在我们使用的接口后台返回的一半都是Json的形式,所以我们也仅仅对json数据的处理做下介绍。 在Flutter中默认已经为我们提供了convert库来处理json字符串的转换 我们可以使用json.encode()或者json.decode()方法来序列化或者反序列化json字符。 好吧,还是来举个例子,还是跟上面的一样请求github api获取用户信息,但是这次我们根据用户输入的用户名来获取用户信息,并且把返回的用户信息合理的显示在屏幕上。 界面很简单,最上面一个image,下面是几个ListTitle,在下面就是一个TextField,最下面就是就是一个RaisedButton了。 当我们点击RaisedButton时就会获取TextField输入的内容并且去请求服务器并返回。 import 'dart:convert';
import 'package:flutter/material.dart';
import 'package:http/http.dart' as http;
import 'package:test1/http/User.dart';
void main() {
runApp(new MaterialApp(
home: MyApp(),
));
}
class MyApp extends StatefulWidget {
@override
State<StatefulWidget> createState() {
return MyAppState();
}
}
class MyAppState extends State<MyApp> {
User user;
void getUserInfo(String userName) {
http.get("https://api.github.com/users/$userName").then((respsone) {
setState(() {
final responseJson = json.decode(respsone.body);
user = new User.fromJson(responseJson);
print(user.avatar_url);
});
}).catchError((error) {
print(error.toString());
}).whenComplete(() {
print("请求完成");
});
}
@override
Widget build(BuildContext context) {
TextEditingController controller = new TextEditingController();
return Scaffold(
appBar: AppBar(
title: Text("网络操作"),
),
body: new SingleChildScrollView(child: Column(
children: <Widget>[
new Container(
child: Image.network(user != null
? user.avatar_url
: "https://avatars1.githubusercontent.com/u/6630762?v=4"),width: 50.0,height: 50.0,
),
new ListTile(
leading: Icon(Icons.person),
title: Text("name:" + (user != null &&user.name!=null ? user.name : "暂无")),
),
new ListTile(
leading: Icon(Icons.location_city),
title: Text("location:" + (user != null &&user.location!=null? user.location : "暂无")),
),
new ListTile(
leading: Icon(Icons.web),
title: Text("blog:" + (user != null &&user.blog!=null? user.blog : "暂无"))),
new ListTile(
leading: Icon(Icons.http),
title: Text("html_url:" + (user != null&&user.html_url!=null ? user.html_url : "暂无")),
),
new TextField(
decoration: InputDecoration(labelText: "请输入你的github用户名"),
controller: controller,
),
RaisedButton(
onPressed: () {
getUserInfo(controller.text.toString());
},
child: Text("Get请求"),
),
],
),),
);
}
}
// User.dart
class User {
final String name;
final String location;
final String blog;
final String avatar_url;
final String html_url;
User({this.name,this.location, this.blog, this.avatar_url, this.html_url});
factory User.fromJson(Map<String, dynamic> json) {
return new User(
name: json['name'],
location: json['location'],
blog: json['blog'],
avatar_url: json['avatar_url'],
html_url: json['html_url'],
);
}
}
小结http请求也是耗时操作,需要使用Future |
Flutter调用平台代码在前面的文章中我们讲了许多Flutter中的组件和Flutter中的特定操作,但是单单使用Flutter里的组件和方法是不够的。 就像以前我们讲到文件存储、数据库操作单单靠使用Flutter我们是不能完成的,因为这些数据最终需要存储在特定的终端平台上,我们需要通过特点的代码来实现与特点的平台交互,所以我们引入了第三方库来完成这些操作。 当然,这些第三方库帮我们实现了与不同平台交互的代码,所以我们不需要自己再去自己去编写这些与特定平台交互的代码。 当时我们你不可能一直使用人家的第三方库啊,一些特定的功能是没人能帮你的,所以我们还是很有必要来学习下如何跟特定的平台交互的 平台通道flutter使用了一个灵活的系统,允许您调用特定平台的API,无论在Android上的Java或Kotlin代码中,还是iOS上的ObjectiveC或Swift代码中均可用。 Flutter平台特定的API支持不依赖于代码生成,而是依赖于灵活的消息传递的方式: 应用的Flutter部分通过平台通道(platform channel)将消息发送到其应用程序的所在的宿主(iOS或Android)。 宿主监听的平台通道,并接收该消息。然后它会调用特定于该平台的API(使用原生编程语言) - 并将响应发送回客户端,即应用程序的Flutter部分。 用平台通道在客户端(Flutter UI)和宿主(平台)之间传递消息 在客户端,MethodChannel 可以发送与方法调用相对应的消息。 在宿主平台上,MethodChannel 在Android((API) 和 FlutterMethodChannel iOS (API) 可以接收方法调用并返回结果。这些类允许您用很少的“脚手架”代码开发平台插件。 从平台获取数据和上面的类似,我们可以调用系统的方法,我们同样刻印调用我们自己写的方法并且返回调用方法的值,那么我们还是举个例子看下吧。 我们通过flutter调用Android平台的方法获取当前格式化好的时间。 同样的我们还是用用和刚才一样的通道,只不过这一次我们需要更改我们调用的方法即可。 import 'dart:async';
import 'package:flutter/material.dart';
import 'package:flutter/services.dart';
void main() {
runApp(MaterialApp(
home: MyApp(),
));
}
class MyApp extends StatelessWidget {
static const platform = const MethodChannel("com.flyou.test/android");
Future<String> getAndroidTime() async {
var str;
try {
str = await platform.invokeMethod("getAndroidTime");
} on PlatformException catch (e) {
print(e.toString());
}
return str;
}
@override
Widget build(BuildContext context) {
return Scaffold(
appBar: AppBar(
title: Text("platformChannels"),
),
body: new Center(
child: new Builder(builder: (BuildContext context) {
return new RaisedButton(
onPressed: () {
getAndroidTime().then((str){
Scaffold.of(context).showSnackBar(new SnackBar(content:Text(str!=null?str:"获取失败")));
});
},
child: Text("点我获取Android平台数据"),
);
}),
),
);
}
}
|
ListView下拉刷新与加载更多下拉刷新在Flutter中系统已经为我们提供了google material design的刷新效果,我们可以使用RefreshIndicator组件来实现Flutter中的下拉刷新,下面们还是先来看下如何使用吧 const RefreshIndicator({
Key key,
@required this.child,
this.displacement: 40.0,下拉展示距离
@required this.onRefresh,刷新回调
this.color,//刷新进度颜色
this.backgroundColor,//背景颜色
this.notificationPredicate: defaultScrollNotificationPredicate,
})import 'dart:async';
import 'package:flutter/material.dart';
void main() {
runApp(new MaterialApp(
home: new MyApp(),
));
}
class MyApp extends StatefulWidget {
@override
State<StatefulWidget> createState() => MyAppState();
}
class MyAppState extends State<MyApp> {
List<int> items = List.generate(16, (i) => i);
Future<Null> _handleRefresh() async {
await Future.delayed(Duration(seconds: 5), () {
print('refresh');
setState(() {
items.clear();
items = List.generate(40, (i) => i);
return null;
});
});
}
@override
Widget build(BuildContext context) {
return Scaffold(
appBar: AppBar(
title: Text("Refresh"),
),
body: new RefreshIndicator(
child: ListView.builder(
itemCount: items.length,
itemBuilder: (context, index) {
return ListTile(
title: Text("Index$index"),
);
},
),
onRefresh: _handleRefresh,
),
);
}
}
上拉加载更多对于加载更多的组件在Flutter中是没有提供的,所以在这里我们就需要考虑如何实现的。 在ListView中有一个ScrollController属性,它就是专门来控制ListView滑动事件,在这里我们可以根据ListView的位置来判断是否滑动到了底部来做加载更多的处理。 在这里我们可以使用如下代码来判断ListView 是否滑到了底部 _scrollController.addListener(() {
if (_scrollController.position.pixels ==
_scrollController.position.maxScrollExtent) {
print("loadMore");
}
});_scrollController是我们初始化的ScrollController对象,通过监听我们可以判断现在的位置是否是最大的下滑位置来判断是否下滑到了底部。 import 'dart:async';
import 'package:flutter/material.dart';
void main() {
runApp(new MaterialApp(
home: new MyApp(),
));
}
class MyApp extends StatefulWidget {
@override
State<StatefulWidget> createState() => MyAppState();
}
class MyAppState extends State<MyApp> {
bool isLoading = false;
List<int> items = List.generate(16, (i) => i);
ScrollController _scrollController = new ScrollController();
@override
void initState() {
super.initState();
_scrollController.addListener(() {
if (_scrollController.position.pixels ==
_scrollController.position.maxScrollExtent) {
print("loadMore");
_getMoreData();
}
});
}
Future _getMoreData() async {
if (!isLoading) {
setState(() => isLoading = true);
List<int> newEntries = await mokeHttpRequest(items.length, items.length + 10);
setState(() {
items.addAll(newEntries);
isLoading = false;
});
}
}
Future<List<int>> mokeHttpRequest(int from, int to) async {
return Future.delayed(Duration(seconds: 2), () {
return List.generate(to - from, (i) => i + from);
});
}
@override
Widget build(BuildContext context) {
return Scaffold(
appBar: AppBar(
title: Text("LoadMore"),
),
body: ListView.builder(
itemCount: items.length,
itemBuilder: (context, index) {
return ListTile(
title: Text("Index$index"));
},
controller: _scrollController,
)
);
}
@override
void dispose() {
super.dispose();
_scrollController.dispose();
}
}加载更多提示首先我们创建加载更多时显示的Vidget Widget _buildLoadText() {
return Container(child: Padding(
padding: const EdgeInsets.all(18.0),
child: Center(
child: Text("加载中……"),
),
),color: Colors.white70,);
}
然后修改ListView,使得itemCount数目加1,当是最后一条时显示加载中的View,不是最后一条显示正常的Widget body: ListView.builder(
itemCount: items.length + 1,
itemBuilder: (context, index) {
if (index == items.length) {
return _buildLoadText();
} else {
return ListTile(title: Text("Index$index"));
}
},
controller: _scrollController,
)小结
|
Flutter动画【1】补间动画的基本支持类在Flutter中Animation对象是Flutter动画库中的一个核心类,它生成指导动画的值,没错它仅仅用来生成动画的值,这些值并不会直接没改变界面的展示效果。 Animation对象知道动画的当前状态(例如,它是开始、停止还是向前或向后移动),但它不知道屏幕上显示的内容。 在Flutter中我们使用AnimationController来管理动画,控制动画的开始、结束与快慢。 CurvedAnimation 可以说是动画的插值器,负责控制动画的行为,如是先快再慢还是先快再慢等。 入门补间动画Animation在Flutter中是一个抽象类,我们并不能直接来是使用它,但是我们可以使用Tween这个子类来使用它。 我们可以使用addListener回调来监听动画值的改变,可以使用addStatusListener回调来监听动画状态的变更 刚刚我们说过,使用Animation并不能直接改变Widget,它只能生成一系列的值,那么到底是不是这样呢?我们还是看个例子 每次我们点击floatingActionButton都会触发动画开始的操作,然后通过监听把当前动画的值打印到控制台上。 import 'package:flutter/material.dart';
void main() {
runApp(new MaterialApp(home: new MyApp(),));
}
class MyApp extends StatefulWidget {
@override
State<StatefulWidget> createState() => MyAppState();
}
class MyAppState extends State<MyApp> with SingleTickerProviderStateMixin {
Animation<double> doubleAnimation;
AnimationController animationController;
@override
Widget build(BuildContext context) {
return Scaffold(appBar: AppBar(title: Text("AnimAtion"),),
floatingActionButton: FloatingActionButton(
child: Icon(Icons.add), onPressed:onAnimationStart),);
}
@override
void initState() {
super.initState();
animationController = new AnimationController(
vsync: this, duration: const Duration(milliseconds: 2000));
doubleAnimation =
new Tween(begin: 0.0, end: 100.0).animate(animationController)..addListener((){
print(doubleAnimation.value);
});
}
onAnimationStart() {
animationController.forward(from: 0.0);
}
@override
void dispose() {
super.dispose();
animationController.dispose();
}
}AnimatedWidget在上面的例子中我们必须需要通过addListener来获得对动画值变化的监听,但是通过AnimatedWidget我们可以直接获得动画的值并赋值给相应的Widget import 'package:flutter/material.dart';
void main() {
runApp(new MaterialApp(
home: MyApp(),
));
}
class MyApp extends StatefulWidget {
@override
State<StatefulWidget> createState() => MyAppState();
}
class MyAppState extends State<MyApp> with SingleTickerProviderStateMixin {
Animation<double> numberAnimation;
AnimationController controller;
@override
void initState() {
super.initState();
controller = new AnimationController(
duration: const Duration(milliseconds: 2000), vsync: this);
numberAnimation = new Tween(begin: 0.0, end: 100.0).animate(controller);
}
onAnimationStart() {
controller.forward(from: 0.0);
}
@override
Widget build(BuildContext context) {
return new Scaffold(
appBar: AppBar(
title: Text("Animation"),
),
floatingActionButton: new FloatingActionButton(
onPressed: onAnimationStart,
child: AnimationText(animation: numberAnimation,),
),
);
}
dispose() {
controller.dispose();
super.dispose();
}
}
class AnimationText extends AnimatedWidget {
AnimationText({Key key, Animation<double> animation})
: super(key: key, listenable: animation);
@override
Widget build(BuildContext context) {
final Animation<double> animation = listenable;
return Text(animation.value.toInt().toString());
}其实使用起来也非常的简单,只不过我们自定义了一个AnimationText继承于AnimatedWidget来获得对动画的监听并给Text赋值,当然程序的运行效果跟上面的例子是一样的。 |
SliverAppBarSliverAppBar({
Key key,
this.leading,//前导标题
this.automaticallyImplyLeading: true,
this.title,//标题
this.actions,//菜单
this.flexibleSpace,//可以展开区域,通常是一个FlexibleSpaceBar
this.bottom,//底部内容区域
this.elevation,//阴影
this.forceElevated: false,
this.backgroundColor,背景颜色
this.brightness,//主题明亮
this.iconTheme,图标主题
this.textTheme,//文字主题
this.primary: true,//是否预留高度
this.centerTitle,标题是否居中
this.titleSpacing: NavigationToolbar.kMiddleSpacing,
this.expandedHeight,//展开高度
this.floating: false,//是否随着滑动隐藏标题
this.pinned: false,//是否固定在顶部
this.snap: false,//与floating结合使用
}) 构造方法也是非常的简单,但是我们却不能直接使用它,由官方文档可以看到我们通常结合ScrollView来使用它。 我们结合CustomScrollView来看下例子吧。 import 'package:flutter/material.dart';
void main() {
runApp(new MaterialApp(
home: new MyApp(),
));
}
class MyApp extends StatelessWidget {
final List<ListItem> listData = [];
@override
Widget build(BuildContext context) {
for (int i = 0; i < 20; i++) {
listData.add(new ListItem("我是测试标题$i", Icons.cake));
}
return Scaffold(
body: NestedScrollView(
headerSliverBuilder: (BuildContext context, bool innerBoxIsScrolled) {
return <Widget>[
SliverAppBar(
expandedHeight: 200.0,
floating: false,
pinned: true,
flexibleSpace: FlexibleSpaceBar(
centerTitle: true,
title: Text("我是一个帅气的标题",
style: TextStyle(
color: Colors.white,
fontSize: 16.0,
)),
background: Image.network(
"https://timgsa.baidu.com/timg?image&quality=80&size=b9999_10000&sec=1531798262708&di=53d278a8427f482c5b836fa0e057f4ea&imgtype=0&src=http%3A%2F%2Fh.hiphotos.baidu.com%2Fimage%2Fpic%2Fitem%2F342ac65c103853434cc02dda9f13b07eca80883a.jpg",
fit: BoxFit.fill,
)),
),
];
},
body: Center(
child: new ListView.builder(
itemBuilder: (BuildContext context, int index) {
return new ListItemWidget(listData[index]);
},
itemCount: listData.length,
),
),
),
);
}
}
class ListItem {
final String title;
final IconData iconData;
ListItem(this.title, this.iconData);
}
class ListItemWidget extends StatelessWidget {
final ListItem listItem;
ListItemWidget(this.listItem);
@override
Widget build(BuildContext context) {
return new InkWell(
child: new ListTile(
leading: new Icon(listItem.iconData),
title: new Text(listItem.title),
),
onTap: () {},
);
}
}首先我们使用了NestedScrollView中的headerSliverBuilder属性添加了SliverAppBar 然后我们设置展开的高度为200,不让标题栏随着滑动滚动出可视区域 我们使用flexibleSpace来构建了一个可以滚动的区域 最后我们给NestedScrollView的body加了一个ListView 本期小结
flutter SliverAppBar - 卓原的进化之旅 - CSDN博客 |
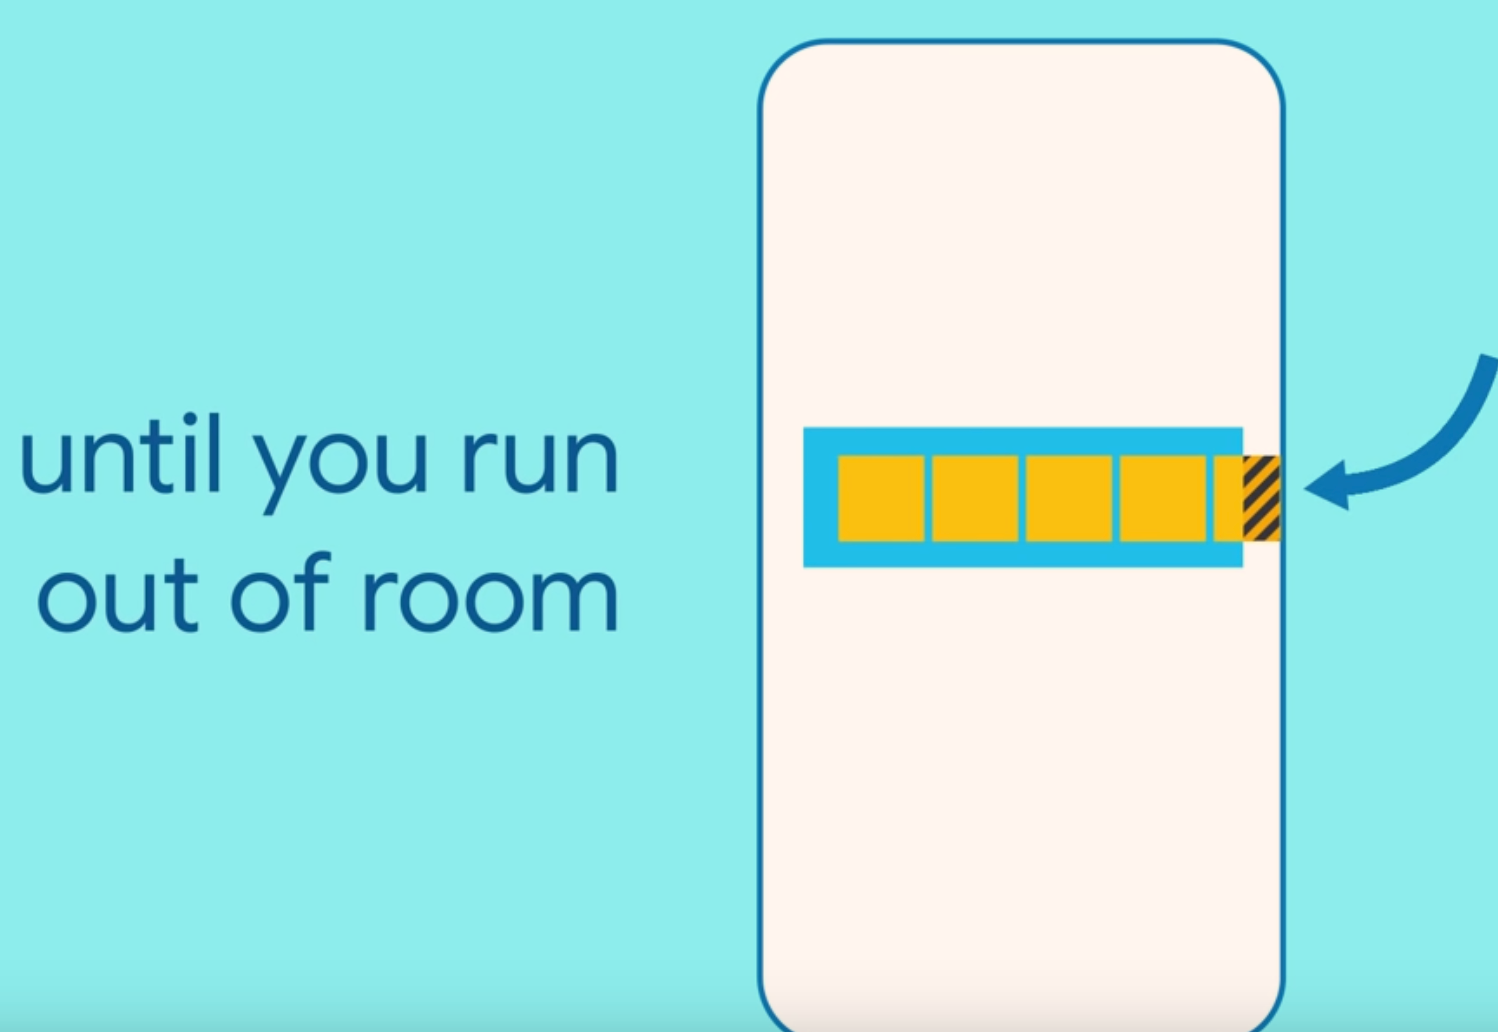
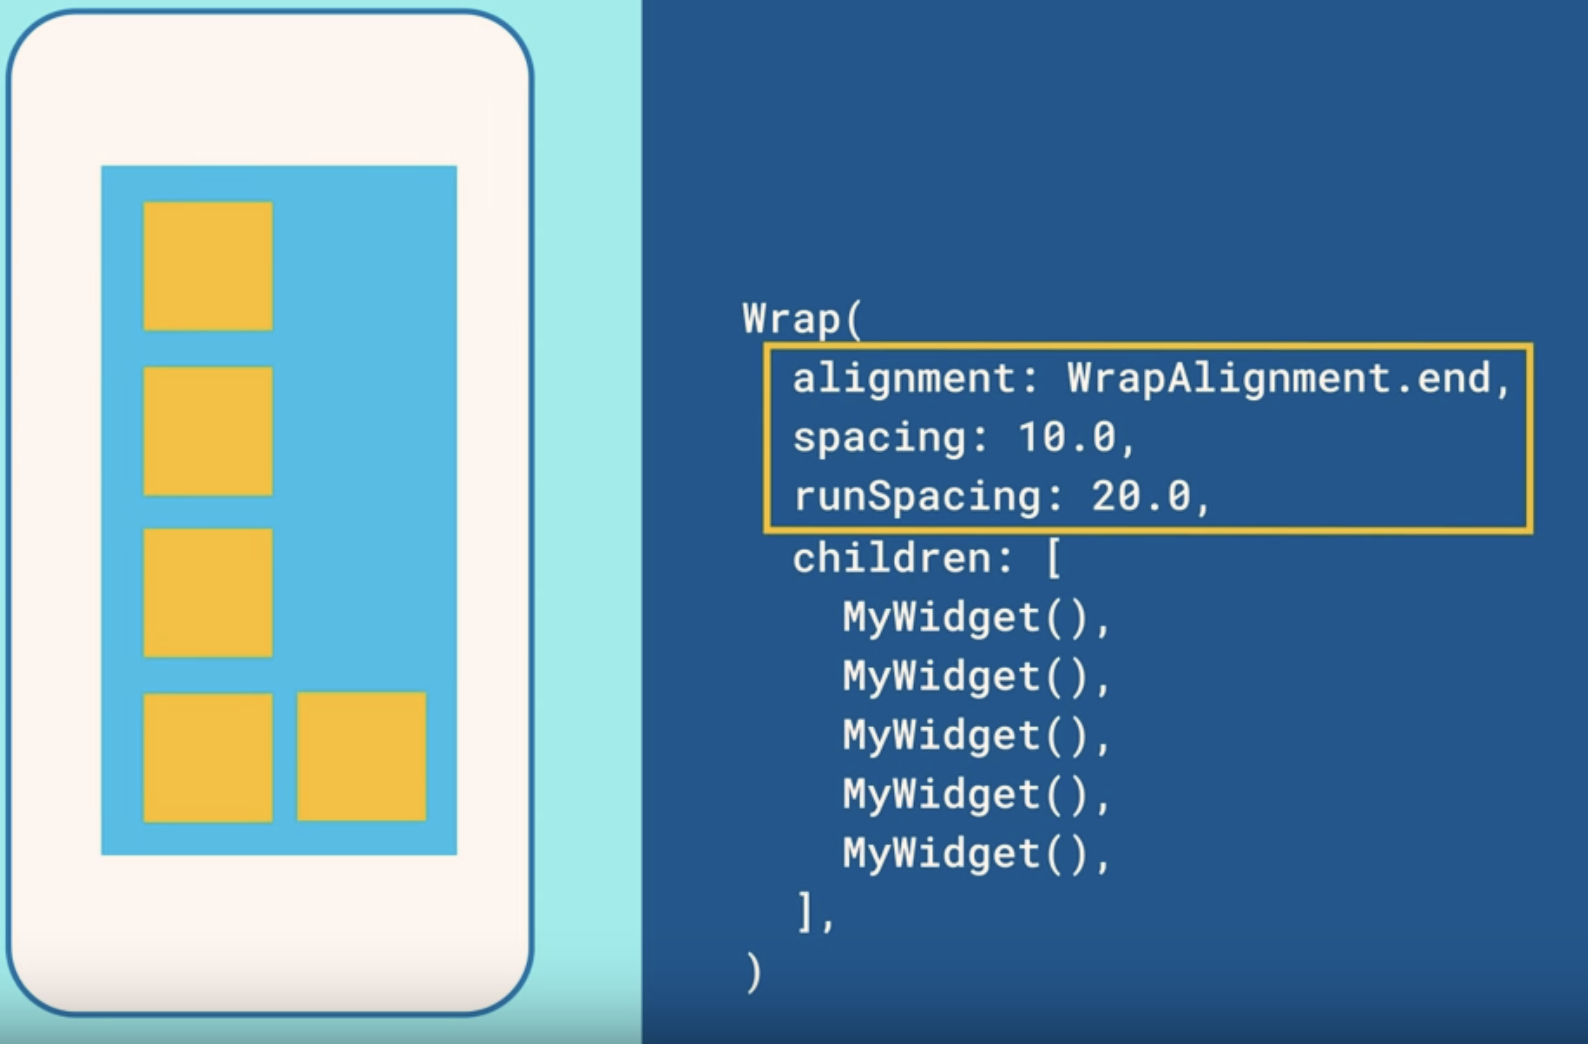
流式布局Wrap流式布局是什么 当然在我们知道每个组件尺寸或者屏幕尺寸固定的情况下我们可以很好地来布局我们的组件来达到最合适的显示效果。 但是如果我们的组件的尺寸是不固定的呢?在这种情况下我们的组件就很有可能会超出屏幕的范围,或者达不到我们预期的效果。 所以,我们就需要借助于流式布局来解决这个问题。流式布局会根据当前屏幕的尺寸和当前组件尺寸来看是否进行换行显示。 如: 当我们想要在一行显示多个Button时就会出现如图的问题,超出屏幕的Widget并不会显示。 Wrap({
Key key,
this.direction = Axis.horizontal,//方向
this.alignment = WrapAlignment.start,//内容排序方式
this.spacing = 0.0,//两个widget之间横向的间隔
this.runAlignment = WrapAlignment.start,
this.runSpacing = 0.0,两个widget之间纵向的间隔,当为纵向时则为横向间隔
this.crossAxisAlignment = WrapCrossAlignment.start,
this.textDirection,//文字排序方向
this.verticalDirection = VerticalDirection.down,//direction为Vertical时排序顺序
List<Widget> children = const <Widget>[],//widgets
})小结
|
Flutter中的自定义View简单的步骤
当然,上面仅仅是自定义的流程,具体的实现还是有很多细节需要处理的。 与绘制相关的知识 画布canvas canvas 拥有多种绘制点、线、路径、矩形、圆形、以及添加图像的方法,结合这些方法我们可以绘制出千变万化的画面。 虽然,画布可以画这些东西,但是决定这些图形颜色、粗细表现的还是画笔。 |
先分flutter的介绍,语法重点,底层原理,和项目实战,和注意坑点。
The text was updated successfully, but these errors were encountered: