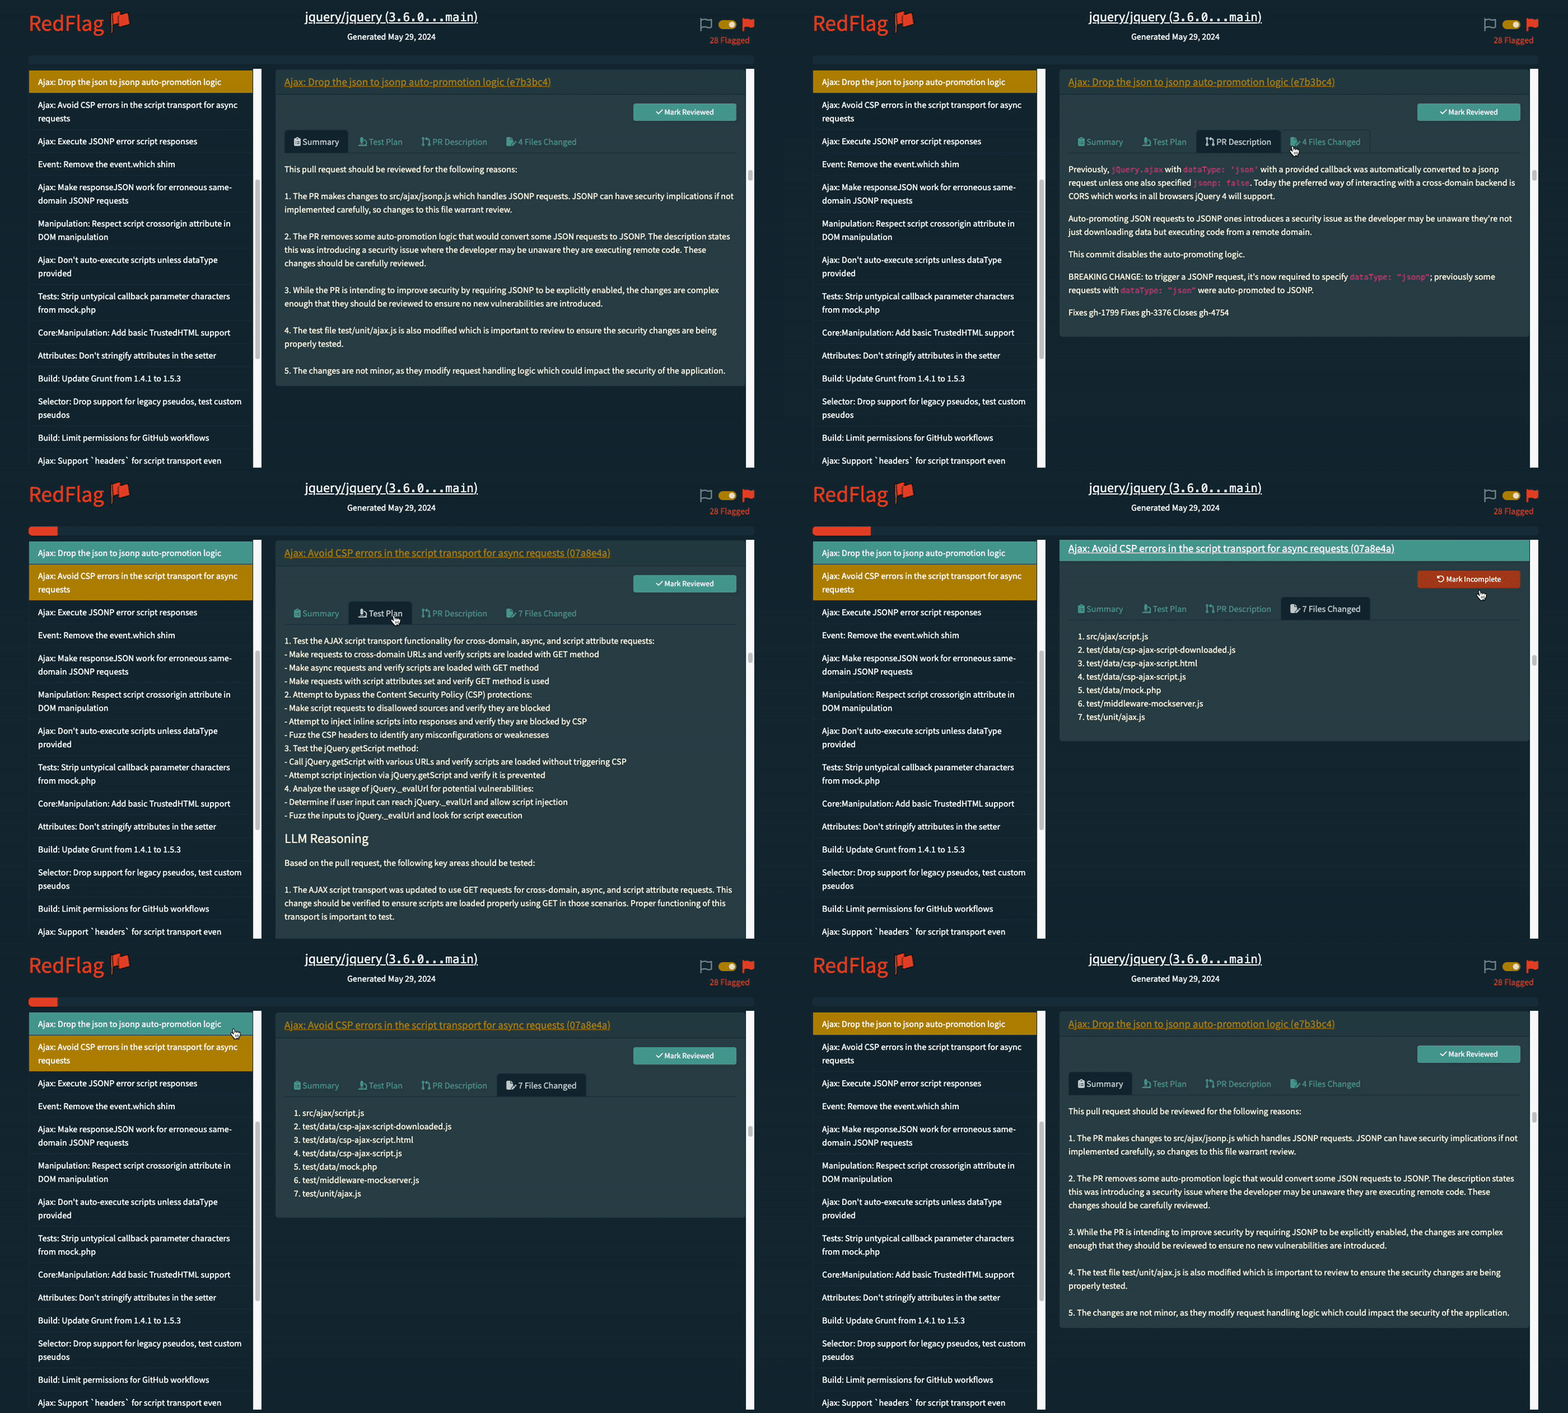
RedFlag leverages AI to determine high-risk code changes.
Run it in batch mode to scope manual security testing of release candidates,
or run it in your CI pipelines to flag PRs and add the appropriate reviewers.
Despite being a security tool, RedFlag can be leveraged for almost any team
as it's configuration makes it infinitely flexible.
Read the blog post »
View Sample Report
·
Report Bug
·
Request Feature
Table of Contents
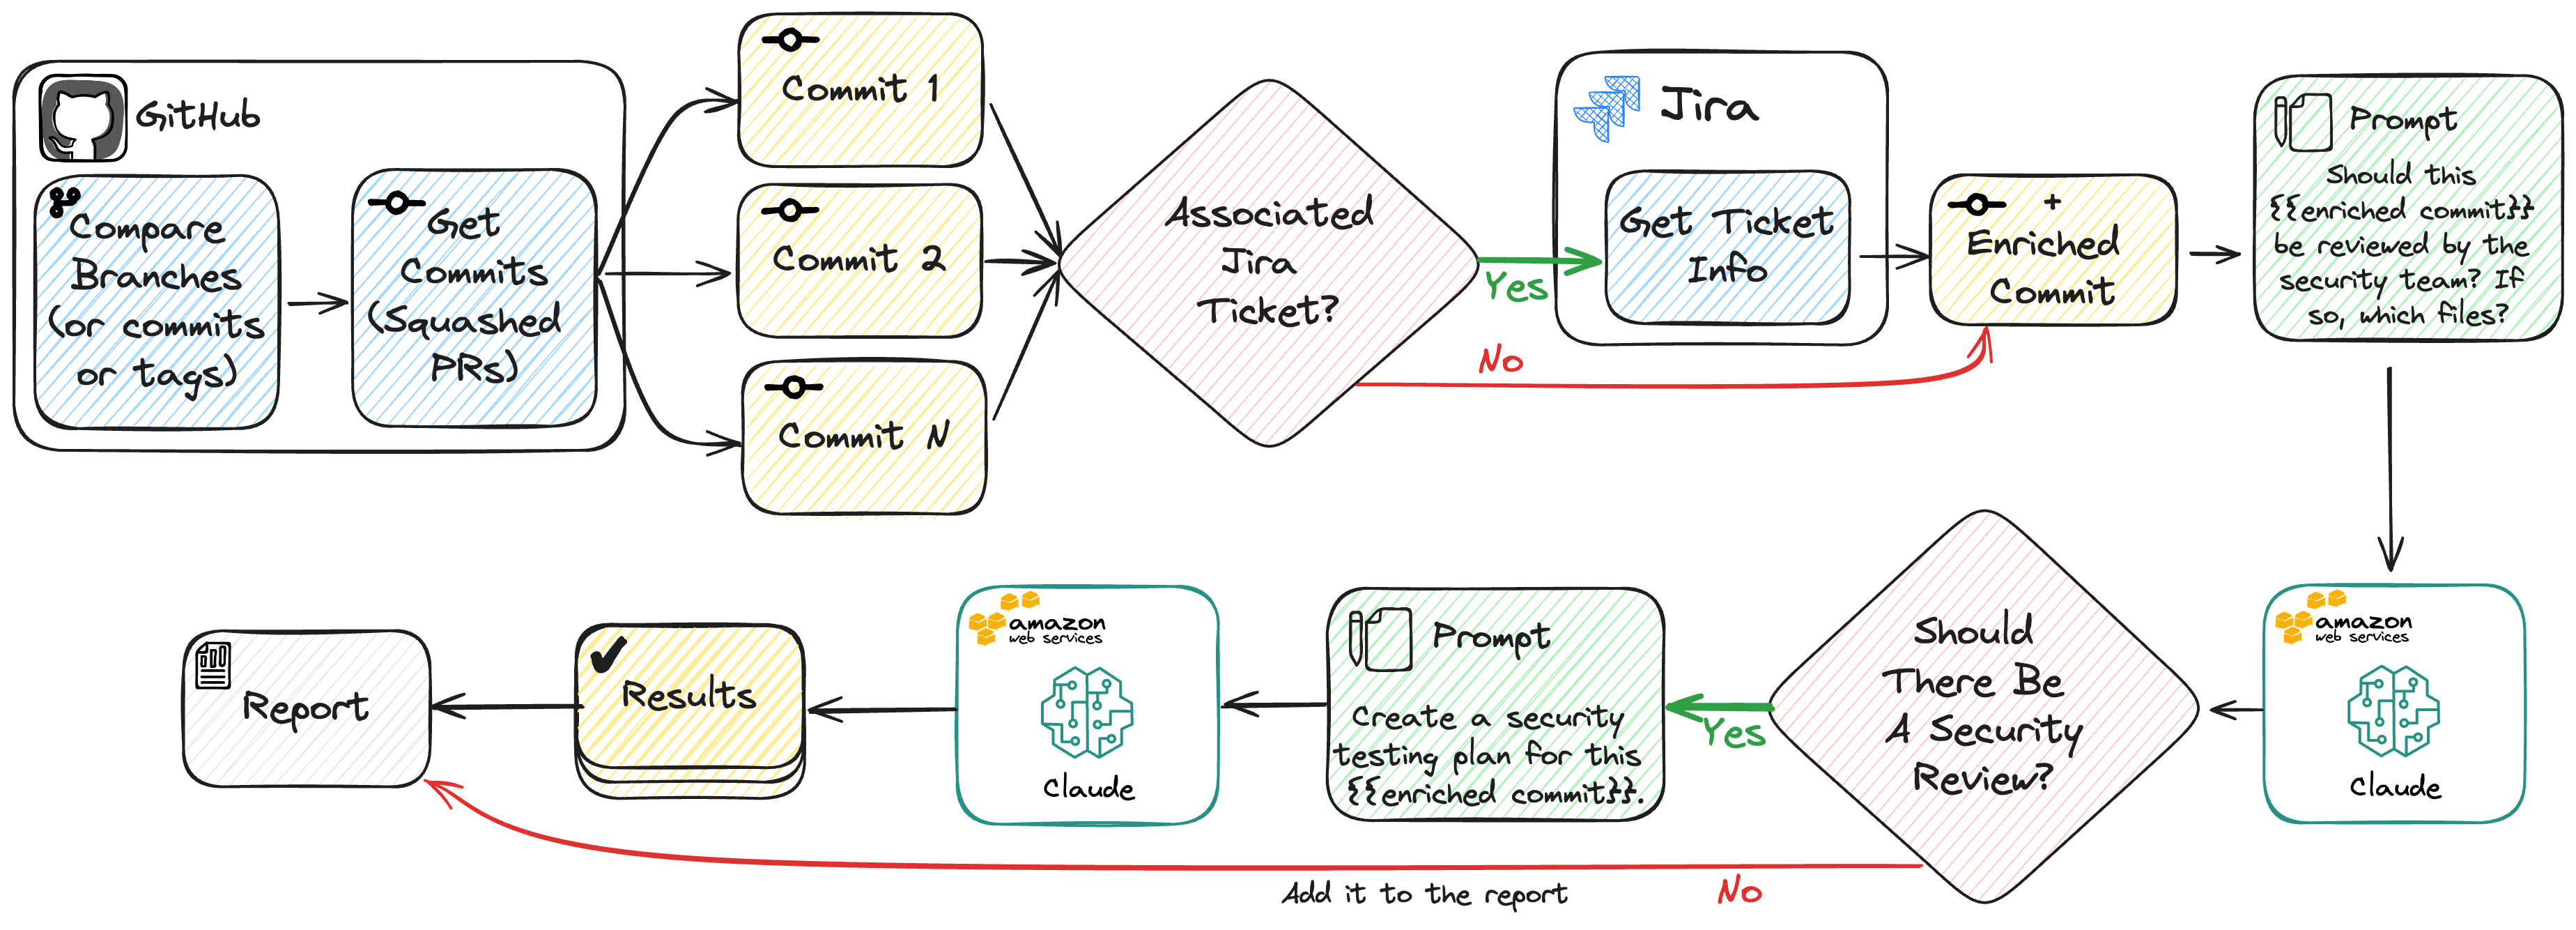
RedFlag is able to analyze a large number of commits in a single run. These commits can be specified using commit hashes, branch names, or tags. This is useful for scoping manual security testing of logical groups of code, such as release candidates.
-
Create a virtual environment:
python -m venv redflag-venv source redflag-venv/bin/activate -
Install RedFlag:
pip install addepar-redflag
Alternatively, if you'd like to use Poetry, clone the repo and use poetry install and then poetry run redflag.
Credentials can be set using:
- Environment variables
- A
.envfile - CLI parameters
- Configuration file (This is not recommended for security reasons!)
RedFlag uses Boto3-Compatible Credentials using Profiles or Env Vars.
Ensure that your AWS IAM policy has InvokeModel and InvokeModelWithResponseStream permissions to Amazon Bedrock.
Lastly, make sure you've requested the necessary Claude models!
Use a Personal Access Token with
repo permissions. Set the token as an environment variable:
export RF_GITHUB_TOKEN=your-token-hereFirst, set a Jira URL (https://your-org.atlassian.net) in the configuration file (jira_url), as a CLI parameter (--jira-url), or as an environment variable (RF_JIRA_URL).
Then create a Jira API Token and set it as an environment variable:
export RF_JIRA_USER=your-username-here
export RF_JIRA_TOKEN=your-token-here- Create a Slack App
- Request required scopes
- Install and authorize the App
- Add environment variables or configuration entries when running RedFlag
export RF_SLACK_TOKEN=xoxb-slack-token-here
export RF_SLACK_CHANNEL=C0123456789
Don't forget to invite the bot to the channel to avoid a channel_not_found error.
Note: When running RedFlag, output messages will indicate it is retrieving and evaluating commits from Pull Requests (PRs). Typically, commits are made via PRs if you have branch protection or repository rulesets in place. Consequently, once a PR is squashed and merged, it appears as a single commit in the target branch. The terminology used may vary depending on how you choose to run RedFlag, as you can specify
--fromand--tocommit SHAs or branches.
Here are some examples on how to run RedFlag in batch mode:
# Using branch names:
redflag --repo YourOrg/SomeRepo --from main --to dev
# Using commit hashes:
redflag --repo YouOrg/SomeRepo --from a1b2c3 --to d4e5f6
# With a custom configuration file:
redflag --config custom-config.ymlBy default, RedFlag produces an HTML report that can be opened in a browser.

RedFlag can be run in CI pipelines to flag PRs and add the appropriate reviewers. This mode uses GitHub Actions to run RedFlag on every PR and post a comment if the PR requires a review. Additionally, CI Mode is best suited for Slack alerting.
RedFlag can be run in evaluation mode to evaluate the performance of the AI model using your own custom dataset. This mode is useful for understanding how the model and prompts perform on your codebase and aids in security risk evaluation.
- CLI Parameters
- Environment Variables
- Configuration File
- Default Values
On each execution, RedFlag will load the configuration in the order of precedence above and then output a table that shows the final configuration and where each parameter was set.
The following table shows configuration options for each parameter:
| Parameter | CLI Param | Env Var | Config File | Default |
|---|---|---|---|---|
| Configuration File | --config | - | - | - |
| Repository | --repo | RF_REPO | repo | - |
| Branch/Commit From | --from | RF_FROM | from | - |
| Branch/Commit To | --to | RF_TO | to | - |
| Parameter | CLI Param | Env Var | Config File | Default |
|---|---|---|---|---|
| GitHub Token | --github-token | RF_GITHUB_TOKEN | github_token | - |
| Jira URL | --jira-url | RF_JIRA_URL | jira.url | - |
| Jira Username | --jira-user | RF_JIRA_USER | jira.user | - |
| Jira Token | --jira-token | RF_JIRA_TOKEN | jira.token | - |
| Slack Token | --slack-token | RF_SLACK_TOKEN | slack.token | - |
| Slack Channel (ID) | --slack-channel | RF_SLACK_CHANNEL | slack.channel | - |
| Slack Message Headline | --slack-headline | RF_SLACK_HEADLINE | slack.headline | - |
| Parameter | CLI Param | Env Var | Config File | Default |
|---|---|---|---|---|
| Debug LLM | --debug-llm | - | - | False |
| Bedrock Model ID | --bedrock-model-id | RF_BEDROCK_MODEL_ID | bedrock.model_id | anthropic.claude-3-sonnet-20240229-v1:0 |
| Bedrock Profile | --bedrock-profile | RF_BEDROCK_PROFILE | bedrock.profile | - |
| Bedrock Region | --bedrock-region | RF_BEDROCK_REGION | bedrock.region | - |
| Review Prompt (Role) | - | - | prompts.review.role | Security review (see sample.config.yaml) |
| Review Prompt (Question) | - | - | prompts.review.question | Security review (see sample.config.yaml) |
| Test Plan Prompt (Role) | - | - | prompts.test_plan.role | Security review (see sample.config.yaml) |
| Test Plan Prompt (Question) | - | - | prompts.test_plan.question | Security review (see sample.config.yaml) |
| Parameter | CLI Param | Env Var | Config File | Default |
|---|---|---|---|---|
| Output Directory | --output-dir | RF_OUTPUT_DIR | output_dir | results |
| Maximum Commits | --max-commits | RF_MAX_COMMITS | max_commits | 0 (∞) |
| Don't Output HTML | --no-output-html | - | - | - |
| Don't Output JSON | --no-output-json | - | - | - |
| Don't Show Progress Bar | --no-progress-bar | - | - | - |
| Don't Strip HTML Comments | --no-strip-html-comments | - | - | - |
| Filter Commit Titles | - | - | filter_commits.title | - |
| Filter Commit Users | - | - | filter_commits.user | - |
| Strip Description Lines | - | - | strip_description_lines | - |
| Parameter | CLI Param | Env Var | Config File | Default |
|---|---|---|---|---|
| Evaluation Dataset | --dataset | RF_DATASET | dataset | - |
Contributions are what make the open source community such an amazing place to learn, inspire, and create. Any contributions you make are greatly appreciated.
If you have a suggestion that would make this better, please fork the repo and create a pull request. You can also simply open an issue with the tag "enhancement". Don't forget to give the project a star! Thanks again!
- Fork the Project
- Create your Feature Branch (
git checkout -b feature/AmazingFeature) - Commit your Changes (
git commit -m 'Add some AmazingFeature') - Push to the Branch (
git push origin feature/AmazingFeature) - Open a Pull Request
Distributed under the MIT License. See LICENSE.md for more information.
Say hi to Addepar Security Engineering at [email protected].


