-
Notifications
You must be signed in to change notification settings - Fork 82
Quick Start
This page includes instructions on how to use Cloudberry and AsterixDB to setup a small instance of TwitterMap on a local machine. The following diagram illustrates its architecture:
- Linux or Mac
- At least 4GB memory
- (if using Virtual Machine) At least 2 CPUs
Follow these instructions to install Java and sbt.
$ cd ~$ wget http://cloudberry.ics.uci.edu/img/asterix-server-0.9.5-SNAPSHOT-binary-assembly.zip$ unzip asterix-server-0.9.5-SNAPSHOT-binary-assembly.zip$ cd apache-asterixdb-0.9.5-SNAPSHOT/opt/local/bin/Step 1.5: Execute start-sample-cluster.sh to start the sample instance. Wait until you see “INFO: Cluster started and is ACTIVE.” message.
$ ./start-sample-cluster.sh
CLUSTERDIR=/home/x/apache-asterixdb-0.9.5-SNAPSHOT/opt/local
INSTALLDIR=/home/x/apache-asterixdb-0.9.5-SNAPSHOT/
LOGSDIR=/home/x/apache-asterixdb-0.9.5-SNAPSHOT/opt/local/logs

Using Java version: 1.8.0_XX
INFO: Starting sample cluster...
Using Java version: 1.8.0_XX
INFO: Waiting up to 30 seconds for cluster 127.0.0.1:19002 to be available.
INFO: Cluster started and is ACTIVE.
Step 1.6: Execute jps to check one instance of “CCDriver” and two instances of “NCService” and “NCDriver” are running:
$ jps
59264 NCService
59280 NCDriver
59265 CCDriver
59446 Jps
59263 NCService
59279 NCDriver
Step 1.7: Open the AsterixDB Web interface at http://localhost:19001 and issue the following query to see the AsterixDB instance is running.
select * from Metadata.`Dataverse`;{ "Dataverse": { "DataverseName": "Default", "DataFormat": "org.apache.asterix.runtime.formats.NonTaggedDataFormat", "Timestamp": "Wed Mar 07 16:13:37 PST 2018", "PendingOp":0}}
{ "Dataverse": { "DataverseName": "Metadata", "DataFormat": "org.apache.asterix.runtime.formats.NonTaggedDataFormat", "Timestamp": "Wed Mar 07 16:13:37 PST 2018", "PendingOp":0}}$ cd ~/apache-asterixdb-0.9.5-SNAPSHOT/opt/local/bin
$ ./stop-sample-cluster.shNext time when you want to start/stop your AsterixDB instance, use the following command.
$ ~/apache-asterixdb-0.9.5-SNAPSHOT/opt/local/bin/start-sample-cluster.sh
$ ~/apache-asterixdb-0.9.5-SNAPSHOT/opt/local/bin/stop-sample-cluster.sh~> git clone https://github.com/ISG-ICS/cloudberry.gitSuppose the repository is cloned to the folder ~/cloudberry.
~/cloudberry> cd ~/cloudberry/cloudberry
~/cloudberry> sbt compile
~/cloudberry> sbt "project neo" "run"
Note: if you see errors like the following:
[ERROR] Failed to construct terminal; falling back to unsupported
java.lang.NumberFormatException: For input string: "0x100"
	at java.lang.NumberFormatException.forInputString(NumberFormatException.java:65)
	at java.lang.Integer.parseInt(Integer.java:580)
	at java.lang.Integer.valueOf(Integer.java:766)
	... ...
it’s due to the compatibility of some versions of sbt , do the following:
Add export TERM=xterm-color to the top of /usr/share/sbt/bin/sbt.
Now the errors above should be gone. And you can continue this guide. If this doesn’t solve the above errors, please refer to this discussion to try other solutions
Wait until the shell prints the messages shown as following:
$ sbt "project neo" "run"
[info] Loading global plugins from /Users/white/.sbt/0.13/plugins
[info] Loading project definition from /Users/white/cloudberry/cloudberry/project
[info] Set current project to cloudberry (in build file:/Users/white/cloudberry/cloudberry/)
[info] Set current project to neo (in build file:/Users/white/cloudberry/cloudberry/)

--- (Running the application, auto-reloading is enabled) ---

[info] p.c.s.NettyServer - Listening for HTTP on /0:0:0:0:0:0:0:0:9000

(Server started, use Ctrl+D to stop and go back to the console...)(1) Download the synthetic sample tweets (about 100K) data:
~/cloudberry> cd ../examples/twittermap/script/
~/script> wget http://cloudberry.ics.uci.edu/img/sample.adm.gz -O sample.adm.gz
(2) Ingest the data into AsterixDB.
~/script> cd ..
~/twittermap> ./script/ingestAllTwitterToLocalCluster.sh
When it finishes you should see the messages shown as following:
Socket 127.0.0.1:10005 - # of ingested records: 260000
Socket 127.0.0.1:10005 - # of total ingested records: 268497
>>> # of ingested records: 268497 Elapsed (s) : 2 (m) : 0 record/sec : 134248.5
>>> An ingestion process is done.
[success] Total time: 3 s, completed Nov 19, 2018 8:44:51 PM
Ingested city population dataset.
Step 2.4: Start the TwitterMap Web server (in port 9001) by running the following command in another shell:
~/twittermap> sbt "project web" "run 9001"Wait until the shell prints the messages shown as following:
$ sbt "project web" "run 9001"
[info] Loading global plugins from /Users/white/.sbt/0.13/plugins
...
--- (Running the application, auto-reloading is enabled) ---

[info] p.c.s.NettyServer - Listening for HTTP on /0:0:0:0:0:0:0:0:9001

(Server started, use Ctrl+D to stop and go back to the console...)
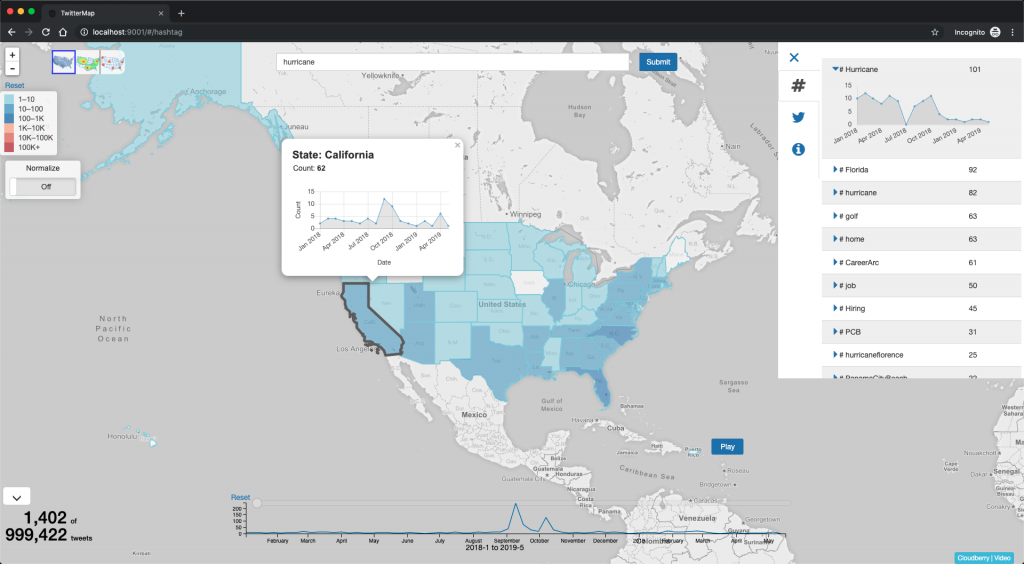
Step 2.5: Open a browser to access http://localhost:9001 to see the TwitterMap frontend. The first time you open the page, it could take up to several minutes (depending on your machine’s speed) to show the following Web page:
(Note: Firefox users have to go to about:config and change privacy.trackingprotection.enabled to false)
Congratulations! You have successfully set up TwitterMap using Cloudberry and AsterixDB!
