-
Notifications
You must be signed in to change notification settings - Fork 645
CoTurn Cluster
Good news! Our documentation has moved to antmedia.io/docs.
In this guide, we're going to explain how to create a load balancer using Turn Server (MySQL support) as DNS Round Robin.
Round Robin DNS is a fast, simple and cost-effective way to load balance or distribute traffic evenly over multiple servers or devices.
By using Round Robin DNS, when a user accesses the home page, the request will be sent to the first IP address. The second user who accesses the home page will be sent to the next IP address, and the third user will be sent to the third IP address. In a nutshell, Round Robin network load balancing rotates connection requests among web servers in the order that requests are received.

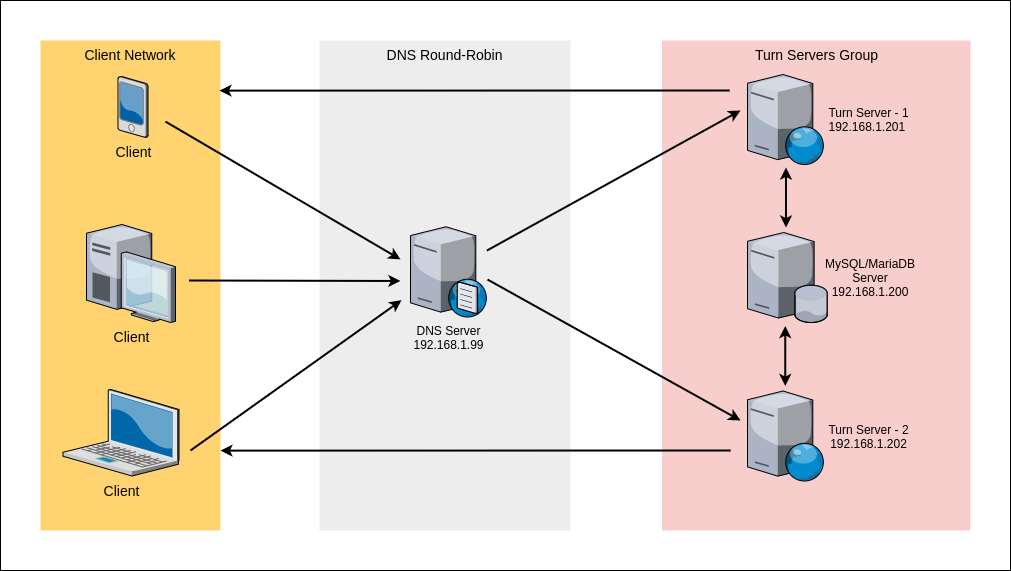
- Clients try to access the turn server via a domain name such
turn.antmedia.io - DNS resolves the
turn.antmedia.ioto the backendsTurn Server - 1andTurn Server - 2by using Round Robin algorithm. - Turn Servers access to the same Database for authentication and serves the client.
2 x Turn Server
1 x MySQL/MariaDB server
1 x DNS Access
DNS    : 192.168.1.199
MariaDB: 192.168.1.200
Coturn1: 192.168.1.201
Coturn2: 192.168.1.202
This "How to" guide has been tested in a real lab environment so you have to set up the configuration according to your own setup.
Assuming this is a fully-registered domain, we will add the following in the DNS settings. We add two A records for the subdomain turn.antmedia.io and point them to the turn server servers IP address.
Example DNS Record is as follows:
turn.antmedia.io	IN		A		192.168.1.201
turn.antmedia.io	IN		A		192.168.1.202
In this way, when we request to turn.antmedia.io, it will distribute every request in the round-robin structure to the ip addresses we have stated above.
We always prefer to install the Database Server on a separate server and we choose MariaDB. We use long-term authentication in this structure and we authenticate to the turn server with the users that we created.
-
Update the repository and install MariaDB with the following command:
apt-get update && apt-get install mariadb-server -y -
Edit the following file
/etc/mysql/mariadb.conf.d/50-server.cnfwith your favorite editor such asvimornanoPlease add the following lines then save and exit:bind-address = 0.0.0.0 innodb_file_format=Barracuda innodb_file_per_table=1 innodb_large_prefix=1 -
Restart the MariaDB Server.
systemctl restart mysqld -
Login Mariadb shell as follows:
mysql -uroot -p -
Run the SQL command as follows on the MariaDB shell. Please pay attention that we set password as
coturn123and this value will be used later. You should change it with your own secure password.SET SESSION innodb_strict_mode=ON; SET GLOBAL innodb_default_row_format='dynamic'; create database coturn; CREATE USER 'coturn'@'192.168.1.201' IDENTIFIED BY 'coturn123'; CREATE USER 'coturn'@'192.168.1.202' IDENTIFIED BY 'coturn123'; GRANT ALL PRIVILEGES ON coturn.* TO 'coturn'@'192.168.1.201'; GRANT ALL PRIVILEGES ON coturn.* TO 'coturn'@'192.168.1.202'; flush privileges; quit;
In this section, we will install and configure CoTurn on Coturn1 and Coturn2 server.
-
Update the repository and install CoTurn with the following command
apt-get update && apt-get install coturn -y -
Enable the TURN server as follows
sed -i 's/#TURNSERVER_ENABLED.*/TURNSERVER_ENABLED=1/g' /etc/default/coturn -
Add CoTurn to startup at boot time
systemctl enable coturn -
Backup original conf file:
mv /etc/turnserver.conf{,_bck} -
Create the following file with the editor
vim /etc/turnserver.conf -
Add below lines then save and exit. Keep in mind that we did set the password
coturn123and we use them below. If you change the password, use your own instead ofcoturn123below.fingerprint lt-cred-mech realm=turn.antmedia.io mysql-userdb="host=192.168.1.200 dbname=coturn user=coturn password=coturn123 port=3306 connect_timeout=60 read_timeout=60" syslog -
Make sure you're doing this step on Coturn1 and Coturn2 server separately. The syslog output of all servers is as follows:

-
Import SQL schema(
/usr/share/coturn/schema.sql) to the database server. The file /usr/share/coturn/schema.sql is in one of the turn servers. Upload to the database server andschema.sqlis imported.scp -r /usr/share/coturn/schema.sql [email protected]: -
Run the following command to import the SQL file:
mysql -uroot -p coturn < schema.sql -
Restart the service on both nodes CoTURN instances
systemctl restart coturn -
To create a username and password, run the following command on the turn1 or turn2 server:
turnadmin -a --mysql-userdb="host=192.168.1.200 dbname=coturn user=coturn password=coturn123" -u antmedia -p 123456 -r turn.antmedia.ioLet's check if the configurations are working correctly:
turnutils_uclient -v -t -T -u antmedia -w 123456 -p 3478 turn.antmedia.io -
If everything is fine, your output will be as follows

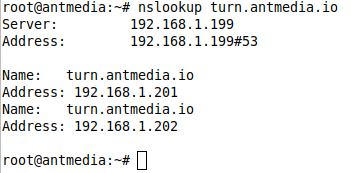
You can use the following command to check that DNS Round-Robin is working correctly:
nslookup turn.antmedia.io

If you have any questions, please just drop a line to contact (at) antmedia.io
- Introduction
- Quick Start
- Installation
- Publishing Live Streams
- Playing Live Streams
- Conference Call
- Peer to Peer Call
- Adaptive Bitrate(Multi-Bitrate) Streaming
- Data Channel
- Video on Demand Streaming
- Simulcasting to Social Media Channels
- Clustering & Scaling
- Monitor Ant Media Servers with Apache Kafka and Grafana
- WebRTC SDKs
- Security
- Integration with your Project
- Advanced
- WebRTC Load Testing
- TURN Servers
- AWS Wavelength Deployment
- Multi-Tenancy Support
- Monitor Ant Media Server with Datadog
- Clustering in Alibaba
- Playlist
- Kubernetes
- Time based One Time Password
- Kubernetes Autoscaling
- Kubernetes Ingress
- How to Install Ant Media Server on EKS
- Release Tests
- Spaceport Volumetric Video
- WebRTC Viewers Info
- Webhook Authentication for Publishing Streams
- Recording Streams
- How to Update Ant Media Server with Cloudformation
- How to Install Ant Media Server on GKE
- Ant Media Server on Docker Swarm
- Developer Quick Start
- Recording HLS, MP4 and how to recover
- Re-streaming update
- Git Branching
- UML Diagrams