This page outlines how to get a basic console set up and operational.
Basic setup of the console and the python virtual environment is as follows:
- Clone the repo to a local directory of your choice.
- Open a terminal window in this directory and create a new python virtualenv using
python3 -m venv .If you have multiple python installations, make sure you're using python3.9 or greater. - Install the required libraries using pip and the requirements.txt file using
python -m pip install -r requirements.txt.
You will likely hit some issues during dependency installation. Keep reading!
If you encounter errors during the installation of the netifaces package, you may need to install the Microsoft Visual C++ Build Tools as outlined on this page.
Thanks to Bill, WA8WG, for running into this error and emailing me the solution!
PyAudio is a required library but is not included in requirements.txt because the installation process differs depending on your operating system.
Installing pyaudio on a linux system requires you to first build the portaudio library from source. See the portaudio documentation for information.
Once portaudio is installed, pyaudio can be installed simple by running pip install pyaudio inside the python virtual environment.
I've run into some issues on Debian systems where PyAV can't find the alsa container - this is solved by building PyAV from source and copying the resulting av folder into the root directory of this project.
Pip is not able to install pyaudio properly on windows, at least for me. I had to follow the steps in this StackOverflow answer to get it to work:
- Find your python version with
python --version - Identify if you're running 32 bit or 64 bit python. The easiest way to find out is to run
pythonand view the build information:
Python 3.9.4 (tags/v3.9.4:1f2e308, Apr 6 2021, 13:40:21) [MSC v.1928 64 bit (AMD64)] on win32 - Download the correct pyaudio .whl file for your python installation from this website.
- Move the whl file to the console directory, and install using
pip install <pyaudio whl file>
The python samplerate package depends on the libsamplerate library. On Windows and Mac, it's included with the package, but it must be installed manually on linux. For Debian-based systems the package is libsamplerate0.
You'll need to obtain XCMP authentication keys to use this console with TRBO radios. These are normally distributed by Motorola for developers only. However, they can be found around the internet relatively easily, or within CPS itself if you know where to look.
Currently, there's a pastebin with XCMP keys that seems to work. Place these inside the interface/xcmp_keys.sample.py file and rename to xcmp_keys.py. The console should now launch without any import errors.

There are two components for radio hardware interfacing - control and audio.
Most modern Motorola radios should have an SB9600 bus with four signals: BUS+, BUS-, BUSY, and ground. You'll need a RIB (radio interface box) to translate these signals into standard serial. If you're having issues getting the radio to connect, try switching the BUSY signal for the /BUSY signal (active low vs active high) as the RIB output has both available.
I've been working on a small board to do USB -> Serial -> SB9600 all in one compact package. More to come on that!
This connection is a network-based control protocol. Simply connect a USB programming cable to your APX/XPR radio, and a new network device will be created on your computer. The IP address that this device has is determined by the radio programming, so be sure that you change it appropriately for your particular network setup (to avoid IP conflicts, etc).
I used a cheapo USB soundcard with mic & headphone plugs. Wire RX audio from the radio's accessory connector (for example, RX_FILT_AUD on the XTL5000) to the mic input, and wire TX audio from the soundcard headphone jack to the MIC line that will work with your radio.
Currently this console controls PTT by sending the SB9600 command for a PTT button press. On the radio I tested with (an XTL5000 with an O5 head), mic audio could only be input to the radio via the front microphone connector. The MIC_IN pin on the radio's TIB was disabled, and AUX_MIC/AUX_TX require a hardware signal (AUX_PTT) to be triggered before they get enabled.
On TRBO/APX radios, this should not be an issue.
Running the client webpage is not as simple as just clicking on the html file. Unfortunately, because of the way modern browsers behave, there's more work to be done. You'll need to get SSL certificates created for the console, and a webserver configured to host the page.
The console client uses several new-ish javascript features, some of which require the webpage to be served over an SSL connection (in Chrome at least). It's annoying but I haven't found a workaround for this yet. The python server runtime starts its own https webserver, but it needs valid certificates otherwise the client-side portion will run into all kinds of issues.
You can generate your own CA & certificate using this answer from StackOverflow. You'll have to overwrite the existing keys & certs in the certs/ folder of this repo, but if you use the same names everything should "just work." You'll then need to trust the root CA you made (the CA.pem file created from the link above) in your operating system as a trusted root certificate authority.
Once you go through these annoying steps, the https connection should then work without a bunch of errors and issues. There's probably a better and more secure way to do this but for now I've also included the CA & cert files I used. If you don't care too much about the security implications of trusting a random CA from a Github repo, you can trust the localCA.pem authority in Chrome/Windows and things should work with minimal effort.
Another important note - if you run multiple radio daemons from different server addresses, you'll need to generate a unique certificate for each address and use that in the daemon config.
Once you have your certificates ready, the simplest way to host the web interface is to use the built-in python http.server module. I've created a python script to handle setup and configuration of this module, located in console-client/client.py. To start this server, do the following:
- Activate the virtual environment you made above from a terminal prompt:
.\Scripts\activate(Windows) orsource ./bin/activate(Linux) - Start the webserver script, providing the paths to the certificate files you created above:
python client.py -a <server address> -p <server port> -c <certfile path> -k <keyfile path> - Navigate to
<server address>:<port>(example:localhost:4443) and an empty console should load. If you see a security error, you did not configure your certificates correctly and the console will not work. Double check that you're using the right certificates and you've trusted the root CA in your operating system.
If you've gotten this far, you're in the home stretch now.
Once you've determined you have a working client interface, it's time to configure the radios avaialble. This is done with a JSON config file names radios.json located in the same directory as the rest of the client files. This file is loaded during page load and determines what radios are available to the console user. The structure of this file is fairly straightforward, and an example file is provided with the repository:
{
    "RadioList": [
        {
            "name": "Motorola XTL",
            "address": "1.2.3.4",
            "port": 9501,
            "color": "blue"
        },
        {
            "name": "Motorola XPR",
            "address": "5.6.7.8",
            "port": 9502,
            "color": "purple"
        }
    ]
}
name: the name of the radio (used in the UI before we connect to the radio)address: the address of the radio daemon (configured below)port: the port of the radio daemon (again, configured below)color: the color of the radio card in the UI. Available options arered,amber,green,blue, orpurple
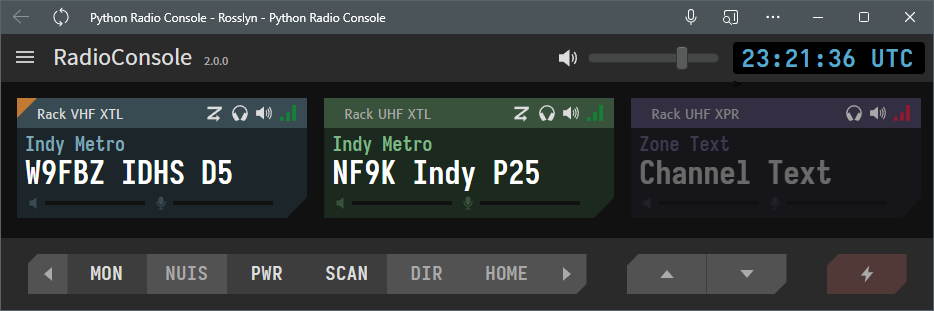
Once this file is configured, a refresh of the web client will show the configured radios as cards in the main window. They start in a disconnected state, and clicking on the red signal bar will start the connection process.

If everything goes well, the icon will turn green and you'll see the channel and zone texts update.

At this point, your radio console is fully functional! Except - I never told you how to run the radio control daemons, did I?
The following guide will help you get the radio control daemon up and running.
Basic radio information required to run the radio daemon is contained in a JSON file.
example config.json:
{
    "Radio":
    {
        "name": "Test Radio",
        "desc": "Bench Testing Radio",
        "ctrlMode": "SB9600-XTL-O",
        "ctrlPort": "/dev/ttyUSB0",
        "txDev": "out0",
        "rxDev": "mic0"
    },
    "Certfile": "certs/private/console-cert.crt",
    "Keyfile": "certs/private/console-cert.key"
}
name: Radio name. Shown in the console radio headers. Be sensible in your name lengths. There's no limit but it'll look bad.desc: Radio description. Not used anywhere yet, but might be at some point. Can be blank I suppose.ctrlMode: Radio control mode. Options are- Implemented:
SB9600-XTL-O: XTL5000 with O5 control headXCMP-XPR: XPR4000/5000 series mobiles
- Planned:
SB9600-XTL-W: XTL5000 with W9 control headSB9600-MCS-3: MCS2000 with model 3 control headSB9600-AS-W: Astro spectra with W9 control head (will probably just work with the XTL W profile)Soundcard-CM108: CM108B/CM119 soundcard PTT control (for a generic radio. No control besides PTT will be available)Soundcard-VOX: VOX-based PTT control. Same as above except relying on radio VOX circuit for PTT. Don't ever use this and I probably won't actually do it.
- Implemented:
ctrlPort- For SB9600: port the above interface is connected to.
COMxfor Windows,/dev/ttySxfor linux. - For XCMP: IP address of the radio
- For SB9600: port the above interface is connected to.
txDev: transmit audio device name. For linux, query device names withaplay -L. For windows, this is the name shown in the sound manager.rxDev: receive audio device name. For linux, query device names witharecord -L. For windows, this is the name shown in the sound manager.Certfile: path to the SSL certificate file you created aboveKeyfile: path to the SSL certificate key you created above
Once you have your configuration file and your certificates, go ahead and run the control daemon:
- Activate the virtual environment again, just like you did earlier:
.\Scripts\activate(Windows) orsource ./bin/activate(Linux) - Start the daemon using the following command:
python radio-daemon.py -c <config file> -a <address> -sp <port>
Once the daemon is running, you should be able to connect to the radio via the web client. At this point, you've got a fully working radio console. Congrats!