⚠️ This quickstart relies on ReactFire's concurrent mode features. We'd love PRs that add samples that work with stable builds of React!
⚛ + 🔥 = 🌯
This quickstart shows you how to connect your React web app to Cloud Firestore, listen for its data, and display the data in real time. We'll also configure Firebase Performance Monitoring so you can get some performance stats.
Let's build a web app that displays, in real time, the tastiness of a burrito. Yum!
To see the completed app, check out this StackBlitz workspace.
If your project doesn't have a Cloud Firestore database instance yet, check out these instructions to create a new instance. Please initialize it in locked mode.
-
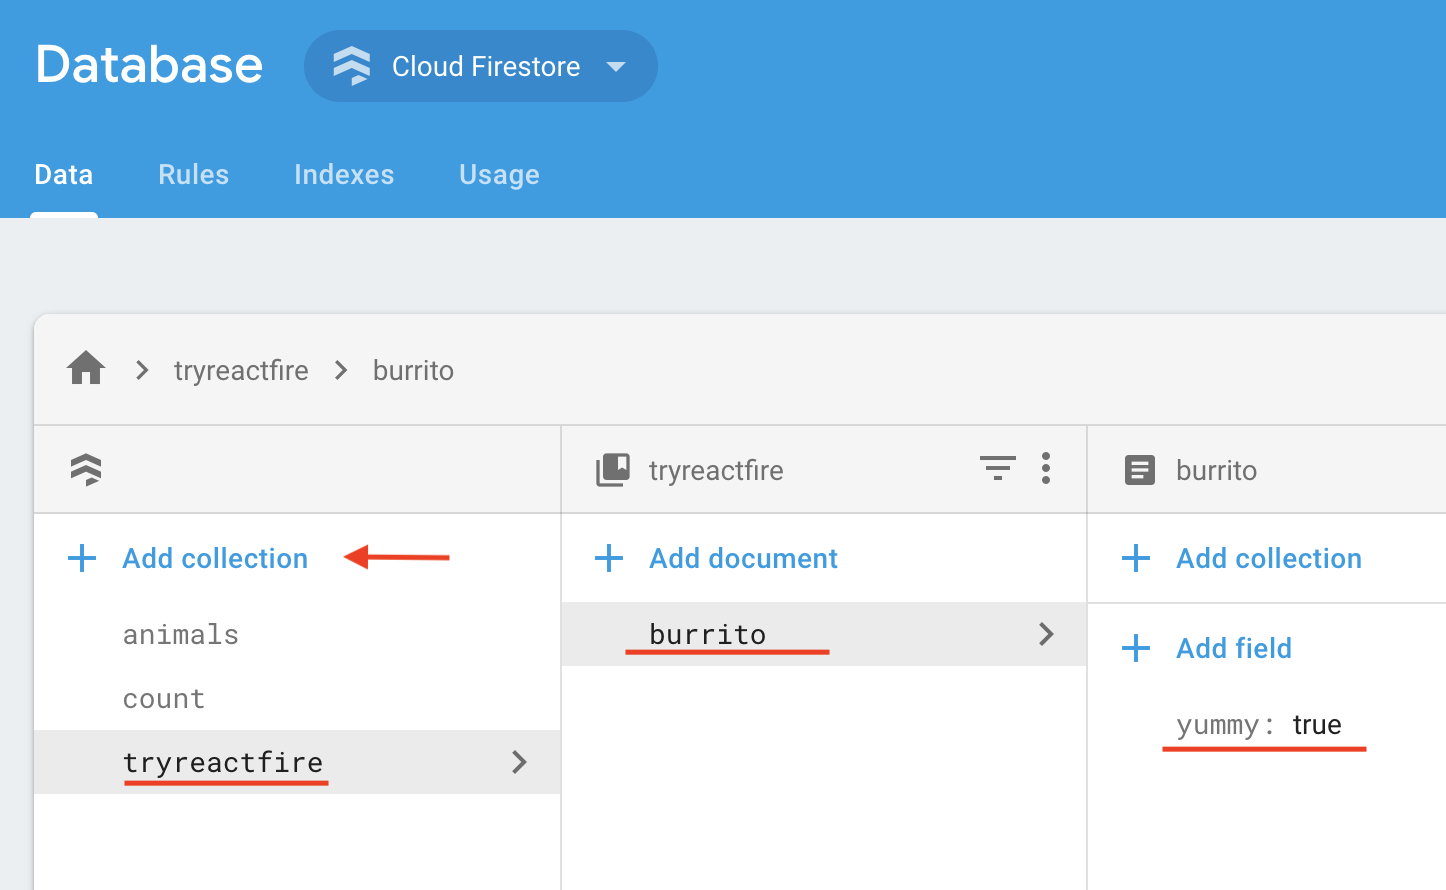
Go to the Database tab in the Firebase console.
-
Add a document.
-
In the Data tab of the console, click Add Collection
-
Name the collection tryreactfire
-
Add a document with ID burrito and boolean field
yummy: true
-
-
Add security rules to your document.
- In the Rules tab of the console, add the following security rules:
rules_version = '2'; service cloud.firestore { match /databases/{database}/documents { match /tryreactfire/burrito { allow read, write: if true; } } }- Publish the rules.
Prerequisite: make sure you have Node.js installed.
In a terminal, create a fresh React app in a directory of your choice.
npx create-react-app myapp
cd myappIgnore yarn/npm warnings.
yarn add firebase reactfire

# or

npm install --save firebase reactfire-
In the center of the Firebase console's project overview page, click the Web icon to launch the setup workflow.
If you've already added an app to your Firebase project, click Add app to display the platform options.
-
Enter your app's nickname.
Note: Firebase Hosting is not required for you to use Firebase products with your web app.
-
Register the app.
-
Copy the Firebase configuration. This will be used in Step 4.
-
Continue to Console
Open the src directory and add code to index.js as described below.
-
Import from ReactFire
//...
import { FirebaseAppProvider } from 'reactfire';
//...
-
Add the Firebase configuration
Add the firebaseConfig constant and paste the configuration from Step 3.
//...
const firebaseConfig = {
  /* Paste your config object from Firebase console here */
};
//...
-
Wrap your app in a
FirebaseAppProviderReplace the default render function.
//...
ReactDOM.createRoot(document.getElementById('root')).render(
  <FirebaseAppProvider firebaseConfig={firebaseConfig}>
    <App />
  </FirebaseAppProvider>
);
//...
Open the src directory and add code to App.js as described below.
-
Import from ReactFire
//...
import { useFirestoreDocData, useFirestore, SuspenseWithPerf } from 'reactfire';
//...
-
Add a function component
//...
function Burrito() {
  // lazy load the Firestore SDK and create a document reference
  const burritoRef = useFirestore()
    .collection('tryreactfire')
    .doc('burrito');

  // subscribe to the doc. just one line!
  const burrito = useFirestoreDocData(burritoRef);

  // get the value from the doc
  const isYummy = burrito.yummy;

  return <p>The burrito is {isYummy ? 'good' : 'bad'}</p>;
}
//...
-
Render your component inside of a
Suspensetag
We need to do this because
useFirestoreDocDatathrows a Promise while it is waiting for a response from Firestore. Suspense will catch the Promise and renderfallbackuntil the Promise is resolved.
Replace the App function with the following:
//...
function App() {
  return (
    <div className="App">
      {/*
        SuspenseWithPerf behaves the same as Suspense,
        but also automatically measures load times with the User Timing API
        and reports it to Firebase Performance Monitoring
      */}
      <SuspenseWithPerf fallback={'loading burrito status...'} traceId={'load-burrito-status'}>
        <Burrito />
      </SuspenseWithPerf>
    </div>
  );
}
//...-
Run your app.
yarn start # or npm run start -
Edit the value of
yummyin the Database tab in the Firebase console and watch it update in real time in your app! 🔥🔥🔥
SuspenseWithPerf will lazy load the Firebase Performance Monitoring library and report on on our custom trace, load-burrito-status, that we set in the traceId prop of SuspenseWithPerf. In addition, it will automatically measure common performance stats!
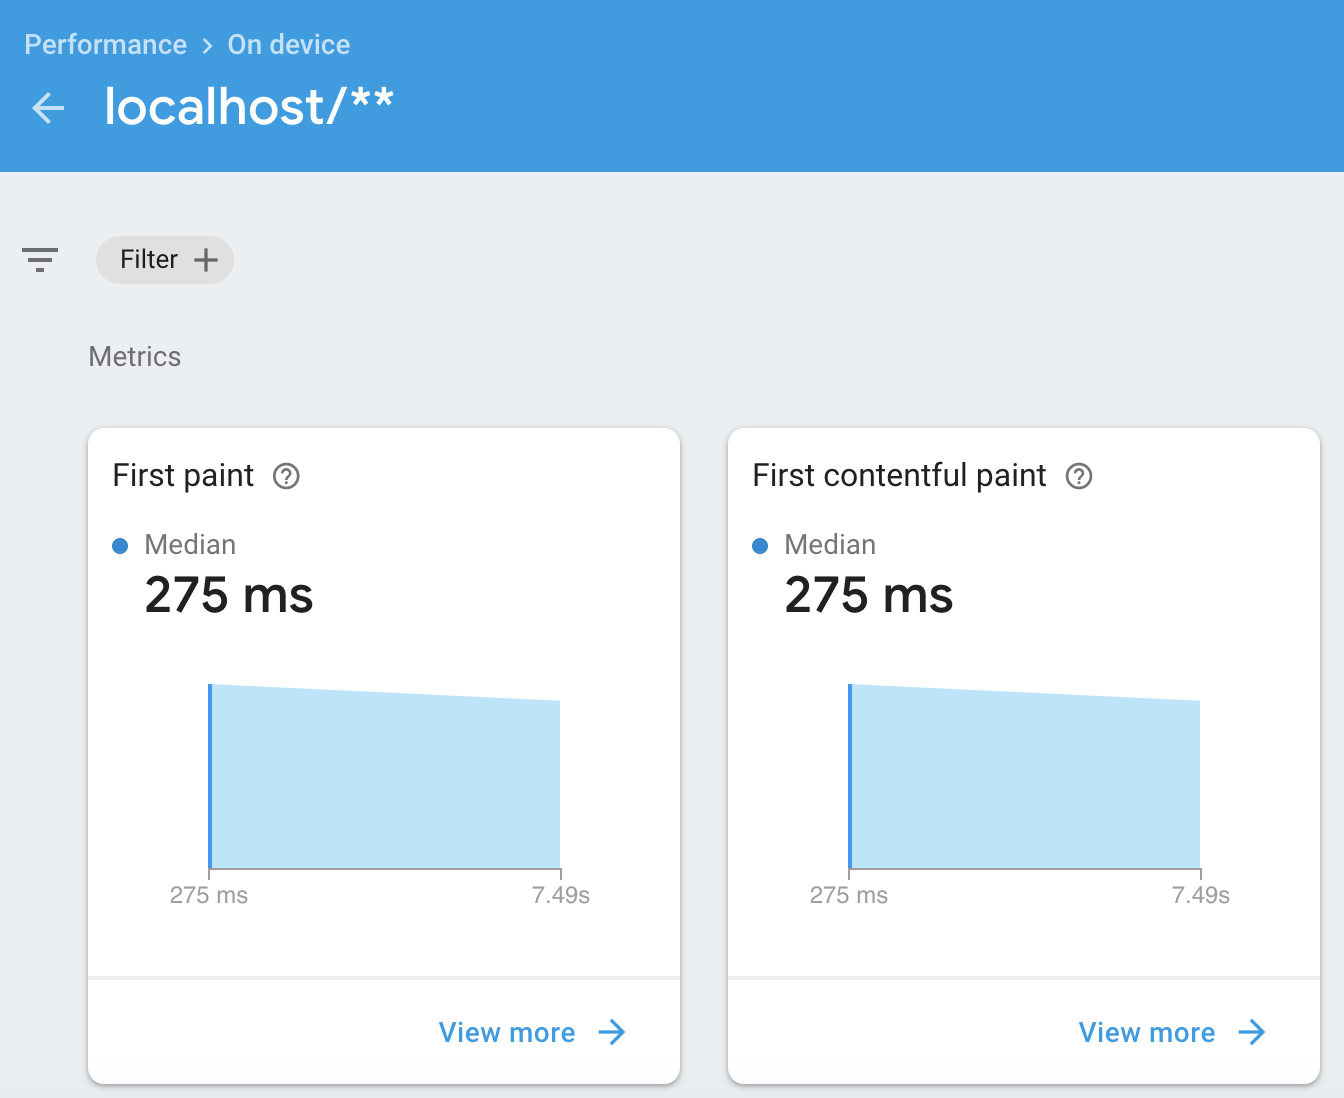
Note that Firebase Performance Monitoring can take about 12 hours to crunch your data and show it in the Performance tab of the Firebase console.
This is an example of some of the stats in the Firebase Performance Monitoring console after 12 hours:
To explore information on using ReactFire, check out Common Use Cases.