-
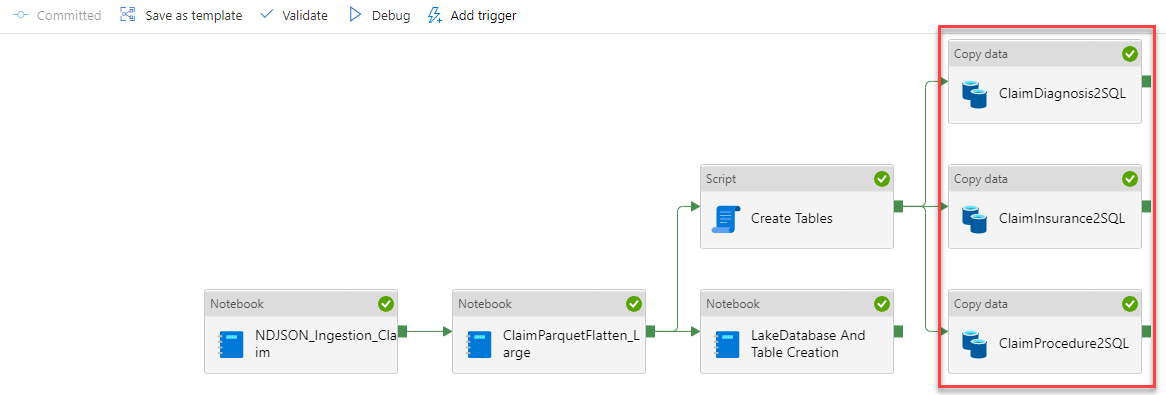
This pipeline takes the JSON data that is in FHIR standard format from our "raw" ADLS container and converts it to parquet. Since Parquet is a columnar compressed file format this makes it much faster to import and work with the data. We store the parquet output in our "processed" container in ADLS under a folder called claim.

-
We plan to eventually load this data into Dedicated SQL Pool across 3 tables representing Diagnosis, Insurance, and Procedures. We need to extract the data needed for each table, clean it, and write it back to ADLS. The second activity in our pipeline handles all of this in a single Synapse Spark Notebook.

-
Now that the data is prepared and cleaned we are ready to load it into our Dedicated Pool, but we need to create the schema and tables first. We have a script activity that will run against our Dedicated Pool to create these artifacts for us.
Note: Make sure your Dedicated Pool is running prior to executing this pipeline. You can see this in the SQL Pools tab under the Manage Hub.

-
We are now all setup with data ready to go and tables to load it in and we'll use a Copy Activity for each table and load them in parallel.
-
There is one last thing in our pipeline. We have some data engineers that will need to explore the data in the lake to understand how they can enable new work streams for the business. They are currently skilling up in PySpark, but until then we need to give them the ability to explore the data through TSQL. We have created a Notebook activity that creates the meta data for SQL Tables on top of the data in our data lake. You'll be able to play around with some exploration scripts in a later activity.

Prior to running the claims pipeline (FHIR_Pipeline4Claim_Spark_OC) you will need to set the pipeline parameters to use the artifact names you chose during deployment. Go to the integrate hub, expand the claims folder, and select the pipeline to open it.

Once the pipeline opens you will need to click somewhere on the canvas (open space or background) to see the pipeline level parameters. This means that NONE of the activities should be highlighted or selected. Now select the Parameters tab in the bottom pane to view the pipeline level parameters.

Change the default value for each of the following five parameters to what you chose during deployment:
- StorageName - This is the name of your Synapse workspace ADLS account
- DatabaseName - This is the name of your database in Synapse Dedicated SQL Pool
- ServerName - This is the name of your Synapse Dedicated SQL Pool
- SparkPoolName - This is the name of your Synapse Spark Pool
- DatasetSize - This is either "1tb" or "30tb" depending on which size dataset you want to use
- You need to hit the debug button to kick off the pipeline run.
Note: Make sure your Dedicated Pool is running prior to executing this pipeline. You can see this in the SQL Pools tab under the Manage Hub.
