Table of Contents
- Overview
- ML Pipeline Tasks
- Kubeflow
- Overview & Components
- Jupyter Notebooks Hub
- Kubeflow Pipelines
- Kale Jupyter Notbook to Pipeline Conversion
- Parameter Tuning using Katib
- Model Registry
- Kubeflow Serving
- Kubeflow Operators
- Kuebflow GPUs
- Building and Deploying Machine Learning Pipelines
- A Dummies’ guide to building a Kubeflow Pipeline
- How continuous batching enables 23x throughput in LLM inference while reducing p50 latency
- Kubeflow: Streamlining Machine Learning Workflows on Kubernetes
- Automating Kubeflow Pipelines with GitOps, GitHub Actions and Weave Flagger
- 7 Frameworks for Serving LLMs - a comprehensive guide into LLMs inference and serving with detailed comparison
- Case Study: Amazon Ads Uses PyTorch and AWS Inferentia to Scale Models for Ads Processing
- GPU - CUDA Programming Model
- GPU - CUDA Interview questions on CUDA Programming?
- Improving GPU Utilization in Kubernetes
- Kubeflow pipelines (part 1) — lightweight components
- Automate prompt tuning for large language models using KubeFlow Pipelines
- Building a ML Pipeline from Scratch with Kubeflow – MLOps Part 3
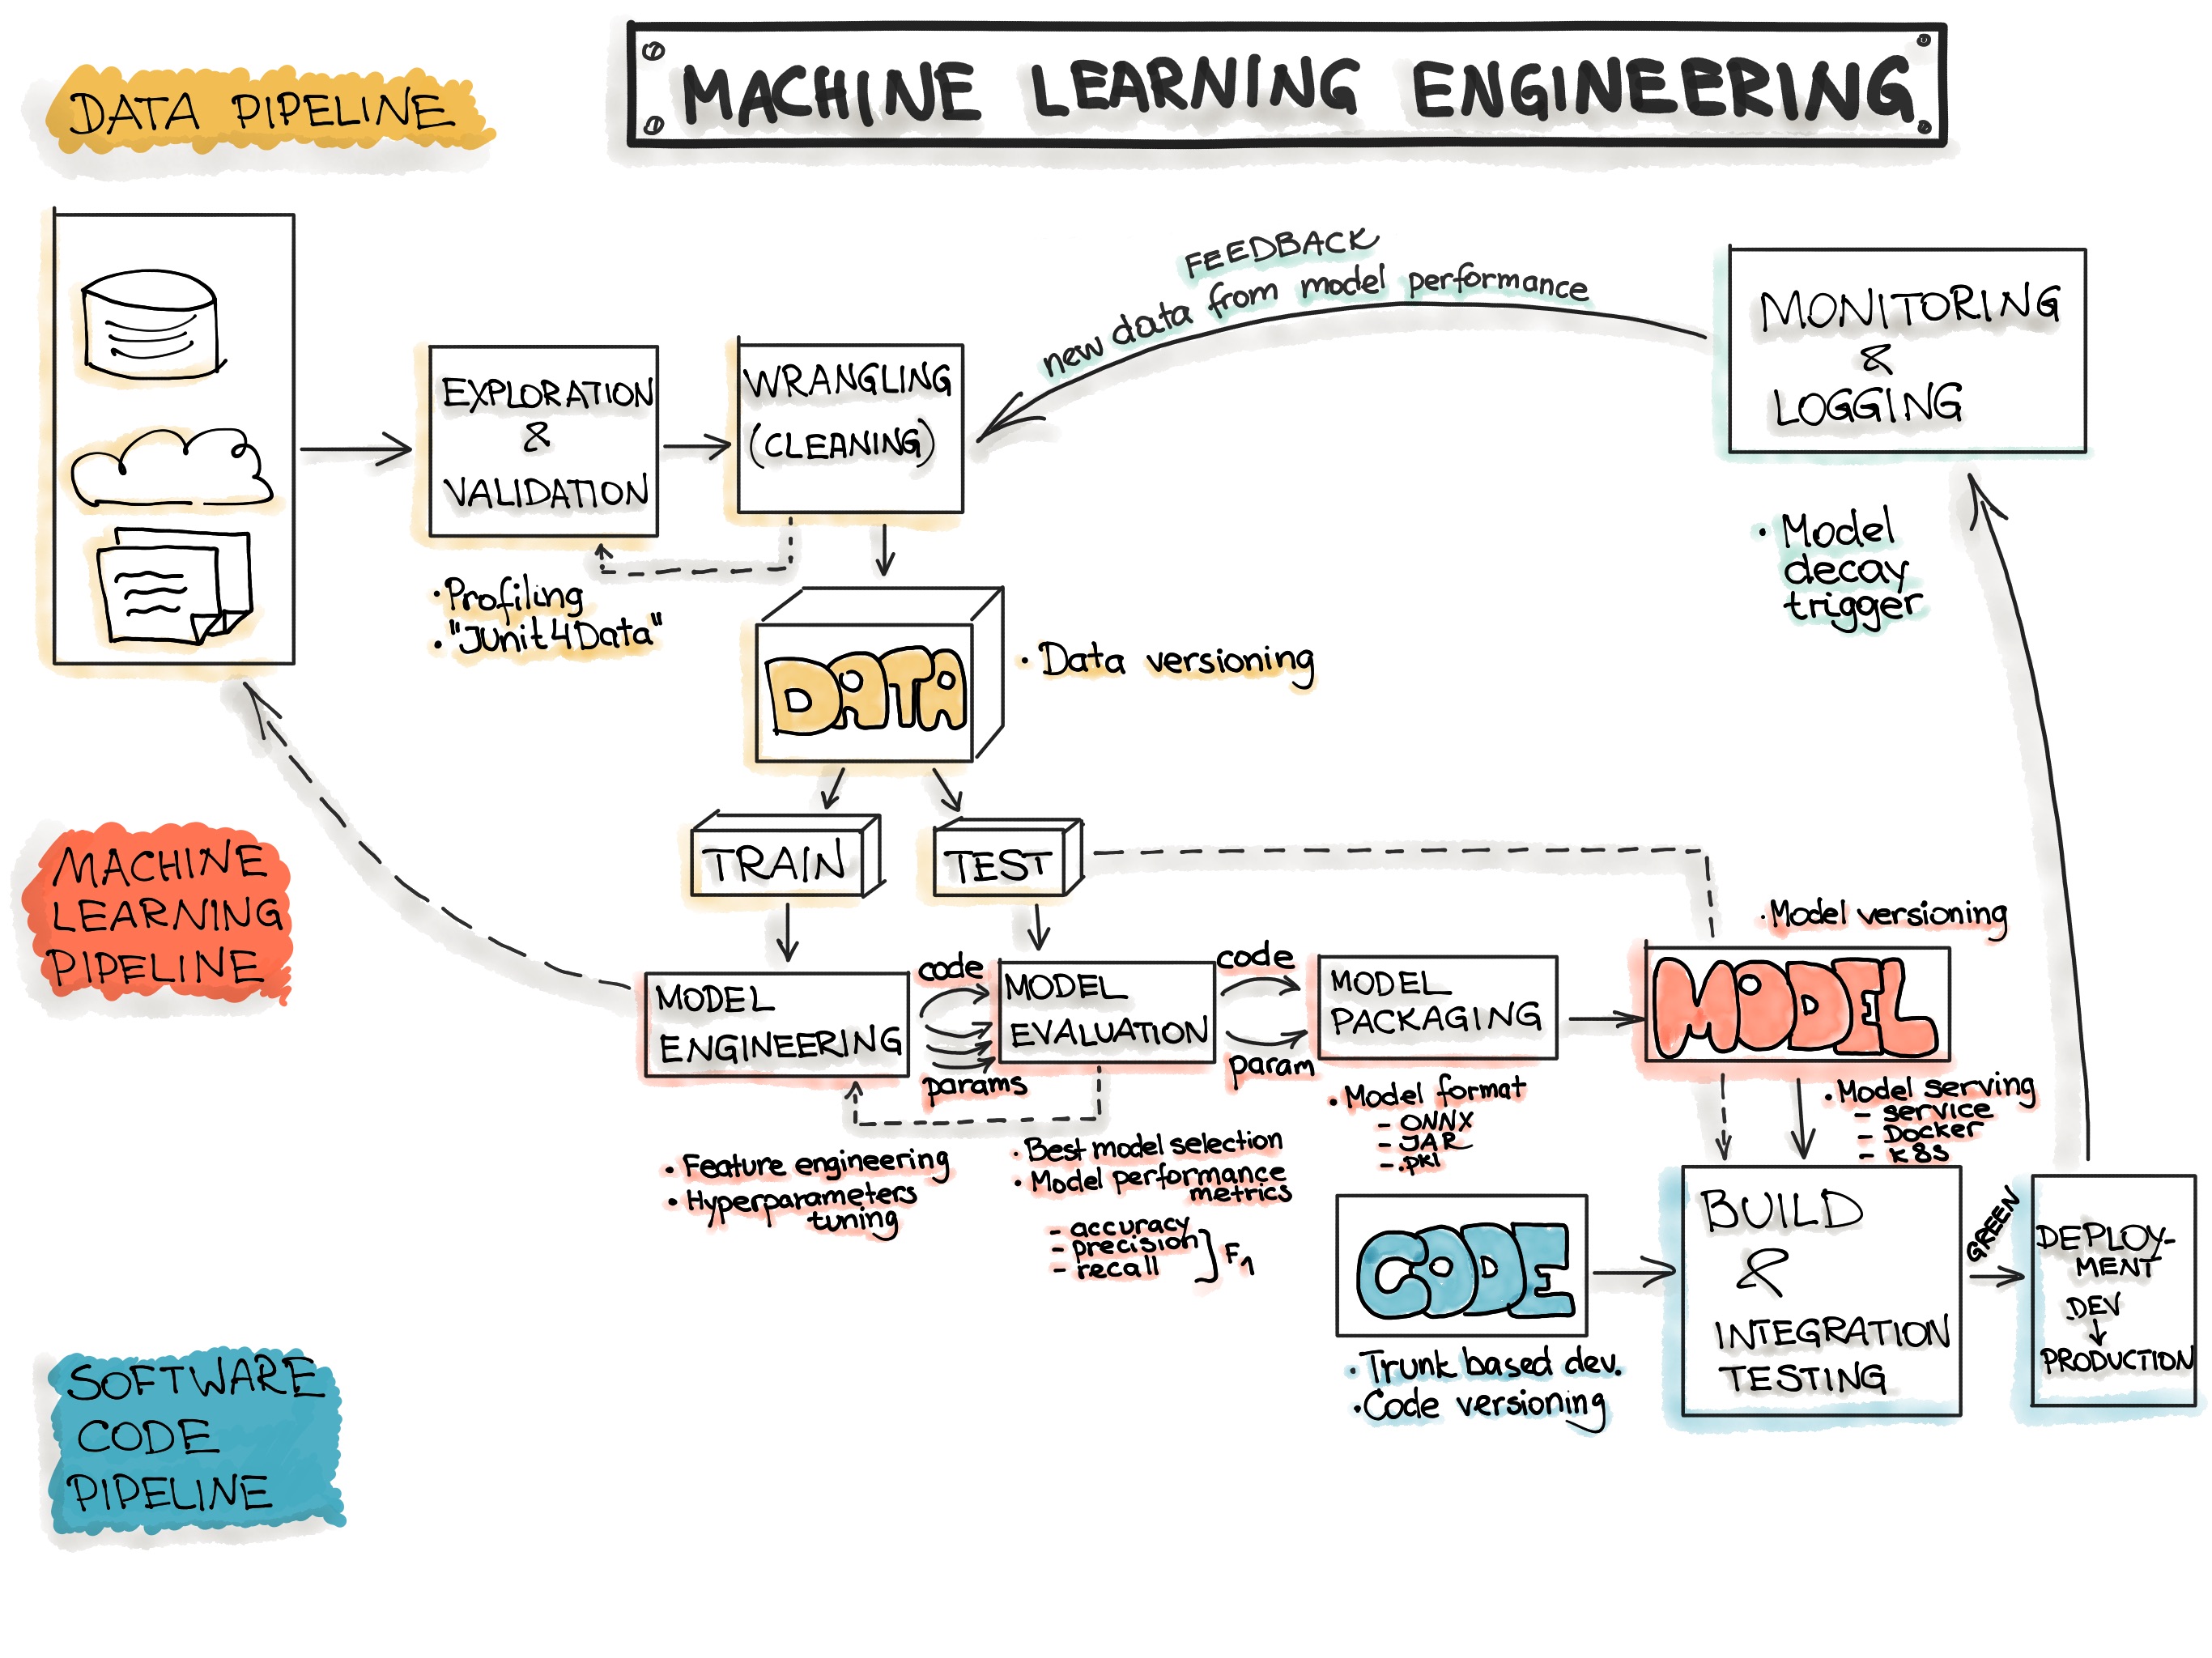
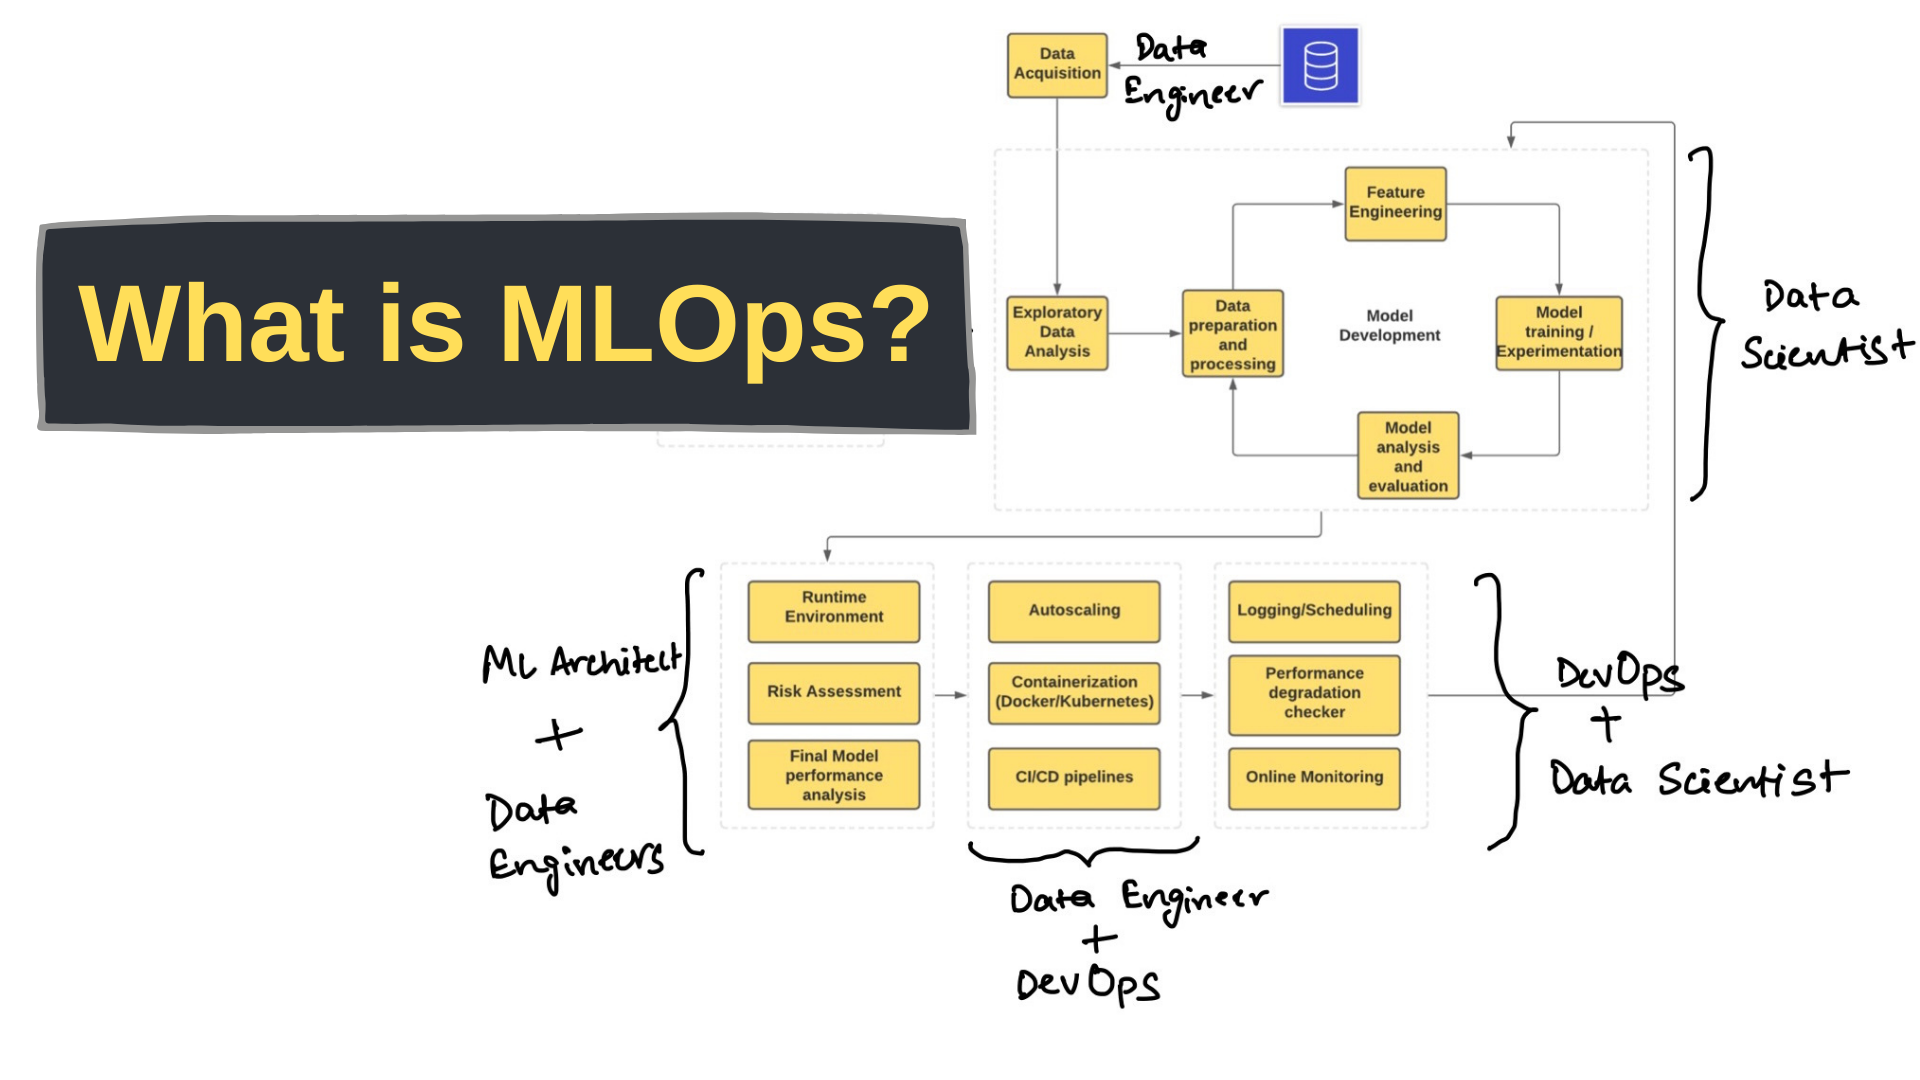
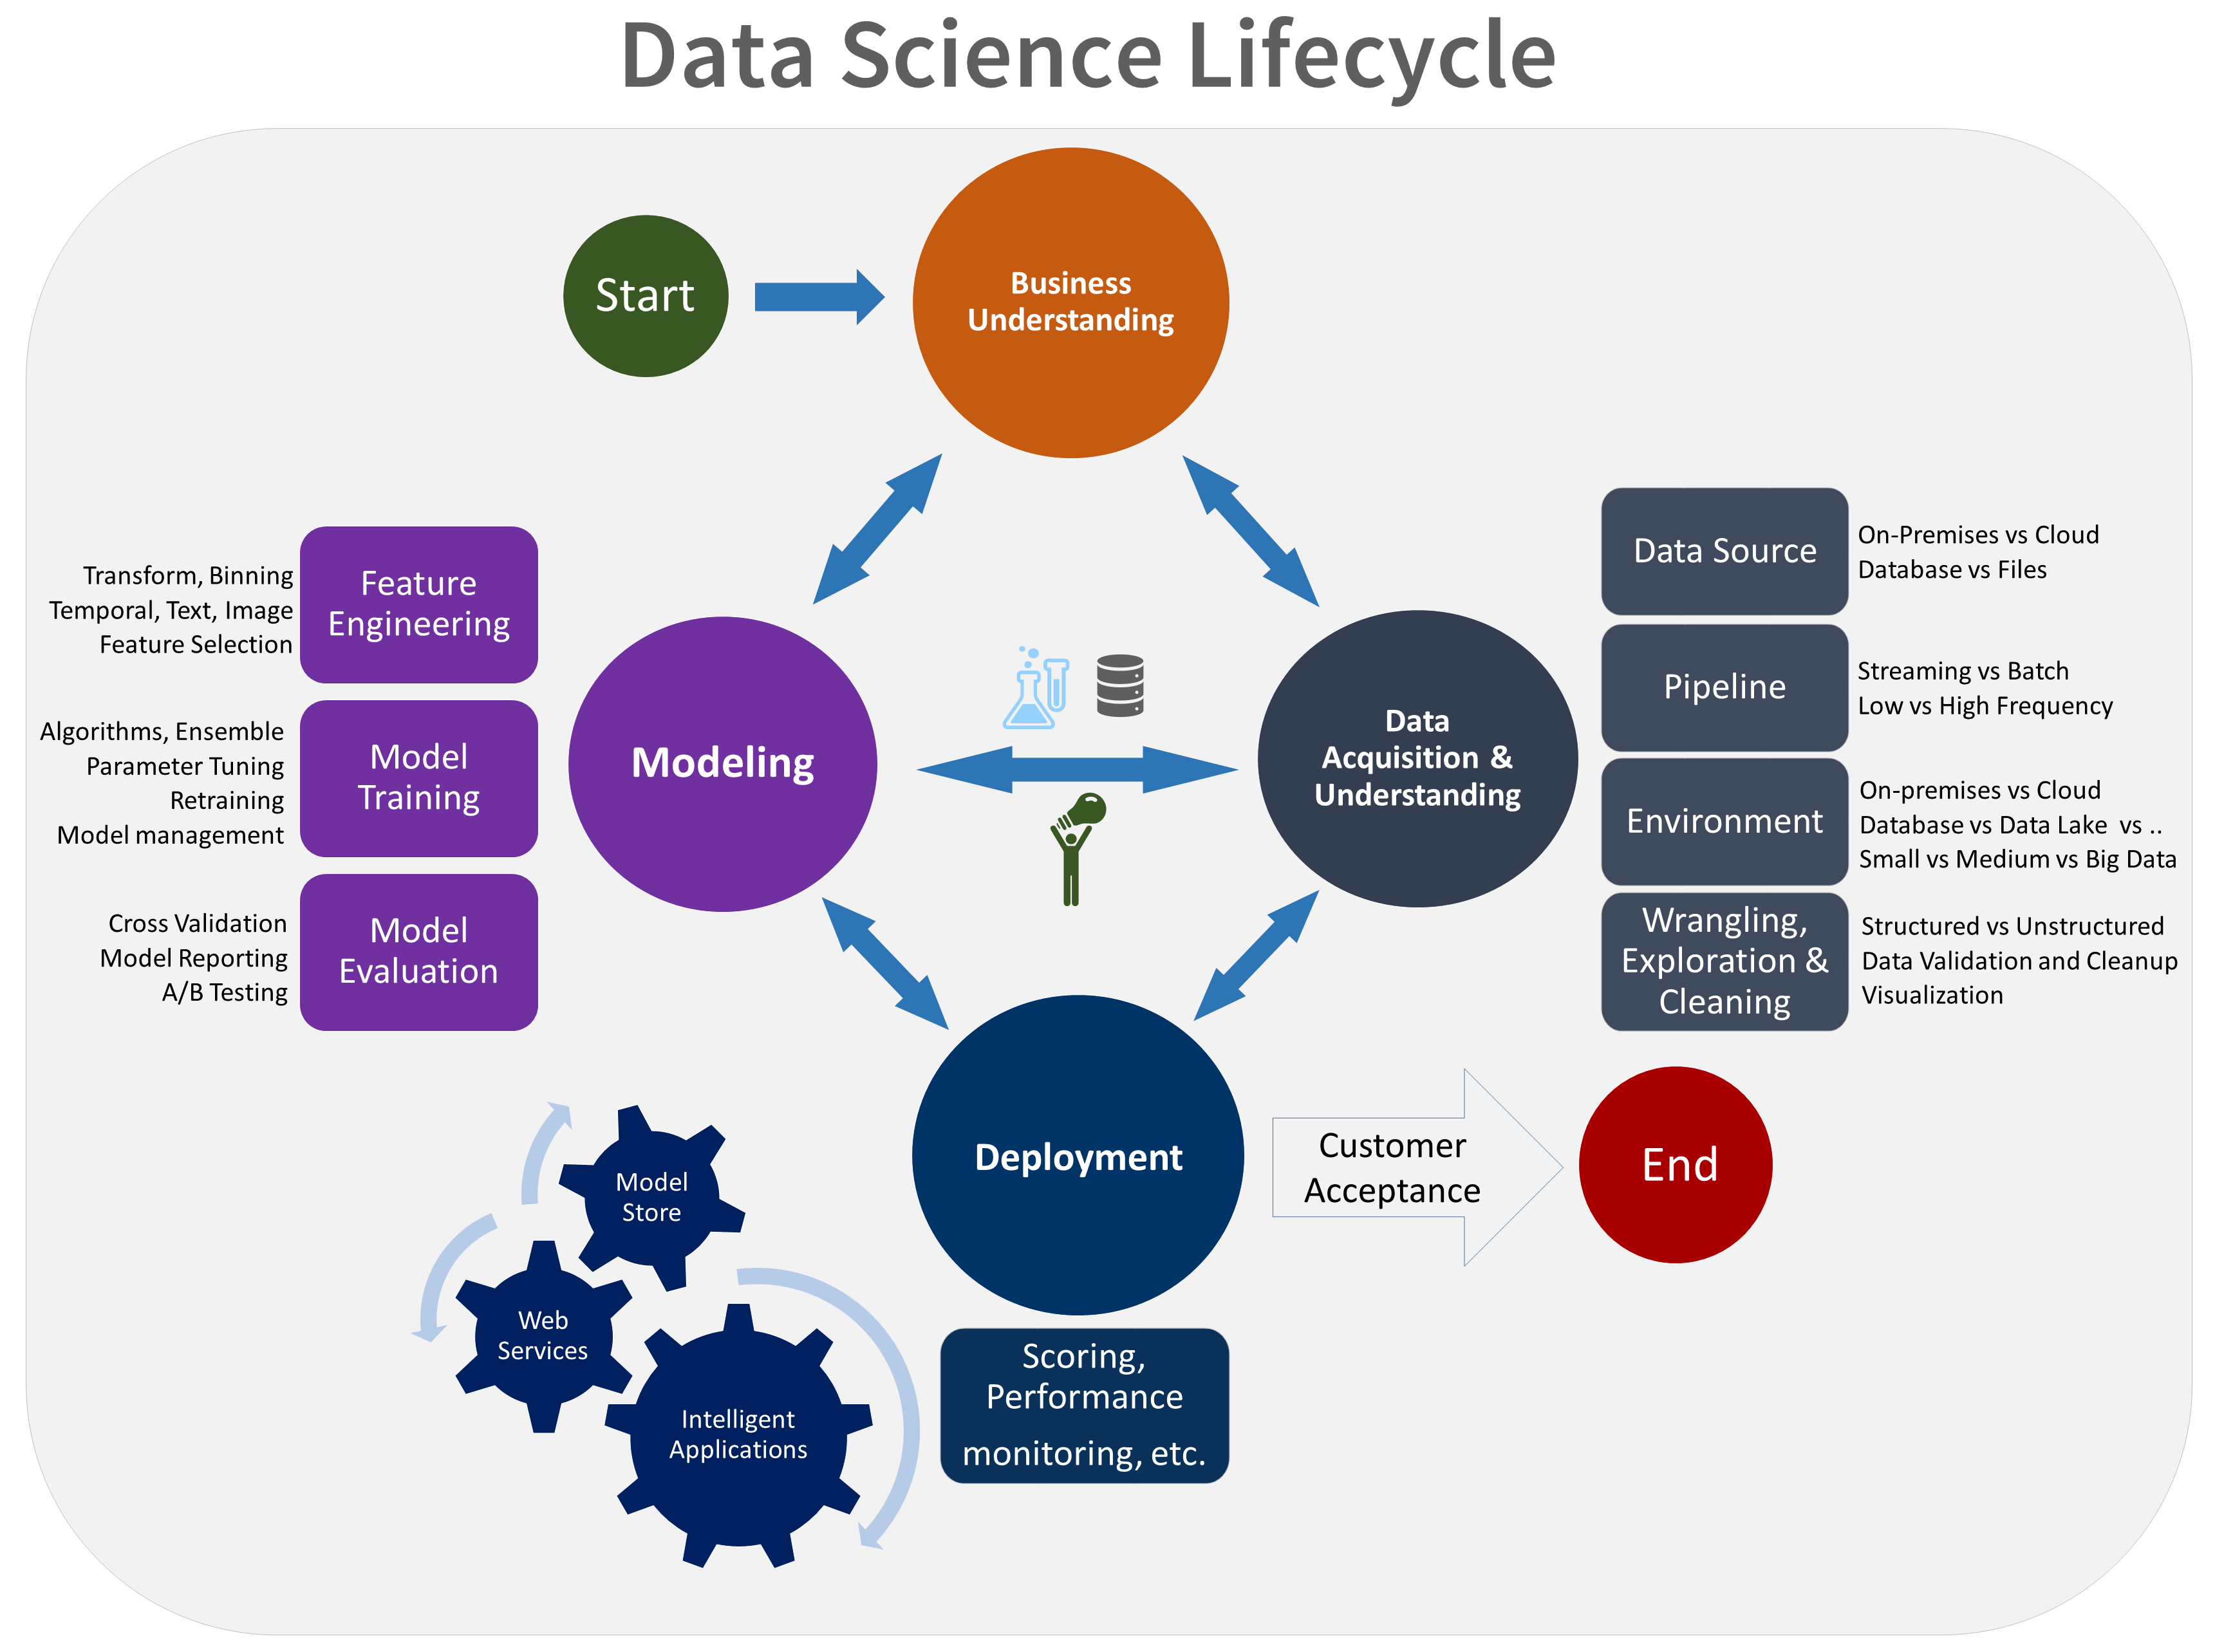
A picture speaks a thousand words
 |
 |
 |
- Data Acquistion
- Crawler & Scraper
- Data Ingestion Processing: Streaming, Batch
- Data Validation
- Data Wrangling & Cleaning
- Text
- Raw Text, Tokenization, Word embeddings,
- Text
- Data Versioning
- Exploratory Data Analysis
- Transform, Binning Temporarl
- Clean, Normalize, Impute Missing, Extract Features, Encode Features,
- Feature Selection
- Feature Store
- Model Packaging
- .pkl
- ONNX
- TorchScript
- Containerization
pickle (and joblib by extension), has some issues regarding maintainability and security. Because of this,
- Never unpickle untrusted data as it could lead to malicious code being executed upon loading.
- While models saved using one version of scikit-learn might load in other versions, this is entirely unsupported and inadvisable.
ONNX is a binary serialization of the model
Predictive Model Markup Language (PMML) format might be a better approach than using pickle alone.
TorchServe provides a utility to package all the model artifacts into a single TorchServe Model Archive File (MAR). After model artifacts are packaged into a MAR file, you then upload to the model-store under the model storage path.
ONNX (Open Neural Network Exchange), an open-source format for representing deep learning models, was developed by Microsoft and is now managed by the Linux Foundation. ONNX resolves this issue by providing a standard format that multiple deep learning frameworks, including TensorFlow, PyTorch, and Caffe2 can use. With ONNX, models can be trained in one framework and then easily exported to other frameworks for inference, making it convenient for developers to experiment with different deep learning frameworks and tools without having to rewrite their models every time they switch frameworks. It can execute models on various hardware platforms, including CPUs, GPUs, and FPGAs, making deploying models on various devices easy.
Spawn up a shared-persistent storage across the cluster to store models
ONNX uses protobuf to serialize the graph
- Model Training
- Model validation
- Hyperparameter Tuning
- Best Model Selection
- Cross Validation
Explain model deployment or inference pipelines (CD- Continuous Delivery)? How production serving is done? How instrumentation works (logging, monitoring, observability)? - TorchServe, TensorRT
-
Model Serving
- KServe Vs. TorchServe
- K8s, Docker
- Service - gRPC Vs. REST Vs. Client Libraries
-
Performance, Benchmarking
-
Scoring & Monitoring
- Experiment Tracking
Kubeflow enables you to set up CI/CD pipelines for your machine learning workflows. This allows you to automate the testing, validation, and deployment of models, ensuring a smooth and scalable deployment process.
Where models are stored in Kubeflow? What is a model registry (Or) model repository? Is your models stored in S3? What are popular tools for model store/registry? How models are versioned?
https://github.com/kubeflow/model-registry is th answers. Looks like its still in alpha version
Kubeflow provides a centralized model repository for storing, versioning, and managing ML models. This is called the Kubeflow Model Registry.
- Kubeflow Model Registry stores the model artifacts (weights, hyperparameters etc) in a storage service like S3 or GCS. The metadata (name, version, path etc) is stored in a database like MySQL, PostgreSQL etc.
- Metadata like model name, version etc are stored in a database.
- Using the model registry, models can be versioned, searched, deployed and integrated into ML pipelines in a centralized way. It provides features like model lineage, model security, governance etc.
- To version models, each model build or iteration can be assigned a unique version number or id. New model versions can be registered and looked up by version. Older versions are retained for record keeping.
Claude/ChatGPT Prompt: Show me Kubeflow code snippet to store a model into model registry? Also show code for to fetch a model from model repository using kubeflow pipelines SDK?
- Registry Server (kubeflow-model-registry-server) & Registry UI (kubeflow-model-registry-ui)
- ML Metadata DB: ml-pipeline-ui-db, ml-pipeline-mysql
- Minio Object Storage: minio
- PostgreSQL for ML Metadata: kubeflow-ml-pipeline-db
- Model Inference Servers: kfserving-tensorflow-inference-server, triton-inference-server
- Push Model Utility (kubeflow-push-model), Fetch Model Utility (kubeflow-fetch-model) & Model Converter (kubeflow-model-converter)
The push-model container provides a Python SDK and CLI to upload model artifacts and metadata to the registry.
push_model_op = kfp.components.load_component_from_url('kubeflow-push-model')- Kubeflow registry for internal model management
- HF Model Hub to leverage public/shared models
Hugging Face Model Hub
-Public repository of a broad range of ML models -Emphasis on easy sharing and use of models -Integrates with Hugging Face libraries like Transformers -Includes preprocessed datasets, notebooks, demos
Pipelines are used to chain multiple steps into an ML lifecycle - data prep, train, evaluate, deploy.
A ContainerOp represents an execution of a Docker container as a step in the pipeline. Some key points:
- Every step in the pipeline is wrapped as a ContainerOp. This encapsulates the environment and dependencies for that step.
- Behind the scenes, the ContainerOp creates a Kubernetes Pod with the specified Docker image to run that step.
- So yes, containerizing every step introduces computational overhead vs just running Python functions. The containers can be slow to spin up and add resource usage.
- However, the benefit is that each step runs in an isolated, reproducible environment. This avoids dependency conflicts between steps.
- ContainerOps also simplify deployment. The pipeline itself is a portable Kubernetes spec that can run on any cluster.
For Python code, the func_to_container_op decorator allows you to convert Python functions to ContainerOps easily.
For performance critical sections, you can optimize by:
- Building custom slim Docker images
- Using the dsl.ResourceOp construct for non-container steps
- Group multiple steps in one ContainerOp
- Tuning Kubernetes Pod resources
So in summary, ContainerOps trade off some performance for better encapsulation, portability and reproducibility. For a production pipeline, optimizing performance is still important.
ResourceOps in Kubeflow Pipelines allow defining pipeline steps that don't execute as Kubernetes Pods or ContainerOps.
-
Jobs are standalone, reusable ML workflow steps e.g. data preprocessing, model training.
-
Pipelines stitch together jobs into end-to-end ML workflows with dependencies.
-
Use jobs to encapsulate reusable ML functions - data processing, feature engineering etc.
-
Use jobs within a pipeline to break up the pipeline into reusable components.
-
Kubeflow jobs leverage composable kustomize packages making reuse easier. Kubernetes jobs use vanilla pod templates.
Difference between saving ML model & packaging a model? What are differtent formats for packaging model?
Saving a model involves persisting just the core model artifacts like weights, hyperparameters, model architecture etc. This captures the bare minimum needed to load and use the model later.
Packaging a model is more comprehensive - it bundles the model with any additional assets needed to deploy and serve the model. This allows portability. Model packaging includes:
- Saved model files
- Code dependencies like Python packages
- Inference code
- Environment specs like Dockerfile
- Documentation & Metadata like licenses, model cards etc
Containerizing can be considered a form of model packaging, as it encapsulates the model and dependencies in a standardized unit for deployment.
Model packaging formats:
- Docker image - Bundle model as microservice
- Model archival formats - ONNX, PMML
- Python package - For use in Python apps
Why not use containers as the delivery medium for models?
It is fortunate that Kubernetes supports the concept of init-containers inside a Pod. When we serve different machine learning models, we change only the model, not the serving program. This means that we can pack our models into simple model containers, and run them as the init-container of the serving program. We also include a simple copy script inside of our model containers that copies the model file from the init container into a volume so that it can be served by the model serving program.
https://github.com/chanwit/wks-firekube-mlops/blob/master/example/model-serve.yaml
Here is a list of some of the key operators in Kubeflow:
Kubeflow Pipelines operators:
Argoproj Workflow Operator - Manages and executes pipelines
Persistent Agent - Caches data for pipelines agents
ScheduledWorkflow Operator - Handles scheduled/cron workflows
Notebooks operators:
Jupyter Web App Operator - Manages Jupyter notebook web interfaces
Notebook Controller Operator - Handles lifecycle of notebook servers
Serving operators:
KFServing Operator - Manages model inference services
Seldon Deployment Operator - Manages running Seldon inference graphs
Inference Services Operator - Deprecated operator for TF Serving
Training operators:
MPI Operator - Handles distributed MPI training jobs
PyTorch Operator - Manages PyTorch training jobs
TFJob Operator - Manages TensorFlow training jobs
Misc operators:
Kubeflow Namespace Operator - Installs components in kubeflow namespace
Profile Controller - Records detailed profiles of runs
Studyjob Operator - Hyperparameter tuning using Katib
Volumes Web App - Manages PVC and volumes
The core operators for pipelines, notebooks and model serving/inference provide end-to-end ML workflow functionality on Kubernetes. The training operators support orchestrated model training jobs.
There are also various utility operators for management, tuning, monitoring etc. Many operators are being consolidated under KServe umbrella.
Hyperparameter tuning aims to find the best combination of hyperparameters to optimize a specific metric (e.g., accuracy, loss) for a given model.
Katib (AutoML) supports hyperparameter tuning, early stopping, and neural architecture search (NAS). Katib is agnostic to ML frameworks and can tune hyperparameters for applications written in any language.
Katib automates this process by exploring different hyperparameter configurations to find the optimal settings for your model.
or applications written in any language.
Creating a Hyperparameter Tuning Experiment:
Define an Experiment in Katib:
    Specify the objective metric (e.g., validation accuracy).
    Define the search space for hyperparameters (min/max values or allowable values).
    Choose a search algorithm (e.g., Bayesian optimization, random search).
    Create the Katib Experiment using Kubernetes Custom Resource Definitions (CRDs).
Running Trials:
Katib runs several training jobs (Trials) within each Experiment.
Each Trial tests a different set of hyperparameter configurations.
The training code evaluates each Trial with varying hyperparameters.
Optimization Process:
Katib optimizes the objective metric by exploring different hyperparameter combinations.
It uses algorithms like Bayesian optimization, Tree of Parzen Estimators, and more.
At the end of the Experiment, Katib outputs the optimized hyperparameter values.
Example: Hyperparameter Tuning for a Neural Network:
Suppose we’re training a neural network for image classification.
We define an Experiment in Katib:
    Objective: Maximize validation accuracy.
    Search space: Learning rate (0.001 to 0.1), batch size (16 to 128), and dropout rate (0.1 to 0.5).
    Search algorithm: Bayesian optimization.
Katib runs multiple Trials, each with different hyperparameter values.
After several Trials, Katib identifies the best hyperparameters for maximizing validation accuracy.
Write code for hyperparameter tuning for xgboost using kubeflow pipelines? where the multi fold cross validation information is stored? how best model is detected?
import kfp
from kfp import dsl
from kfp.components import func_to_container_op

def xgboost_train(params):
    model = xgb.XGBRegressor(**params)
    model.fit(X_train, y_train)
    return model

@func_to_container_op
def log_metrics(model):
    cv_scores = cross_validate(model, X_train, y_train, cv=5)
    print(cv_scores)
    return model

@dsl.pipeline(
    name='XGBoost-tuning',
    description='Tuning XGBoost hyperparameters using Katib'
)
def xgboost_tuning_pipeline(
    learning_rate = hp.choice(0.01, 0.1),
    n_estimators = hp.choice(100, 200)
):

    xgb_train_op = dsl.components.func_to_container_op(xgboost_train)
    best_hp = tuner.search(xgb_train_op, {
        "learning_rate": learning_rate,
        "n_estimators": n_estimators
    })

    final_model = xgb_train_op(best_hp.to_dict())
    log_metrics(final_model)

if __name__ == '__main__':
kfp.compiler.Compiler().compile(xgboost_tuning_pipeline, __file__ + '.yaml')- KServe is a Kubernetes operator for serving, managing and monitoring machine learning models on Kubernetes.
- KServe supports multiple inference runtimes like TensorFlow, PyTorch, ONNX, XGBoost.
- KServe can leverage GPU acceleration libraries like TensorRT for optimized performance.
- For PyTorch, KServe integrates with TorchServe to serve PyTorch models.
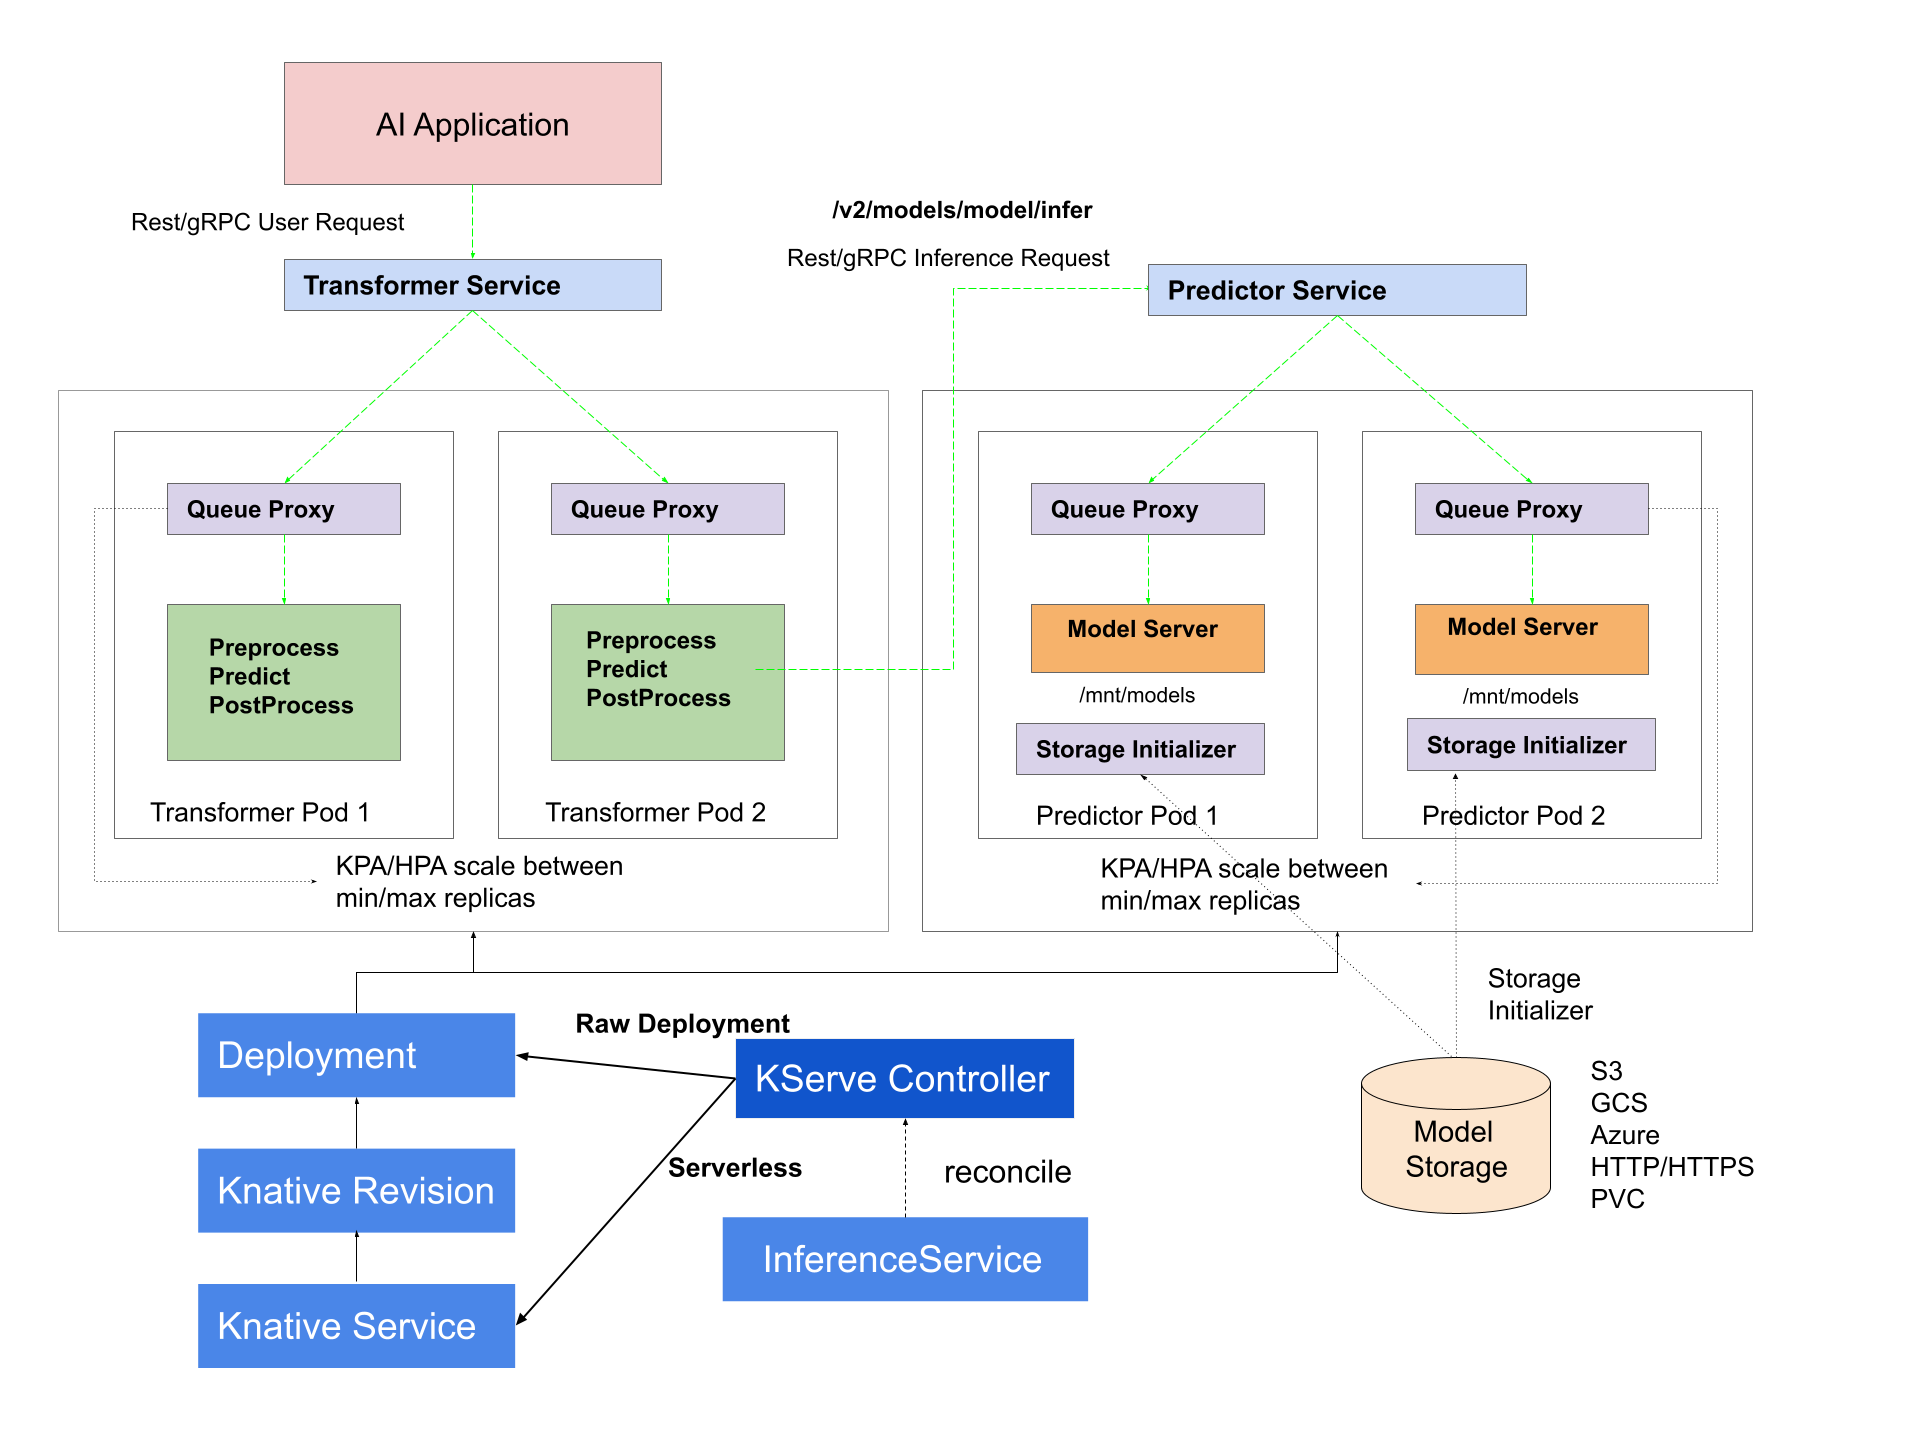
KServe provides a Kubernetes Custom Resource Definition for serving machine learning (ML) models on arbitrary frameworks. It aims to solve production model serving use cases by providing performant, high abstraction interfaces for common ML frameworks like Tensorflow, XGBoost, ScikitLearn, PyTorch, and ONNX.
It encapsulates the complexity of autoscaling, networking, health checking, and server configuration to bring cutting edge serving features like GPU Autoscaling, Scale to Zero, and Canary Rollouts to your ML deployments. It enables a simple, pluggable, and complete story for Production ML Serving including prediction, pre-processing, post-processing and explainability.
Model Serving Runtimes
KServe provides a simple Kubernetes CRD to enable deploying single or multiple trained models onto model serving runtimes such as TFServing, TorchServe, Triton Inference Server. In addition ModelServer is the Python model serving runtime implemented in KServe itself with prediction v1 protocol, MLServer implements the prediction v2 protocol with both REST and gRPC. These model serving runtimes are able to provide out-of-the-box model serving, but you could also choose to build your own model server for more complex use case.
SKLearn MLServer TorchServe
Deploy a PyTorch Model with TorchServe InferenceService
KServe supports the implementation of Knative Pod Autoscaler (KPA) and Kubernetes’ Horizontal Pod Autoscaler (HPA).
KServe by default selects the TorchServe runtime when you specify the model format pytorch
apiVersion: "serving.kserve.io/v1beta1"
kind: "InferenceService"
metadata:
  name: "torchserve-mnist-v2"
spec:
  predictor:
    model:
      modelFormat:
        name: pytorch
      protocolVersion: v2
      storageUri: gs://kfserving-examples/models/torchserve/image_classifier/v2
TorchScript is an intermediate representation of a PyTorch model (subclass of nn.Module) that can later run them outside of Python, in a high-performance environment like LibTorch (a C++ native module).
TorchScript is a mechanism for converting your PyTorch models (typically defined using nn.Module subclasses) into a serialized, optimized format. This format, known as a TorchScript model.
TorchScript models can be executed more efficiently on various platforms (CPUs, GPUs, mobile devices) due to optimizations performed by PyTorch's Just-In-Time (JIT) compiler.
It can automate optimizations like,
- Layer fusion
- Quantization
- Sparsification
Refer to Layer Fusion for more information.
PyTorch provides two primary approaches to create TorchScript models:
- Tracing: When using torch.jit.trace you’ll provide your model and sample input as arguments. The input will be fed through the model as in regular inference and the executed operations will be traced and recorded into TorchScript. Logical structure will be frozen into the path taken during this sample execution.
- Scripting: When using torch.jit.script you’ll simply provide your model as an argument. TorchScript will be generated from the static inspection of the nn.Module contents (recursively).
https://towardsdatascience.com/pytorch-jit-and-torchscript-c2a77bac0fff
How to save/load TorchScript modules?
TorchScript saves/loads modules into an archive format. This archive is a standalone representation of the model and can be loaded into an entirely separate process.
    Saving a module torch.jit.save(traced_model,’traced_bert.pt’)
    Loading a module loaded = torch.jit.load('traced_bert.pt')
How to view the PyTorch IR captured by TorchScript?
Example 1: Use traced_model.code to view PyTorch IR
Skipping this as it’s very verbose
Example 2: Use script_cell_gpu.code to view PyTorch IR
def forward(self,
    input: Tensor) -> Tensor:
  _0 = self.fc
  _1 = self.avgpool
  _2 = self.layer4
  _3 = self.layer3
  _4 = self.layer2
  _5 = self.layer1
  _6 = self.maxpool
  _7 = self.relu
  _8 = (self.bn1).forward((self.conv1).forward(input, ), )
  _9 = (_5).forward((_6).forward((_7).forward(_8, ), ), )
  _10 = (_2).forward((_3).forward((_4).forward(_9, ), ), )
  input0 = torch.flatten((_1).forward(_10, ), 1, -1)
  return (_0).forward(input0, )
TensorRT optimizes and executes compatible subgraphs, letting deep learning frameworks execute the remaining graph
- TensorRT is designed to optimize deep learning models for inference on NVIDIA GPUs, which results in faster inference times.
- TensorRT performs various optimizations on the model graph, including layer fusion, precision calibration, and dynamic tensor memory management to enhance inference performance.
During the optimization process, TensorRT performs the following steps:
- Parsing: TensorRT parses the trained model to create an internal representation.
- Layer fusion: TensorRT fuses layers in the model to reduce memory bandwidth requirements and increase throughput.
- Precision calibration: TensorRT selects the appropriate precision for each layer in the model to maximize performance while maintaining accuracy.
- Memory optimization: TensorRT optimizes the memory layout of the model to reduce memory bandwidth requirements and increase throughput.
- Kernel selection: TensorRT selects the best kernel implementation for each layer in the model to maximize performance.
- Dynamic tensor memory management: TensorRT manages the memory required for intermediate tensors during inference to minimize memory usage.
TensorRT is better than TorchScript in terms of performance.
[Accelerating Inference Up to 6x Faster in PyTorch with Torch-TensorRT]https://developer.nvidia.com/blog/accelerating-inference-up-to-6x-faster-in-pytorch-with-torch-tensorrt/
- nvidia-smi
- gpustat
- nvtop & nvitop
- nvidia_gpu_exporter & promotheous
- DCGM Prometheus exporters to monitor GPU statistics in real time.
- Clock Speed: nvidia-smi -q -d CLOCK
- Power Consumption: nvidia-smi -q -d POWER
- Memory Usage: nvidia-smi -q -d MEMORY
- Performance: nvidia-smi -q -d PERFORMANCE # Displays the “P” state of a GPU. P state refers to the current performance of a GPU.
- Temperature:
P state refers to the current performance of a GPU.
GPU’s Performance (P) States,
- P0 and P1 are the power states when the GPU is operating at its highest performance level.
- P2/P3 is the power state when the GPU is operating at a lower performance level.
- P6-P12 is the power state when the GPU is operating at a low power level to an idle state. The higher the P number, the lower the performance.
Built a comprehensive framework for feature creation, versioning, and serving in both real-time and batch modes.
It uses offline store (S3) & online store (AWS Redshift)
Data Infrastructure Layer: Where It All Begins The Data Infrastructure Layer is the backbone of your feature store. It’s responsible for the initial stages of your data pipeline, including data ingestion, processing, and storage.
Serving Layer: API-Driven Feature Access
The Serving Layer is your “customer service desk,” the interface where external applications and services request and receive feature data.
Application Layer: The Control Tower
The Application Layer serves as the orchestrator for your feature store.
Feature Store Architecture and How to Build One
comply with GDPR or similar regulations,
use Amazon EFS as the storage layer to store our training datasets.
use Kubeflow on Amazon EKS to implement model parallelism and use Amazon EFS as persistent storage to share datasets.
Machine Learning with Kubeflow on Amazon EKS with Amazon EFS
use DataSync to transfer data from an Amazon EFS file system to an Amazon S3 bucket
Model parallelism is a distributed training method in which the deep learning model is partitioned across multiple devices, within or across instances.
Feature pipelines - Transforms data into features and labels; feature pipeline retrieves data from outside sources, transforms them, and loads them into the feature store Training Pipeline - Train models with features and labels; training pipeline fetches data from the feature store for model training, sends training metadata to an experiment tracker for later analysis, and places the resulting model in the model registry. Inference Pipeliens - Make predictions with few models and new features; inference pipeline loads a model from the model registry. It uses the feature store to retrieve properly transformed features, which it feeds to the model to make predictions that it exposes to downstream applications.
training pipeline can easily load snapshots of training data from tables of features (feature groups). In particular, a feature store should provide point-in-time consistent snapshots of feature data so that your models do not suffer from future data leakage.
NVIDIA GPU Operator uses the operator framework within Kubernetes to automate the management of all NVIDIA software components needed to provision GPU nodes. These components include the NVIDIA drivers (to enable CUDA), Kubernetes device plugin for GPUs, the NVIDIA Container Runtime, automatic node labelling, DCGM based monitoring and others.
The GPU Operator allows administrators of Kubernetes clusters to manage GPU nodes just like CPU nodes in the cluster. Instead of provisioning a special OS image for GPU nodes, administrators can rely on a standard OS image for both CPU and GPU nodes and then rely on the GPU Operator to provision the required software components for GPUs.
The NVIDIA GPU Operator enables oversubscription of GPUs through a set of extended options for the NVIDIA Kubernetes Device Plugin. GPU time-slicing enables workloads that are scheduled on oversubscribed GPUs to interleave with one another.
This mechanism for enabling time-slicing of GPUs in Kubernetes enables a system administrator to define a set of replicas for a GPU, each of which can be handed out independently to a pod to run workloads on. Unlike Multi-Instance GPU (MIG), there is no memory or fault-isolation between replicas, but for some workloads this is better than not being able to share at all. Internally, GPU time-slicing is used to multiplex workloads from replicas of the same underlying GPU.
A typical resource request provides exclusive access to GPUs. A request for a time-sliced GPU provides shared access. A request for more than one time-sliced GPU does not guarantee that the pod receives access to a proportional amount of GPU compute power.
A request for more than one time-sliced GPU only specifies that the pod receives access to a GPU that is shared by other pods. Each pod can run as many processes on the underlying GPU without a limit. The GPU simply provides an equal share of time to all GPU processes, across all of the pods.
Multi-Instance GPU (MIG) allows GPUs based on the NVIDIA Ampere architecture (such as NVIDIA A100) to be securely partitioned into separate GPU Instances for CUDA applications.
If the cluster has multiple node pools with different GPU types, you can specify the GPU type by the following code.
import kfp.dsl as dsl
gpu_op = dsl.ContainerOp(name='gpu-op', ...).set_gpu_limit(2)
gpu_op.add_node_selector_constraint('cloud.google.com/gke-accelerator', 'nvidia-tesla-p4')
The code above will be compiled into Kubernetes Pod spec:
container:
  ...
  resources:
    limits:
      nvidia.com/gpu: "2"
nodeSelector:
  cloud.google.com/gke-accelerator: nvidia-tesla-p4


