Zalecane: API 30.
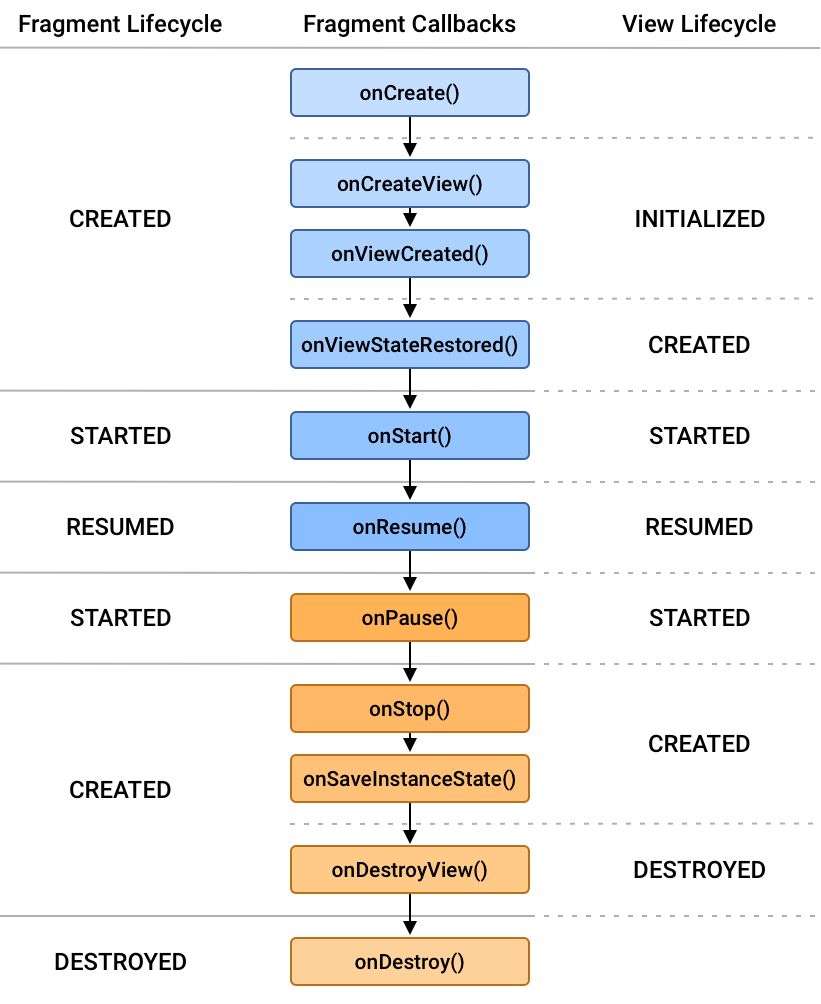
Fragment reprezentuje zachowanie lub część interfejsu użytkownika w aktywności. Wiele fragmentów można łączyć w jedną całość, aby utworzyć wieloplatformowy interfejs użytkownika i ponownie użyć fragmentu w wielu działaniach. Fragment można interpretować jako modułową sekcję aktywności, która ma własny cykl życia, odbiera własne zdarzenia wejściowe i które można dodawać lub usuwać, gdy aktywna jest aktywność (rodzaj podobnej "podgrupy", którą można ponowne wykorzystanie w różnych działaniach). Fragment musi zawsze być osadzony w aktywności, a cykl życia fragmentu ma bezpośredni wpływ na cykl życia aktywności np. gdy aktywność jest wstrzymana, to również wszystkie jej fragmenty.
Źródło: developer.android.com/guide/fragments/lifecycle
-
Utwórz nowy project o nazwie FragmentsApp oraz zdefiniuj plik zasobów układu dla naszego pierwszego fragmentu o nazwie
first_fragment.xml.<?xml version="1.0" encoding="utf-8"?> <LinearLayout xmlns:android="http://schemas.android.com/apk/res/android" android:layout_width="match_parent" android:layout_height="match_parent"> <TextView android:id="@+id/first_fragment_text" android:layout_width="wrap_content" android:layout_height="wrap_content" android:text="" android:textColor="#FFFFFF" android:textSize="35dp" android:textStyle="bold" /> </LinearLayout>
-
Utwórz nowy plik
FirstFragment.kt. Zauważ, że naszFistFragmentnie jest aktywnością. Fragment to nie jest aktywność! Nasza klasaFirstFragmentjest klasą fragmentów. Podobnie jak w przypadku metodyonCreate()wActivity, mamy tutaj metodęonViewCreated().class FirstFragment: Fragment() { lateinit var textView : TextView override fun onCreateView( inflater: LayoutInflater, container: ViewGroup?, savedInstanceState: Bundle? ): View? { return inflater.inflate(R.layout.first_fragment, container, false) } override fun onViewCreated(view: View, savedInstanceState: Bundle?) { super.onViewCreated(view, savedInstanceState) textView = view.findViewById(R.id.first_fragment_text) textView.text = "1st Fragment" } }
-
Utwórz drugi zasób układu dla naszego drugiego fragmentu o nazwie
second_fragment.xml.<?xml version="1.0" encoding="utf-8"?> <LinearLayout xmlns:android="http://schemas.android.com/apk/res/android" android:layout_width="match_parent" android:layout_height="match_parent"> <TextView android:id="@+id/second_fragment_text" android:layout_width="wrap_content" android:layout_height="wrap_content" android:text="" android:textColor="#FFFFFF" android:textSize="35sp" android:textStyle="bold" /> </LinearLayout>
-
Zaimplementujmy teraz drugi fragment w
SecondFragment.kt. Przeanalizuj co się w nim dzieje.class SecondFragment: Fragment() { lateinit var textView : TextView override fun onCreateView( inflater: LayoutInflater, container: ViewGroup?, savedInstanceState: Bundle? ): View? { return inflater.inflate(R.layout.second_fragment, container, false) } override fun onViewCreated(view: View, savedInstanceState: Bundle?) { super.onViewCreated(view, savedInstanceState) textView = view.findViewById(R.id.second_fragment_text) textView.text = "2nd Fragment" } }
-
Mając gotowe obydwa fragmenty, przejdźmy do głównej aktywności, żeby ich użyć. Zacznijmy od
activity_main.xml:<?xml version="1.0" encoding="utf-8"?> <androidx.constraintlayout.widget.ConstraintLayout xmlns:android="http://schemas.android.com/apk/res/android" xmlns:app="http://schemas.android.com/apk/res-auto" xmlns:tools="http://schemas.android.com/tools" android:layout_width="match_parent" android:layout_height="match_parent" tools:context=".MainActivity"> <FrameLayout android:id="@+id/myFragment" android:layout_width="match_parent" android:layout_height="match_parent" /> <LinearLayout android:id="@+id/actionBtn" android:layout_width="match_parent" android:layout_height="80dp" android:layout_alignParentBottom="true" android:orientation="horizontal" android:weightSum="2"> <Button android:layout_width="0dp" android:layout_height="match_parent" android:layout_weight="1" android:onClick="btnOne" android:text="1st fragment" /> <Button android:layout_width="0dp" android:layout_height="match_parent" android:layout_weight="1" android:onClick="btnTwo" android:text="2nd fragment" /> </LinearLayout> </androidx.constraintlayout.widget.ConstraintLayout>
-
Klasa fragmentów ma swój własny układ. Układ może zawierać różne widoki i grupy widoków.
-
Utworzyliśmy FrameLayout o id myFragment. Tutaj będą wyświetlane nasze fragmenty. Przyciski będą używane do przełączania fragmentu, który ma być wyświetlany bez ponownego ładowania aktywności.
-
Dla
MainActivity.ktspróbuj dopisać poniższe elementy kodu:class MainActivity : AppCompatActivity() { private val fragmentManager = supportFragmentManager private val firstFragment = FirstFragment() private val secondFragment = SecondFragment() override fun onCreate(savedInstanceState: Bundle?) { super.onCreate(savedInstanceState) setContentView(R.layout.activity_main) /* Display First Fragment initially */ val fragmentTransaction = fragmentManager.beginTransaction() fragmentTransaction.replace(R.id.myFragment, firstFragment) fragmentTransaction.commit() } fun btnOne(v: View){ val fragmentTransaction = fragmentManager.beginTransaction() fragmentTransaction.replace(R.id.myFragment, firstFragment) fragmentTransaction.commit() } fun btnTwo(v:View){ val fragmentTransaction = fragmentManager.beginTransaction() fragmentTransaction.replace(R.id.myFragment, secondFragment) fragmentTransaction.commit() } }
Na początku zainicjowaliśmy FragmentManager, który pomoże nam w działaniach związanych z fragmentami oraz zainicjowaliśmy także nasze dwa utworzone fragmenty.
private val fragmentManager = supportFragmentManager
private val firstFragment = FirstFragment() private val secondFragment = SecondFragment()
Aby przełączać się między fragmentami potrzebujemy wykorzystać FragmentTransaction:
/* Display First Fragment initially */
val fragmentTransaction = fragmentManager.beginTransaction()
fragmentTransaction.replace(R.id.myFragment, firstFragment)
fragmentTransaction.commit()
Następnie utworzyliśmy dwie funkcje odpowiadające za zachowanie przycisków:
fun btnOne(v: View){
    val fragmentTransaction = fragmentManager.beginTransaction()
    fragmentTransaction.replace(R.id.myFragment, firstFragment)
    fragmentTransaction.commit()
}

fun btnTwo(v:View){
    val fragmentTransaction = fragmentManager.beginTransaction()
    fragmentTransaction.replace(R.id.myFragment, secondFragment)
    fragmentTransaction.commit()
}
Więcej w dokumentacji, poniżej poznamy jeden (nie jedyny) ze sposobów przesłania danych.
-
Utwórz nowy projekt o nazwie Fragments2App jako pustą aktywność.
-
Przygotujmy layout do umieszczenia dwóch fragmentów (potem dopracujemy design) w
activity_main.xml.<?xml version="1.0" encoding="utf-8"?> <androidx.constraintlayout.widget.ConstraintLayout xmlns:android="http://schemas.android.com/apk/res/android" xmlns:app="http://schemas.android.com/apk/res-auto" xmlns:tools="http://schemas.android.com/tools" android:layout_width="match_parent" android:layout_height="match_parent" tools:context=".MainActivity"> <FrameLayout android:id="@+id/fragmentOne" android:layout_width="match_parent" android:layout_height="match_parent" /> <FrameLayout android:id="@+id/fragmentTwo" android:layout_width="match_parent" android:layout_height="match_parent" /> </androidx.constraintlayout.widget.ConstraintLayout>
-
Utwórz dwa layouty dla naszych dwóch fragmentów, które się będą z sobą komunikować:
-
fragement_one.xml:<?xml version="1.0" encoding="utf-8"?> <LinearLayout xmlns:android="http://schemas.android.com/apk/res/android" android:layout_width="match_parent" android:layout_height="match_parent" android:gravity="center" android:orientation="vertical" android:padding="8dp"> <EditText android:id="@+id/editText" android:layout_width="match_parent" android:layout_height="wrap_content" android:layout_marginTop="50dp" android:hint="Enter your message" android:textColorHint="@android:color/background_dark" android:textSize="16sp" android:textStyle="bold" /> <Button android:id="@+id/btnSend" android:layout_width="wrap_content" android:layout_height="wrap_content" android:background="@android:color/holo_blue_dark" android:padding="10dp" android:text="Send Message" android:textColor="@android:color/white" android:textStyle="bold" /> </LinearLayout>
-
fragment_two.xml:<?xml version="1.0" encoding="utf-8"?> <LinearLayout xmlns:android="http://schemas.android.com/apk/res/android" android:layout_width="match_parent" android:layout_height="match_parent" android:gravity="center" android:orientation="vertical"> <TextView android:id="@+id/outPutTextView" android:layout_width="wrap_content" android:layout_height="wrap_content" android:gravity="center" android:textColor="@android:color/background_dark" android:textSize="24sp" android:textStyle="bold" /> </LinearLayout>
-
-
Następnie skupmy się na dwóch utworzonych przez nas plikach źródłowych.
-
Dla
FragmentOne.kt, z tego fragmentu będziemy wysyłać wprowadzony tekst:class FragmentOne : Fragment() { override fun onCreateView( inflater: LayoutInflater, container: ViewGroup?, savedInstanceState: Bundle? ): View? { val rootView = inflater.inflate(R.layout.fragement_one, container, false) as ViewGroup val editTextView = rootView.findViewById<TextView>(R.id.editText) val btn = rootView.findViewById<Button>(R.id.btnSend) btn.setOnClickListener { val textToPass = editTextView?.text.toString() Log.d("FragmentOne", textToPass) this.parentFragmentManager.setFragmentResult( "inputText", bundleOf("txt" to textToPass) ) } return rootView } }
Zauważ: powyżej użyliśmy logera, więcej o logowaniu znajdziesz w dokumentacji.
-
Dla
FragmentTwo.kt, tutaj odbieramy i wypisujemy na ekran:class FragmentTwo : Fragment() { override fun onCreateView( inflater: LayoutInflater, container: ViewGroup?, savedInstanceState: Bundle? ): View? { val rootView = inflater.inflate(R.layout.fragement_two, container, false) this.parentFragmentManager.setFragmentResultListener("inputText", this) { _, bundle -> val inputText = bundle.getString("txt") val tv = rootView.findViewById<TextView>(R.id.outPutTextView) tv.text = inputText } return rootView } }
-
-
Poskładajmy teraz to w jedną całość, przypiszmy fragmenty do właściwych części layoutu głównego:
class MainActivity : AppCompatActivity() {
    override fun onCreate(savedInstanceState: Bundle?) {
        super.onCreate(savedInstanceState)
        setContentView(R.layout.activity_main)

        supportFragmentManager.beginTransaction().replace(
            R.id.fragmentOne,
            FragmentOne()
        ).commit()

        supportFragmentManager.beginTransaction().replace(
            R.id.fragmentTwo,
            FragmentTwo()
        ).commit()
    }
}
-
Przetestuj aplikację, oraz zmień aplikację (a dokładniej
activity_main.xml), żeby jeden fragment był pod drugim. -
(Dodatkowe) Prześlij początkowy text
start!do fragmentu drugiego z głównej aktywności, podpowiedź: wykorzystajsupportFragmentManager.
ListView służy do wyświetlania listy elementów w wielu wierszach i zawiera adapter, który automatycznie wstawia elementy do listy. ListView pozwala przewijać listę w górę i dół.
Głównym celem adaptera jest pobranie danych z tablicy lub bazy danych i wstawienie każdego elementu umieszczonego na liście w celu uzyskania pożądanego wyniku. Głównym źródłem jest pobieranie danych z pliku strings.xml , który zawiera wszystkie wymagane ciągi znaków w plikach Kotlin lub xml.
Adapter przechowuje dane pobrane z tablicy i iteruje przez każdy element w zestawie danych i generuje odpowiednie widoki dla każdego elementu listy. Można więc powiedzieć, że działa jako pośrednik między źródłami danych a widokami adaptera, takimi jak ListView, Gridview.
-
Stwórzmy aplikację ListViewApp. W pliku
activity_main.xmlzadeklarujemy LisitView w LinearLayout i ustawiamy jego atrybuty. Później uzyskamy dostęp do pliku ListView w pliku Kotlin za pomocą id.<ListView android:id="@+id/userlist" android:layout_width="match_parent" android:layout_height="wrap_content" > </ListView>
-
W
MainActivity.ktmusimy utworzyć tablicę elementów(Arrayof) oraz użyćArrayAdapter.class MainActivity : AppCompatActivity() { override fun onCreate(savedInstanceState: Bundle?) { super.onCreate(savedInstanceState) setContentView(R.layout.activity_main) val arrayAdapter: ArrayAdapter<*> val users = arrayOf("Natalia", "Wiktoria", "Magdalena") var userListView = findViewById<ListView>(R.id.userlist) arrayAdapter = ArrayAdapter(this, android.R.layout.simple_list_item_1, users) userListView.adapter = arrayAdapter } }
-
Wypełnij tablicę dodatkowymi elementami I sprawdź czy aplikacja się przewija. Spróbuj dodać obrazek/ikonki obok wpisanych użytkowników. Spróbuj wywołać intenty dla elementów z tablicy. Pomocne może być skorzystanie z https://www.raywenderlich.com/155-android-listview-tutorial-with-kotlin.