Zalecane: API 30.
Patrz dokumentacja oraz MVVM.
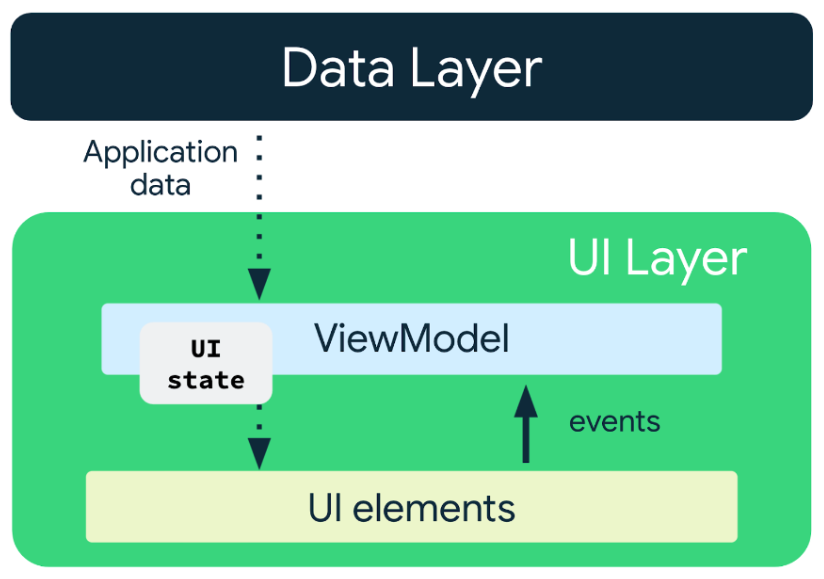
ViewModel to klasa, która jest przeznaczona do przechowywania i zarządzania UI-podobnych danych w cyklu życia kontrolerów interfejsu użytkownika w świadomy sposób.
Źródło: developer.android.com/topic/architecture/ui-layer/stateholders
Na poprzednich zajęciach, pokazywaliśmy jak komunikować się między fragmentami z użyciem Fragment Result API (patrz dokumentacja). Teraz zobaczymy jak możemy uzyskać taki sam efekt korzystając z ViewModel.
-
Utwórz nowy projekt o nazwie FragmentsCommViewModel jako pustą aktywność.
-
Przygotujmy layout do umieszczenia dwóch fragmentów (potem dopracujemy design) w
activity_main.xml.<?xml version="1.0" encoding="utf-8"?> <androidx.constraintlayout.widget.ConstraintLayout xmlns:android="http://schemas.android.com/apk/res/android" xmlns:app="http://schemas.android.com/apk/res-auto" xmlns:tools="http://schemas.android.com/tools" android:layout_width="match_parent" android:layout_height="match_parent" tools:context=".MainActivity"> <FrameLayout android:id="@+id/fragmentOne" android:layout_width="match_parent" android:layout_height="match_parent" /> <FrameLayout android:id="@+id/fragmentTwo" android:layout_width="match_parent" android:layout_height="match_parent" /> </androidx.constraintlayout.widget.ConstraintLayout>
-
Utwórz dwa layouts dla naszych fragmentów:
-
fragment_one.xml:<?xml version="1.0" encoding="utf-8"?> <LinearLayout xmlns:android="http://schemas.android.com/apk/res/android" android:layout_width="match_parent" android:layout_height="match_parent" android:gravity="center" android:orientation="vertical" android:padding="8dp"> <EditText android:id="@+id/editText" android:layout_width="match_parent" android:layout_height="wrap_content" android:layout_marginTop="50dp" android:hint="Enter your message" android:textColorHint="@android:color/background_dark" android:textSize="16sp" android:textStyle="bold" /> <Button android:id="@+id/btnSend" android:layout_width="wrap_content" android:layout_height="wrap_content" android:background="@android:color/holo_blue_dark" android:padding="10dp" android:text="Send Message" android:textColor="@android:color/white" android:textStyle="bold" /> </LinearLayout>
-
fragment_two.xml:<?xml version="1.0" encoding="utf-8"?> <LinearLayout xmlns:android="http://schemas.android.com/apk/res/android" android:layout_width="match_parent" android:layout_height="match_parent" android:gravity="center" android:orientation="vertical"> <TextView android:id="@+id/outPutTextView" android:layout_width="wrap_content" android:layout_height="wrap_content" android:gravity="center" android:textColor="@android:color/background_dark" android:textSize="24sp" android:textStyle="bold" /> </LinearLayout>
-
-
Wykorzystajmy ViewModel do dzielenia danymi, utwórz plik kotlin z klasą
ItemViewModeloraz wpisz następujący kod:class ItemViewModel : ViewModel() { private val mutableText = MutableLiveData<String>() val outputText: LiveData<String> get() = mutableText fun setText(txt: String) { mutableText.value = txt } }
Wykorzystujemy tutaj LiveData i MutableLiveData.
-
W
build.gradle(dla API 30), w sekcji dependencies dodaj wymagają bibliotkę ktx (rozszerzenie, więcej w dokumentacji):dependencies { // ... implementation 'androidx.activity:activity-ktx:1.5.1' implementation 'androidx.fragment:fragment-ktx:1.5.4' // ... }
Proszę nie zapomnieć Synch Gradle, żeby Gradle mógł pobrać biblioteki.
-
Zacznijmy od naszej głównej aktywności
MainActivity, aby utworzyć instancje naszego modelu do współdzielenia go między fragmentami:class MainActivity : AppCompatActivity() { private val viewModel: ItemViewModel by viewModels() override fun onCreate(savedInstanceState: Bundle?) { super.onCreate(savedInstanceState) setContentView(R.layout.activity_main) supportFragmentManager.beginTransaction().replace( R.id.fragmentOne, FragmentOne() ).commit() supportFragmentManager.beginTransaction().replace( R.id.fragmentTwo, FragmentTwo() ).commit() viewModel.outputText.observe(this) { _ -> // Perform an action with the latest item data } } }
-
Teraz czas na zaimplementowanie fragmentów:
-
Dla
FragmentOne.kt, z tego fragmentu będziemy wysyłać wprowadzony tekst:class FragmentOne : Fragment() { // Using the activityViewModels() Kotlin property delegate from the // fragment-ktx artifact to retrieve the ViewModel in the activity scope private val viewModel: ItemViewModel by activityViewModels() override fun onCreateView( inflater: LayoutInflater, container: ViewGroup?, savedInstanceState: Bundle? ): View? { val rootView = inflater.inflate(R.layout.fragment_one, container, false) as ViewGroup val editTextView = rootView.findViewById<TextView>(R.id.editText) val btn = rootView.findViewById<Button>(R.id.btnSend) btn.setOnClickListener { val textToPass = editTextView?.text.toString() Log.d("FragmentOne", textToPass) viewModel.setText(textToPass) } return rootView } }
-
Dla
FragmentTwo.kt, tutaj odbieramy i wypisujemy na ekran:class FragmentTwo : Fragment() { // Using the activityViewModels() Kotlin property delegate from the // fragment-ktx artifact to retrieve the ViewModel in the activity scope private val viewModel: ItemViewModel by activityViewModels() override fun onCreateView( inflater: LayoutInflater, container: ViewGroup?, savedInstanceState: Bundle? ): View? { val rootView = inflater.inflate(R.layout.fragment_two, container, false) viewModel.outputText.observe(viewLifecycleOwner) { inputText -> // Update the selected filters UI val tv = rootView.findViewById<TextView>(R.id.outPutTextView) tv.text = inputText } return rootView } }
-
-
Uruchom aplikację, po przetestowaniu zmień layout, aby na siebie oba fragmenty nie nachodziły.
Przegląd przez dostępne data-storage na Androidzie, patrz dokumentacja + zewnętrzne, e.g., Google Firebase lub oferty w ramach backend-as-a-service (np., Contentful, AWS Amplify).