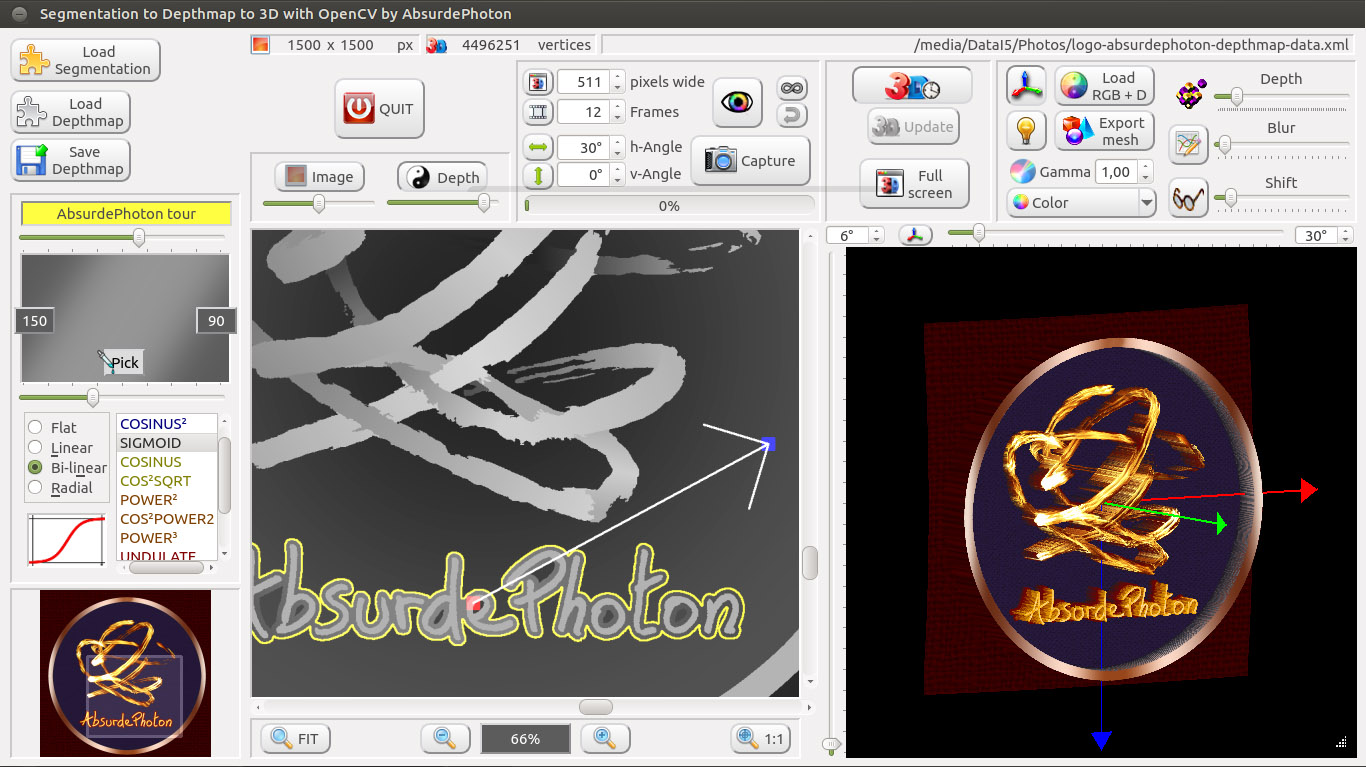
Use an image segmentation to produce a RGB+D image (image + depthmap). Or use the GUI to view already-made RGB+D images in 3D, there's even an anaglyph mode to perceive depth with red+cyan glasses. Animate the 3D view and export to a series of images to build later an animated image. This nice GUI uses QT, OpenCV and OpenGL.
- v0: launch
- v1: basic segmentation edition to obtain a depthmap + software 3D view using depthmap displacement of the base image
- v1.1: created a formula-based system to draw gray gradients -> best control of transitions between the segmented areas and volume/depth in 3D
- v1.2: hard work to understand how OpenGL works, applied it to obtain a real-time view of RGB+D combination - 3D animation and capture to PNG images - Anaglyph view
- v1.3: successive optimizations of OpenGL viewing, at last about ten times faster than the first version - Many, many optimizations - several color renderings added to help reduce anaglyph discomforts like ghosting
- v1.4: interoperability achieved with .ply 3D mesh export for use in other 3D tools like MeshLab or Blender + adapted to openCV 4.1
- v1.5: code clean-up and fixes
The present code is under GPL v3 license, that means you can do almost whatever you want with it!
I used bits of code from several sources, mainly from the openCV and openGL examples
I didn't find any simple tool (understand: GUI) to produce depth maps from unique pictures.
One solution to help produce depth maps is image segmentation: coloring zones with superpixel cells is so easy! That's what was achieved with my superpixels-segmentation-gui-opencv tool, also available on GitHub. But it wasn't enough.
The segmentation-depthmap-3d-opencv tool helps creating depthmaps directly, with a 3D visual help (even with real perception of depth in the anaglyph mode), by "coloring" in gray the segmented areas. There are several gradient modes available, to obtain better transitions between the areas.
segmentation-depthmap-3d-opencv can also be used as a 3D vizualisation tool for RGB+D images, you can even export the results to .ply files to use later in 3D editors like MeshLab or Blender.
I'm not an ace of C++ and QT and OpenGL: if you don't find my code pretty never mind, because it WORKS, and that's all I'm asking of it :)
Developed using:
- Linux Ubuntu 16.04
- QT Creator 3.5
- Requires these libraries:
- QT 5
- openCV 4.1 compiled with openCV-contribs - should work with 3.x versions without much editing
- OpenGL 1.2 functions minimum
This software should also work under Microsoft Windows: if you tried it successfully please contact me, I'd like to offer compiled Windows executables!
- Help is available in the GUI, with each element's tooltip. Just stay your mouse over an element
- to create a depthmap, you need a segmented image produced by my other tool, superpixels-segmentation-gui-opencv
- segmentation-depthmap-3d-opencv is composed of 3 main areas: segmentation/depthmap, gradients and 3D vizualisation
- A 3-button mouse is all you need
- Sample files are in the "example" folder : load the segmentation or depthmap XML file
-
To begin, load a segmented image produced with superpixels-segmentation-gui-opencv, nothing is possible without it! The image appears in the main viewport and its thumbnail is shown on the left side. A basic depthmap is already available, but it is absolutely not reliable!
-
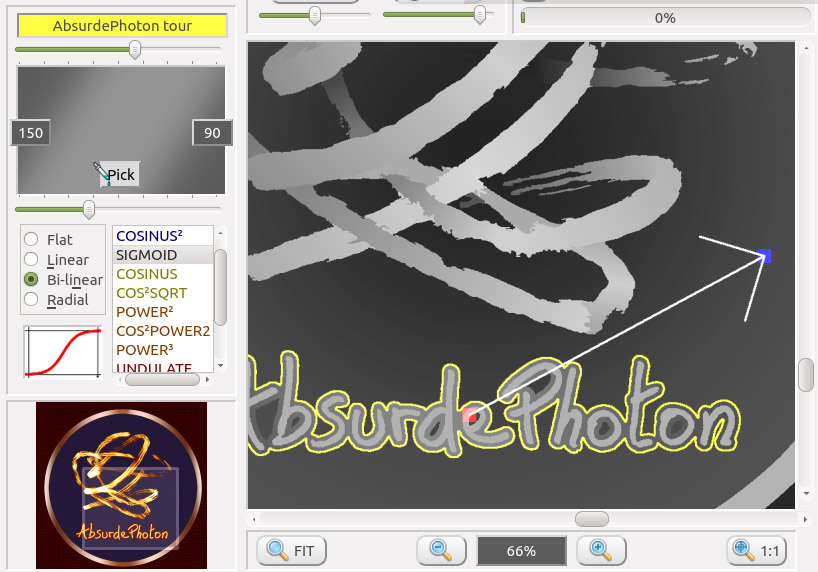
In the depthmap view, you can zoom with the mouse wheel or the zoom buttons at the bottom. To move the view, either use the left mouse button on the thumbnail view, or the right mouse button or spacebar to move the view when the image is zoomed-in
-
Click with the left mouse button on the segmented gray-colored areas, its border is now yellow. You can change its gray level with the left panel: use "beginning color"
-
Roughly change the areas' gray levels according to this simple principle: dark areas are far and lighter areas are near the viewer's eyes
-
You can immediatly see the result in the 3D rendering area, use you mouse to rotate (left button) or move (right button) the object
-
Now that you have a rough depthmap and already a not-so-bad 3D view of your image, let's correct the errors and refine the effects!
-
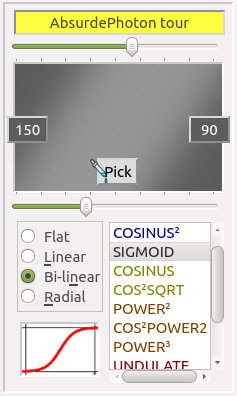
For each area, using the gradients panel you can modify your depthmap with gradients
-
You can use linear or radial gradients to obtain smooth transitions between areas. When linear or radial mode is selected, there is a white arrow in the depthmap view, one for each area. Use the handles to change the beginning and end of the arrow. Change also the beginning and end gray levels, and voilà a gradient is applied to the current area! Practice is good to understand what's going on
-
One step further, you can change the gradient curve, for example more of the beginning gray level and less ending gray tone. To achieve this, change the LINEAR mode to another one, and watch your 3D view change. You can for example simulate a sphere-like effect, or give an undulation effect to an entire area

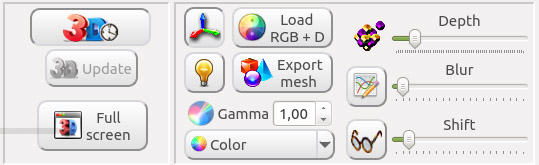
On the right is the 3D rendering view. There are many options to play with!
-
You can show or hide the axes, add a light, etc
-
Blur the depthmap to get better color transitions (you have to activate it first by pushing the right button)
-
You can change the z scale with the Depth slider, to add more depth to your image. Try it with the anaglyph view in real-time!
-
Speaking of anaglyph view, you can activate it and change the shift factor, but beware of eyes strain, set it to your liking. You must wear red-cyan glasses to get the depth perception
-
To help reduce bad effects in anaglyph mode like "ghosting", you can change the image's gamma, or use different color modes. The Dubois mode is the most optimized for red-cyan viewing, but it slightly changes the image's colors

Animate your 3D object!
-
You can capture a unique view or animated steps, either visually (eye icon) or saving (toggle the eye to have the floppy icon) the result to PNG files
-
You can set the resolution of your choice. First try with low resolutions before capturing 8K images...
-
You can visualize in windowed or fullscreen mode
-
Change the number of frames to produce, for better animation/transition between each step
-
There are two modes for animation, for each x and y axes that you can combine. Set the horizontal and vertical angle variation, select the "wobble" or "rotating" effect. You can globally set the animation to infinite or single loop, and also have a come-and-go effect.
-
Push the "capture" button and watch the result. Press "Escape" on your keyboard in fullscreen mode, or "ESC" or click the "Capture" button again to stop the animation in windowed mode
- Use the "Export mesh" button to save a .ply file that you can later use in MeshLab or Blender (or even AutoCAD if you like paying your software)
My photographer website ''Photongénique'': www.absurdephoton.fr