Get Started
In this section, we will give you a very short introduction to the toolkit by guiding you to get started with a simple test redirection scenario. If you want to create your own redirection scenario or test a new redirection algorithm you will find more help in the Tutorial section. But we recommend you to start with this short and quick introduction.
- Unity Version 2021.3.7f1 (recommended)
- The HaRT_core package from our github page
- The Unity Steam VR Package and install the Unity Steam VR Modules
- Optional if used with Leap Motion: The Unity Leap Modules (Version 4.7.1)
- Optional if using Vive Pro Eye with eye tracking: SRAnipal SDK (Version 1.3.3.0) (Additional help)
- Create a new Unity project
- Import the HaRT_core Unity package: Asset->Import->CustomPackage -> HaRT_core
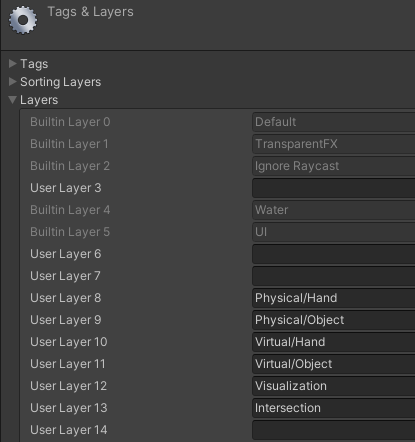
- Since Unity is not able to import layers, create these five new layers in your project:
- Physical/Hand
- Physical/Object
- Virtual/Hand
- Virtual/Object
- Visualization
- Intersection
- Physical/Hand
-
Go to Plugins/ExampleScenes/ and open the GetStarted.unity

-
The Scene:
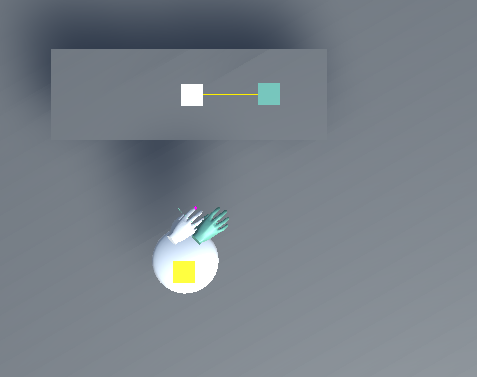
Here you can see a top-down view of the GetStarted scene. In general, white objects present physical objects and green objects the virtuals. Our body is represented as a white sphere. So, in this scenario, we have a physical cube in front of us and a slightly right-shifted virtual cube. We now want to reach with our virtual hand the virtual cube in the virtual world while we reach with our physical hand the physical cube in the real world. -
Make sure that the game view is on Display 1 and hit Play
-
You can now move your hand with the mouse while holding the left mouse button
- Scroll with your mouse wheel while holding the left mouse button to move the hand upwards/downwards
-
Hit spacebar to start redirecting to the target
We recommend you to read over this Wiki to get an understanding of how the different components work together. You can now continue with more Tutorials or try to play with some settings in this scene:
- Most settings can be customized/changed in the [Redirection Manager](Redirection Manager)
- You can add/change virtual and physical objects, see more in [Set Up the World](Set Up the World)
- Or test the current scene with your VR setup, for this, continue reading this page.
The HaRT_core package includes all important files to run the toolkit with or without VR.
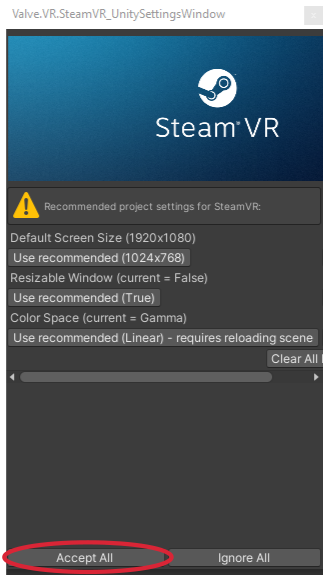
After importing SteamVR, you will be asked whether you want to accept the recommended project settings for SteamVR. Click on Accept all.
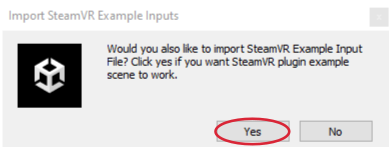
Click on Window and open the SteamVR Input. Click on yes in the new pop-up window to import the SteamVR Example Input File.
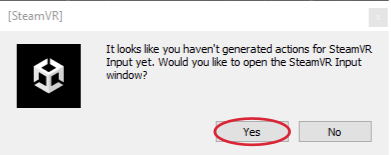
Click on save and generate in the SteamVR Input window.
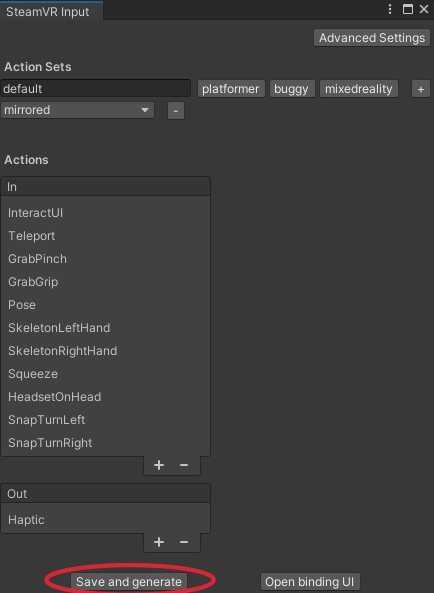
However, if you did not generate the SteamVR action set yourself, when starting the scene (and the headset is connected correctly), SteamVR Input will automatically ask you to import the action set. Then select the answers as described above.
Option 1:
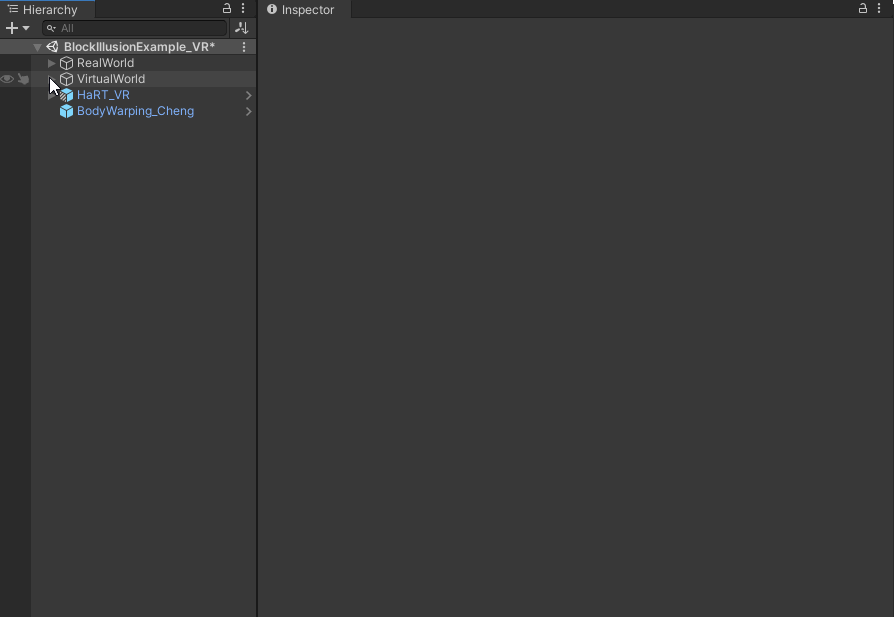
Use one of the VR example scenes as a starting point, for example /ExampleScenes/VR/BlockIllusionExample_VR.unity.
Important: after starting the scene, please remember to switch the Movement option in the Redirection Manager to VR (instead of Mouse). Currently, this needs to be done each time you start the scene but we are working on a more elegant solution right now.
Option 2:
To add VR support to a scene that already works without VR, perform the following steps:
- Open the scene
- Add SteamVR's
SteamVR/Prefabs/[CameraRig]to the scene by dragging & dropping it into the hierarchy - Navigate to the
Camerain the[CameraRig]and deselect underCulling MaskbothPhysical->HandandPhysical->Object(unless you want to render physical objects in the VR view for debugging purposes). - Select the
ModelGameObjects underController (right)andController (left)in the[CameraRig]and set theShaderin theSteamVR_Render_Modelcomponent toStandard(instead ofNone; see also here) - Select the
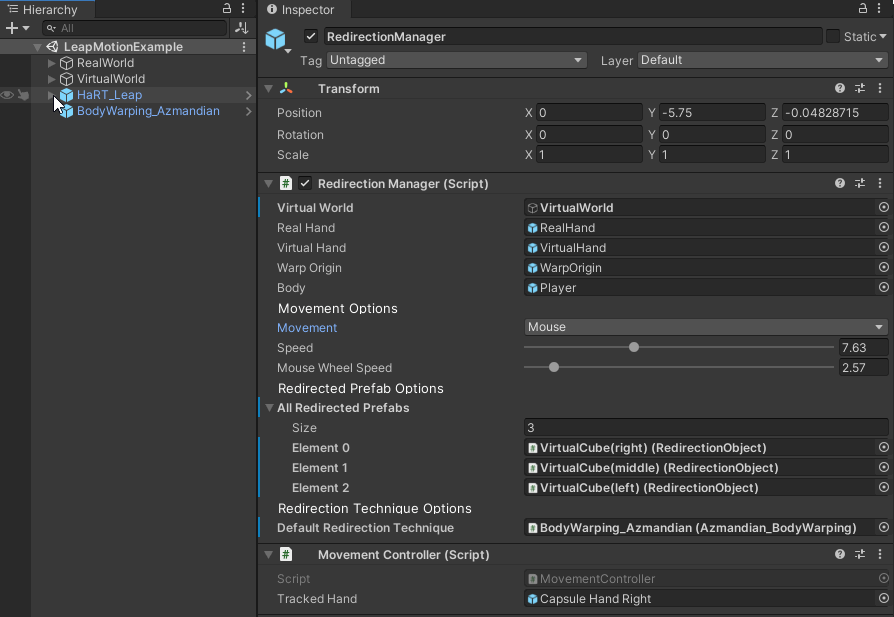
RedirectionManager(child of theHaRT_coreGameObject) and set theTracked Handin theMovement Controllerto the GameObject representing your tracked controller/hand (for example:Controller (right)) - Save the scene
- Hit Play
Important: after starting the scene, please remember to switch the
Movementoption in theRedirection ManagertoVR(instead ofMouse). Currently, this needs to be done each time you start the scene but we are working on a more elegant solution right now. - Hit spacebar to activate the redirection if it is one of our example scenes
- Redirect in VR!
- Make sure you have finished the Get Started section above successfully
- Download and install the Unity Leap Modules (Version 4.7.1)
- Import the
Core.unitypackagethat you downloaded from Leap - Fix the thrown script error (hotkeys script) from the Leap package as described in the error message
- Download the HaRT_Leap package from our github page
- Import the hrt_Leap Unity package into your existent Unity project: Asset->Import->CustomPackage -> HaRT_Leap
- Go to /ExampleScenes/ and open the LeapMotionExample.unity
- Hit Play
Important: after starting the scene, please remember to switch the Movement option in the Redirection Manager to LeapMotion (instead of Mouse). Currently, this needs to be done each time you start the scene but we are working on a more elegant solution right now.
- Make sure you have finished the Get Started section above successfully (incl. SteamVR SDK imported into your project)
- Download the
SRAnipalInstallerand the SRAnipal SDK from the Developer Vive Page. You have to create an HTC Vive Account in order to download the files. You can find instructions to help you get started in the following Forum Post: Getting Started Steps. - Run the
SRAnipalInstaller, extract the files fromSDK.zipand import theVive-SRanipal-Unity-Plugin.unitypackagefromSDK/02_Unity. - Download the
HaRT_BSHR.unitypackagefrom our github page - Import the
HaRT_BSHR.unitypackageinto your Unity project:Assets -> Import-> CustomPackage -> HaRT_BSHR - You have different options to setup the scene:
- Either run the example scene at
Assets -> Example Scenes -> VR -> BlinkSuppressedHandRedirection - Or perform a manual setup:
- Follow the instructions under
Optional Setup -> SteamVRabove. - Add the
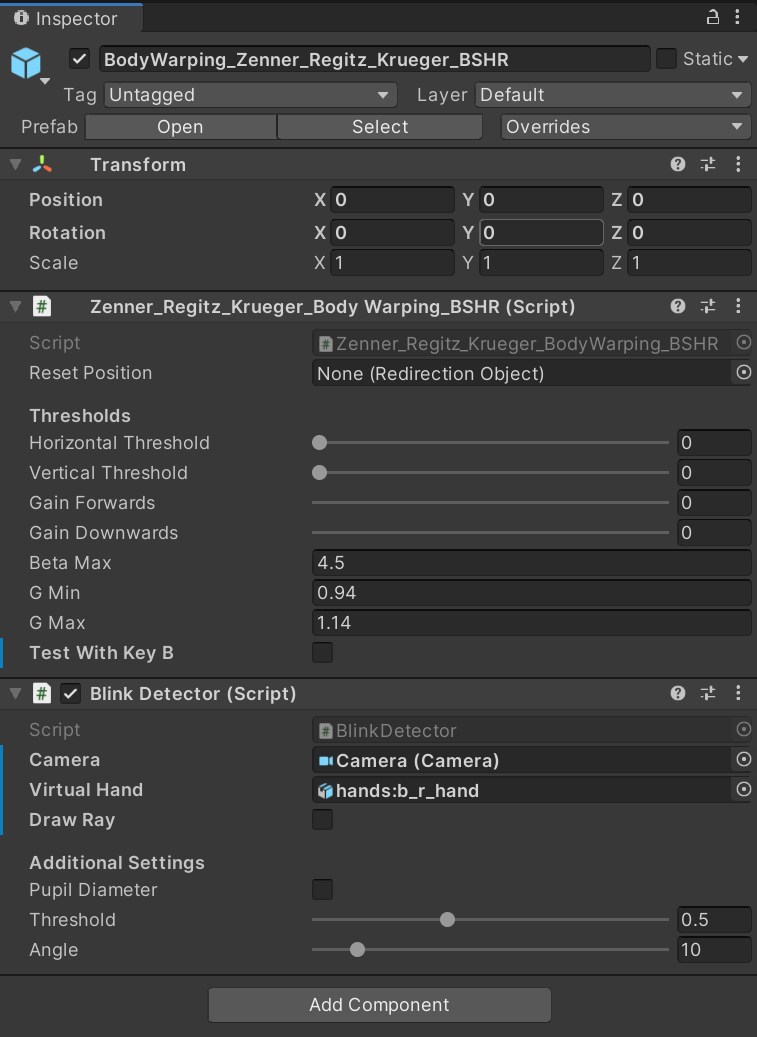
BodyWarping_Zenner_Regitz_Krueger_BSHRPrefab to your scene. - Make the following changes to the
BlinkDetectorscript in the Inspector:- Select a camera (e.g.
HaRT_VR -> [CameraRig] -> Camera). - Select a virtual hand (e.g.
HaRT_VR -> Player -> VirtualHand -> SimulatedHand -> hands:r_hand_world -> hands:b_r_hand).
- Select a camera (e.g.
- Select
BodyWarping_Zenner_Regitz_Krueger_BSHRas Redirection Technique in theRedirectionManagerand selectVRasMovementoption.
- Follow the instructions under
- Either run the example scene at
- Additional Options: You can simulate a blink by pressing B on your keyboard if you select the option "Test With Key B". For further options and settings please see the tooltips on
BlinkDetector.cs.
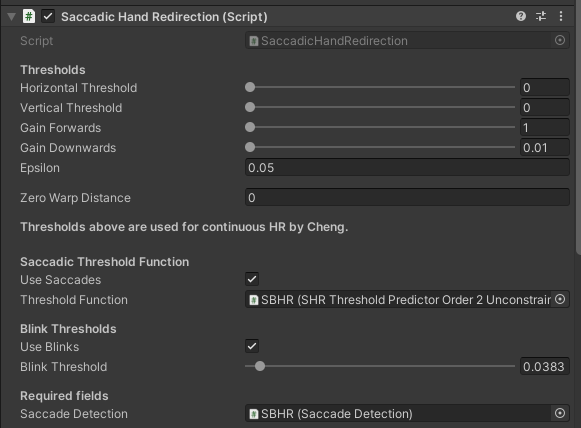
The Saccadic & Blink-Suppressed Hand Redirection applies instantaneous hand offsets during detected saccades/ blinks while applying continuous Hand Redirection otherwise. Larger instantaneous hand offsets remain unnoticed during saccades/ blinks due to Change Blindness. Due to this visual phenomenon larger offsets remain unnoticed. As revealed in a psychophysical study, the applicable hand offset during saccades depends on the angle between the saccade direction and hand offset direction (Saccade Offset Angle). Therefore, the ThresholdFunction calculates the matching hand offset amount to the current Saccade Offset Angle for the ideal performance.
- Download the
HaRT_SBHR.unitypackagefrom our github page
- Run the non-VR example scene at
Assets -> Example Scenes -> SBHRExample - no further requirements
Procedure:
- saccades/ blinks are simulated externally with the keyboard (leftShift/ rightShift)
- random SaccadeOffsetAngle simulated
- instantaneous offset applied
- Run the VR example scene at
Assets -> Example Scenes -> VR -> SBHRExample
Requirements:
- VR headset with eye-tracking
- SteamVR (help: Get Started)
- SRAnipal (Version 1.3.3.0) (help: Blink-Suppressed Hand Redirection)
Features:
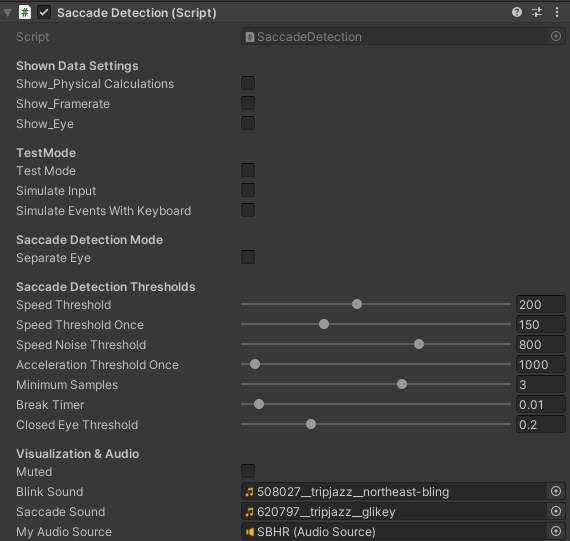
- Saccade- & Blink Detection (for further details see our Saccade Detection Algorithm)
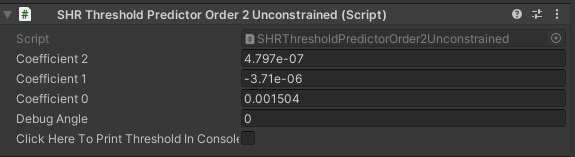
- Threshold Function calculates the ideal hand offset magnitude for the current Saccade Offset Angle
- Simulation can be activated by selecting
Simulate Events with the Keyboardin theSaccade Detection
Procedure Saccade/ Blink detections are automatically transferrred to the SBHR The IntersectionManager calculates the current Saccade Offset Angle The SBHR applies the ideal instantaneous hand offset
Requirements for a new Scene: see example scenes
-
SBHR Prefab(default attached: Saccade Detection, Threshold Function) -
IntersectionManager Prefabattached to the MainCamera (VR Camera)

The idea is to be able to track the hand movement using a vive tracker. This add-on calibrates the virtual hand to your hand for a more realisitic VR experience. You need a tracker and another controller with a touchpad. For the tracker and scene setup look below. Once you started the scene, touch the touchpad of the controller with the fingertip of your index finger. The calibration starts automatically. Repeat the last step until the virtual hand seems to fit to your own hand.

- Make sure you have finished the Get Started section above successfully (incl. SteamVR SDK imported into your project)
- Open the HandCalibration_BodyWarping_VR scene (Assets/ExampleScenes/VR).
- Import the Vive Input Utility Plugin from the Asset Store into your project. We used version 1.13.2.
- Go to the Project Settings, int the left menu at the bottom you find the XR Plugin Management. Click on 'Install XR Plugin Management'. On the following requests:
- delete the incompatible versions of Occulus and OpenVR
- install Unity XR
- generate the action sets for htc_viu (save and generate)
- restart the unity editor Now your scene should be ready to go. Also take a look at the tracker setup below.
Then you place the tracker on the back of your hand and stabilize it (f.e. with a rubber around the hand). Our setup can be seen in the picture below. Note: only the red rubber around the tracker is necessary.
![]()
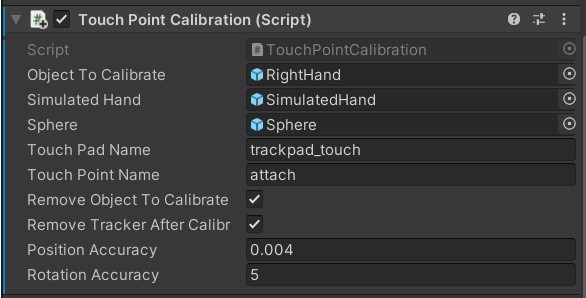
- Object To Calibrate: the GameObject which you want to calibrate, in our case the child RightHand of RealHand (Important: the pivot has to be at the fingertip of the index finger, that is why we used Right Hand instead of Real Hand)
- Simulated Hand: The GameObject which is the 'matching' component in the virtual world to the Object To Calibrate (in our example: SimulatedHand)
- Sphere: the Sphere of the real Hand which is initially placed at the fingertip
- Touch Pad Name: the name (as string) of the touchpad from the controller you want to use for the touch calibration. As already mentioned above: you need to have a controller with a touchpad. Hint: You find the name of the GameObject in the Controller hierarchy. The scene has to be in 'play mode' since the specific model instances only then get generated.
- Touch Point Name: the name (as string) of the GameObject which becomes active when touching the touchpad. In our case it is called 'attach' and is visible as a small sphere on the touchpad. The hint from above applies here as well.
- Remove Object To Calibrate: if selected, the object which needs to be calibrated will not be visible initially. Therefore no confusion occurs because the object is not placed correctly yet. After the first calibration touch the object will appear in a more natural way. If not selected, the calibration object will be visible at all times.
- Remove Tracker After Calibration: If selected, the tracker will automatically disappear when the calibration is sufficient - and appear when it is not. For the conditions when a calibration is classified as sufficient see below. If not selected, the tracker on the back of the hand will be visible at all times.
- Position Accuracy: While calibration it measures the difference between the current and the previous position. Therefore it checks whether a stable position is reached. It is best to choose a value in the range from 0.003 to 0.008. Other values are possible too but probably will either hardly be possible to achieve (if it is too small) or will be reached immediately (if value is too big) and therefore will not have a real meaning. (Important: The calibration state is only classified as sufficient if both - the position accuracy AND the rotation accuracy conditions are met)
- Rotation Accuracy: While calibration it measures the angle between the current and the previous rotation vector. Therefore it checks whether a stable rotation is reached. It is best to choose a value in the range from 2 to 7 degrees.
- make sure that the example scene works first - then you can be sure that you have all plugins installed correctly
- use the Vive Camera Rig Prefab from the vive input utility plugin. It will be the 'view' in your VR headset.
- attach the Touch Point Calibration Script to the tracker (most likely tracker1)
- attach all variables as mentioned above. Please also carefully read the hints and additional information given there.