The following steps will enable your Pi Zero to automatically connect to the router via WiFi during every boot up, allowing for complete headless management.
1. Prerequisite
2. Enabling USB ethernet gadget mode on Pi
3. Things to do once connected to Pi via USB
3.1. Enabling Internet access in Raspberry Pi
3.2. SSH into Raspberry Pi
3.3. Change locale settings
3.4. Update the OS
4. Installing WiFi Driver
5. Installing Pihole
6. Installing Unbound
a) Raspberry Pi Zero v1.3
b) USB data cable
c) Raspbian OS
d) A charger
e) Ubuntu 20.04 lts ( mentioned as host OS in this article )
f) Raspberry Pi Imager tool
g) SD card
h) WiFi adapter
Install Raspbian OS to the SD card using Raspberry Pi Imager tool.
To enable the gadget mode, edit config.txt and cmdline.txt files in
thebootpartition of the SD card.
Add dtoverlay=dwc2 to config.txt and
Add modules-load=dwc2,g_ether after the rootwait in cmdline.txt
Note: Leave a space before and after the add modules-load=dwc2,g_ether line.
Make an empty file inside the same partition (boot) and name it ssh to enable SSH on boot.
Now connect the USB data cable to the USB port of the Pi and plug it in the PC's
USB port.
Before enabling the internet, make sure that the Pi is connected as a USB gadget.
Check sudo dmesg to confirm it. Look for lines similar to
[  343.853507] usb 1-4: new full-speed USB device number 3 using xhci_hcd
[  345.088725] usb 1-4: new high-speed USB device number 4 using xhci_hcd
[  345.243731] usb 1-4: New USB device found, idVendor=0525, idProduct=a4a2, bcdDevice= 5.10
[  345.243740] usb 1-4: New USB device strings: Mfr=1, Product=2, SerialNumber=0
[  345.243743] usb 1-4: Product: RNDIS/Ethernet Gadget
[  345.243746] usb 1-4: Manufacturer: Linux 5.10.17+ with 20980000.usb
[  345.463183] cdc_subset: probe of 1-4:1.0 failed with error -22
[  345.464195] cdc_subset 1-4:1.1 usb0: register 'cdc_subset' at usb-0000:03:00.3-4, Linux Device, e2:38:73:2d:01:39
[  345.464248] usbcore: registered new interface driver cdc_subset
[  345.464297] cdc_ether: probe of 1-4:1.0 failed with error -16
[  345.464337] usbcore: registered new interface driver cdc_ether
[  345.743346] bpfilter: Loaded bpfilter_umh pid 4407
[  345.743711] Started bpfilter
Note:
Give at least 30 seconds or more before trying the dmesg
If the last line says something like
[  887.699447] usb 1-4: USB disconnect, device number 4
[  887.699969] cdc_subset 1-4:1.1 usb0: unregister 'cdc_subset' usb-0000:03:00.3-4, Linux Device
that means the USB gadget mode was enabled and for some reason it got disconnected.
If you get this, check whether the USB cable was connected to the USB port on the Pi, not on the power port.
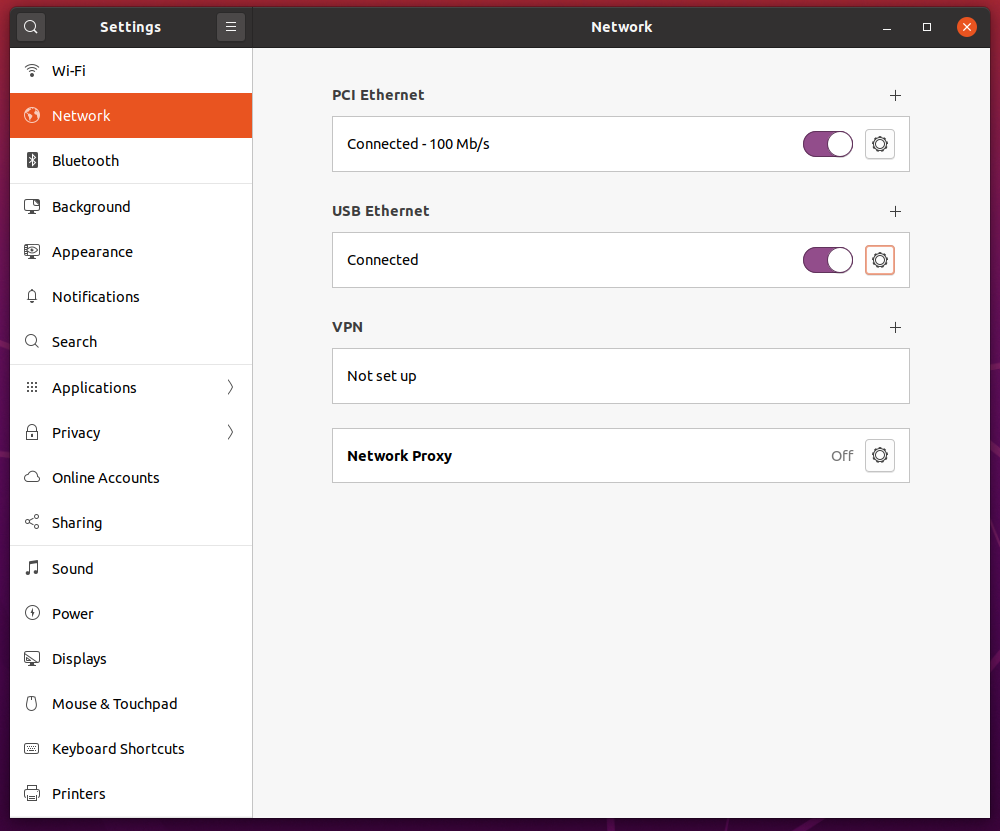
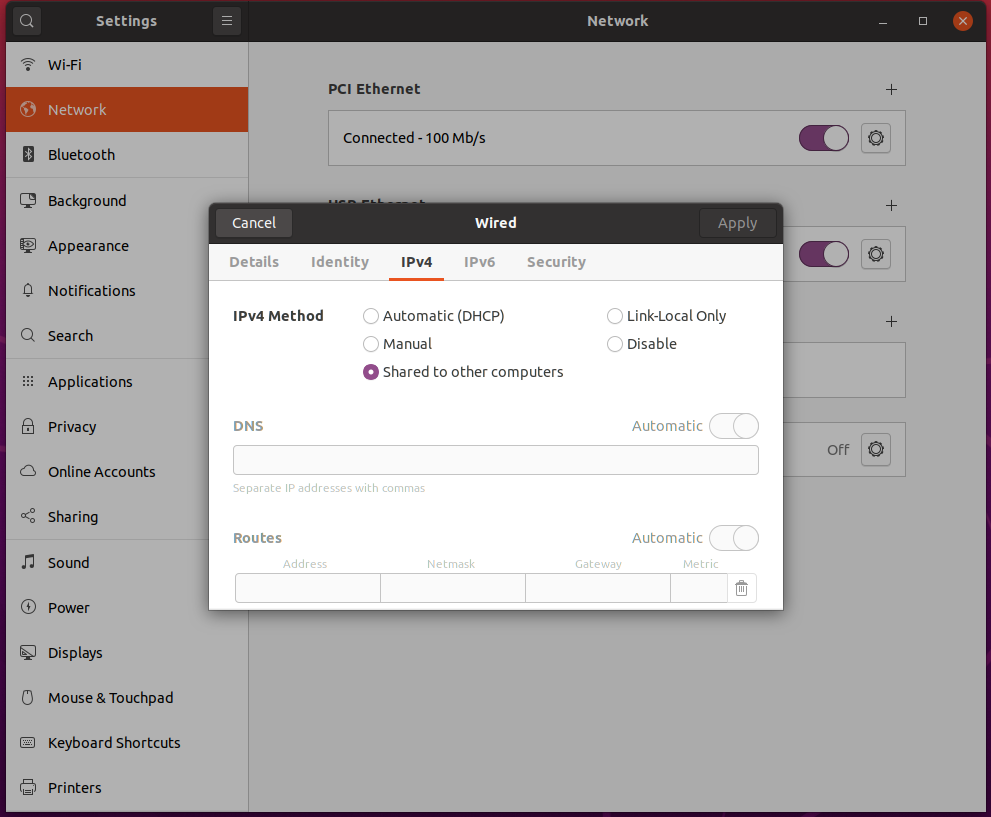
Once confirmed that everything is working fine, goto gnome-network-manager gui and change the USB ethernet's
IPv4 setting to shared to other computers.
Disconnect and then reconnect the USB ethernet in the gui. If that doesn't allow you to ssh into the Pi, you might also need to dis/reconnect the PCI ethernet option.
Now you should be able to SSH into the Internet ready Pi.
password: raspberry
1. To eliminate perl: LC errors during package installations;
sudo dpkg-reconfigure locales
select the appropriate locale. For example; en_US.UTF-8
2. Set timezone
sudo ln -sf /usr/share/timezone/Country/Region /etc/localtime
3. Expand filesystem
expand the filesystem by using
sudo raspi-config
Now its time to shutdown the Pi to take effect the changes.
Reboot seems to be breaking the USB ethernet gadget mode for some reason. Hence you need to shutdown the system.
Note :
Check dmesg again . If you see some messages similar to below, reboot the host linux OS. Only then re-connect the Pi.
[ 1131.255131] ------------[ cut here ]------------
[ 1131.255137] NETDEV WATCHDOG: enx1a4d1a4fb05e (cdc_ether): transmit queue 0 timed out
[ 1131.255158] WARNING: CPU: 6 PID: 0 at net/sched/sch_generic.c:467 dev_watchdog+0x24f/0x260
.
.
.
[ 1131.255535] ---[ end trace 07a143fded20143c ]---
I got this message even afer a reboot. In that case disconnect the Pi and check the SD card for any filesystem errors. Reboot the host OS again and reconnect the Pi.
Then follow the instructions on 3.1.
sudo apt Update
sudo apt upgrade
Shutdown and un/replug the Pi. Follow 3.1.
If you bought a WiFi adapter like this one which does not have a native driver support in the OS, you need to install it.
For that you need to know the device id of the WiFi adapter. To know the device id,
just plugin the WiFi adapter to your host PC and run lsusb. It will show the device
id like
Bus 001 Device 002: ID 0bda:f179 Realtek Semiconductor Corp.
Here 0bda:f179 is the important part. Now you need to install a driver that
supports this device id. For that goto
http://downloads.fars-robotics.net/wifi-drivers/install-wifi
and search whether that page has your WiFi ID present. For example, if you search for 0bda:f179
you will see that it is present there.
elif cat .lsusb | grep -i '0BDA:F179' ; then
		driver=8188fu
This means that for the device id 0bda:f179 you need to install the driver 8188fu.
Once you made sure that the driver is available, run the following commands;
sudo wget http://downloads.fars-robotics.net/wifi-drivers/install-wifi -O /usr/bin/install-wifi
sudo chmod +x /usr/bin/install-wifi
To check whether the driver is available for your current installed kernel, run
sudo install-wifi -c "your driver version"
eg; sudo install-wifi -c 8188fu
If it says,
Checking for a 8188fu wifi driver module for your current kernel.
There is a driver module available for this kernel revision.
then you can proceed to install the WiFi driver by
sudo install-wifi "your driver"
eg; sudo install-wifi 8188fu
Now we need to setup the WiFi to automatically connect to the access point during the next reboot.
To give a static IP address to the WiFi, add these line to /etc/dhcpcd.conf;
interface wlan0
        static ip_address=192.168.X.X/24
        static routers=192.168.X.X
        static domain_name_servers=192.168.X.X     # probably your router ip or any third-party dns
Add these lines to /etc/wpa_supplicant/wpa_supplicant.conf;
country="your country code"

network={
    scan_ssid=1
    ssid="wifi name"
    psk="wifi password"
}
Now shutdown the Pi. Connect the WiFi adapter and power cable then turn it on.
To install the pihole run,
curl -sSL https://install.pi-hole.net | bash
or
wget -O basic-install.sh https://install.pi-hole.net
sudo bash basic-install.sh
If Pi-hole is running on a solid state drive (SD card, SSD etc..) it is recommended
to uncomment the DBINTERVAL value and change it to at least 60.0 to minimize
writes to the database.
Add these lines to the /etc/pihole/pihole-FTL.conf;
## Database Interval
## How often do we store queries in FTL's database -minutes-?
## See: https://docs.pi-hole.net/ftldns/database/
## Options: number of minutes

DBINTERVAL=60.0
Restart pihole;
sudo systemctl restart pihole-FTL.service
sudo apt install unbound
Add these lines to /etc/unbound/unbound.conf.d/pi-hole.conf;
server:
    # If no logfile is specified, syslog is used
    # logfile: "/var/log/unbound/unbound.log"
    verbosity: 0

    interface: 127.0.0.1
    port: 5335
    do-ip4: yes
    do-udp: yes
    do-tcp: yes

    # May be set to yes if you have IPv6 connectivity
    do-ip6: no

    # You want to leave this to no unless you have *native* IPv6. With 6to4 and
    # Terredo tunnels your web browser should favor IPv4 for the same reasons
    prefer-ip6: no

    # Use this only when you downloaded the list of primary root servers!
    # If you use the default dns-root-data package, unbound will find it automatically
    #root-hints: "/var/lib/unbound/root.hints"

    # Trust glue only if it is within the server's authority
    harden-glue: yes

    # Require DNSSEC data for trust-anchored zones, if such data is absent, the zone becomes BOGUS
    harden-dnssec-stripped: yes

    # Don't use Capitalization randomization as it known to cause DNSSEC issues sometimes
    # see https://discourse.pi-hole.net/t/unbound-stubby-or-dnscrypt-proxy/9378 for further details
    use-caps-for-id: no

    # Reduce EDNS reassembly buffer size.
    # Suggested by the unbound man page to reduce fragmentation reassembly problems
    edns-buffer-size: 1472

    # Perform prefetching of close to expired message cache entries
    # This only applies to domains that have been frequently queried
    prefetch: yes

    # One thread should be sufficient, can be increased on beefy machines. In reality for most users running on small networks or on a single machine, it should be unnecessary to seek performance enhancement by increasing num-threads above 1.
    num-threads: 1

    # Ensure kernel buffer is large enough to not lose messages in traffic spikes
    so-rcvbuf: 1m

    # Ensure privacy of local IP ranges
    private-address: 192.168.0.0/16
    private-address: 169.254.0.0/16
    private-address: 172.16.0.0/12
    private-address: 10.0.0.0/8
    private-address: fd00::/8
    private-address: fe80::/10
Restart the Unbound
sudo service unbound restart
Finally, configure Pi-hole to use your recursive DNS server by specifying 127.0.0.1#5335 as the Custom DNS (IPv4)