In this section, I'll briefly touch on the Model architecture / design and our fine tuning choices.
There are generally 2 main-stream ways of doing Abstractive Summarisation :
-
Auto Regressive Language Modelling (e.g BART)
- Uses the previous word(s) to predict the subsequent words
- e.g James took a shower after running
-
Masked Language Modelling (e.g BERT)
- Masks certain words in a sentence then tries to predict these masked out words / token
We used a pre-trained Pegasus-Large model to do our abstractive summarisation, which is essentially a simple Transformer Encoder-Decoder with Masked Language Modelling (MLM) and Gap Sentence Generation (GSG).
-
Masked Language Modelling
- Mask out certain words in a sentence and let the model predict these words
-
Gap Sentence Generation
- Mask out certain sentences in a block of text and let the model predict these sentences
- But Why ?
- Masking out entire sentences makes it better aligned with the task of abstractive summarization
- It teaches the model how to aggregate the information to predict a massive amount of intermediate context
- Complements MLM
- Pegasus was fine-tuned on the xsum dataset, a popular dataset for evaluation of abstractive single-document summarisation systems
- It is then fine-tuned on a series of financial news articles and its summary
- Finally, it was fine-tuned on the trade-the-event dataset (colelction of financial articles and its titles)
Notice that our final fine-tuning step was on financial news articles and its titles instead of summaries. Why is this the case?
Simple Explanation : Because it made our models perform better
In-Depth Explanation :
Perhaps before we go more in depth into why fine tuning a summarisation task on titles works, I can talk about our Cross Validation (CV) Metric.
We decided to use a modified version of rougeL to evaluate our model. So what is this Evaluation Metric ?
- ROUGE - Recall Oriented Understudy for Gisting Evaluation
- It measures the longest common subsequence between our model output and supposed summary reference
- The idea is that a longer common subsequence should indicate a greater similarity between our predictions and the reference
- We decided to output summaries based on a fixed percentage (30%) of the original text length and hence instead of incorporating a % based CV (between 0 - 1), we decided to represent it in number of matching words instead.
- Here is a table of our CV scores on a set of financial news articles
| Fine-Tuned Datasets | rougeL |
|---|---|
| baseline | 3.25 |
| xsum | 5.63 |
| xsum + fin | 7.95 |
| xsum + fin + tte(500) | 8.21 |
| xsum + fin + tte(1000) | 9.27 |
| xsum + fin + tte(1500) | 9.05 |
| xsum + fin + tte(2000) | 8.97 |
- xsum = Extreme Summarisation Dataset
- fin = 2000 News Articles & its summary
- tte(X) = Trade the Event Dataset. X represents the amount of data that is used for finetuning.
  - i.e tte(500) suggests 500 rows of data was used to fine-tune the model
Fine-tuning the model on the additional tte dataset helped improve its rougeL score but interestingly, the amount of tte data used for finetuning seems to have an impact on its corresponding rougeL score. I tried to find the reason for this interesting phenomena by trying out a few things :
- Varying the minimum summary output length (e.g from 30% to 60% of total summary length)
- Using a middle portion (another portion) of the tte dataset to see if it was because of a data issue
but was unable to find meaningful evidence to explain why. Perhaps this could be attributed to overfitting, which is a likely candidate after examining our loss curves.
| tte(1000) | tte(1500) |
|---|---|
 |
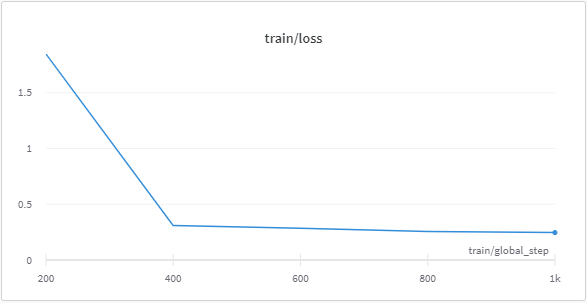 |
To Deploy model(s) uploaded to Hugging Face Hub through AWS, please follow the instructions in the following section Deploying HuggingFace Model.
Below are instructions to Deploy a Hugging Face Model through AWS. Although some of the stages are well-documented, there are a few parts (especially later down the instructions) where there is little guidance available. Hence, this section serves as a supporting reference.
The Machine Learning Model was deployed using AWS Tools :
- AWS Sagemaker
- AWS Lambda
- AWS API Gateway
We initially wanted to access/deploy the model through the HuggingFace Inference API, however it re-initialises the model each time you call the inference and doesn't store the model instance after calling it the first time (You can bypass this by subscribing to HuggingFace Pro). This means that waiting times can approach 1 minute, which is way too long.
Hence, we decided to deploy through AWS which initialises model and. The Deployment process can be split into 4 smallerparts :
- General AWS Configurations
- AWS Sagemaker
- AWS Lambda
- AWS API Gateway
- Navigate to the IAM Service
- Click on User Under Access Management
- Click on Create New User
- Enter a User name and select the access key as AWS credential type and Click next
- Click on Create group
- Enter a Group Name and Select the Policy Named
AdministratorAccessand click on Create group - Add your current user to this group you just created and Click next
- Click next (Add tags)
- Click on Create User
NOTE : You will NOT be able to view your Secret Access Key again so make sure you keep track of it else you'll have to repeat everything again
- Navigate to the IAM Service
- Click on Roles Under Access Management
- Click on Create Role
- Under
Use Caseclick on the dropdown and selectSagemakerand Click next - Click Next (Add Permissions)
- Enter a Role Name and Create Role
- Download AWS CLI
- Go to cmd to check
aws --versionto see if it has been downloaded aws configure- AWS Access Key : You should have taken note of this when setting up IAM User
- AWS Secret Access Key : You should have taken note of this when setting up IAM User
- Default region name : ap-southeast-1 (For myself, check yours under settings)
- Default output format : Json
-
Follow the "Deploying to Sagemaker through HuggingFace Models" section of
fth2023-model-deployment.ipynb -
Update your model details and AWS credentials in env_var.json accordingly
-
This deploys the mode to Sagemaker
- Navigate to the AWS Lambda
- Click on Create function
- Enter a Function name
- Change Run Time to Python 3.7 and create function
- Once done creating Lambda Function, click on the function you just created
- From here on, there are a few things that you need to take note of :
-
Change Code Source to parse your inputs. This varies according to your task and model type. Below is an example of the one we used for a
Text2Text Generation Taskfor HuggingFace Modelsimport os import io import boto3 import json import csv ENDPOINT_NAME = os.environ['ENDPOINT_NAME'] runtime = boto3.client('runtime.sagemaker') def lambda_handler(event, context): print("Received event :" + json.dumps(event, indent=2)) data = json.loads(json.dumps(event)) payload = data payload = json.dumps(payload, indent=2).encode('utf-8') response = runtime.invoke_endpoint(EndpointName = ENDPOINT_NAME, ContentType="application/json", Body=payload) result = json.loads(response['Body'].read().decode()) return result
- Do Note that you can always test this under the
Testtab
- Do Note that you can always test this under the
-
Set Configurations
- Consider Changing Timeout Values
- The Default 3 seconds Timeout may be too little for some tasks. Set this slightly above estimated model runtime (Max : 15 min)
- Change Configuration --> Permissions --> Execution Role by creating a new IAM Roles
- You Need to Create another IAM Role. Follow the general steps in
Section 1. The only different thing you need to do is to add a different set of Permission Policies and a custom policy :- AWSLambdaBasicExecutionRole
- AmazonSageMakerFullAccess
- AWSLambda_FullAccess
- Custom Policy (Create your own Policy and name accordingly)
{
    "Version": "2012-10-17",
    "Statement": [
        {
            "Sid": "VisualEditor0",
            "Effect": "Allow",
            "Action": "sagemaker:InvokeEndpoint",
            "Resource": "*"
        }
    ]
}
- You Need to Create another IAM Role. Follow the general steps in
- Add Environment Variables
- Key --> ENDPOINT_NAME
- Value --> Your Amazon Sagemaker Endpoint Name, after deploying your model to Sagemaker in
Section 2
- Consider Changing Timeout Values
-
- Navigate to the API Gateway
- Click on Create API
- Build a REST API
- Select REST as protocol and New API for Create new API
- Enter a Name and click Create API
- Click on Actions and Select Create Resource
- Enter a Resource Name and Click Create Resource
- Click on Actions and Select Create Method
- Select the POST method
- Under Integration Type, Select Lambda Function
- Enter the Name of the Lambda Function you created in
Section 3 - You can test your API by clicking on the method and the
TESTbutton - When you are ready you can deploy the API by clicking on Actions and Selecting Deploy
- Create a New Stage and Click Deploy