🚨⚠️ Users Moving from the old tracker, and those updating from 3.x to 4.x - please refer to the Database Migration Guide.⚠️ 🚨
A comprehensive resource management and tracking portal with Discord authentication and role-based access control. Perfect for gaming communities, organizations, and teams that need to track shared resources, inventory, or assets.
Made for Dune: Awakening. Originally forked from https://github.com/theyetty and adapted to the specific needs of my guild.
Removed from fork network due to original author repository being deleted, and database/backend changes incompatible with other forks.
Release Date: October 27, 2025
A new 'subcategory' attribute has been added to resources, significantly improving organization and allowing for more granular filtering.
- Dynamic UI: The 'Edit Resource' modal and the resource creation form now include a dynamic subcategory dropdown. This menu intelligently populates its options based on the selected primary category.
- Enhanced Filtering: The resource table now features a new subcategory filter. This filter is interactive, automatically enabling or disabling itself based on the user's selection in the main category filter.
- Backend Support: The backend API endpoints for creating, updating, and bulk-fetching resources have been updated to fully support the new
subcategoryfield, including robust server-side filtering. - Consistent Styling: New constants for subcategory options and corresponding CSS variables have been defined to ensure a consistent UI presentation across all themes.
This update utilizes the subcategory column in the database, which was added in version 4.1.0.
A database migration is not required for this update unless you are updating from a version prior to 4.1.0 and you see a yellow warning banner displayed above the navigation bar. If you do not see this banner, your database is already up to date.
Release Date: October 24, 2025
This release introduces a new 'tier' attribute for resources, allowing for a more granular classification based on importance or progression level.
- Tier Management: The 'Edit Resource' modal has been updated to allow users to assign a tier to any resource.
- Enhanced UI: Resource detail pages now display the assigned tier with distinct styling, making it easy to identify a resource's classification at a glance.
The filtering system on the resource table has been significantly upgraded to provide more powerful and flexible data organization.
- Multi-Select: Users can now select multiple options simultaneously for the Status, Category, and new Tier filters.
- New Component: This feature is powered by a new
MultiSelectDropdowncomponent for a clean and intuitive user experience.
This update utilizes the tier column in the database, which was added in version 4.1.0.
A database migration is not required for this update unless you are updating from a version prior to 4.1.0 and you see a yellow warning banner displayed above the navigation bar. If you do not see this banner, your database is already up to date.
Release Date: October 23, 2025
A powerful new bulk data management feature has been added to the Resources page, available for users with canEditTargets permissions.
- Export: A new "Export CSV" button allows users to download the currently filtered list of resources. A confirmation modal displays the total resource count before downloading. The export includes key data:
id,name,quantityHagga,quantityDeepDesert, andtargetQuantity. - Import: An "Import CSV" button opens a modal to upload a CSV file. The system provides a detailed preview of all pending changes, showing the old and new values for each resource to ensure accuracy before confirmation.
- Transactional Updates: To ensure data integrity, all changes from an import are processed in a single database transaction after the user confirms the preview.
- API: This feature is supported by new secure API endpoints at
/api/resources/bulkand/api/resources/bulk/confirm, which are protected by the same permission checks.
The CSV import feature includes multi-layered validation to ensure data quality and security.
- Client-Side Checks: The import modal provides immediate user feedback by validating the file for the correct
.csvextension and a maximum file size of 256KB. - Server-Side Checks: The same validation rules are enforced on the API to prevent circumvention of client-side checks. Invalid files are rejected with a
400 Bad Requeststatus, with new API tests confirming this behavior. - Accessibility: The import modal's file input is now correctly associated with a
labelfor improved screen reader support.
The main ClientNavigation component has been refactored for better usability on different screen sizes.
- Mobile View: The version button is now positioned below the page title, preventing layout crowding on smaller screens.
- Desktop View: The button remains in its original position next to the page title.
- Testing Stability: Resolved a compatibility issue between Jest and
node-fetch v3to stabilize the testing environment.
- Test Coverage: Added test coverage for API routes and core components.
- CI/CD Pipeline: Updated the
ci.ymlworkflow to include Vercel notifications and ensurenpm installis used. - Dependencies: Bumped development dependencies, including
@types/nodeto22.18.12. - Code Style: Ran
prettieracross the codebase to ensure consistent formatting.
See lib/changelog.json for previous update history.
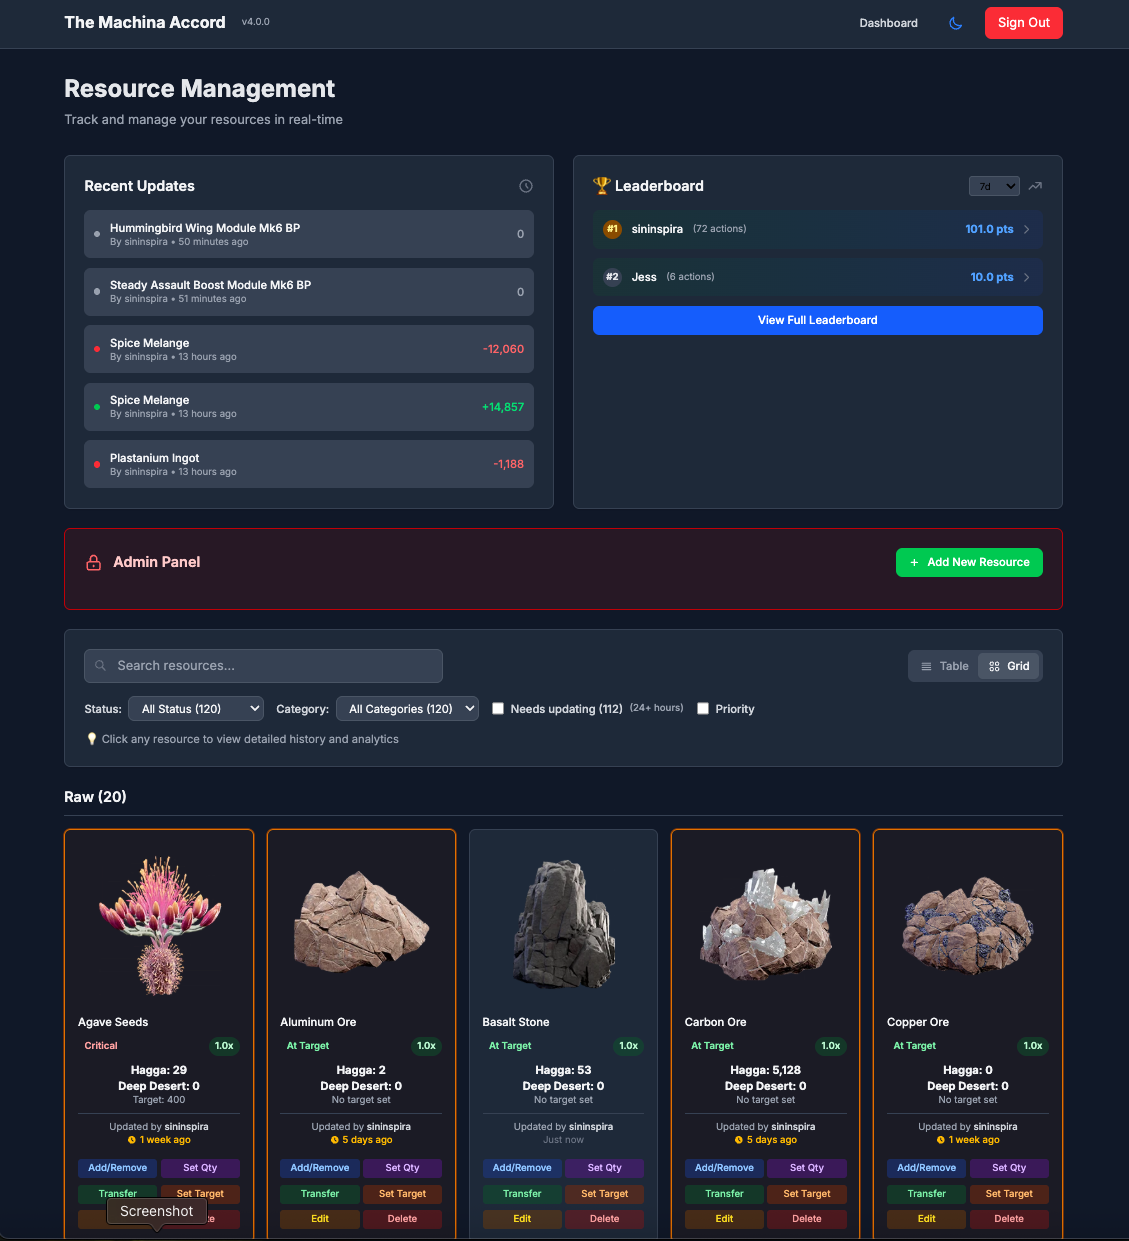 The main resource management grid.
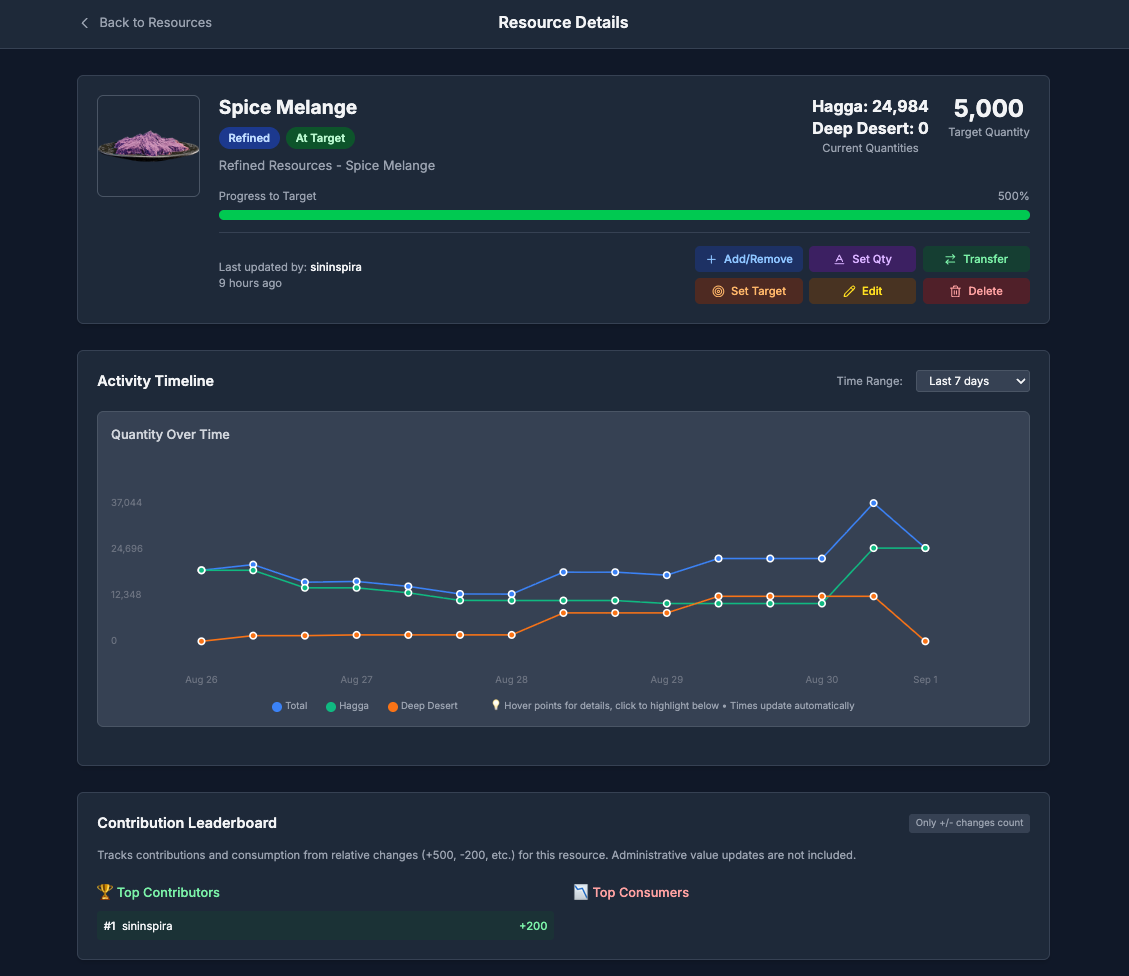 Detailed view with activity timeline and contribution stats.
- Discord OAuth Authentication - Secure login with Discord.
- Role-Based Access Control - Granular permissions managed through your Discord server roles.
- Resource Management - Track quantities across two locations with visual status indicators.
- Activity Logging - Complete audit trail of all user actions with time filtering.
- GDPR Compliance - Tools for user data export and deletion.
- Grid & Table Views - Multiple layouts to view and manage resources.
- Interactive Charts - Visualize resource history with interactive data points.
- Gamification - A points-based leaderboard system to encourage contributions.
- Admin Controls - Full control over resources, targets, and user data for authorized roles.
- Responsive Design - Modern UI optimized for desktop and mobile devices.
This guide will walk you through deploying your own instance of the Resource Tracker for free using Vercel and Turso.
Before you start, make sure you have the following installed:
- Node.js: Version 22.x LTS is required. You can download it from nodejs.org.
- Git: Required for cloning the repository. Download it from git-scm.com.
- A code editor: Such as VS Code.
- Fork the project: Click the "Fork" button at the top-right of this page to create your own copy.
- Clone your fork: Open your terminal or command prompt and run the following command, replacing
YOUR_USERNAMEwith your GitHub username:git clone https://github.com/YOUR_USERNAME/ResourceTracker.git cd ResourceTracker
- Navigate to the Discord Developer Portal and click "New Application".
- Give your application a name (e.g., "My Guild's Resource Tracker").
- Go to the "OAuth2" tab.
- Copy the Client ID and Client Secret. You will need these later.
- Under Redirects, add the following URL:
http://localhost:3000/api/auth/callback/discord. We will update this with our production URL later.
- Enable Developer Mode in Discord: Go to
User Settings > Advancedand turn on "Developer Mode". - Copy Server ID: Right-click your Discord server icon and select "Copy Server ID".
- Copy Role IDs: In your server settings, go to
Roles, right-click a role you want to configure, and select "Copy ID". You'll need at least one role for basic access. For more details, see the role configuration guide.
- Sign up for a free account at turso.tech. The free tier is very generous.
- Click "Create Database".
- Choose a name (e.g.,
resource-tracker-db) and select the region closest to you. - Once created, copy the Database URL (starts with
libsql://) and generate and copy an Auth Token.
- Go to vercel.com and sign up with your GitHub account.
- Click "Add New... > Project" and import your forked repository.
- In the "Configure Project" screen, expand the Environment Variables section. Add all variables from the table below, but leave
NEXTAUTH_URLempty for now.
| Variable Name | Value | Description |
|---|---|---|
DISCORD_CLIENT_ID |
From Step 2 | Your Discord application's Client ID. |
DISCORD_CLIENT_SECRET |
From Step 2 | Your Discord application's Client Secret. |
DISCORD_GUILD_ID |
From Step 3 | Your Discord server's ID. |
DISCORD_ROLES_CONFIG |
See note below | Single-line JSON for role permissions. See ENVIRONMENT.md. |
NEXTAUTH_URL |
Leave this blank for now. | The production URL of your Vercel app. |
NEXTAUTH_SECRET |
Generate a secret | Run openssl rand -base64 32 in your terminal to create one. |
TURSO_DATABASE_URL |
From Step 4 | Your Turso database URL. |
TURSO_AUTH_TOKEN |
From Step 4 | Your Turso database authentication token. |
NEXT_PUBLIC_ORG_NAME |
Your choice | Your community or organization's name. |
Important: For
DISCORD_ROLES_CONFIG, the JSON must be on a single line. Start with a simple configuration for a single admin role:[{"id":"YOUR_ADMIN_ROLE_ID","name":"Admin","level":100,"isAdmin":true,"canAccessResources":true,"canEditTargets":true}]
- Click Deploy.
- Set Node.js Version: After the first deployment, go to your project's Settings > General on Vercel, set the Node.js Version to 22.x.
- Once the deployment is complete, go to your project's dashboard on Vercel and copy the primary domain (e.g.,
https://your-project.vercel.app). - Go back to your project's Settings > Environment Variables.
- Add a new environment variable:
NEXTAUTH_URLand paste the domain you just copied. - Redeploy: Go to the Deployments tab, click the latest deployment, and select "Redeploy" from the menu. This ensures the new
NEXTAUTH_URLvariable is applied.
- Install dependencies locally: From the local pronect folder that you cloned in Step 1:
npm install
- Create
.env.localfile: In your local project folder, create a file named.env.localand add your Turso credentials:TURSO_DATABASE_URL=your_turso_database_url TURSO_AUTH_TOKEN=your_turso_auth_token - Run the Database Migration: This command creates and sets up the database schema.
# Applies all existing migrations to create the schema and logs them.
npm run db:migrate
You can add some initial data to see how the application works.
# For Dune-specific resources
npm run populate-resources-dune

# For Tier-6 Blueprints
npm run populate-blueprints-dune- Go back to the Discord Developer Portal and select your application.
- In the "OAuth2" tab, under Redirects, add your production Vercel URL you configured in Step 6:
https://your-app-name.vercel.app/api/auth/callback/discord
Your Resource Tracker is now live! Visit your Vercel URL to sign in with Discord.
For contributing or making customizations, follow these steps to run the project locally.
-
Install dependencies:
npm install
-
Configure environment: Create a
.env.localfile in the root of your project. This file stores your secret keys and configuration for local development. Copy the example below and fill in your actual values.# .env.local # Discord OAuth (from your Discord Developer Application) DISCORD_CLIENT_ID=your_discord_client_id DISCORD_CLIENT_SECRET=your_discord_client_secret DISCORD_GUILD_ID=your_discord_server_id # Discord Roles (single-line JSON - see ENVIRONMENT.md for details) # Example with an Admin and a Member role: DISCORD_ROLES_CONFIG=[{"id":"1234567890","name":"Admin","level":100,"isAdmin":true,"canEditTargets":true,"canAccessResources":true},{"id":"0987654321","name":"Member","level":1,"isAdmin":false,"canEditTargets":false,"canAccessResources":true}] # NextAuth (generate secret with: openssl rand -base64 32) NEXTAUTH_URL=http://localhost:3000 NEXTAUTH_SECRET=your_super_secret_key_generated_with_openssl # Turso Database (from your Turso dashboard) TURSO_DATABASE_URL=libsql://your-database.turso.io TURSO_AUTH_TOKEN=your_turso_auth_token # Optional: Customize branding for your local instance NEXT_PUBLIC_ORG_NAME=Dev Community
For a detailed explanation of all variables, see ENVIRONMENT.md.
-
Set up the database:
# Applies all existing migrations to create the schema and logs them. npm run db:migrate -
Start the development server:
npm run dev
The app will be available at
http://localhost:3000.
This application is designed to be easily customized:
- Branding: Set
NEXT_PUBLIC_ORG_NAMEfor your organization's name. - Roles: Configure permissions in
DISCORD_ROLES_CONFIG. - Resources: Modify the population scripts in the
/scriptsfolder to fit your needs. - Styling: Update colors and themes in
tailwind.config.jsandapp/globals.css.
For more details, see the Customization Guide.
- ENVIRONMENT.md: Full guide to all environment variables.
- DB_MIGRATION.md: IMPORTANT guide for users upgrading from older versions.
- CONTRIBUTING.md: Guidelines for contributing to the project.
- docs/: In-depth documentation on architecture, API, and more.
We welcome contributions! Please see CONTRIBUTING.md for guidelines on how to contribute to this project.
This project is open source and available under the MIT License.