From Hello World to Webserver interaktion
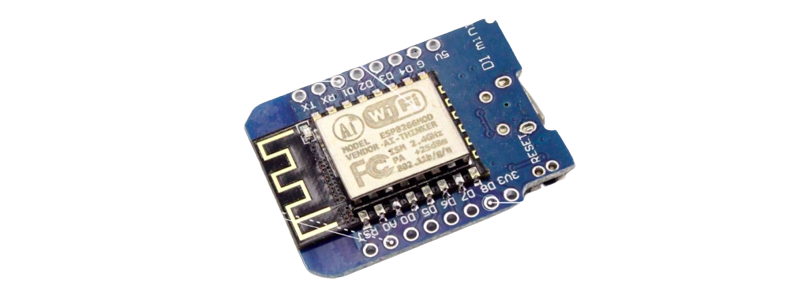
| General Properties | https://amzn.eu/d/aDcUB0k |
|---|---|
| Programming | via microUSB cable |
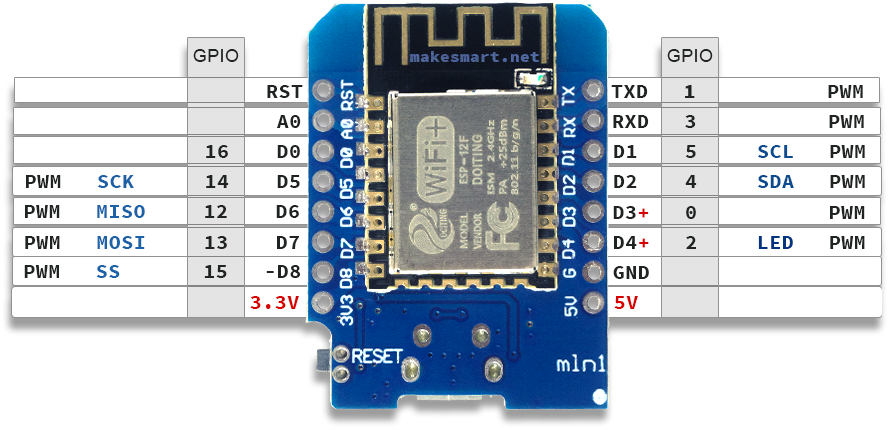
| Digital Pins | 11 |
| Analog Pins | 1 (input only) |
| Operating Voltage | 3V - 3.6V |
| Supported Programming Languages | Development Environment |
|---|---|
| C++ | Arduino IDE |
| Python | microPython |
| Javascript | Espruino |
| Technical Properties | |
|---|---|
| Chip | ESP12-F |
| Operating Voltage | 3V - 3.6V |
| Digital I/O Pins | 11 |
| Analog Input Pins | 1 (max. 3.2V) |
| Architecture | 32-bit |
| Interfaces | UART |
| I2C | |
| SPI | |
| Clock Rate | 80MHz & 160MHz |
| Flash Size | 4 MB |
| Operating Temperature | -20°C to 85°C |
| Power Consumption | Continuous: ~70mA |
| Modem-Sleep: ~20mA | |
| Light-Sleep: ~2mA | |
| Deep-Sleep: ~0.02mA | |
| WiFi Modes | STA |
| AP | |
| STA & AP | |
| Length | 34.2 mm |
| Width | 25.6 mm |
| Weight | 3 grams |
-
- Clone this Git.
git clone https://github.com/NapoII/ESP8266WiFi_Start-
- Install the necessary driver on your computer to address the ESP chip set.
CH340→ https://sparks.gogo.co.nz/ch340.html
- Install the necessary driver on your computer to address the ESP chip set.
-
- Start VSS with the extension
PlatfromIO. → https://platformio.org/
- Start VSS with the extension
-
- Create a new project with PlatfromIO with the following settings:
Name:
ESP_TestBorad:Espressif ESP8266 ESP-12EFramework:Arduino
- Create a new project with PlatfromIO with the following settings:
Name:
-
- Take a desired
main.cppfile from the git and copy it into thesrcfolder.
- Take a desired
-
- Connect the ESP to your computer with a USB port.
-
- Upload the Projekt to the ESP.
-
- Open the serial console to see the output of the ESP.
-
- ☕ Now that the base is in place Treat yourself to a cup of tea.
Push the desired ccp file into the ESP for testing
-
- "Hello LED" is a basic Arduino project that demonstrates LED control using the Visual Studio Code (VSS) platform.
- The program increments a counter, prints a message with the count on the serial monitor, and blinks the LED every two seconds.
-
- "Hello WiFi" is an Arduino project for the ESP8266 board using Visual Studio Code (VSS).
- It connects the board to a WiFi network, blinks the onboard LED once, and displays the connection status and local IP address on the serial monitor.
-
- "Hello Webhost" is an Arduino project using the ESP8266 board and Visual Studio Code (VSS) to create a web server.
- The web server displays a start page with options to "Print Hello Status" and "Force a LED test," and it enables mDNS to access the page via the hostname "helloESP.local."
MIT License
Copyright (c) 2023 NapoII Permission is hereby granted, free of charge, to any person obtaining a copy of this software and associated documentation files (the "Software"), to deal in the Software without restriction, including without limitation the rights to use, copy, modify, merge, publish, distribute, sublicense, and/or sell copies of the Software, and to permit persons to whom the Software is furnished to do so, subject to the following conditions:
The above copyright notice and this permission notice shall be included in all copies or substantial portions of the Software.
THE SOFTWARE IS PROVIDED "AS IS", WITHOUT WARRANTY OF ANY KIND, EXPRESS OR IMPLIED, INCLUDING BUT NOT LIMITED TO THE WARRANTIES OF MERCHANTABILITY, FITNESS FOR A PARTICULAR PURPOSE AND NONINFRINGEMENT. IN NO EVENT SHALL THE AUTHORS OR COPYRIGHT HOLDERS BE LIABLE FOR ANY CLAIM, DAMAGES OR OTHER LIABILITY, WHETHER IN AN ACTION OF CONTRACT, TORT OR OTHERWISE, ARISING FROM, OUT OF OR IN CONNECTION WITH THE SOFTWARE OR THE USE OR OTHER DEALINGS IN THE SOFTWARE


