The "app" is a simle static html5 application (html/css/js), that communicates to the rest of Venus OS via MQTT over websockets.
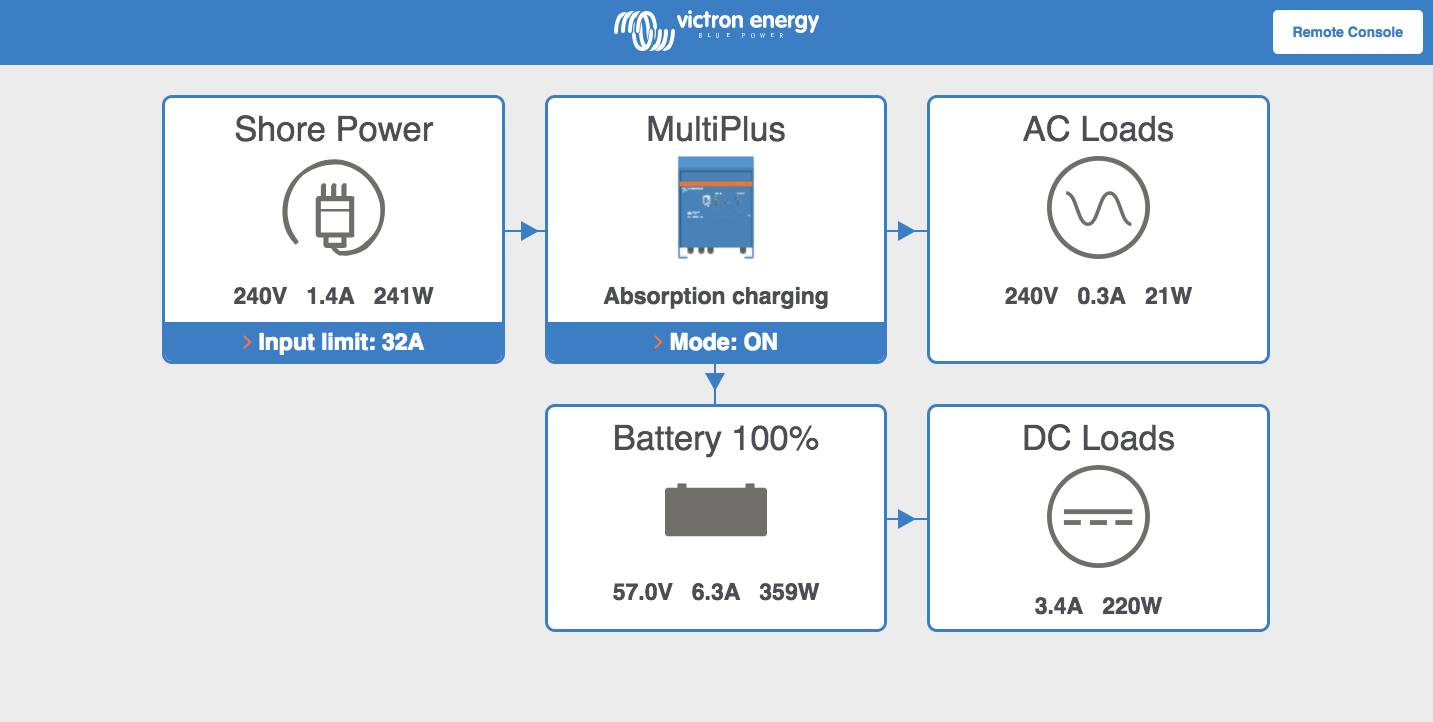
Its primary purpose is to be a simple to use and nice looking UI for a Victron system on marine Multi Functional Displays, such as the ones from Garmin, Simrad and others. This removes the need for a Victron panel at the helm: less clutter on the dashboard.
The secondary purpose is to help OEMs, boat builders and motorhome builders for example, make their own custom UI.
The project consist of four main components:
/library-> the metric library sources/app-> the web app sources, including the compiled version of the metric library/*-> some nodejs files used to compile the metric library
The project is set-up such, that you can use the app (html, css) as an example for how to implement your own custom user interface. And use the metric library as is. When you need changes in the metric library, please put in a Pull Request, so we keep one version.
It is not necessary to run it from a webserver; as all files are static. Simply open index.html in a browser.
The communicates to the rest of Venus OS, to for example retrieve battery voltages, or change input current limit, via the MQTT protocol, over websockets. It connects to the MQTT broker running on Venus OS.
By default, the page expects the broker to listen on the hostname in the url, on port
9001. It is also possible to specify a different host and port: use the host and
port query parameters:
file:///home/matthijs/dev/venus-webapp/app/index.html?host=192.168.178.129&port=1884
Tip: enable the Demo mode on the Venus device; see Settings -> General. This allows to get useful data if you have only the Venus device and no other Victron devices. without requiring various Victron devices to be connected to the Venus device.
var deviceInterface = new Venus.MqttInterface('localhost', 9001);
var metricService = new Venus.MetricService(deviceInterface);When we have the metric service in place, we need to setup our metrics. Each metric needs to have a unique key, a path to the device interface, some meta-data and a formatter that turns the raw value into a user-friendy string for display. All metric also has an access specifier that determines read/writeability.
NOTE: A metric needs to have the correct access for read/write to work as expected. 'r', 'w' or 'rw'
The available Venus OS dbus paths can be found at: https://github.com/victronenergy/venus/wiki/dbus
The following line will register a metric dc/battery/voltage that will update using the
/system/0/Dc/Battery/Voltage dbus path. The display is then formatted with 1 decimal
point. The 'r' represents the access specifier.
metricService.register('dc/battery/voltage', '/system/0/Dc/Battery/Voltage', 'Voltage', 'V', Venus.numericFormatter(1), 'r');
It is also possible to write completely custom formatting.
metricService.register('system/mode', '/vebus/257/Mode', 'System mode', '', function(metric) {
  if (metric.rawValue == 1) return 'Charger only';
  if (metric.rawValue == 2) return 'Inverter only';
  if (metric.rawValue == 3) return 'ON';
  if (metric.rawValue == 4) return 'OFF';
  return '--';
}, 'rw');The easiest way of presenting the metric data is by using html attributes. This method simply uses a property on the metric to update a property of a HTML element.
data-metriccontains the metric key to bind and is required.data-metric-propertycontains the property on the metric to display and is optional (defaults tovalue).data-bindingcontains the property on the element to update and is optional (defaults toinnerHTML).
<div data-metric="dc/battery/power"></div>
<div data-metric="dc/battery/power" data-property="rawValue"></div>
<input type="checkbox" data-metric="dc/battery/ischarging" data-binding="checked"/>
To hook up the bindings one must call the bindElements method on the metric service:
metricService.bindElements();Sometimes the simple property binding is not enough. Maybe you need to use some script that is more complex. In those cases subscribe to the metrics on change callback:
metric.addOnChangeCallback(function(metric) {
  var message = metric.description + ' = ' + metric.value + metric.unit;
  document.getElementById('some-id').innerHTML = message;
});You can also subscribe to metric changes using callbacks and implement a completely custom data binding.
The onUpdate callback is raised when a registered metric raw value changes.
metricService.onUpdate = function(metric) {
  console.log(metric.key + '=' + metric.value);
};The onRawUpdate callback gives you all updates from the device interface.
metricService.onRawUpdate = function(path, value) {
  console.log(path + '=' + value);
};First setup the build environment:
npm install
To build the metric library run the following command:
npm run webpack
This will output a venus-metrics.min.js file in the build folder.
Make sure to copy it to /app/library when making a release.