timing at saturation
When I measured the conversion time at different MTreg's, I noticed a strange behavior:
Every time the sensor was saturated, the conversion time was shorter than usual.
The brighter the light at saturation, the shorter the conversion time!
I suspected that the chip, when saturated, would terminate the measurement prematurely.
Since the raw value is saturated, it is useless, but the conversion time still has a reaction to the light.
So, i asked myself:
I made the following thesis:
When the conversion time is halved, the brightness is twice as high as the highest value.
We can calculate a factor from the expected time and the obtained time.
factor = time(expected)/time(measured)
At saturation this value is always higher than 1.
With this factor we multiply our saturated value and will get a higher value.
To test this, I wrote a little application:
In the main loop I measured the light with the lowest sensitivity followed by a measurement with highest sensitivity.
If the brightness increases, the sensor will be saturated at high sensitivity at a certain brightness.
But with the low sensitivity we can monitor the brightness but only with a lower resolution.
I started the application and moved a torch closer and closer to the sensor.
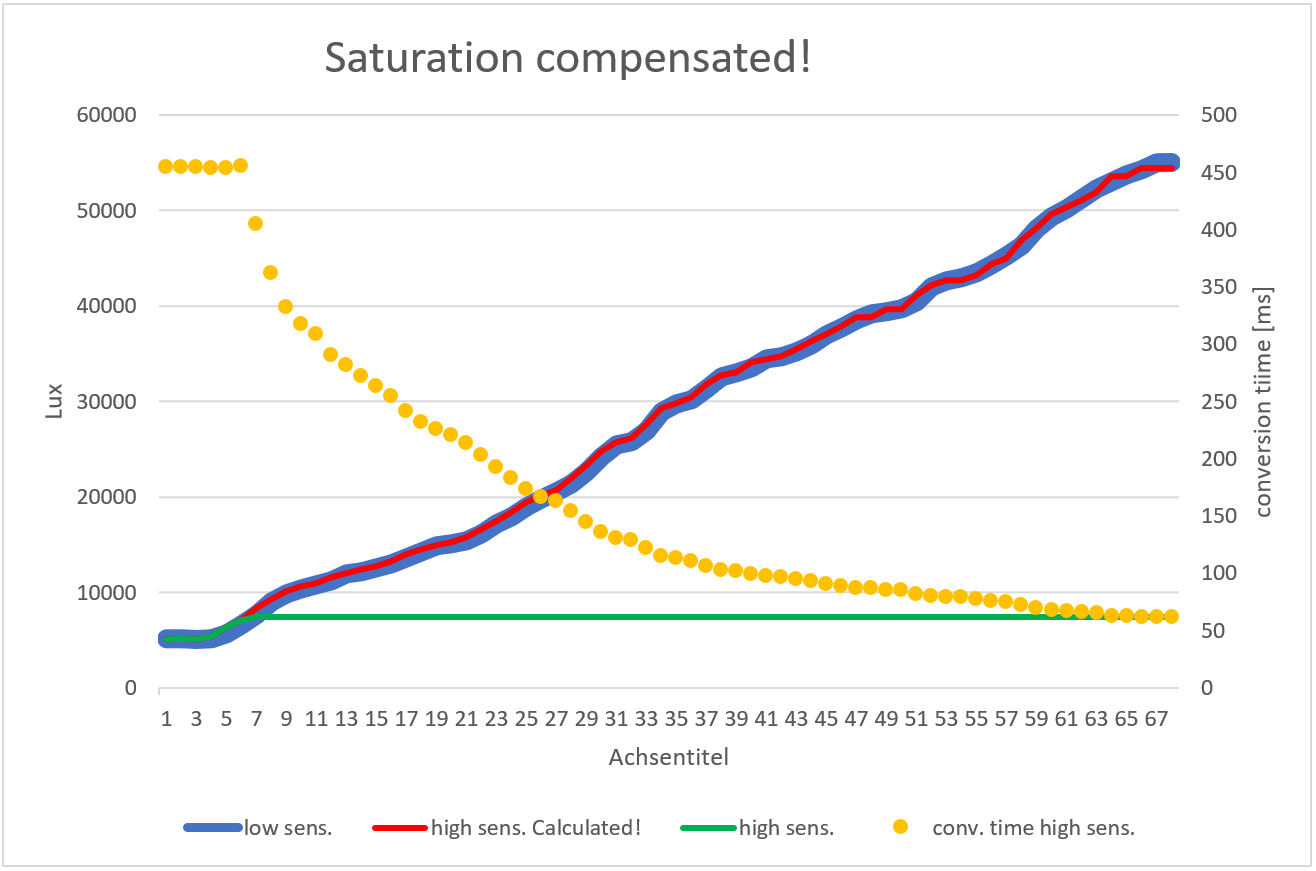
At the first 6 samples the measurements with high sensitivity (green curve) delivers valid values.
With increasing brightness, the curve becomes a flat line because it is saturated!
But we can ask for the conversion time (orange dots).
At the first 6 samples we will get the estimated conversion time of about 450 ms.
After this measurements are saturated, the conversion time decreases.
But with the measurement at low sensitivity we are still able to get valid results (thick blue curve).
And now have a look to the red curve!
This curve is calculated from the saturated conversion times. (orange dots).
Even when the measurement at low quality was saturated at 120,000 Lux, I get reasonable values from this calculation.
Of course it the factor is too big, the values are jiggle a little.
But even a rough estimation is better than the Message: "Sorry, saturated".
I did not write a function for this hack, because with this library, you only need one additional line of code to achieve this:
#include <hp_BH1750.h>
#include <Arduino.h>
hp_BH1750 BH1750;
void setup() {
  BH1750.begin(BH1750_TO_GROUND); // or BH1750_TO_VCC
  BH1750.calibrateTiming();
}
void loop() {
  BH1750.start(BH1750_QUALITY_HIGH2, 254);
  float val = BH1750.getLux();
  if (BH1750.saturated()) val = val * BH1750.getMtregTime() / BH1750.getTime();// additional line for the hack!
}
The example above is a blocking read to sensor.
For a non-blocking read it looks like this:
#include <hp_BH1750.h>
#include <Arduino.h>
hp_BH1750 BH1750;
void setup() {
  BH1750.begin(BH1750_TO_GROUND); // or BH1750_TO_VCC
  BH1750.calibrateTiming();
  BH1750.start(BH1750_QUALITY_HIGH2, 254); // start initial measurement in setup
}
void loop() {
  if (BH1750.hasValue(true)) {
  float val = BH1750.getLux();
    if (BH1750.saturated()) val = val * BH1750.getMtregTime() / BH1750.getTime();// additional line for the hack!
    BH1750.start(BH1750_QUALITY_HIGH2, 254);
  }
  //do a lot of stuff here
}
Have a look to if (BH1750.hasValue(true)) {.
With the parameter true we force a reading to the sensor.
Without this parameter, hasValue() will only read a value from then sensor after the calculated time, which will be longer.
Please refer to hasValue().