

This project is still under development and it intend to offer a full notification system, back and front-end. Questions and suggestions are welcome and you can use the issues list on Github to provide that feedback.
In actual version, notifications are composed by:
- Receiver (required): the object that will receive the notification
- Sender: who sent the notification
- Target: object that you will be the subject between the sender and receiver
- Data: hash where you can store more info about the notification
- Template (required): html template used by notification
- Read: flag that records if the receiver read the notification
- Seen: flag that records if the receiver seen the notification
- If and Unless: used to create notifications conditionally
- Kind: an attribute to scope notifications
First we need to add the gem to Gemfile
gem 'notifly'Run the bundle command to install it. After that, you need to run the initializer
$ rails generate notifly:installYou can choose to change the namespace for Notifly routes, but the default is notifly.
It will creates config/initializers/notifly.rb too. Also, in this file you can
see/change the default configs
Notifly need to storage the notifications and to do it you need to run the migrations
  $ rake notifly:install:migrations
$ rake db:migrateWe have two ways to create notifications:
If you want to create notifications after (or before) any method call.
class TicketOrder < ActiveRecord::Base
  belongs_to :ticket
  belongs_to :buyer
  belongs_to :owner

  notifly default_values: { receiver: :owner }

  notifly before: :destroy, template: :destroy, sender: :buyer, data: :attributes
  notifly after: :send_gift!, template: :ticket_gift, sender: :buyer,
    target: :ticket, if: -> { completed? }
  notifly after: :accept_gift, sender: -> { self.owner }, receiver: :buyer, target: :ticket,
    then: ->(notification) { self.send_mail_with(notification) }

  def send_gift!
    # code here
  end

  def accept_gift
    # code here
  end

  def send_mail_with(notification)
    # code here
  end
end
Value explanation about each parameter:
| Parameter | Value |
|---|---|
before or after |
The method which will create notification before or after its call |
receiver |
The method which returns the notification receiver object |
sender |
The method which returns the notification sender object |
template |
The symbol or string that indicates which partial will be rendered at views. The partial must be inside app/views/notifly/templates/. Default is :default. |
target |
The method which returns the notification target object. It's a third actor of the notification. Example: In "Max sent you a ticket" notification, Max is the sender, you are the receiver and the ticket is the target. |
data |
A method which returns a hash with usefull values to be persisted, like ticket price or whatever you want to persist. |
kind |
String used to scope notifications, default is :notification and all notifications with default type will be shown in current_user's notifications |
then |
Callback that will be executed after the notification creation. It can receive a notification as parameter. Right now it only works in the code above. |
Note that you can use the default_values parameter, it is specific to DRY your
notiflies and set the values to all notiflies. If you need to overwrite some
default value, just declare it again like the :accept_gift notifly above.
If you need to create notifications without callbacks, even in the controller scope.
class TicketOrder < ActiveRecord::Base
  belongs_to :ticket
  belongs_to :buyer
  belongs_to :owner

  before_destroy do
    owner.notifly! template: :destroy, sender: buyer, data: attributes
  end

  def send_gift!
    # code here

    if completed?
      owner.notifly! template: :ticket_gift, sender: buyer, target: ticket
    end
  end

  def accept_gift
    # code here

    buyer.notifly! sender: owner, target: ticket
  end
end
The receiver will be always the object which you call #notifly!
Notifly can send mails too. To do it, just add the option mail to your notifly
statement
class TicketOrder < ActiveRecord::Base
  belongs_to :ticket
  belongs_to :buyer
  belongs_to :owner

  notifly default_values: { receiver: :owner }

  notifly before: :destroy, template: :destroy_order_notification, sender: :buyer,
    data: :attributes, mail: { template: :destroy_order_mail }
  notifly after: :send_gift!, template: :ticket_gift, sender: :buyer,
    target: :ticket, mail: true, if: -> { completed? }
  notifly after: :accept_gift, sender: :owner, receiver: :buyer, target: :ticket,
    template: :accept_gift, mail: { only: true }

  def send_gift!
    # code here
  end

  def accept_gift
    # code here
  end
end| Description | |
|---|---|
true |
send email and notification using notifly template |
only: true |
send only an email using notifly template |
template: :foo |
send email using foo mail template and a notification using notifly template |
Notiflies with mail: { only: true } will persist notifications, but them won't
be in receivers notifications views. If you use
delayed_job
or sidekiq mails will be sent async.
You can access the notifications using the following methods:
receiver_object.notifly_notifications- Querying
Notifly::Notifications - Using our front-end helpers
- all_from: used on
Notifly::Notificationsto show notifications from a specific receiver - unseen: used on
Notifly::Notificationsand#notifly_notificationsto show only unseen notifications - not_only-mail: used on
Notifly::Notificationsand#notifly_notificationsto remove notification that are mail only
If you want to use websocket just install the gem websocket-rails and change the notifly's configuration
at config/initializers/notifly.rb
First, you need to have a current_user, if you use
Devise maybe it is already there. If you
haven't a current_user, just define a method in ApplicationController and
add it to the helpers methods. Your controller should look like this:
class ApplicationController < ActionController::Base
  def current_user
    current_talker
  end

  ActiveSupport.on_load(:action_controller) do
    helper_method :current_user
  end
end
After that you need our assets, add them to your application.js and application.css.
//= require notiflyThe notifly contain the code to do all requests and notifications injection, if
you do not use Twitter bootstrap you will need
to add //= notifly_dropdown to the code above.
/*
*= require notifly
*/
Now finally you can see the notifications view adding code bellow to your view
<%= notiflies %>This will inject our views and it will be like that
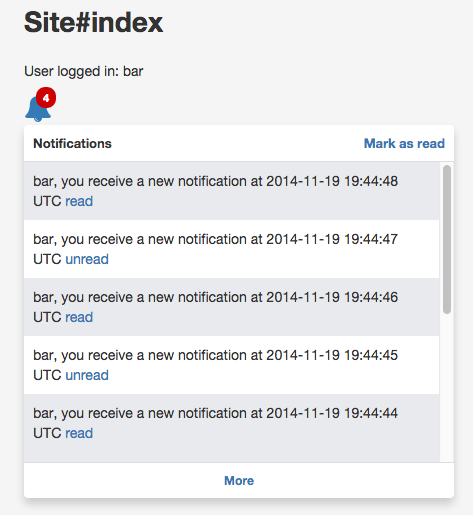
If you want to change something just use the code below
$ rails generate notifly:views| Option | Description |
|---|---|
--notification |
generates notifications templates files |
--layout |
generates layout files |
--mail |
generates mail templates files |
Notifications and Mails are rendered with their templates. They use a simple default
template but if you want to change or create new ones run the generate above
with the option that you want or create them in app/views/notifly/templates/.
Remember that notifications templates should be in notifications folder and
mails templates in mails folder and with both you need to use the main_app
to render links.
If you already have a layout and just want add our features to it, take a look at Adapting your layout.
Notifly uses I18n to render mail's subject and views, if you run the install generator
you can change it in config/locales/notifly.en.yml or create your own.
All partials that we insert in your layout are in the gem or if you generated them,
they will be in app/views/notifly/layouts/
Below are the elements that will loading the Notifly in your layout
- Counter: this element will show how many notifications are not seen. It
should have the id
#notifly-counter, and it will be replaced by the_counter.html.erb - Notifications icon: this element is the trigger to load the notifications
and you should have an icon to show when the user "have notifications" and
"do not have notifications" this element should have the id
#notifly-icon. The html icon is defined in our view helpernotifly_iconyou can overwrite it, just remember that this method should have the argumenthave_notifications=falseand is this method that tell us which icon will be in the view. - Notifications: they will be inserted in
#notifly-notifications-container, this element will contain all notifications (_notification.html.erb) rendered by_index.html.erb - Next page link: this link will append the next notifications page to the
#notifly-notifications-container, it should be in the page and should have the id#notifly-more-notifications-link. This link should not have a href. - Mark as read: this link will mark all notifications in the page as read,
it should be in the page and should have the id
#notifly-mark-as-read-link. This link should not have a href. - Loading: html element that will be showing while the notifications request
isn't completed. It should be in
#notifly-notifications-containerand should have the classloading - Toggle read: this link will be rendered by
_actions.html.erb' in_notification.html.erb`
Those elements should be inside an element with id #notifly and the dropdown
trigger should have the id #notifly-trigger. For more info and examples, just
take a look at _notifly.html.erb
Consider to use zenhub, with it will know what issues and features are in "progress" or "to do". Also, I encourage you to use git-flow and EditorConfig.
Fork the repository. Then, run:
  git clone [email protected]:<username>/notifly.git
  cd notifly
  git branch master origin/master
  git flow init -d
  git flow feature start <your-feature>
Then, do work and commit your changes.
git flow feature publish <your feature>When done, open a pull request to your feature branch.