Contact : [email protected]
You can install gwaihir via the setup.py script (pip install .)
Gwaihir is also avaible on pypi.org, each new stable version from the master branch is uploaded: https://pypi.org/project/gwaihir/
On the contrary, if you follow the github changes on the you will have the latest updates.
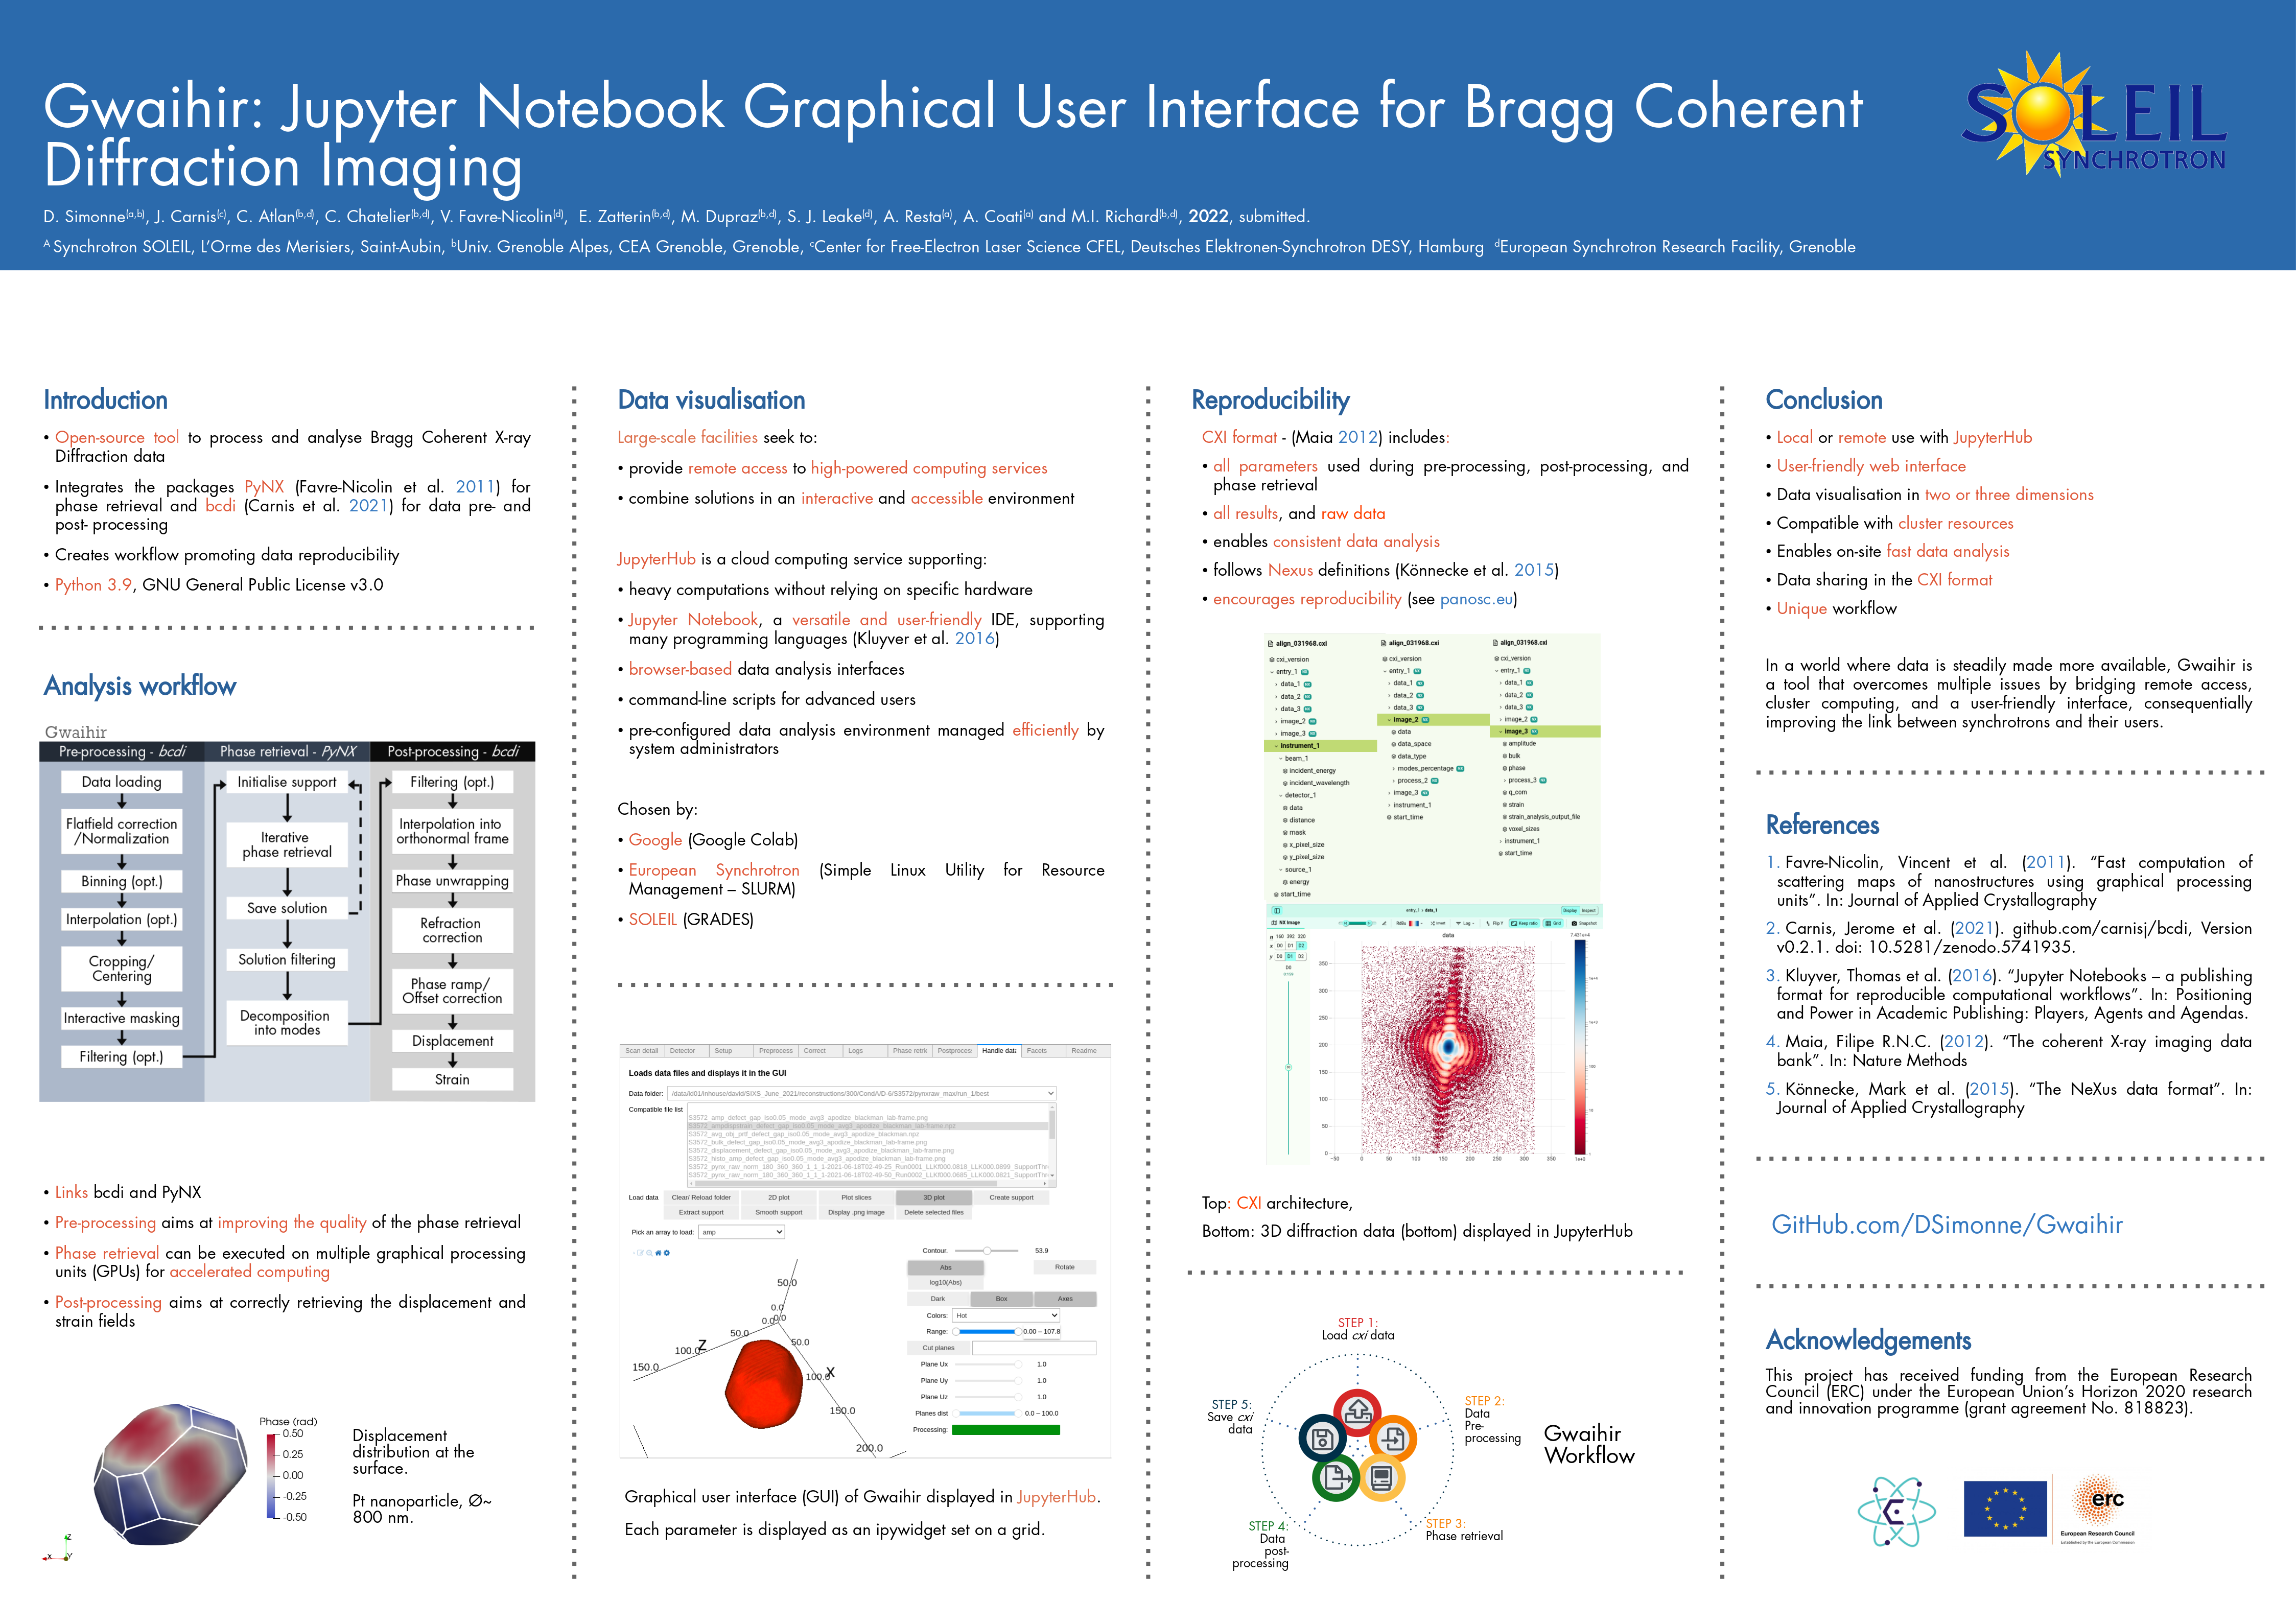
Here is a link to a poster that tries to present Gwaihir: Poster_Gwaihir.pdf
And to the paper
To increase the width of the cells in Jupyter Notebook:
from IPython.core.display import display, HTML
display(HTML("<style>.container { width:75% !important; }</style>"))
To avoid automatic cell scrolling:
%%javascript
IPython.OutputArea.prototype._should_scroll = function(lines) {
    return false;
}preprocessing.mp4
phase_retrieval.mp4
handle_data.mp4
postprocessing.mp4
No video yet.
An example file can be downloaded at: https://www.dsimonne.eu/PhDAttachments/align_031968.cxi
Gwaihir only works on slurm, while using the p9 GPUs, for phase retrieval.
if you want to use it for data analysis, you can install gwaihir and bcdi on rnice.
How to access:
ssh -X <login>@slurm-nice-devel
Ask for a GPU:
srun -N 1 --partition=p9gpu --gres=gpu:1 --time=01:00:00 --pty bash
/usr/bin/python3: your personal environemnt- p9.dev : optimised for BCDI, gwaihir and PyNX, development version,
source /data/id01/inhouse/david/p9.dev/bin/activate - p9.stable : optimised for BCDI, gwaihir and PyNX, stable version,
source /data/id01/inhouse/david/p9.stable/bin/activate - p9.pynx-devel : pynx only, frequently updated :
source /sware/exp/pynx/devel.p9/bin/activate
You are not allowed to modify these environments but you can link a kernel if you wish to use them in jupyter.
To do so:
- Source the environment; e.g.
source /data/id01/inhouse/david/p9.dev/bin/activate - Make sure that:
- you are on slurm
- you requested a GPU
- Create the kernel:
python3 -m ipykernel install --user --name p9.stable
- Documentation
Once you feel confident, you should create your own environment, to avoid sudden updates that may impact your work!
To list the kernels you have installed: jupyter kernelspec list
And to remove them: jupyter kernelspec uninstall <kernelname>
- Login into slurm (make sure that you asked for a GPU)
- Open a terminal (new -> terminal)
Enter the following commands (replace <username> with your username, for me it is simonne)
cdssh-keygen -t rsa(press enter when prompted, ~ 3 times)ssh <username>@slurm-nice-devel mkdir -p .sshcat .ssh/id_rsa.pub | ssh <username>@slurm-nice-devel 'cat >> .ssh/authorized_keys'
You should not need a password anymore when login into slurm, make sure it is the case by typing
ssh <username>@slurm-nice-devel
To access SOLEIL from your personal computer, you can use NoMachine (easiest way, to the best of my knowledge).
Otherwise you may use a remote desktop, the documentation can be found here (must be on SOLEIL network) http://confluence.synchrotron-soleil.fr/display/EG/Service%3A+Remote+Desktop
A GPU is installed on sixs3, a computer available on the beamline, for phase retrieval.
Please respect the following steps:
- Make sure that you are logged in as
com-sixs - Activate the environment
source_py3.9orsource /home/experiences/sixs/simonne/Documents/py39-env/bin/activate, this environment is protected and you cannot modify it. - Launch
jupyter notebook - Go to the test_data folder and then choose the beamline you want to test
- Follow the instructions in the notebook
A GPU is installed on cristal4, a computer available on the beamline, for phase retrieval.
Please respect the following steps:
- Make sure that you are logged in as
com-cristal - Activate the environment
source_py3.9orsource /home/experiences/sixs/simonne/py39-env/bin/activate, this environment is protected and you cannot modify it. - Launch
jupyter notebook - Go to the test_data folder and then choose the beamline you want to test
- Follow the instructions in the notebook
- First, I advise you to create a
/Packagesdirectory to keep these. - Secondly, I advise you to create a virtual environment to help with debogging, and so that once everything works, you don't update a package by mistake. To do so please follow the following steps:
mkdir py38-envcd py38-env/python3.8 -m venv .source bin/activate# To activate the environment- Make sure
wheelis installed:pip install wheel
Then you should create an alias such as: alias source_p9="source /home/user/py38-env/bin/activate"
cd /Packagesmkdir PyNX_installcd PyNX_install/curl -O http://ftp.esrf.fr/pub/scisoft/PyNX/pynx-devel-nightly.tar.bz2# Installation details within install-pynx-venv.shsource_p9pip install pynx-devel-nightly.tar.bz2[cuda,gui,mpi]# Install with extras cuda, mpi, cdi- cite
PyNX: high-performance computing toolkit for coherent X-ray imaging based on operators is out: J. Appl. Cryst. 53 (2020), 1404, also available asarXiv:2008.11511
cd /Packagesgit clone https://github.com/DSimonne/gwaihir.gitcd gwaihirsource_p9pip install .- cite <>
cd /Packagesgit clone https://github.com/carnisj/bcdi.gitcd bcdisource_p9pip install .- cite
DOI: 10.5281/zenodo.3257616 - If
vtkdoes not install (on slurm), you can type :pip install --trusted-host www.silx.org --find-links http://www.silx.org/pub/wheelhouse vtk, you may also need to remove the version requirements inbcdi/setup.py
- Send a thank you email to Fred Picca =D
cd /Packagesgit clone https://salsa.debian.org/science-team/facet-analyser.gitcd facet-analysergit checkoutsudo mk-build-deps -i- Make sure that you have qt installed, for me I had to install
libqt5opengl5-dev(debian-testing) debuild -b- if the package creation fail, try to ignore the test in /debian/rules (line 19)
sudo debi- The package is now installed. You can check the locations of its files with the command
dpkg -L facet-analyser - You should see a file named
/usr/lib/x86_64-linux-gnu/paraview-5.9/plugins/FacetAnalyser/FacetAnalyser.so - Now launch
/usr/bin/paraview(if not installed yet, good luck, refer tohttps://www.paraview.org/Wiki/ParaView:Build_And_Install#Installing) - In paraview, go to Tools > Manage Plugins > Load New
- Here type the path to the plugin that was printed with the
dpkg -L facet-analysercommand. - Feel free to add it to
/usr/bin/pluginso that it is loaded automatically. - cite
Grothausmann, R. (2015). Facet Analyser : ParaView plugin for automated facet detection and measurement of interplanar angles of tomographic objects. March.
It is possible to automate the navigation in the GUI !
Here I have a pandas DataFrame that contains data about my scans, I use to automate the navigation:
import time
import numpy as np
import matplotlib.pyplot as plt
import pandas as pd
import glob

df = pd.read_csv("reconstructions/scans_data.csv")

GUI.tab_facet.children[3].value = False
GUI.window.selected_index = 0
time.sleep(1)

GUI._list_widgets_init_dir.children[7].value = False
time.sleep(1)

scan = 3600
row = df[df.scan == scan]

particle = row.particle.values[0]
temp = row.temp_given.values[0]
condition = row.condition.values[0]

GUI._list_widgets_init_dir.children[2].value = scan
GUI._list_widgets_init_dir.children[
    3].value = f"/data/id01/inhouse/david/SIXS_June_2021/reconstructions/{temp}/{condition}/{particle}/S{scan}/data/"
GUI._list_widgets_init_dir.children[
    4].value = f"/data/id01/inhouse/david/SIXS_June_2021/reconstructions/{temp}/{condition}/{particle}/"
time.sleep(1)
GUI._list_widgets_init_dir.children[7].value = True

time.sleep(1)

GUI.window.selected_index = 9

GUI.tab_facet.children[3].value = "load_csv"