I tried this original sound board project. you can see the original project here https://github.com/israelperez/heroquest The biggest issue i had is the 8mb storage limit. I saw there is mp3 support for circuit python. https://learn.adafruit.com/circuitpython-essentials/circuitpython-mp3-audio Mp3 files are 5x or more smaller that wav files.
I’ve always wanted to make my games immersive in a way that allows most people to get into them and enjoy them. So, I decided to create a soundboard. In the past I used websites before using an app on my phone, and now I’ve finally created a standalone self-contained soundboard which can be used for anything really.
Copyright Notice The audio samples here were gathered from various sources and have copyright. They have been edited, cleaned and mixed to create the samples used in this project. They are only intended for personal use under creative commons 4.0 (CC BY_NC 4.0) https://creativecommons.org/licenses/by-nc/4.0/
you are free to:
- Share: Copy and redistribute the material in any medium or format
- Adapt: Remix, transform, and build upon the material
Under the following terms:
- Attribution: You must give appropriate credit, provide a link to the license, and indicate if changes were made. You may do so in any reasonable manner, but not in any way that suggests the licensor endorses you or your use.
- NonCommercial: You may not use the material for commercial purposes.
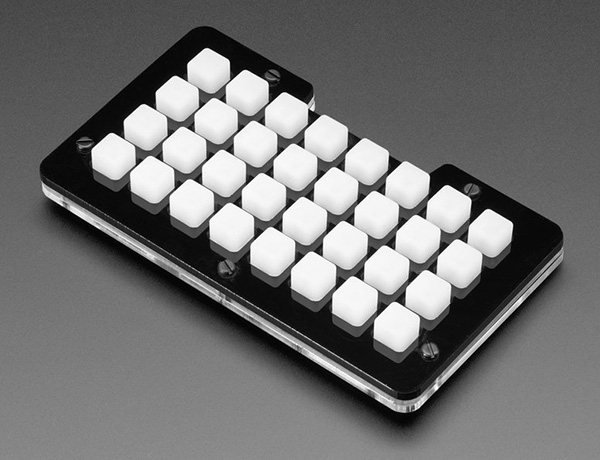
NeoTrellis M4
https://www.adafruit.com/product/4020
I bought mine from digikey. This kit includes the following parts:
- 1 x Adafruit NeoTrellis M4 Mainboard
- 1 x Adafruit NeoTrellis M4 Enclosure kit
- 2 x Silicone Elastomer 4x4 Button Keypad
- 1 x Little Rubber Bumper Feet (4 bumpers total)
Assembly of the NeoTrellis M4 Enclosure kit is pretty straight forward, just note the order of the acrylic panels is important. If you’re using the 3d printed mount then don’t use the screws on the side, we will use these to attach it to mount. https://learn.adafruit.com/adafruit-neotrellis-m4/assembly
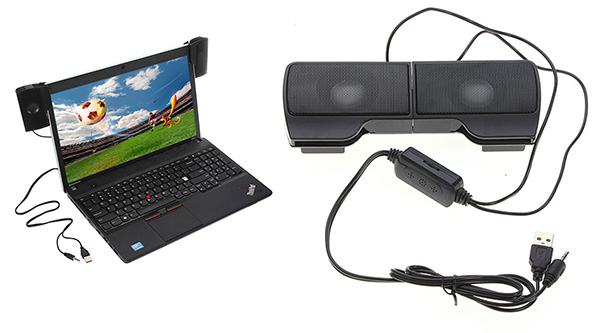
USB speaker
This is the one I bought because it comes with volume control and the speakers have clips which make it easy to mount to something.

Power bank
I bought the Kenji 10,000 mAh power bank. This project doesn’t require much power. this one was cheap and had dual usb outs and came with a usb to micro-usb to power the board. If you want to use it the same 3d printable frame you’ll need to make sure your power bank is smaller than 144mm (L) x 70mm (W) x 15mm (H). You could use sponge material to wedge for whichever one you use. Just make sure there is access to any on/off button, the usb ports and the recharge port.
3D files for mounting frame
You can download the files from
You can read https://learn.adafruit.com/adafruit-neotrellis-m4 for detailed information. It can be overwhelming but it’s there in case you need it. For this project the steps are really minor
I used the following projects as a basis
- https://learn.adafruit.com/neotrellis-dungeon-crawl-soundboard
- https://learn.adafruit.com/star-trek-sound-board-with-neotrellism4
-
Update to the latest bootloader https://learn.adafruit.com/adafruit-neotrellis-m4/update-the-uf2-bootloader
- Essentially this is downloading the UF2 file.
- Click the reset button on the back of the board once or twice depending on what’s already running on the board. You should see the NeoTrellis M4 come up as a new drive labelled something...BOOT
- Drag and drop the bootloader UF2 into the new drive
-
Install the latest CircuitPython for NeoTrellis https://learn.adafruit.com/adafruit-neotrellis-m4/circuitpython
- Essentially this is downloading the UF2 file of CircuitPython that is specifically made for this board.
- Double click the reset button and a new drive will appear something...BOOT
- Drag and drop the circuit python UF2 into the new drive
-
Add the latest versions of the libraries used in this project. https://github.com/adafruit/Adafruit_CircuitPython_Bundle/releases/ You’ll need to download the right library for the version of CircuitPython you’re using. I’ve included version 7x in this repo as it was the stable version at the time of writing this.
For this project you will need the following files and paste them into the /lib folder:
- adafruit_fancyled (whole folder)
- adafruit_trellism4.mpy
- neopixel.mpy
- adafruit_matrixkeypad.mpy
You can download the entire contents of https://github.com/israelperez/heroquest/tree/main/soundboard/images/NeoTrellis%20M4 and paste it into the root directory of the NeoTrellis. Just be aware that this code is using version 7.x of circuit python, so if you are using another version you will need to grab the correct libraries. It would still be worth while to read the rest of this guide incase you have problems or you want to make customisations. Make sure you understand the copyright and skip to section 5. Ready to use..
With this project there is the option of using up to 32 different audio samples and 1 intro welcome sample. All the files need to be in the same format. Which is 16-bit PCM WAV at 22,050 Hz and they need to be either all Stereo or all Mono. No mix and match! If the non-matching samples are played it will shutdown the unit.
If you want an intro with a swirling light effect, include welcome.wav in the root directory. The welcome file in this repo is mono, but you can use a stereo one. You’ll just have to edit code.py.
- Uncomment line 39 (remove the # at the start)
# with audioio.AudioOut(board.A1, right_channel=board.A0) as audio: - Comment line 40 (add a # at the start)
with audioio.AudioOut(board.A1) as audio:
This project uses the file soundboard.txt. This file should be in the root directory of the NeoTrellis. The file defines what sound files are available, which button on the NeoTrellis is used and the chosen colour of that button. All audio files should be in the /samples folder.
Each line is made up of a filename and a colour, separated by a comma. Colour names correspond to those in the color_names.py file.
The first line defined the sample used for the top left button. The next line defines the button to the right unless there are no more on the current row in which case it will be defined the first button of a new line. Blank lines and comments (lines starting with # are ignored. Spaces around the separating commas are also ignored. If the file can’t be found it will be replaced with a pass value
pass : if the line has the "pass" value, this button will have no sound and will be button will be black.
bgm_ : if the filename starts with "bgm_" then the sample is played a different layer, the background layer, and won’t be interrupted by other sound effects - only another file starting with "bgm_" will interrupt playback. Example: bgm_mission__complete.wav
loop : (only applies to files with files that start with "bgm_") By adding "loop" to the end of a filename, the soundboard will loop the playback of the sample. Examples: bgm_ambience-loop.wav, bgm_combat_loop.wav, bgm_combat-bossloop.wav
cannon_hit.mp3, RED
sea_monster_1.mp3, AQUA
sea_monster_5.mp3, AQUA
pass
pass
pass
pass
pass

cannon_miss.mp3, RED
sea_monster_2.mp3, AQUA
combat_death_male.mp3, ORANGE
pass
pass
pass
pass
pass

distant_cannon_blast_hit.mp3, RED
sea_monster_3.mp3, AQUA
combat_death_female.mp3, ORANGE
pass
pass
pass
pass
pass

distant_cannon_blast_miss.mp3, RED
sea_monster_4.mp3, AQUA
combat_death_monster.mp3, ORANGE
bgm_tavern-loop.mp3, PURPLE
bgm_ship-loop.mp3, PURPLE
bgm_ship storm-loop.mp3, PURPLE
bgm_calm_sea_sailing-loop.mp3, PURPLE
bgm_market-loop.mp3, PURPLE
With the above soundboard.txt, you will get the following layout
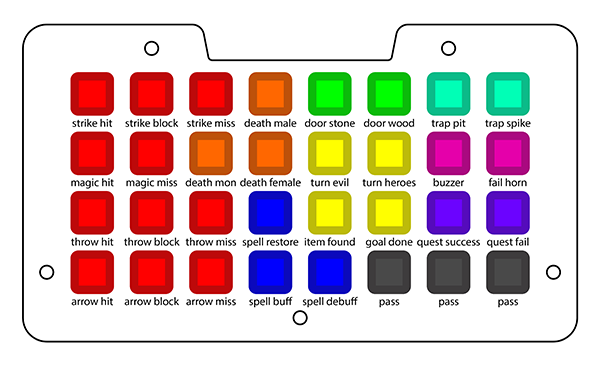
I’ve created and tested my own colour values, the ones it had predefined weren’t well defined or looked so similar that you couldn't tell they were different colours.
RED = 0xff0000
ORANGE = 0xd03100
YELLOW = 0xffff00
GREEN = 0x00ff00
AQUA = 0x00e022
TEAL = 0x00b04f
SKY = 0x008080
BLUE = 0x0000ff
PURPLE = 0x4000c0
LILAC = 0x710090
PINK = 0xb80047
CHERRY = 0xe80017
WHITE = 0xFFFFFF
BLACK = 0x000000code.py is the brains of the soundboard
# SPDX-FileCopyrightText: 2018 Limor Fried for Adafruit Industries
# SPDX-License-Identifier: MIT
# Enhanced by Israel Perez

import time
import board
import audioio
import gc
#  import audiocore
import audiomixer
import adafruit_fancyled.adafruit_fancyled as fancy
import adafruit_trellism4
#  import digitalio
import audiomp3

from color_names import *  # pylint: disable=wildcard-import,unused-wildcard-import


PLAY_SAMPLES_ON_START = False
SELECTED_COLOR = WHITE
SAMPLE_FOLDER = "/samples/"  # the name of the folder containing the samples
SAMPLES = []


# For the intro, pick any number of colors to make a fancy gradient!
INTRO_SWIRL = [RED, GREEN, BLUE]

# Our keypad + neopixel driver
trellis = adafruit_trellism4.TrellisM4Express(rotation=0)


# load the sound & color specifications
with open("soundboard.txt", "r") as f:
    for line in f:
        cleaned = line.strip()
        if len(cleaned) > 0 and cleaned[0] != "#":
            if cleaned == "pass":
                SAMPLES.append(("does_not_exist.mp3", BLACK))
            else:
                f_name, color = cleaned.split(",", 1)
                SAMPLES.append((f_name.strip(), eval(color.strip())))

# set led brightness
trellis.pixels.brightness = 0.1

# Play the welcome mp3 (if its there) and run intro sequence
# with audioio.AudioOut(board.A1) as audio: # mono
with audioio.AudioOut(board.A1, right_channel=board.A0) as audio:  # stereo
    try:
        f = open("welcome.mp3", "rb")
        mp3 = audiomp3.MP3Decoder(f)
        audio.play(mp3)
        swirl = 0  # we'll swirl through the colors in the gradient
        while audio.playing:
            for i in range(32):
                palette_index = ((swirl+i) % 32) / 32
                color = fancy.palette_lookup(INTRO_SWIRL, palette_index)
                # print(palette_index, fancy.denormalize(color)) display RGB of swirl
                trellis.pixels[(i % 8, i//8)] = color.pack()
            swirl += 1
            #  key press stops intro
            pressed_buttons = trellis.pressed_keys
            if pressed_buttons:
                mp3.deinit()

            time.sleep(0.005)
        f.close()
        # Clear all pixels
        trellis.pixels.fill(0)
        # just hold a moment
        time.sleep(0.5)
    except OSError:
        # no welcome.mp3 file
        pass
gc.collect()
mp3.deinit()

# Parse the first file to figure out what format its in
channel_count = None
bits_per_sample = None
sample_rate = None
with open(SAMPLE_FOLDER+SAMPLES[0][0], "rb") as f:
    mp3 = audiomp3.MP3Decoder(f)
    channel_count = mp3.channel_count
    bits_per_sample = mp3.bits_per_sample
    sample_rate = mp3.sample_rate
    print("%d channels, %d bits per sample, %d Hz sample rate " %
          (mp3.channel_count, mp3.bits_per_sample, mp3.sample_rate))

    # Audio playback object - we'll go with either mono or stereo depending on
    # what we see in the first file
    if mp3.channel_count == 1:
        audio = audioio.AudioOut(board.A1)
    elif mp3.channel_count == 2:
        audio = audioio.AudioOut(board.A1, right_channel=board.A0)
    else:
        raise RuntimeError("Must be mono or stereo mp3s!")

mixer = audiomixer.Mixer(voice_count=2,
        sample_rate=sample_rate,
        channel_count=channel_count,
        bits_per_sample=bits_per_sample,
        samples_signed=True)
audio.play(mixer)

# Clear all pixels
trellis.pixels.fill(0)

# Light up button with a valid sound file attached
for i, v in enumerate(SAMPLES):
    filename = SAMPLE_FOLDER+v[0]
    try:
        with open(filename, "rb") as f:
            mp3 = audiomp3.MP3Decoder(f)
            print(filename,
                  "%d channels, %d bits per sample, %d Hz sample rate " %
                  (mp3.channel_count, mp3.bits_per_sample, mp3.sample_rate))
            if mp3.channel_count is not channel_count:
                pass
            if mp3.bits_per_sample is not bits_per_sample:
                pass
            if mp3.sample_rate is not sample_rate:
                pass
            trellis.pixels[(i % 8, i//8)] = v[1]
            if PLAY_SAMPLES_ON_START:
                audio.play(mp3)
                while audio.playing:
                    pass
    except OSError:
        # File not found! skip to next
        if filename is not SAMPLE_FOLDER+"does_not_exist.mp3":
            print('Not found: ' + filename)
        pass

def stop_playing_sample(playback_details):
    print("playing: ", playback_details)
    mixer.stop_voice(playback_details["voice"])
    trellis.pixels[playback_details["neopixel_location"]] = playback_details["neopixel_color"]
    playback_details["file"].close()
    playback_details["voice"] = None
    playback_details["sample_num"] = None

current_press = set()
current_background = {"voice" : None, "sample_num": None}
currently_playing = {"voice" : None}
# last_samplenum = None
while True:
    pressed = set(trellis.pressed_keys)
    just_pressed = pressed - current_press

    for down in just_pressed:
        sample_num = down[1]*8 + down[0]
        try:
            gc.collect()
            filename = SAMPLE_FOLDER+SAMPLES[sample_num][0]
            f = open(filename, "rb")
            mp3 = audiomp3.MP3Decoder(f)
            print(sample_num, filename)
            # Check to see if its background music
            if filename[9:13] == "bgm_":
                # Check if sample is already playing then stop it
                if current_background["sample_num"] == sample_num:
                    stop_playing_sample(current_background)
                    gc.collect()
                    break
                # Check to see if it needs to loop
                will_loop = False
                file_name = filename.split(".")[0]
                if file_name[len(file_name) - 4:] == "loop":
                    will_loop = True
                if current_background["voice"] is not None:
                    print("Interrupt")
                    stop_playing_sample(current_background)
                    gc.collect()
                trellis.pixels[down] = WHITE
                mixer.play(mp3, voice=0, loop=will_loop)
                current_background = {
                    "voice": 0,
                    "neopixel_location": down,
                    "neopixel_color": SAMPLES[sample_num][1],
                    "sample_num": sample_num,
                    "file": f}
            else:
                if currently_playing["voice"] is not None:
                    print("Interrupt")
                    stop_playing_sample(currently_playing)
                    gc.collect()
                trellis.pixels[down] = WHITE
                mixer.play(mp3, voice=1, loop=False)
                currently_playing = {
                    "voice": 1,
                    "neopixel_location": down,
                    "neopixel_color": SAMPLES[sample_num][1],
                    "sample_num": sample_num,
                    "file": f}
        except OSError:
            pass  # File not found! skip to next

    # check if any samples are done
    if not mixer.playing:
        if currently_playing["voice"] is not None:
            stop_playing_sample(currently_playing)
            gc.collect()
        if current_background["voice"] is not None:
            stop_playing_sample(current_background)
            gc.collect()

    time.sleep(0.01)  # a little delay here helps avoid debounce annoyances
current_press = pressedYour soundboard is now ready to use how ever you want to. You'll notice pressing the button a second time will stop playback of that sample of the same layer. Pressing a new button will interrupt the currently playing sample of the same layer. Files starting with "bgm_" will play on one layer and all other files on another.
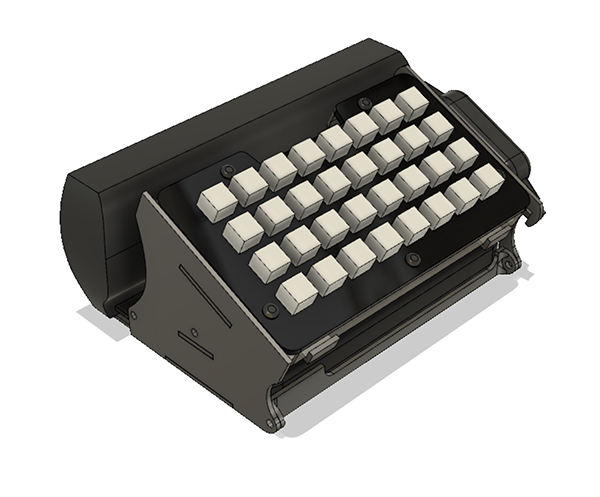
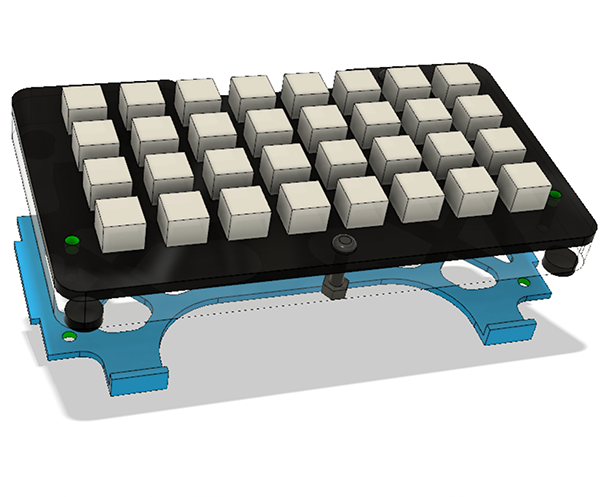
I have designed this mounting frame that neatly packages all the parts of this project. You do not need it to enjoy the soundboard but its saves room and mess on a table top.
You will need:
- All parts 3d printed. Make sure you test fit the parts before you begin assmebly. Ensure the tabs fit correctly, you may need to remove material from the tabs due to elephants’ foot or inaccuracies in your printer.
- 8x M3x6mm screws
- 2x M3x16mm screws.
- Zip ties no wider than 4mm. Once you print all the parts, test fit the parts, you may need to remove material from the tabs due to elephants’ foot or inaccuracies in your printer.
Assemble in the following order.
-
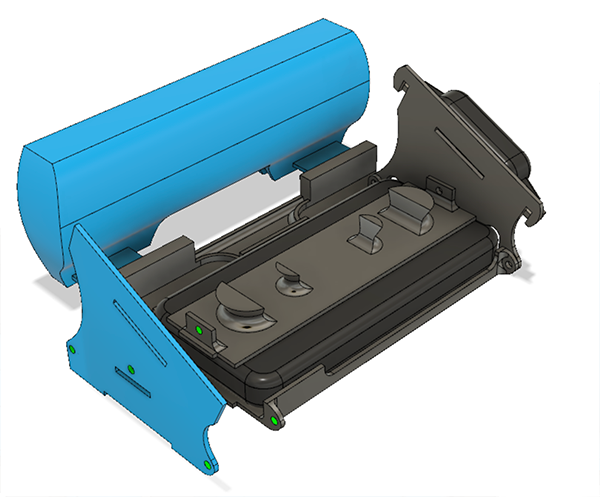
Combine the speaker mount to the battery mount with 2x M3x6mm screws.
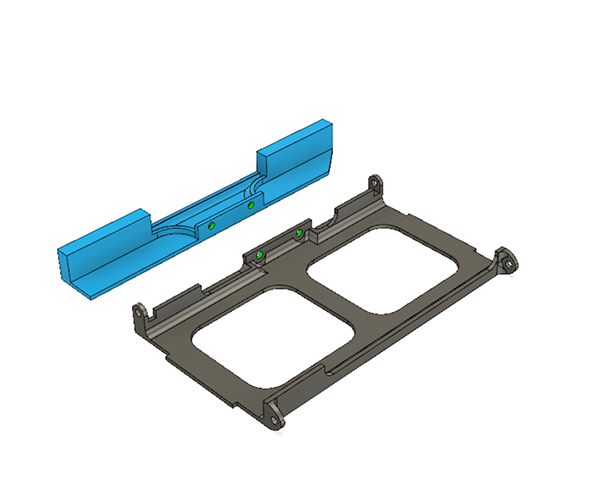
-
Now combine side B using another 2x M3x6mm screws.
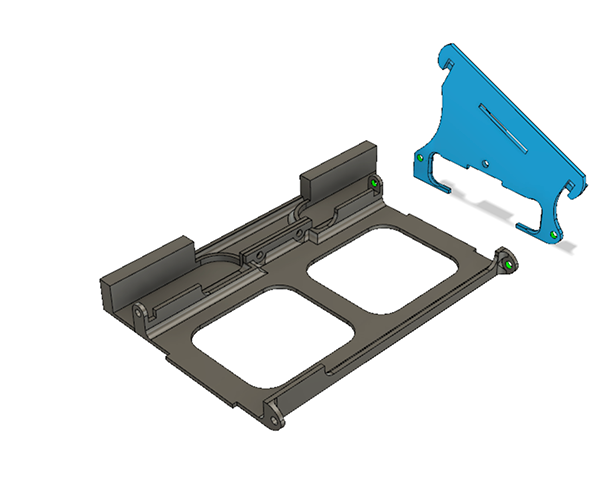
-
Now add the part cable tidy with 1x M3x6mm screw.

-
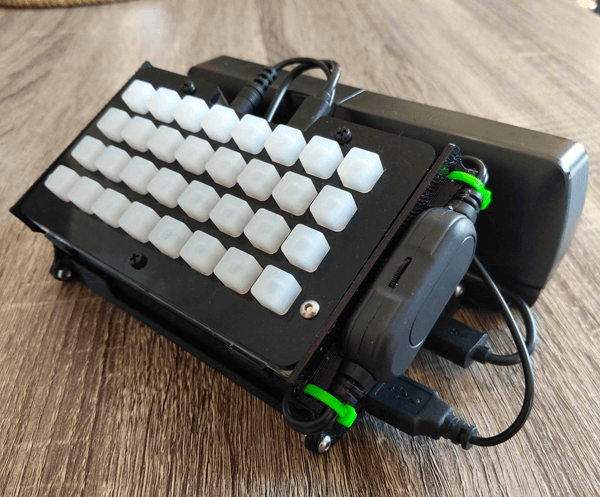
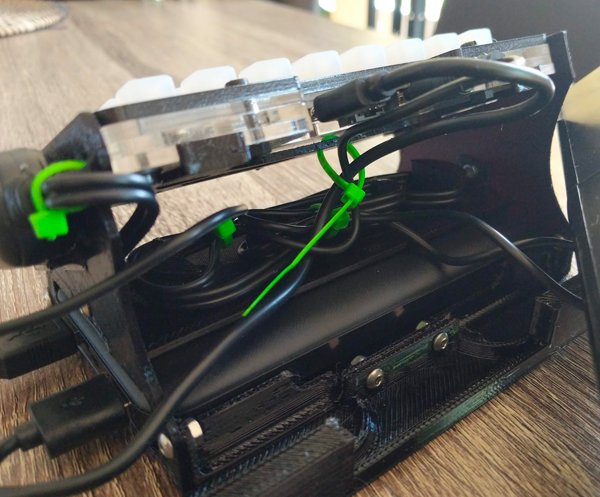
Attach the speakers and start wiring, use the protrusions and wrap the wires. leave enough slack to be able to remove the speakers if need be. Once all the wiring is done slide in the power bank.
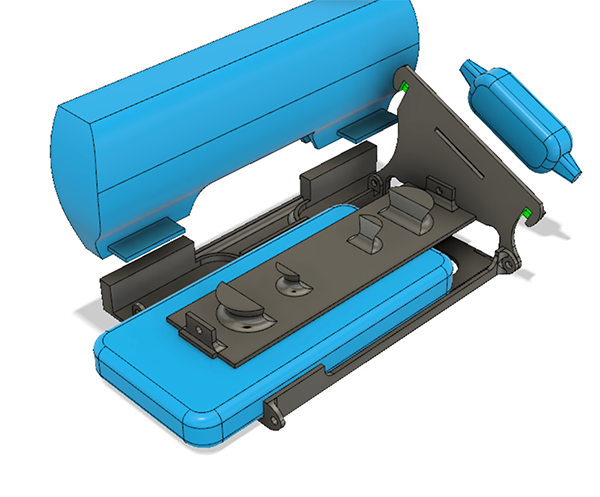
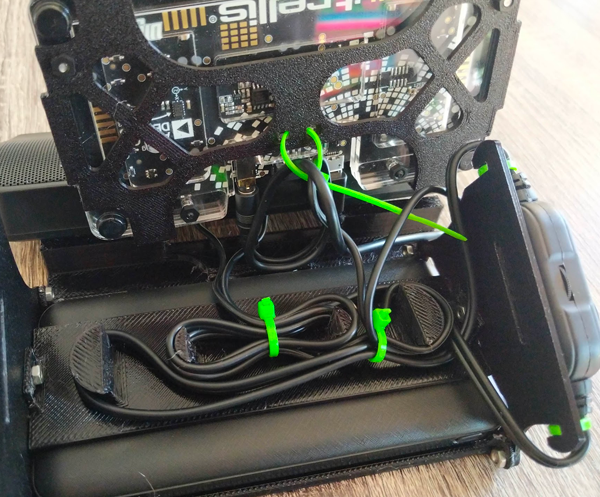
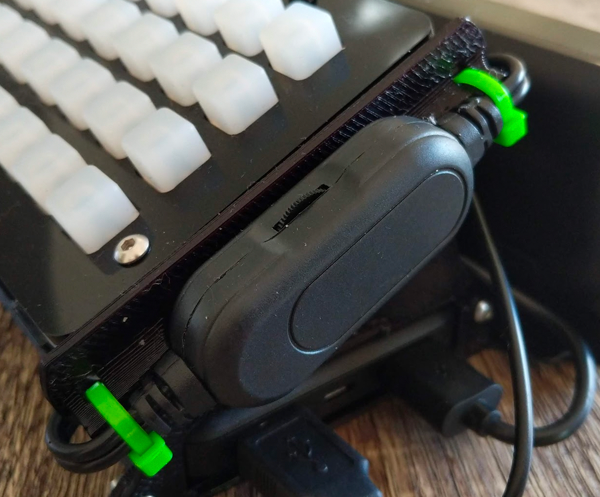
The part side B has a part where you you need to use zip ties to attach the volume control. Ensure the volume dial is facing upwards. Continue to wrap the cable using zip ties as need be. Leave enough slack on the other end to be able to plug the cables into the device and power bank.
-
Remove the speakers so you can attach side A with 2 more M3x6mm screws.
-
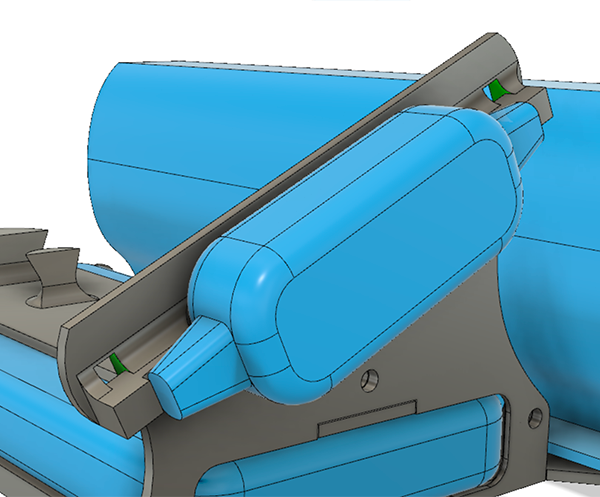
Now its time to prepare the NeoTrellis. If you fully assembled the NeoTrellis M4 Enclosure kit, remove the 2 black M3x12mm screws on the sides. Use these holes and the 2x M3x16mm screws to attach it to the M4 mount. There is also a hole for a zip tie so you can pass the 3.5mm audio jack and micro usb through. I didn’t tighten it but kept it as a loose loop. Made it easier to pass the audio cable and micro usb cable.
-
Finally push the M4 mount with the NeoTrellis into the sides and into the tab holes. Make sure its the right way up, with the ports facing the speaker. Reattach the speakers.

-
All done!