To communicate with other devices we need to use a board that has WiFi, Bluetooth or etc. Therefore we will use ESP 32 board which is suitable for this usage.
We want to provide a IoT dashboard for our Green House!!!

Please follow this link.
Look at your board. Find a gold chipset. see the name and find this name in the arduino IDE boards.
Remember Lab 1, upload the Blink LED source code. build the circut and see if it works.
| Ex.1 | Add this step to the report. |
|---|
Remember Lab 3, Upload the code of Ex.3 there. build the circut and see if it works.
| Ex.2 | Add this step to the report. |
|---|
The objective of this part is to explain how to get started using the WiFi functionalities of the ESP32, more precisely how to scan surrounding WiFi networks and how to connect to a specific WiFi network. This part will also cover getting some parameters, such as the local IP of the ESP32 when connected to the WiFi network, and also its MAC address. We will also cover how to disconnect from the WiFi network.
Your ESP32 has a wifi module.
The
WiFi.hlibrary allows an Arduino board to connect to the internet. It can serve as either a server accepting incoming connections or a client making outgoing ones. The library supports WEP and WPA2 Personal encryption, but not WPA2 Enterprise. Also note, if the SSID is not broadcast, the shield cannot connect.
The first thing we are going to do is including the WiFi.h library
#include <WiFi.h>
//setup OLED
void setup(){
  display.begin(); // Instead of Serial.begin(9600)
  display.setTTYMode(true); // This set the TTY mode

}
Next, we will declare two global variables to hold our WiFi network credentials, more precisely the network name (SSID) and the password.
const char* ssid = "yourNetworkName";
const char* password = "yourNetworkPassword";void scanNetworks() {
int numberOfNetworks = WiFi.scanNetworks();
display.printf("Number of networks found: %d\n",numberOfNetworks);
for (int i = 0; i < numberOfNetworks; i++) {
display.print("Network name: ");
display.println(WiFi.SSID(i));
display.print("Signal strength: ");
display.println(WiFi.RSSI(i));
display.print("MAC address: ");
display.println(WiFi.BSSIDstr(i));
//display.print("Encryption type: ");
//display.print(WiFi.encryptionType(i)); the type is wifi_auth_mode_t
display.println("-----------------------");
}
}void connectToNetwork() {
WiFi.begin(ssid, password);
while (WiFi.status() != WL_CONNECTED) {
delay(1000);
display.println("Establishing connection to WiFi..");
}
display.println("Connected to network");
}void printWiFiInfo() {
display.println(WiFi.macAddress());
display.println(WiFi.localIP());
}void disconnect(){
WiFi.disconnect(true);
display.print("Disconnected! ip:");
display.println(WiFi.localIP());
}ThingSpeak is a free web service which helps us in IoT based projects. By using ThingSpeak server, we can monitor our data over the internet using the API and channels provided by ThingSpeak. In this section I am explaining about how to send sensor data of ESP32 to ThingSpeak server. For this you have to follow following steps:
-
Firstly go to https://thingspeak.com/ and create an account and sign in to this server.
-
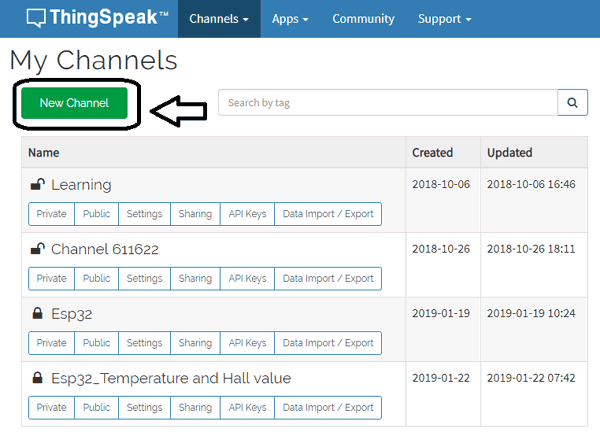
After signing in you will find below window in which number of channels are listed in this go to New channel.
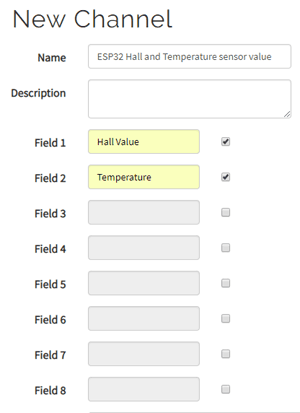
- After clicking on New Channel you will find a window in which you have to enter some details about the channel, in this project we want to analyze temperature and Hall sensor value of ESP32 so you will require 2 fields. So enter the details as shown and save the channel.
- After saving of channel you will find channel stats window showing details about your channels.

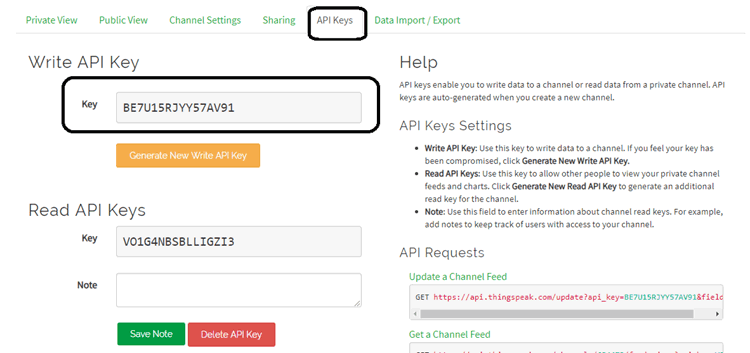
- Now go to API key menu which shows you Write API keys and Read API key, Copy Write API key as you will required this API during programming of ESP32.
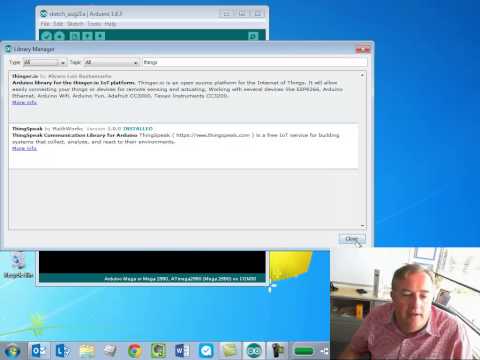
In the Arduino IDE, choose Sketch/Include Library/Manage Libraries. Click the ThingSpeak Library from the list, and click the Install button.
We have provided a few Arduino sketch examples with the ThingSpeak library. They are designed to work right away with no changes. To make the examples work with your ThingSpeak channel, you will need to configure the myChannelNumber and myWriteAPIKey variables.
The WriteSingleField Arduino sketch example reads an analog voltage from pin 0, and writes it to a channel on ThingSpeak every 20 seconds. Load the example in the Arduino IDE. Make sure to select the correct Arduino board and COM port. Then, upload the code to your Arduino.
Since ThingSpeak supports up to 8 data fields, you might want to send more than one value to ThingSpeak. To send multiple value to ThingSpeak from an Arduino, you use ThingSpeak.setField(#,value) for each value to send and then use ThingSpeak.writeFields(myChannelNumber, myWriteAPIKey) to send everything to ThingSpeak. Use the WriteMultipleFields Arduino sketch example to send multiple pin voltages to ThingSpeak.
- Please see the
ReadFieldexample. It is Reading from a public channel and a private channel on ThingSpeak.
| Ex.3 | Build circuit of Step 6 in Lab1. Send its data to thingspeak dashboard! Take a photo of the dashboard |
|---|
create your own plugin to change the LED state.

Go to thingspeak dashboard-> App-> plugin -> new
don't forget to change ,
led_field,readapikeyandwrite api keyin the js
<head>

  %%PLUGIN_CSS%%
  %%PLUGIN_JAVASCRIPT%%

</head>
<body>

   <div class="pretty p-switch">
        <input type="checkbox" id="myCheck" onclick="myFunction()">
        <div class="state">
            <label>LED 1</label>
        </div>
    </div>

</body>
</html>
<style type="text/css">
  body { background-color: #fff; }
</style>
<link rel="stylesheet" href="https://cdn.jsdelivr.net/npm/[email protected]/dist/pretty-checkbox.min.css" />
<script type='text/javascript' src='https://ajax.googleapis.com/ajax/libs/jquery/1.9.1/jquery.min.js'></script>


<script type="text/javascript">
  // set your channel id here
  var channel_id = 1250634;
  var read_api_key = 'L7K0BVNWS2FFV3UG';
  var write_api_key = 'PPXSCLNQXIOJ2HCR';

  temp_field=1
  led_field=2

  function myFunction() {
  // Get the checkbox
    var checkBoxVal = $("#myCheck").is(":checked")
  // Write On channel
    $.getJSON('https://api.thingspeak.com/update?api_key=' + write_api_key+"&field"+led_field+"="+(checkBoxVal?1:0), function(data) {
      if(data==0){
        alert("fast toggle");
        return;
      }

    });


  }

  function updateStat(){
  $.getJSON('https://api.thingspeak.com/channels/' + channel_id + '/feed/last.json?api_key=' + read_api_key, function(data) {
      // get the data point
      p = data['field'+led_field];
      // if there is a data point display it
      if (p) {
        $("#myCheck").prop('checked',p==1);
      }
    });
  }

  $( document ).ready(function(){
  setInterval(updateStat,1000);

  });
</script>