Now that you've seen a little bit of the bash shell and cloned a Git repository from GitHub, its time to practice a full workflow cycle in a little more detail. In this lesson, we'll start by taking a look at how to create a new Git repository if you are not working from an existing one. From there, we'll further investigate how the concepts of git add, git commit, and git push work in practice.
You will be able to:
- Create a new git repository
- Compare local and remote repositories
- Use
git add,git commit, andgit pushto make changes to a repository
In order to create a new Git repository, start by going to https://github.com/new.
(Alternatively, you can click the New button under the repositories tab of you profile page)
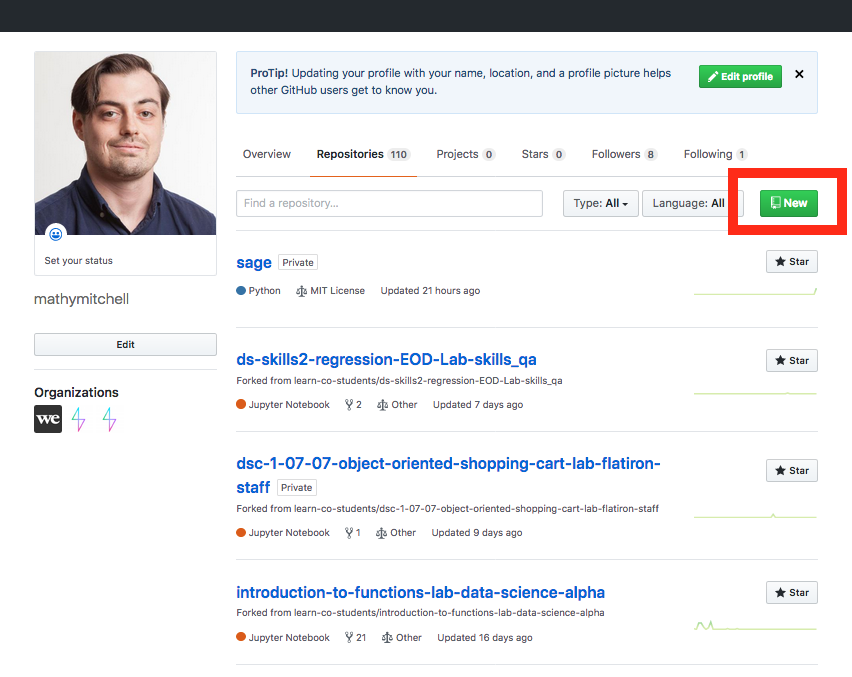
Either way, you'll then end up at the https://github.com/new page:
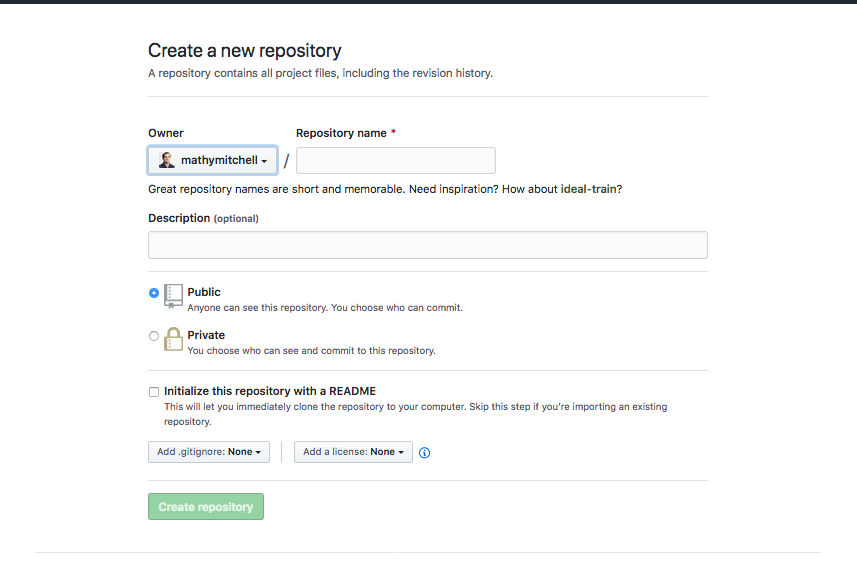
Here, you have several fields to go through:
- Naming the repository
- For this example, make the repository name
git_practice
- For this example, make the repository name
- Description
- Optional as described; leave it blank for now
- The public vs private
- Do you want this code to be publicly visible to everyone on GitHub or do you wish to keep it private?
- Public is probably fine for this
- Initialize this repository with a README
- This option is very important!
- If you check this box then you will clone the online repository as we did before and work from there
- If you don't check this box, then you will start from your local computer and then attach that work to the online repository.
- This option is very important!
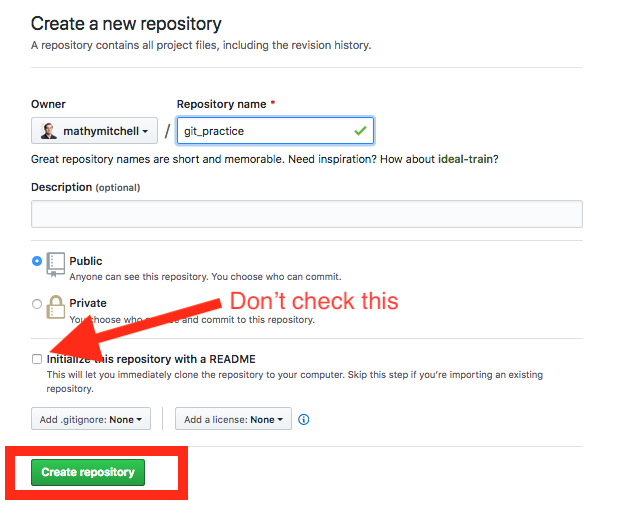
For now, name the repository git_practice, select public and do NOT check the readme box.
Then click create repository.
You'll see a page like this:
Note: The screenshots here use the word
masterwhich is a legacy term that is still used in GitHub. It is more common now, and what you are likely to see, ismain.
![]()
This says it all!
Here's an explanation of the steps we're going to follow:
- Create a directory (GitHub doesn't tell you to do this, but we want to organize and contain what we're sending to the web)
echo "# git_practice" >> README.md:echois a bash command which will create a markdown fileREADME.mdwith the text"# git_practice"git init: This turns the current directory into a Git repositorygit add README.md: Now that the current folder is a Git repository fromgit init, we can add files for Git to trackgit commit -m "first commit": Once files have been added to Git, we commit them. The-moption is for leaving a comment which is requiredgit remote add origin url_goes_here: By default, git does not have to be connected to an online platform like GitHub. You can use Git locally for version control too. There are also other online Git platforms like Bitbucket and GitLab. Here, you're adding a link to GitHub's online hosting so that you can also sync your work with the cloud. This is super handy for sharing your work with others, collaborating, or any of the other reasons why cloud services are used
Again, now that you have an overview, let's have at it!
- Open up your command line (mac: terminal, windows: git bash)
- Navigate to the appropriate directory such as /Documents/Flatiron/Module_2_Git_Bash (or however you plan to organize your course materials)
- Create a new folder for this lesson
mkdir git_practice
cd git_practice
git init
echo "# git_practice" >> README.mdas described works perfectly well- Alternatively, if you're feeling adventurous, you can try a text editor such as nano, vim, or emacs
- If you're going the adventurous route, try
nano README.txtfor now and then type "# git_practice" in the file. Press "Ctrl+X" to quit and press "Y" to confirm you wish to save your changes
- If you're going the adventurous route, try
While not required, let's get familiar with what's going on with git status.
Add your file. You can use git add README.md or git add --all (if there were multiple files, you would add all of them).
Again, not required but helpful to get familiar with everything. Try it again and note the difference: git status.
Now that we've added the files, we're ready to finalize them to our version history. Commit them with git commit -m "your message here".
Again, remember that Git itself is a version control system that can be used anywhere. GitHub is an online hosting platform allowing us to take Git repositories to the cloud to share and collaborate. By adding a remote location, we are able to sync our work between online and offline and collaborate with others. The origin is simply a default naming convention symbolizing that the online version will be the central source of truth for this repository.
With that, we can set it up with
git remote add origin the_url_for_the_repo
Generally, it's easiest to simply copy and paste from the code provided by GitHub.
We've already added our README.md file to Git and committed the changes. While these changes are present and up to date (take a look at git status again), they are not reflected online yet as we haven't synced our updates with our online version. To do this, type git push origin main.
If you are wondering what main is, it's the name of our branch. You can use branches in git to separate versions of code from each other. A common example comes from web development for production environments. The main branch usually contains the working code for the website or app in production, and then other branches can be created for developing updates and new features, while not breaking the current working version. main is the default branch for all Git repositories, and we'll take a further look into branches in general in the upcoming lessons.
Now that you've pushed your changes online, refresh the GitHub page. You should now see a little page like this:

Congratulations! You just created your first Git repository!
In this lesson, we continued to practice our bash skills with the command line and started practicing our version control skills with Git. We created our first Git repository from scratch, and practiced adding, committing, and pushing those changes to GitHub.