-
Notifications
You must be signed in to change notification settings - Fork 13
Sencha Designer
Traditionally, ExtJs projects were developed using text editors like Vim, Emacs or Notepad, and today you can continue using it, but there's a new tool to help building ExtJs applications: Sencha Designer.
Sencha Designer is the new evolution of ExtJs Designer. The previous version allowed us to create Views that can be integrated to our projects, and extended using a text editor, but the newest incarnation allows much more than that, now it's a complete ide, even with a text editor included.
One drawback (to me) of the new Sencha Designer is that if you choose to create a project using it, you will be forced to use it from the very beginning of your application. For example you can't start an app using your text editor, then continue using Sencha Designer, for me this is a major problem. Imagine a workgroup composed of some developers using Sencha Designer (front end designers) and others using just text editors, if a programmer adds a View by hand, this view is not imported automatically to Sencha Designer and can't be modified by the front end designer.
I'm not the only developer who thought about this, please take a look at this
thread:
http://www.sencha.com/forum/showthread.php?153742-Add-a-new-Component-in-Designer-2&langid=4
Having said that, I'll explain how to create our project using Sencha Designer from the beginning.
When first openned Sencha Designer you'll see this:
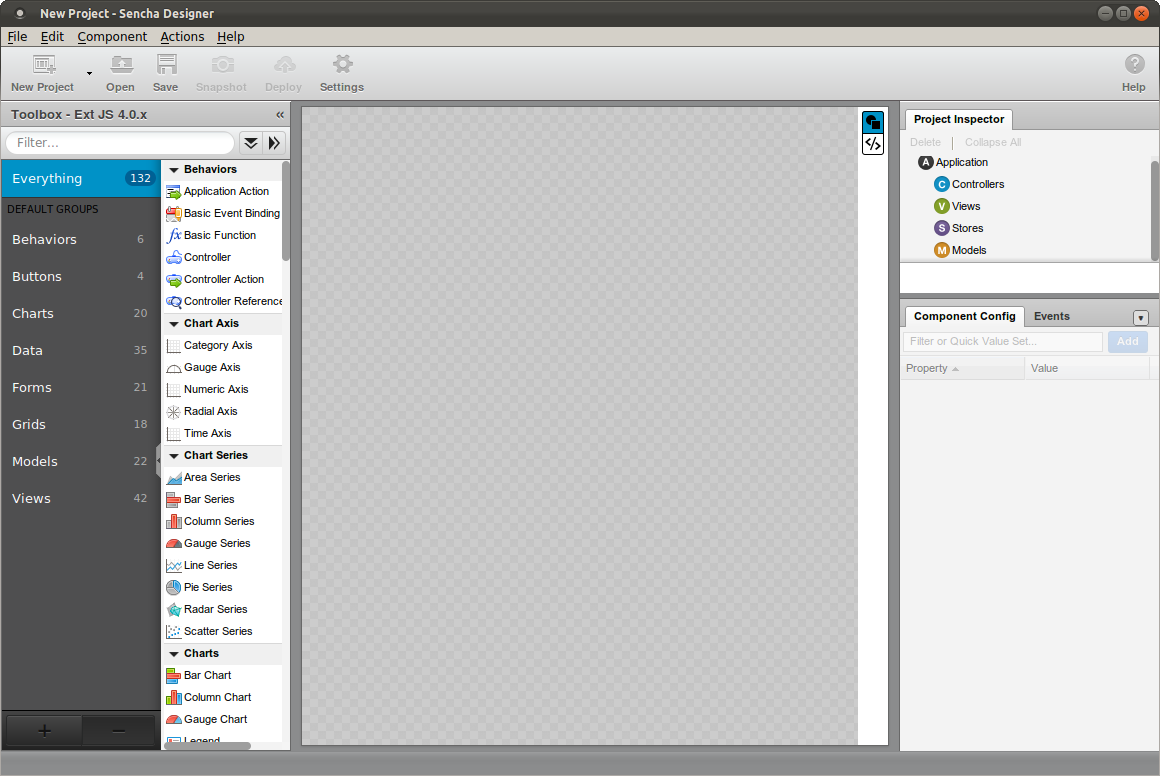
Before continuing, please take a look a this page http://www.sencha.com/blog/sencha-designer-beta for some introductory information about the product.
The first thing I usually do after creating a new, empty ExtJs 4 project is going to File->Save Project As... and save the project with a name, in this case, I'll use the name a-better-crm.xds. This will create the directory "a-better-crm" and the following files inside it:
designer.html
designer.js
undefined.xds
As you can see, the file "undefined.xds" is our main project file, I don't know why Sencha Designer doesn't named this file "a-better-crm.xds", probably because of a bug in the beta version I'm using to create this tutorial. But don't worry, you can go to File -> Save As... again an rename the project file.
Now that the basic project structure is defined, you can take a look at the generated files:
designer.html
<!DOCTYPE html>

<!-- Auto Generated with Sencha Designer -->
<!-- Modifications to this file will be overwritten. -->
<html>
<head>
    <meta http-equiv="Content-Type" content="text/html; charset=utf-8" />
    <title>a-better-crm</title>
    <link rel="stylesheet" type="text/css" href="http://extjs.cachefly.net/ext-4.0.2a/resources/css/ext-all.css"/>
    <script type="text/javascript" src="http://extjs.cachefly.net/ext-4.0.2a/ext-all-debug.js"></script>
    <script type="text/javascript" src="designer.js"></script>
</head>
<body></body>
</html>
Note. By default, Sencha Designer defines the ExtJs path to "http://extjs.cachefly.net/ext-4.0.2a". I prefer to point to my local Apache server by going to Edit -> Project Settings and replacing the "Ext JS Path" field with "http://localhost/extjs-4/" (my extjs 4.0.x files are stored in /var/www/extjs-4).
designer.js
/*
 * File: designer.js
 *
 * This file was generated by Sencha Designer version 2.0.0.
 * http://www.sencha.com/products/designer/
 *
 * This file requires use of the Ext JS 4.0.x library, under independent license.
 * License of Sencha Designer does not include license for Ext JS 4.0.x. For more
 * details see http://www.sencha.com/license or contact [email protected].
 *
 * This file will be auto-generated each and everytime you save your project.
 *
 * Do NOT hand edit this file.
 */

Ext.Loader.setConfig({
    enabled: true
});

Ext.application({
    name: 'MyApp',

    launch: function() {

    }
});
Please, review my Application structure notes for more info about the basic project structure.
Now, to create the Viewport, just type in the filter on the left hand side the word "view", and the list of components will automatically show all components who's name starts with "view". Then drag the component "Viewport" to the big gray area in the middle of the screen.
The result must be this:
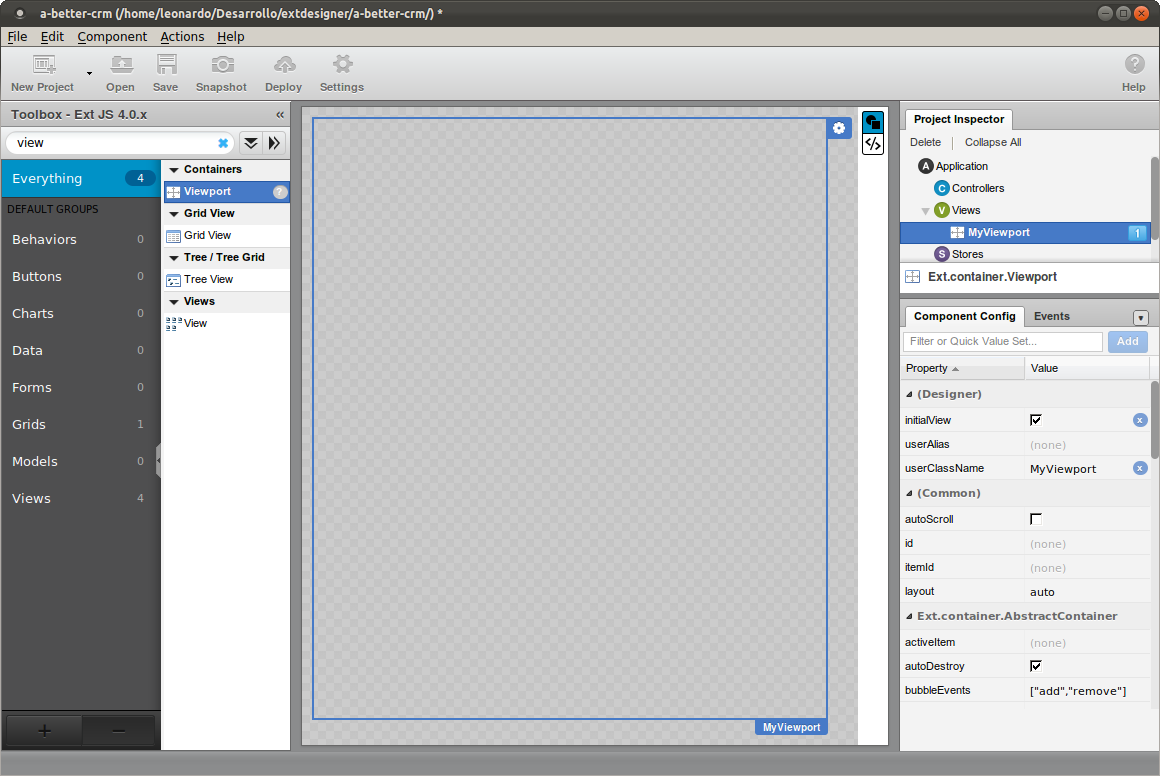
By default, the Viewport's layout is Anchor. Our project needs a vieport's type Border, so, please change the layout property to border in "Component Config". After this change, the Viewport will show the message "Please add the required 'center' region.".
Now, you'll have to create the north, center and south panels. Just drag the component "Container" from the component toolbox to the viewport, and change the property "Region" of each container to north, center and south, as needed.
The next step is to edit container's html property as follows:
Select the north container in Project Inspector, then look for the html property in Component Config, and type this:
<h1 class="x-panel-header">Page Title</h1>
On south container type this:
<h1 class="x-panel-header">Page footer</h1>
In the center container, do not edit its html property. Only change its layout property to "vbox".
The result will be this:

From now on, after each screenshot I'll paste the source code view.
Code view
Ext.define('MyApp.view.ui.MyViewport', {
    extend: 'Ext.container.Viewport',

    layout: {
        type: 'border'
    },

    initComponent: function() {
        var me = this;

        Ext.applyIf(me, {
            items: [
                {
                    xtype: 'container',
                    layout: {
                        type: 'vbox'
                    },
                    region: 'center'
                },
                {
                    xtype: 'container',
                    height: 100,
                    html: '<h1>A Better CRM</h1>',
                    region: 'north'
                },
                {
                    xtype: 'container',
                    height: 50,
                    html: '<h1>Copyright(C) 2012 - LittleBig Company</h1>',
                    region: 'south'
                }
            ]
        });

        me.callParent(arguments);
    }

});
To create the LogIn window, just find the FormPanel component in the Toolbox and drag it to the "Project Inspector", then drop in Views. The result is this:

Code view
Ext.define('MyApp.view.ui.LoginForm', {
    extend: 'Ext.form.Panel',
    alias: 'widget.loginform',

    draggable: true,
    floating: true,
    frame: true,
    height: 155,
    width: 302,
    bodyPadding: 10,
    title: 'Login',
    url: '/cgi-bin/a_better_crm/login/check',

    initComponent: function() {
        var me = this;

        me.initialConfig = Ext.apply({
            url: '/cgi-bin/a_better_crm/login/check'
        }, me.initialConfig);

        Ext.applyIf(me, {
            dockedItems: [
                {
                    xtype: 'toolbar',
                    ui: 'footer',
                    dock: 'bottom',
                    items: [
                        {
                            xtype: 'tbfill'
                        },
                        {
                            xtype: 'button',
                            id: 'btnSubmit',
                            text: 'Login'
                        }
                    ]
                }
            ],
            items: [
                {
                    xtype: 'textfield',
                    name: 'userName',
                    fieldLabel: 'Username',
                    allowBlank: false,
                    anchor: '100%'
                },
                {
                    xtype: 'textfield',
                    inputType: 'password',
                    name: 'passWord',
                    fieldLabel: 'Password',
                    allowBlank: false,
                    anchor: '100%'
                }
            ]
        });

        me.callParent(arguments);
    }

});
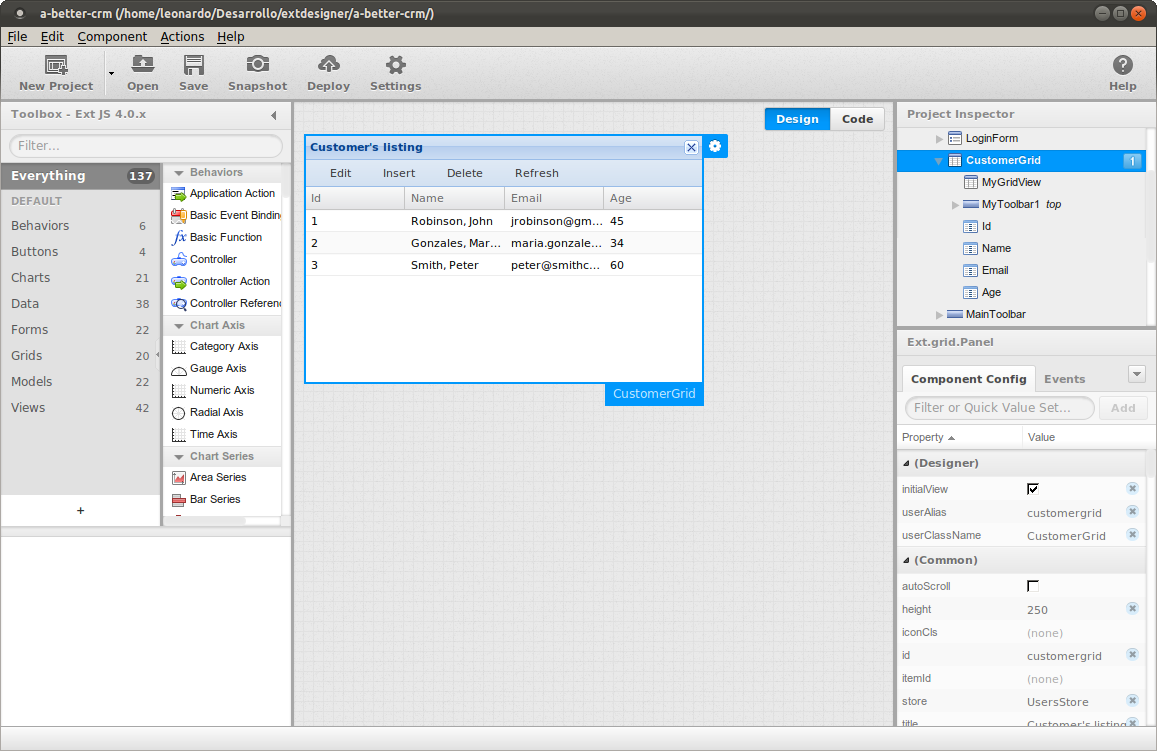
Code view
Ext.define('MyApp.view.ui.CustomerGrid', {
    extend: 'Ext.grid.Panel',

    autoShow: true,
    id: 'customergrid',
    title: 'Customer\'s listing',
    forceFit: true,
    store: 'Customers',

    initComponent: function() {
        var me = this;

        Ext.applyIf(me, {
            viewConfig: {

            },
            dockedItems: [
                {
                    xtype: 'toolbar',
                    width: 400,
                    dock: 'top',
                    items: [
                        {
                            xtype: 'button',
                            id: 'btnEdit',
                            icon: 'icons/edit.png',
                            text: 'Edit'
                        },
                        {
                            xtype: 'button',
                            id: 'btnInsert',
                            icon: 'icons/insert.png',
                            text: 'Insert'
                        },
                        {
                            xtype: 'button',
                            id: 'btnDelete',
                            icon: 'icons/delete.png',
                            text: 'Delete'
                        },
                        {
                            xtype: 'button',
                            id: 'btnRefresh',
                            icon: 'icons/refresh.png',
                            text: 'Refresh'
                        }
                    ]
                }
            ],
            columns: [
                {
                    xtype: 'gridcolumn',
                    dataIndex: 'id',
                    text: 'Id'
                },
                {
                    xtype: 'gridcolumn',
                    dataIndex: 'name',
                    text: 'Name'
                },
                {
                    xtype: 'gridcolumn',
                    dataIndex: 'email',
                    text: 'Email'
                },
                {
                    xtype: 'gridcolumn',
                    dataIndex: 'age',
                    text: 'Age'
                }
            ]
        });

        me.callParent(arguments);
    }

});
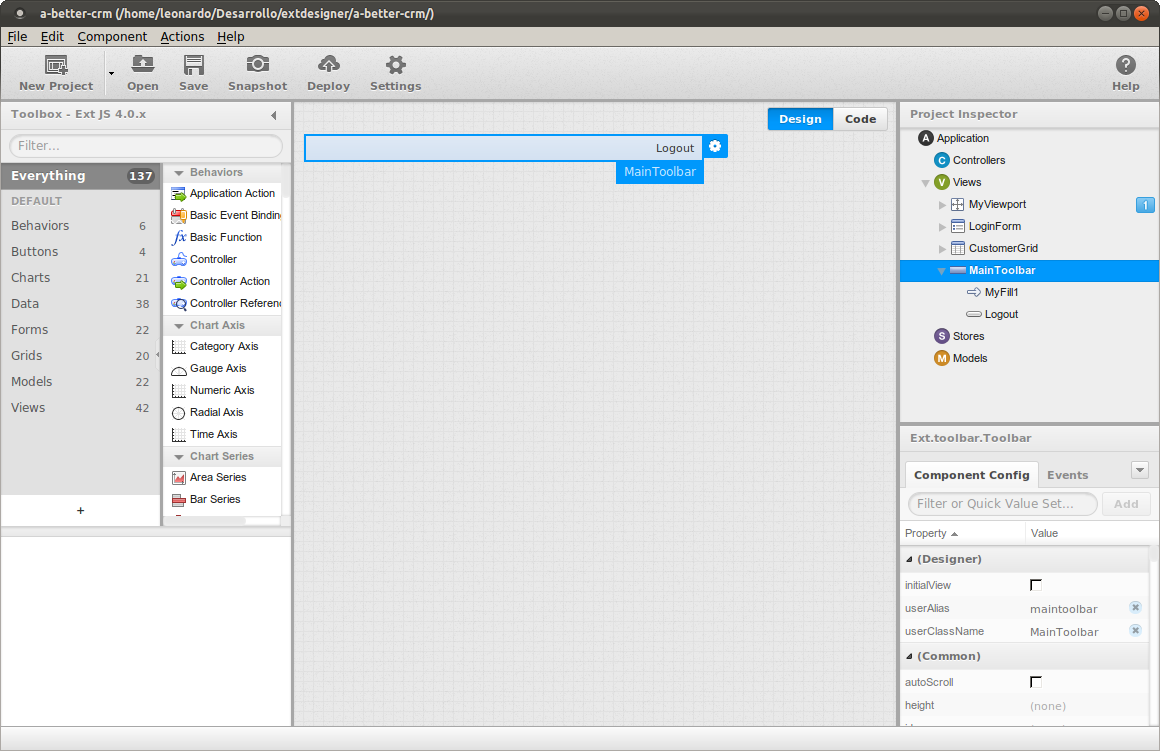
Code view
Ext.define('MyApp.view.ui.MainToolbar', {
    extend: 'Ext.toolbar.Toolbar',
    alias: 'widget.maintoolbar',

    width: 400,

    initComponent: function() {
        var me = this;

        Ext.applyIf(me, {
            items: [
                {
                    xtype: 'tbfill'
                },
                {
                    xtype: 'button',
                    id: 'btnLogout',
                    icon: 'icons/logout.png',
                    text: 'Logout'
                }
            ]
        });

        me.callParent(arguments);
    }
});
Now we have all Views designed, the next step is to add Stores and link them to the views.
Before creating our Store, we must define which data it should provide.
As we'll provide JSON data, it's better to start with a simple file, let's call it data.json and save it in our web server's documentRoot directory:
{
  "root": [
      {"id": 1, "name": "Robinson, John", "email": "[email protected]", "age":45,"active":true,"gender":0},
      {"id": 2, "name": "Gonzales, María", "email": "[email protected]", "age":34,"active":true,"gender":1},
      {"id": 3, "name": "Smith, Peter", "email": "[email protected]", "age":60,"active":false,"gender":0}
  ]
}
Remember, save it in your web server's documentRoot, in a way that it can be called as http://my-server/data.json, please test this in your web browser before continuing.
Ok, now there's only one step to create our Store, first we'll need to create a Model for this Store.
Drag the component Model to the Project Inspector's Models section. Then, replace the following properties:
userAlias: customer
userClassName: Customer
Now it's time to add fields. Right click on Customer and click Add Field -> 3 fields, then set its name as this:
id
name
email
age
Code View
Ext.define('MyApp.model.Customer', {
    extend: 'Ext.data.Model',

    idProperty: 'id',

    fields: [
        {
            name: 'id'
        },
        {
            name: 'name'
        },
        {
            name: 'email'
        },
        {
            name: 'age'
        }
    ]
});
After the model is created, let's define our Store for that model.
Find the component "JSon Store" in the Toolbox and drag it to the Project Inspector, to the "Stores" section. A store named MyJsonStore will be created, containing an Ajax Proxy called MyAjaxProxy and a Json Reader called MyJsonReader.
Now, select MyJsonStore and change this properties:
userAlias: customersstore
userClassName: Customers
model: Customer
storeid: Customers
Important: fields userClassName and storeid values must be the same. If they are different, the error "Cannot call method 'on' of undefined" will be shown on Chrome's console.
Code view
Ext.define('MyApp.store.base.Customers', {
    extend: 'Ext.data.Store',
    requires: [
        'MyApp.model.Customer'
    ],

    constructor: function(cfg) {
        var me = this;
        cfg = cfg || {};
        me.callParent([Ext.apply({
            storeId: 'Customers',
            model: 'MyApp.model.Customer',
            proxy: {
                type: 'ajax',
                url: '/data.json',
                reader: {
                    type: 'json',
                    root: 'root'
                }
            }
        }, cfg)]);
    }
});
Please, uncheck the autoLoad property. This forces a call to the server each time an instance of the store is created, I prefer to call load() only when I need it.
In MyAjaxProxy, change this:
url: /data.json
In MyJsonReader, change this:
root: root
Now, right-click Customers Store and click Load Data, and hover the mouse over the little "eye" at the far right side of UserStore. The result should be this:
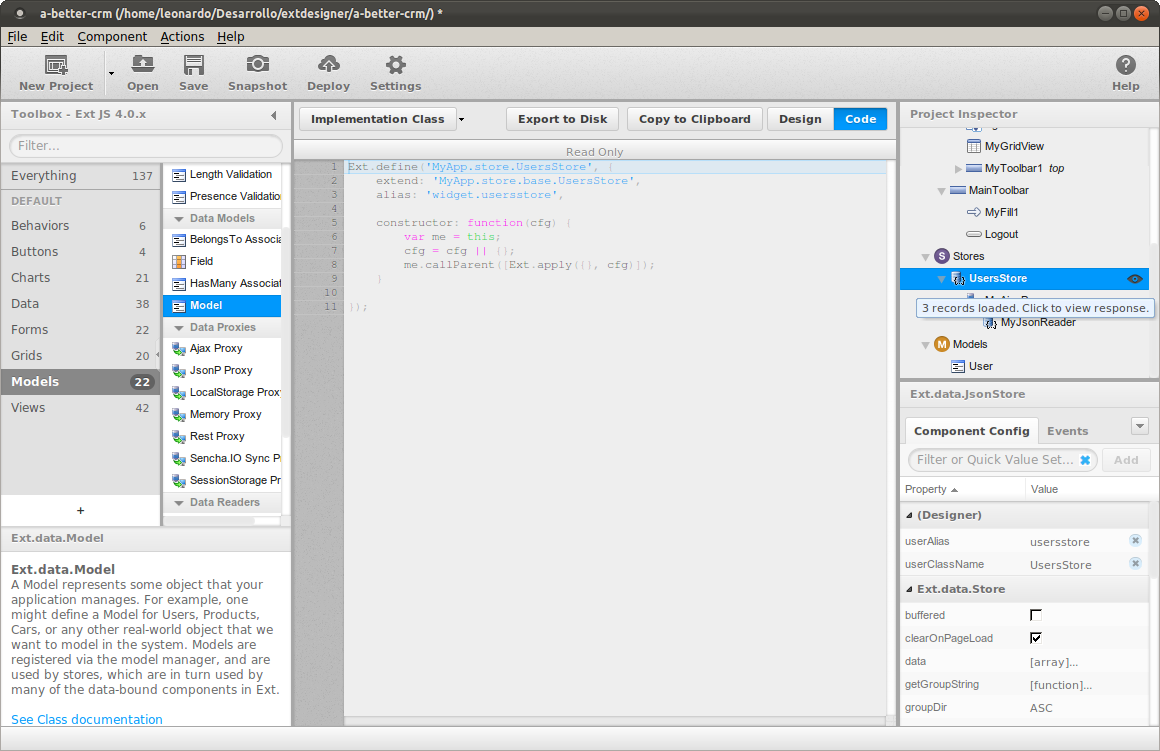
There are two ways to bind a store to a grid, one is clicking the Gear icon on the top right corner of the grid. The other is select CustomerGrid, then, in Component Config set the store property as this:
store: Customers
The next step is to right-click on CustomerGrid, then click on AutoColumns.
At this point, we can start testing what we did, and fix problems as soon as we find them.
During the design process, we created four views, MyViewPort, LoginForm, CustomerGrid and MainToolbar. To test each one of them on the browser, please follow the next steps.
Testing the Viewport
1 - Select Project Inspector->Views->MyViewport, then set its "initialView" property to true.
    You can see that at the right side of MyViewport an icon with a "1" appears.
2 - Now click on Project Inspector->Application, then in Component Config go to the bootom, to section "Ext.app.Controller" and remove all the views, but MyViewport. To remove views just click on the "x" at the right, to select a view just click on (none) or (add another) and a combo box showing all the views will appear. The, add MyViewport to views.
Here's the result:
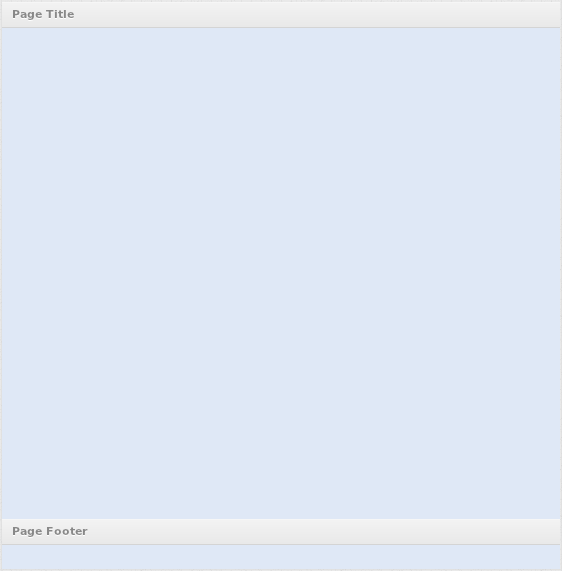
Ok, the next step before we can test our views on the browser, is saving the project by clicking "save" on the toolbar or just CTRL+s.
This is a screenshot of my project's folder structure, yours should be similar:

As you can see, my project is stored in /home/leonardo/Desarrollo/extdesigner/a-better-crm, and my web server's documentRoot is in /var/www. To allow access to my project from a web browser I have to "deploy" the project to the web server using one of this three options:
1 - To copy the whole project to /var/www in a directory called a-better-crm.
2 - To click on "Deploy" button, and set the Deploy path to /var/www/a-better-crm
3 - To create a symlink from our project's folder to /var/www/a-better-crm. I preffer this approach on my development machine.
After deploying the app, please open your web browser and type http://localhost/a-better-crm (I'm assuming you have a web server running on your local machine). The result will be this:
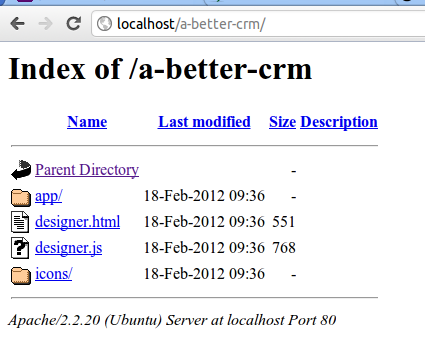
If you click on "designer.html" you should see the Viewport.
If everything went ok, you can follow the same steps as you did with the Viewport, this time with the LoginForm:
1 - Select Project Inspector->Views->LoginForm, then set its "initialView" property to true.
    You can see that at the right side of LoginForm an icon with a "1" appears.
2 - Now click on Project Inspector->Application, and replace MyViewport by LoginForm.
After this, again deploy the project and test.
Do the same with MainToolbar and CustomerGrid.
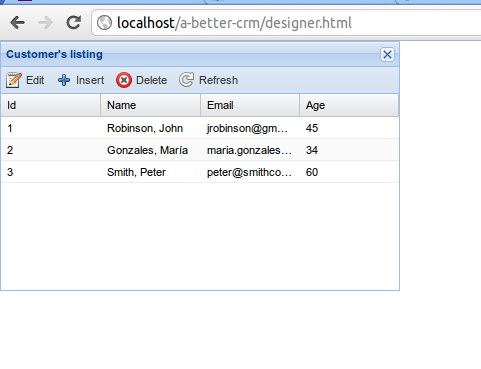
Here's the screenshot of the CustomerGrid running on the browser:
Now that everything is tested and runs as expected, I'll start working with the Controllers that let us define the "flow" of the application. The idea is when the application is oppened for the first time, the viewport appears with the login form in the center of the screen, then, after login-in, the center region of the Viewport is replaced by the CustomerGrid and the MainToolbar on top.
I deliverately left the creation of the Model and Store in charge of handling User data to this part, because they are more related to the behavior of the LoginForm than the views. So, let's create them as follows:
First create the User model with two fields, and a localstorageproxy, here's it's code view:
Code view
Ext.define('MyApp.model.User', {
    extend: 'Ext.data.Model',

    fields: [
        {
            name: 'id',
            type: 'int'
        },
        {
            name: 'loggedIn',
            type: 'boolean'
        }
    ],

    proxy: {
        type: 'localstorage',
        id: 'userpreference'

    }
});
Now, create a new Store with userClassName and storeid called User as shown:
Code view
Ext.define('MyApp.store.base.User', {
    extend: 'Ext.data.Store',
    requires: [
        'MyApp.model.User'
    ],

    constructor: function(cfg) {
        var me = this;
        cfg = cfg || {};
        me.callParent([Ext.apply({
            storeId: 'User',
            model: 'MyApp.model.User'
        }, cfg)]);
    }
});
Remember the store and model are created using drag & drop operations, I showed the code view because that's the final result, but you should create it using the designer.
A note about the localstorage proxy. This will save/load information about the user session in the browser's local storage area, not on the server. Please read more about it at: http://docs.sencha.com/ext-js/4-0/#!/api/Ext.data.proxy.LocalStorage
Let's create our first controller by dragging a Controller component from the Toolbox to Project Inspector->Controllers, set its userClassName to "User" and select UserStore from the stores combo.
Code view
Ext.define('MyApp.controller.User', {
    extend: 'Ext.app.Controller',

    stores: [
        'User'
    ],
    init: function() {
        this.control({
        });
    }
});
Now let's start to add code, first edit the init section as this:
After selecting the "init" section, you can add this code to its body:
init: function() {
    var me = this;
    var store = this.getUserStore();
    store.load();

    user = store.first();
    if(!user){
      store.add({loggedIn: false});
      user = store.first();
      store.sync();
    };
}
Then, please add three "basic functions" to the controller, the final result is this:
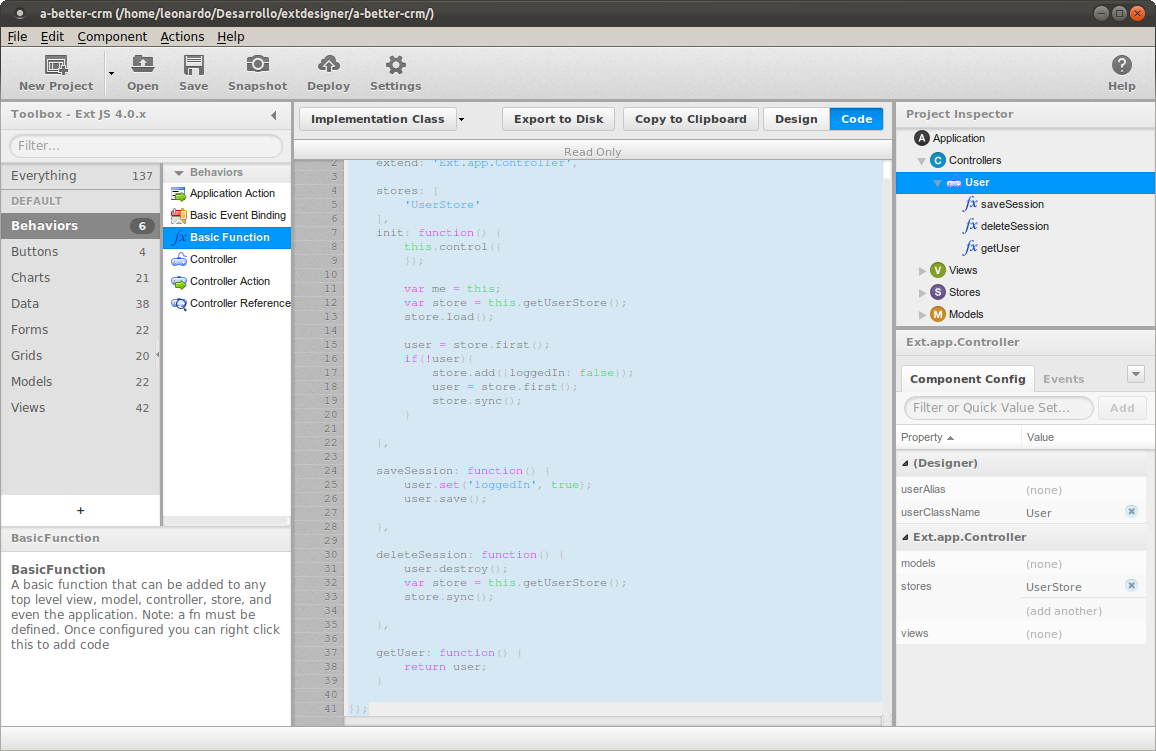
Code view
Ext.define('MyApp.controller.User', {
    extend: 'Ext.app.Controller',

    stores: [
        'User'
    ],
    init: function() {
        this.control({
        });

        var me = this;
        var store = this.getUserStore();
        store.load();

        user = store.first();
        if(!user){
            store.add({loggedIn: false});
            user = store.first();
            store.sync();
        }

    },

    saveSession: function() {
        user.set('loggedIn', true);
        user.save();
    },

    deleteSession: function() {
        user.destroy();
        var store = this.getUserStore();
        store.sync();
    },

    getUser: function() {
        return user;
    }

});
As I mentioned before, the LoginForm should appear when the application is first openned. To do this, please click on Project Inspector->Application, then edit the "launch" method as this:
  var user = this.getController('MyApp.controller.User').getUser();

  if(!user.data.loggedIn) {
      Ext.create('MyApp.view.LoginForm', {}).show();
  }
  else
  {
      alert('Already logged in, this will be replaced by the main window');
  }
This code gets an instance of the User controller, to obtain a User model instance, then checks its loggedIn property to know if the user was logged in before. The app should show the login form once, then, if the user closes the browser, then open it again and go to the application, if in the localstorage the user session has its loggedIn property set to "true", then instead of showing the login form, the main window should appear.
Now, before deploying, go to Project Inspector->Application and remove all the models and stores, and leave only "MyViewport" view.
Drag a new controller to Project Inspector->Controllers and set its userClassName to Login. Then, select the User store in the stores property.
The next step is the creation of the event binding for the Login button. Again, drag a "Controller Action" control over our Login controller, override this properties:
controlQuery: loginform button[id=btnSubmit]
fn: onLoginClick
targetType: Ext.button.Button
name: click
Note. To configure the "name" property, it is mandatory to first select the "TargetType" if you do this using the Designer.
After this, edit the onLoginClick handler. The result should be this:
Code view
Ext.define('MyApp.controller.Login', {
    extend: 'Ext.app.Controller',

    stores: [
        'User'
    ],
    views: [
        'LoginForm'
    ],
    init: function() {
        this.control({
            "loginform button[id=btnSubmit]": {
                click: this.onLoginClick
            }
        });
    },

    onLoginClick: function(button, e, options) {
        alert('Hi!');
    }

});
Note. As you can see, I added an event to the button with the id "btnSubmit" of the form with alias "loginForm". This tells the controller to do a query in the app's component data, using the Ext.ComponentQuery method. Please read more about this here: http://docs.sencha.com/ext-js/4-0/#!/api/Ext.ComponentQuery-method-query
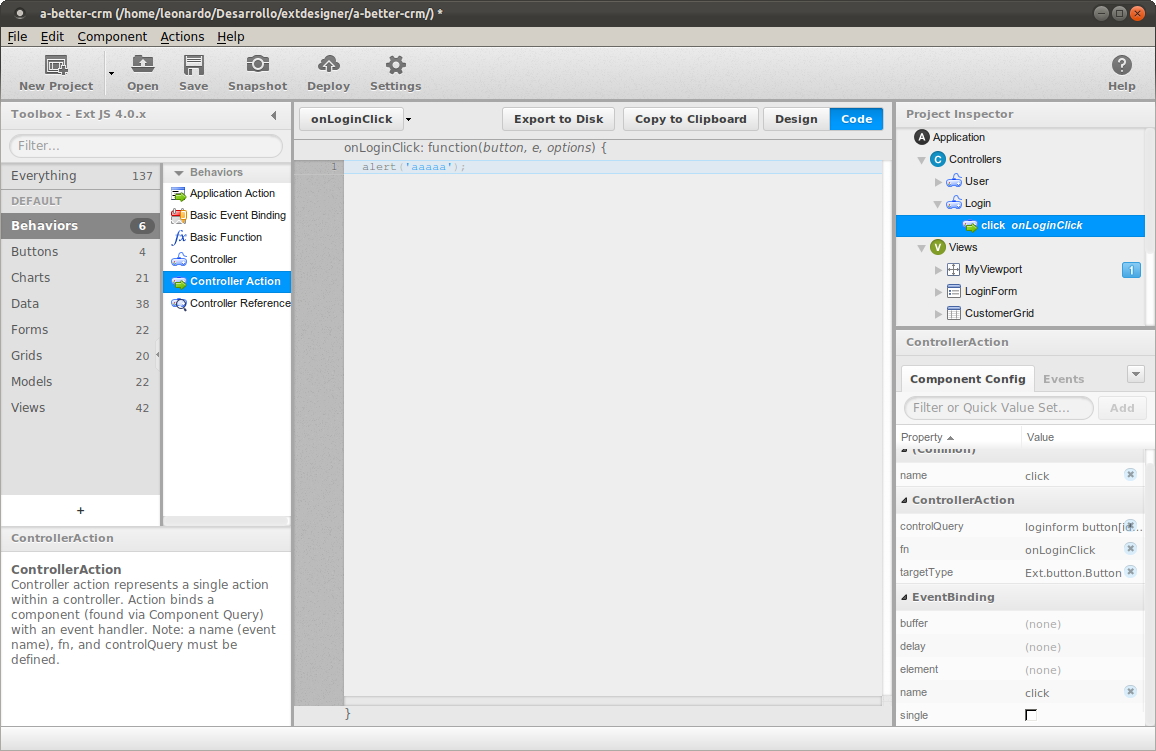
Again, please save and deploy, then test. The result is a login form, then, when the user clicks on Login button, the message "Hi!" should appear.
The next step is to hide the login form after a sucessful login, then replace the center region of the Viewport with our customer grid.
Let's add a new controller called "Main", and add two Basic Functions, called "showMainView" and "destroyAll", also a Controller Referenc, with the following content:
Code view
Ext.define('MyApp.controller.Main', {
    extend: 'Ext.app.Controller',

    models: [
        'Customer'
    ],
    stores: [
        'Customers'
    ],
    views: [
        'CustomerGrid',
        'MainToolbar'
    ],
    refs: [
        {
            ref: 'viewport',
            selector: 'viewport'
        }
    ],

    init: function() {
        this.control({
        });
    },

    showMainView: function() {
        mainToolBar = Ext.create('MyApp.view.MainToolbar', {});
        mainView = Ext.create('MyApp.view.CustomerGrid', {flex: 1});
        // to be able to use "this.getViewport()" the a ref has to be added
        // please take a look at the refs section of this file.
        center_container = this.getViewport().down('container[region=center]');
        center_container.add(mainToolBar);
        center_container.add(mainView);
        // load the store
        this.getCustomersStore().load();
    },

    destroyAll: function() {
        mainToolBar.destroy();
        mainView.destroy();
        this.destroy();
    }

});
IMPORTANT. In the method showMainView, previously, instead of using the variable center_container, I used the name "item" for it. This caused the error "object does not support this action" on Internet Explorer, but worked as expected on Chrome and Firefox. From this incident on, I recomend you to not to call "item" your variables.
Go back to the Login controller and change the options to look as this:
Code view
Ext.define('MyApp.controller.Login', {
    extend: 'Ext.app.Controller',

    stores: [
        'User'
    ],
    views: [
        'LoginForm',
        'MainToolbar'
    ],
    init: function() {
        this.control({
            "loginform button[id=btnSubmit]": {
                click: this.onLoginClick
            },
            "maintoolbar button[id=btnLogout]": {
                click: this.onLogoutClick
            }
        });
    },

    onLoginClick: function(button, e, options) {
        this.getController('MyApp.controller.Main').showMainView();
        this.getController('MyApp.controller.User').saveSession();
        var win = button.up('loginform');
        win.destroy();
    },

    onLogoutClick: function(button, e, options) {
        this.getController('MyApp.controller.Main').destroyAll();
        this.getController('MyApp.controller.User').deleteSession();

        Ext.create('MyApp.view.LoginForm', {}).show();
    }

});
Re-check the User controller also:
Code view
Ext.define('MyApp.controller.User', {
    extend: 'Ext.app.Controller',

    stores: [
        'User'
    ],
    init: function() {
        this.control({
        });

        var me = this;
        var store = this.getUserStore();
        store.load();

        user = store.first();
        if(!user){
            store.add({loggedIn: false});
            user = store.first();
            store.sync();
        }

    },

    saveSession: function() {
        user.set('loggedIn', true);
        user.save();
    },

    deleteSession: function() {
        user.destroy();
        var store = this.getUserStore();
        store.sync();
    },

    getUser: function() {
        return user;
    }

});
And finally, check the Application's implementation:
Code view
  Ext.Loader.setConfig({
      enabled: true
  });

  Ext.application({
      stores: [

      ],

      views: [
          'MyViewport'
      ],

      autoCreateViewport: true,

      name: 'MyApp',

      controllers: [
          'User',
          'Login',
          'Main'
      ],

      launch: function() {
          var user = this.getController('MyApp.controller.User').getUser();

          if(!user.data.loggedIn) {
              Ext.create('MyApp.view.LoginForm', {}).show();
          }
          else
          {
              this.getController('MyApp.controller.Main').showMainView();
          }

      }
  });
As you may have noted, I'm not doing user validation yet, in the finished version, when the user clicks the Login button, the form's data should be sent to the server for validation, if the data is correct, then, the application will show the main screen, if not, an error message should appear.
The onLoginClick event is this for now:
    onLoginClick: function(button, e, options) {
        this.getController('MyApp.controller.Main').showMainView();
        this.getController('MyApp.controller.User').saveSession();
        var win = button.up('loginform');
        win.destroy();
    },
It just gets a reference to the form I defined as "win", then call the showMainView() method of "MyApp.controller.Main" and saveSession() method of "MyApp.controller.User". Then, just uses the reference to the form to destroy it.
By now, we have a not so simple application, with a login form, a grid connected to a store and persistent client sessions. The next step, will be adding a new view and controller, to let the user edit customer data.
As we did with previous views, let's drag a new Form Panel to the Project Inspector->Views section. Rename the userClassName property to "CustomerProperties" and userAlias to "customerproperties", then remove the UserProperties view from Application->Views, because we don't want the view to be created automatically.
Then continue adding components to get this result:
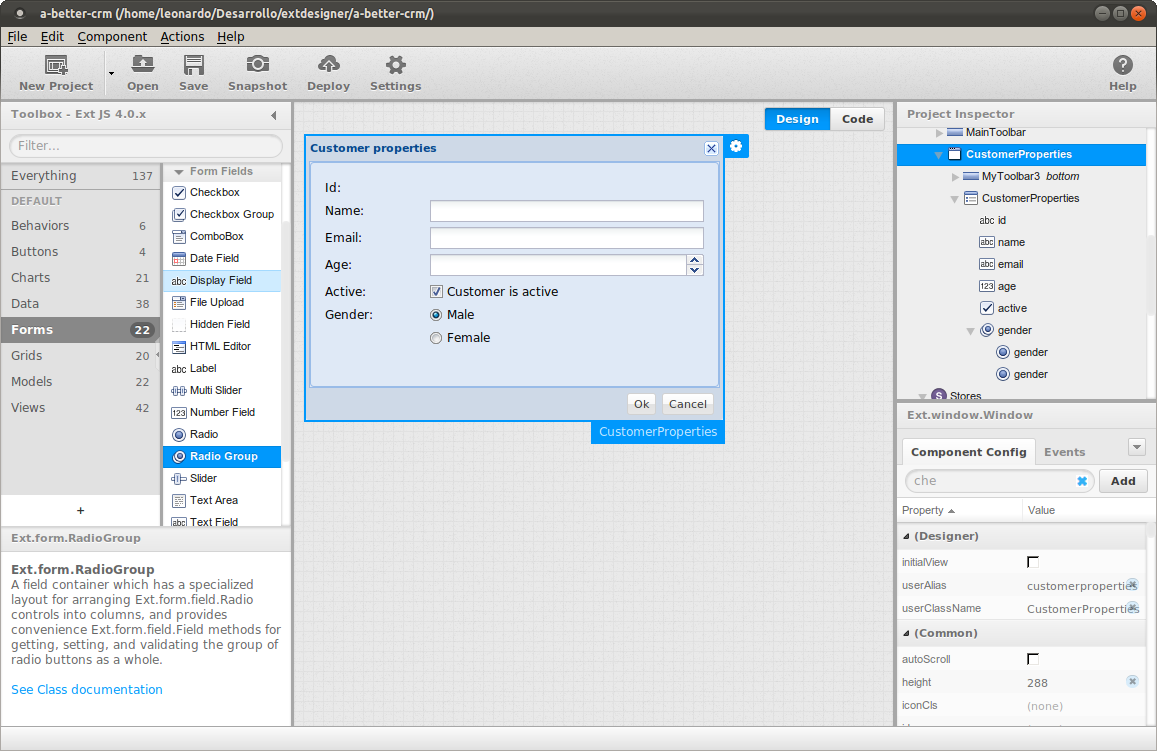
Code view
Ext.define('MyApp.view.ui.CustomerProperties', {
    extend: 'Ext.window.Window',

    autoRender: false,
    height: 288,
    width: 421,
    layout: {
        type: 'fit'
    },
    title: 'Customer properties',
    modal: true,

    initComponent: function() {
        var me = this;

        Ext.applyIf(me, {
            dockedItems: [
                {
                    xtype: 'toolbar',
                    ui: 'footer',
                    dock: 'bottom',
                    items: [
                        {
                            xtype: 'tbfill'
                        },
                        {
                            xtype: 'button',
                            id: 'btnOk',
                            text: 'Ok'
                        },
                        {
                            xtype: 'button',
                            id: 'btnCancel',
                            text: 'Cancel'
                        }
                    ]
                }
            ],
            items: [
                {
                    xtype: 'form',
                    frame: true,
                    id: 'customerproperties',
                    bodyPadding: 10,
                    frameHeader: false,
                    preventHeader: true,
                    items: [
                        {
                            xtype: 'displayfield',
                            name: 'id',
                            fieldLabel: 'Id'
                        },
                        {
                            xtype: 'textfield',
                            name: 'name',
                            fieldLabel: 'Name',
                            anchor: '100%'
                        },
                        {
                            xtype: 'textfield',
                            name: 'email',
                            fieldLabel: 'Email',
                            anchor: '100%'
                        },
                        {
                            xtype: 'numberfield',
                            name: 'age',
                            fieldLabel: 'Age',
                            anchor: '100%'
                        },
                        {
                            xtype: 'checkboxfield',
                            id: 'active',
                            name: 'active',
                            fieldLabel: 'Active',
                            boxLabel: 'Customer is active',
                            checked: true,
                            anchor: '100%'
                        },
                        {
                            xtype: 'radiogroup',
                            height: 53,
                            id: '',
                            layout: {
                                align: 'stretch',
                                type: 'vbox'
                            },
                            fieldLabel: 'Gender',
                            allowBlank: false,
                            columns: 1,
                            items: [
                                {
                                    xtype: 'radiofield',
                                    name: 'gender',
                                    boxLabel: 'Male',
                                    inputValue: 0
                                },
                                {
                                    xtype: 'radiofield',
                                    name: 'gender',
                                    boxLabel: 'Female',
                                    inputValue: 1
                                }
                            ]
                        }
                    ]
                }
            ]
        });

        me.callParent(arguments);
    }

});
As you can see, I've added two new fields to Customer data, Active and Gender. Those fields, must also be added to the Customer model. After added, the model should look like this:
Code view
Ext.define('MyApp.model.Customer', {
    extend: 'Ext.data.Model',

    idProperty: 'id',

    fields: [
        {
            name: 'id'
        },
        {
            name: 'name'
        },
        {
            name: 'email'
        },
        {
            name: 'age'
        },
        {
            name: 'active',
            type: 'boolean'
        },
        {
            name: 'gender',
            type: 'int'
        }
    ]
});
Now that we have the customer properties form created, we need to create a controller for it. As usual, drag a Controller from the Toolbox to the Project Inspector and assigne userClassName to "CustomerProperties" and userAlias to "customerproperties", also include the store "Customer" and the view "CustomerProperties" in stores and views.
The code for the controller should be this:
Code view
Ext.define('MyApp.controller.CustomerProperties', {
    extend: 'Ext.app.Controller',

    stores: [
        'Customers'
    ],
    views: [
        'CustomerProperties'
    ],
    init: function() {
        this.control({
        });
    }
});
Now it's time to start adding actions, first, add the Ok and Cancel buttons click event.
After adding the actions, the controller should look as this:
Code view
Ext.define('MyApp.controller.CustomerProperties', {
    extend: 'Ext.app.Controller',

    stores: [
        'Customers'
    ],
    views: [
        'CustomerProperties'
    ],
    init: function() {
        this.control({
            "button[id=btnOk]": {
                click: this.onOkClick
            },
            "button[id=btnCancel]": {
                click: this.onCancelClick
            }
        });
    },

    onOkClick: function(button, e, options) {
        alert('Ok clicked!');
    },

    onCancelClick: function(button, e, options) {
        button.up('window').destroy();
    }

});
Ok, now I'll create the CRUD actions, let's start with the Update, that will start when the Edit button of the grid is clicked. All actions will be of type "Basic Function", so drag a Basic Function from the Toolbox to the Project Inspector->CustomerProperties, then write "edit" in "fn", to create the edit function, and add the param "customer" in params.
After adding the functions, the form should look like this:
Code view
Ext.define('MyApp.controller.CustomerProperties', {
    extend: 'Ext.app.Controller',

    stores: [
        'Customers'
    ],
    views: [
        'CustomerProperties'
    ],
    init: function() {
        this.control({
            "button[id=btnOk]": {
                click: this.onOkClick
            },
            "button[id=btnCancel]": {
                click: this.onCancelClick
            }
        });
    },

    onOkClick: function(button, e, options) {
        alert('Ok clicked!, mode:' + mode);
    },

    onCancelClick: function(button, e, options) {
        button.up('window').destroy();
    },

    edit: function(customer) {
        // create an instance of CustomerProperties form
        var cp = Ext.create('MyApp.view.CustomerProperties', {});

        cp.down('form').getForm().loadRecord(customer);

        // When the user clicks the Ok button, form's data must be saved,
        // but should it do and Insert or an Update?.
        // to avoid the confusion, I'll create a variable named
        // mode, and assign Update or Insert depending on
        // what function is displaying the form. In this case
        // the function is edit, so, the variable value is Update.

        mode="Update";

        // Show the form
        cp.show();
    },

    insert: function() {
        // create an instance of CustomerProperties form
        var cp = Ext.create('MyApp.view.CustomerProperties', {});

        // When the user clicks the Ok button, form's data must be saved,
        // but should it do and Insert or an Update?.
        // to avoid the confusion, I'll create a variable named
        // mode, and assign Update or Insert depending on
        // what function is displaying the form. In this case
        // the function is edit, so, the variable value is Insert.

        mode="Insert";

        // create an instance of CustomerProperties form
        var cp = Ext.create('MyApp.view.CustomerProperties', {});

        // Show the form
        cp.show();

    }

});
Also I added the onRefreshClick, onInsertClick and onDeleteClick events to the CustomerGrid controller. Now the controller looks as this:
Code view
Ext.define('MyApp.controller.CustomerGrid', {
    extend: 'Ext.app.Controller',

    models: [
        'Customer'
    ],
    stores: [
        'Customers'
    ],
    views: [
        'CustomerGrid'
    ],
    init: function() {
        this.control({
            "button[id=btnEdit]": {
                click: this.onEditClick
            },
            "button[id=btnRefresh]": {
                click: this.onRefreshClick
            },
            "button[id=btnInsert]": {
                click: this.onInsertClick
            },
            "button[id=btnDelete]": {
                click: this.onDeleteClick
            }
        });
    },

    onEditClick: function(button, e, options) {
        // here we get the selected record in the grid
        var customer =  button.up('gridpanel').getSelectionModel().getSelection()[0];

        // get an instance of CustomerProperties controller and call its edit method.
        this.getController('MyApp.controller.CustomerProperties').edit(customer);

    },

    onRefreshClick: function(button, e, options) {
        this.getCustomersStore().load();
    },

    onInsertClick: function(button, e, options) {
        // get an instance of CustomerProperties controller and call its insert method.
        this.getController('MyApp.controller.CustomerProperties').insert();

    },

    onDeleteClick: function(button, e, options) {
        Ext.Msg.show({
            title:'Delete record?',
            msg: 'Please configrm',
            buttons: Ext.Msg.YESNO,
            icon: Ext.Msg.QUESTION,
            fn: function(btn, text) {
                if(btn == 'yes') {
                    record =  button.up('gridpanel').getSelectionModel().getSelection()[0];
                    var store = this.getMyJsonStoreStore();
                    store.remove(record);
                    store.sync();
                }
            },
            scope: this
        });

    }

});
The Insert, Update and Delete methods, that run on the server will be implemented using Lazarus, please read the Lazarus server implementation.