How to implement SnackBar in Flutter
In this article we will learn how to implement SnackBar in Flutter. Snackbar only works with Scaffold widget context. SnackBars is useful to show some task notification and get confirmation from user for that. Let’s say you have removed some record from the app and showed confirmation to user in toast message box, but user can not undo this operation in this case snackbar is very important as it provides action so user can undo it. We will take the same example to understand snackbar in flutter application.
Step 1: First and basic step to create new application in flutter. If you are a beginner in flutter then you can check my blog Create a first app in Flutter. I have created an app named as “flutter_snackbar”.
Step 2: Now, Create a listview using listview builder. We have generated temporary list using generate() method. Following is the code of it.
var records = List<String>.generate(20, (index) => "Record : $index");
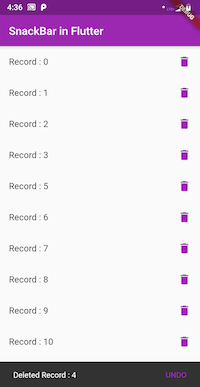
Step 3: We will generate listview and each item has delete button which will delete the item and show snackbar at bottom. Following is the implementation of that.
  Widget build(BuildContext context) {
   return Scaffold(
     appBar: AppBar(
       title: Text('SnackBar in Flutter'),
     ),
     body: ListView.builder(
       itemCount: records.length,
       itemBuilder: (context, index) {
         return ListTile(
           title: Text(records[index]),
           trailing: Container(
             width: 40,
             child: FlatButton(
               child: Icon(
                 Icons.delete,
                 color: Colors.purple,
               ),
               onPressed: () {
                 showSnackBar(context, index);
               },
             ),
           ),
         );
       },
     ),
   );
Step 4: Now we will create method showSnackBar which will show snackbar at bottom. We will implement action in snackbar to undo delete operation as well. Following is the programming implementation of that.
void showSnackBar(BuildContext context, int index) {
   var deletedRecord = records[index];
   setState(() {
     records.removeAt(index);
   });
   SnackBar snackBar = SnackBar(
     content: Text('Deleted $deletedRecord'),
     action: SnackBarAction(
       label: "UNDO",
       onPressed: () {
         // print('Undo Delete of $message');
         setState(() {
           records.insert(index, deletedRecord);
         });
       },
     ),
   );
   Scaffold.of(context).showSnackBar(snackBar);
 }
Step 5: Following is the full code of the example.
import 'package:flutter/material.dart';
void main() => runApp(MyApp());

class MyApp extends StatelessWidget {
 @override
 Widget build(BuildContext context) {
   return MaterialApp(
     theme: ThemeData(
       primarySwatch: Colors.purple,
     ),
     home: MyHomePage(),
   );
 }
}

class MyHomePage extends StatefulWidget {
 @override
 _MyHomePageState createState() => _MyHomePageState();
}

class _MyHomePageState extends State<MyHomePage> {
 var records = List<String>.generate(20, (index) => "Record : $index");
 @override
 Widget build(BuildContext context) {
   return Scaffold(
     appBar: AppBar(
       title: Text('SnackBar in Flutter'),
     ),
     body: ListView.builder(
       itemCount: records.length,
       itemBuilder: (context, index) {
         return ListTile(
           title: Text(records[index]),
           trailing: Container(
             width: 40,
             child: FlatButton(
               child: Icon(
                 Icons.delete,
                 color: Colors.purple,
               ),
               onPressed: () {
                 showSnackBar(context, index);
               },
             ),
           ),
         );
       },
     ),
   );
 }

 void showSnackBar(BuildContext context, int index) {
   var deletedRecord = records[index];
   setState(() {
     records.removeAt(index);
   });
   SnackBar snackBar = SnackBar(
     content: Text('Deleted $deletedRecord'),
     action: SnackBarAction(
       label: "UNDO",
       onPressed: () {
         // print('Undo Delete of $message');
         setState(() {
           records.insert(index, deletedRecord);
         });
       },
     ),
   );
   Scaffold.of(context).showSnackBar(snackBar);
 }
}
Hurrey…. Run the app and Test It on emulator/simulator or device :)))
We have learnt how to implement snackbar in flutter and provide action of undo in the snackbar as well.