This project uses ESP8266WebServer and SPIFFS to create a web enabled automated pet controller.

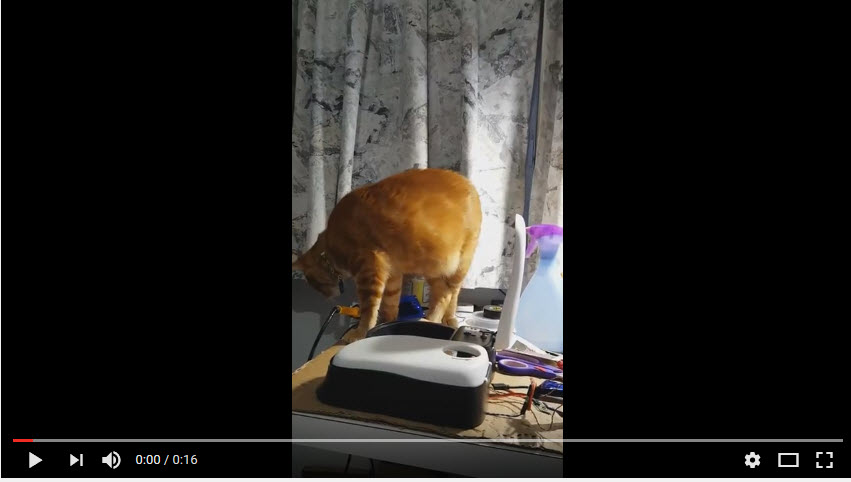
Two servos control the lids of two feeding trays. Two buttons correspondingly control each servo. Once configured you can set the time when each servo is activated.
- ESP-xx with 4 gpio pins available. Plus an additional one if you'd like status sounds. (ESP-03, ESP-07, ESP-12x, nodemcu, hazza) (probably others)
- If using a esp-xx (as opposed to a nodemcu or hazza)
- 3.3v regulator
- 2 SPST pushe buttons (reset and program)
- 2 SPST push buttons
- 2 servos
- A Pet Feeder, something like this: https://www.amazon.com/gp/product/B01IPF3N6Y
- Arduino-1.6.11
- ESP8266/Arduino :Additional Boards Manager URL: http://arduino.esp8266.com/stable/package_esp8266com_index.json
- ESP8266FS plugin, installed in tools https://github.com/esp8266/arduino-esp8266fs-plugin/releases/download/0.2.0/ESP8266FS-0.2.0.zip
- Bounce2 Library, installed in library https://github.com/thomasfredericks/Bounce2/releases/tag/V2.21
- ArduinoJson Library, install in libarry https://github.com/bblanchon/ArduinoJson/releases/tag/v5.6.7
- (the libraries can be installed with the library manager instead)
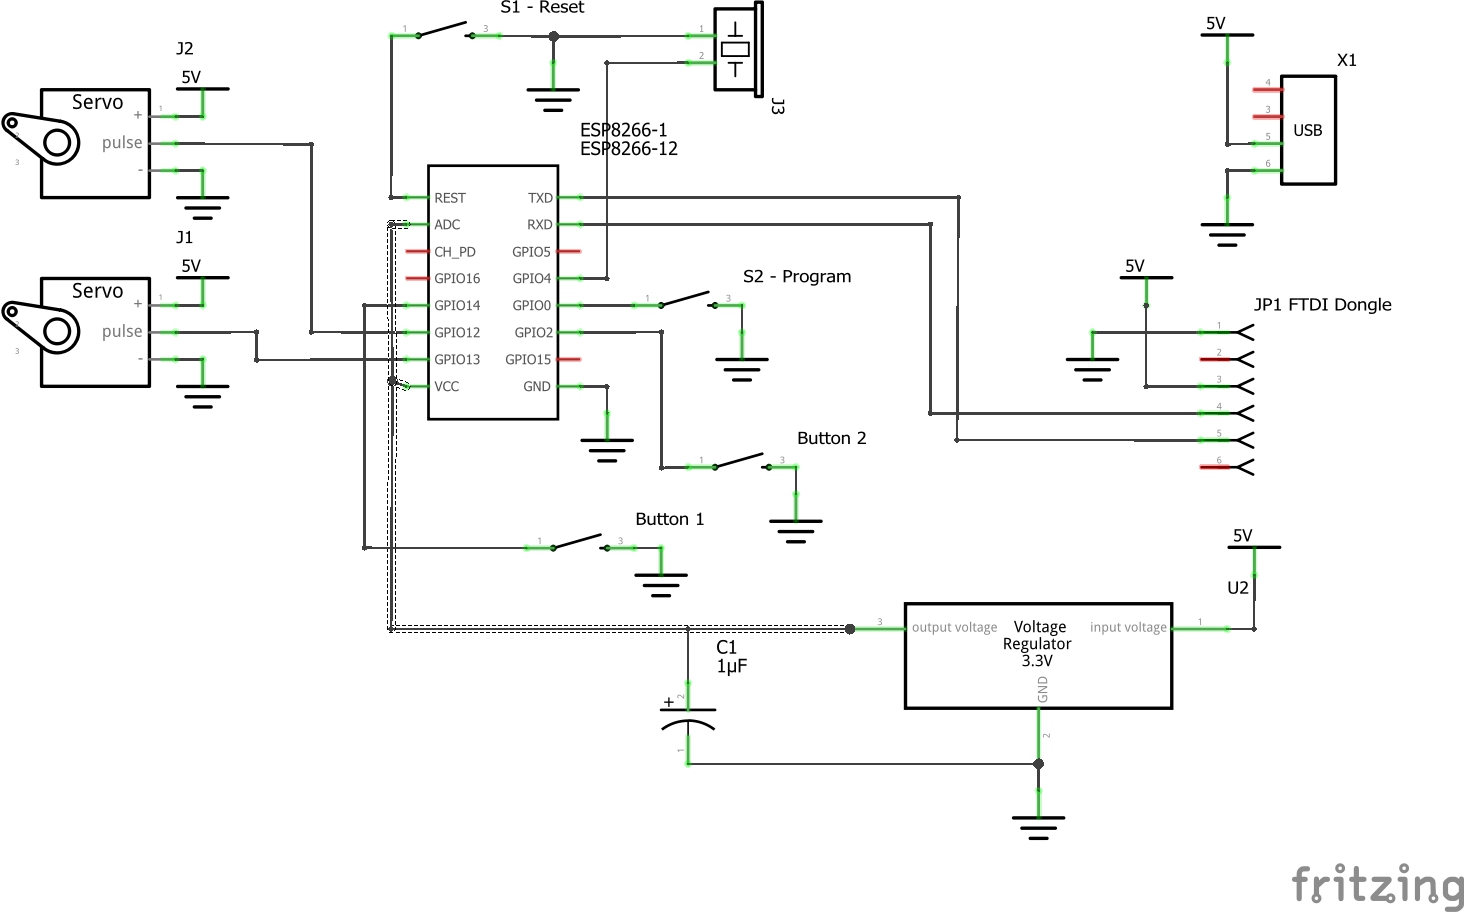
Wireup according to the picture. You can change which pin you use for each function near the top of the sketch where it refers to BUTTON1, BUTTON2, SERVO1, SERVO2 and TONE. I use an ESP-12, so the code is showing the pins I chose for it.
Arrange the servos and the buttons on your pet feeder as shown on the schematic, or differently if you're using some other kind of feeder. * The FTDI, USB and Regulator may not be needed depending on which ESP you're using (i.e. nodemcu/hazza, etc)
Don't forget to restart the Arduino IDE after installing the libraries and boards.
Set your esp settings.. the board, program method, flash size and spiffs size.
This uses the SPIFFS file system. So we need to load that in your esp-xx first. Upload the contents of the data folder with MkSPIFFS Tool ("ESP8266 Sketch Data Upload" in Tools menu in Arduino IDE)
Then compile and upload the .ino.
You should be able to push the buttons and the servos will move. Check out the video:
When initially powered on, the internet access point will not be setup. The EspFeeder will give up on an access point after 60 seconds, and switch to AP mode. It will be come an access point in itself.
So connect to EspFeeder_XXXXXX with a wifi enabled device (no password).
Browse to 192.168.4.1
A simple setup page will appear where you can put in an SSID and a password of the access point it should connect to.
Save, then wait a minute for reboot.
Now you can access the EspFeeder's ip and the feeder will be on the local netowrk.
What is it's IP? If your computer supports mDNS (Anything but windows, but even on windows it'll be there if you have loaded iTunes), you can access it with the following url: http://espfeeder.local/ If you don't have mDNS available, you must find the IP address of the EspFeeder through one of the following methods (or make up your own method)
- Log into your router and look at the dhcp leases (sometimes called dhcp client list) find the entry that shows ESP_xxxxxx
- Connect a serial ttl dongle to the EspFeeder, set the baud rate to 74880. During startup, you'll see the IP address shown.
- Get mDNS on your computer: here's some info for windows: http://stackoverflow.com/questions/23624525/standard-mdns-service-on-windows
- ping from a computer that does handle mDNS -- ping espfeeder.local
Hopefully you'll then see this:

And if you click Go To Config you'll see this: