We can see that there has been an exponential rise in computing resources and data in recent years. Although both computing resources and data are growing, there is a stark contrast between the growth rates of the same. We now have very large volumes of data and not enough computing resources to process those in decent amount of time. This leads us to one of the main problems that the world has been facing right now. How can we compress the data information while maintaining most of the information present in the data?
In this project, we will be dealing with Image Information. There are two main types of compression that are applied to images – lossless and lossy compressions. Some of the examples of lossless compression standards are PNG (Portable Network Graphics) and PCX (Picture Exchange). In lossless compression, all the information is preserved but the compression rate is low. If we need higher compression, we must look at lossy compression algorithms. One of the widely used lossy compression algorithm is JPEG compression algorithm. JPEG Algorithm works on DCT which is the topic of discussion in this project.
DCT stands for Discrete Cosine Transform. It is a type of fast computing fourier transform which maps real signals to corresponding values in frequency domain. DCT just works on the real part of the complex signal because most of the real-world signals are real signals with no complex components. We will discuss the implementation of DCT Algorithm on Image Data here and the potential uses of the same.
Steps for Implementation of DCT for Image Compression: • If we have multichannel image, we need to apply the algorithm individually to every channel. We must convert RGB Image to the equivalent YCbCr format before we can do DCT processing.
• Image is broken into (N,N) blocks. We take N=8 here because that is the JPEG Algorithm standard.
• Next, DCT is applied to every block serially.
• Quantization is applied to restrict the number of values that can be saved without loss of information.
• A subset of the quantized blocks is stored into an array from where it can be picked up for further processing.
• We can apply IDCT to the quantized blocks and then arrange the (8,8) blocks in serial order to get the YCbCr image, which can then be converted to RGB to get the original image in the compressed form.
Image Compression Algorithm Implementation:
The DCT Equation for 2D DCT has been given in the image below. P(x,y) denotes the pixels in the input image here.

However, when we are dealing with JPEG compression, we always take N = 8, which modifies the equation and gets us the equation below:

But applying this complex scalar computation at every point of (8,8) block of image can be time consuming, hence we can simplify the equations further to come up with a vector representation of the same. The vector representation of the same can be given as follows:

We compute the DCT by applying the following formula – D = DCT_Matrix @ Image_Block @ DCT_Matrix.T
The quantization block for (8,8) DCT has been coded directly into the function. The user can however choose the rate of compression that is needed according to the further application.
The human visual system is more perceptive to low frequency components of an Image in comparison to high frequency components. Hence, we can easily discard the high frequency components from the image and still maintain most of the information content in the image. After quantization, the processed array which is of the size (8,8), can be reduced to a lower dimension. We are taking the (5,5) subset of the block here, which still retains about 95% of the information, while reducing the size by 60.9% (1 – (25/64)). This also helps us to achieve an overall compression rate between 60% and 67% depending on the size of the input image.
Experimental Results:
Some of the Experimental Results have been displayed below:
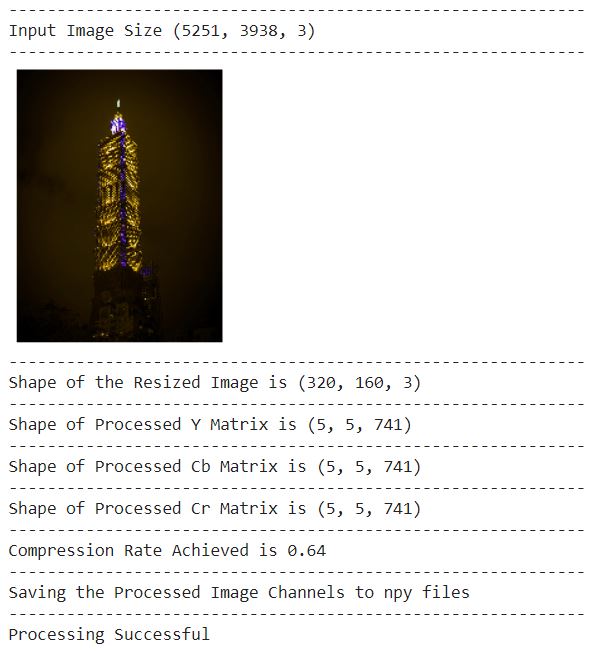
We can see that the input image of size (538,897,3) has been resized to (480,480,3) and then provided to DCT Function channel by channel to get the size (5,5,3481) for each channel, which means that when we compare the input pixels to processed input pixels, we have achieved compression of about 62%.

We can see that the input image of size (1200,1920,3) has been resized to (128,128,3) and then provided to DCT Function channel by channel to get the size (5,5,225) for each channel, which means that when we compare the input pixels to processed input pixels, we have achieved compression of about 66%.
Steps to Use:
• Clone the git repository using the link https://github.com/ojaashampiholi/DCT_Analysis.git
• Run the imageCompression.py on shell.
python imageCompression.py "path_to_image.jpg" resize_height resize_width

Applications:
• The images can be saved in the compressed format and can be reconverted to the RGB version when they must be displayed.
• The processed blocks of information can be sent over communication channel, thus consuming less bandwidth.
• This processed DCT information can be given as input to Deep Learning based Computer Vision Tasks which usually need lots of high-quality data.
As a Data Scientist with background in Electronics and Telecommunications which primarily focused on Signal Processing, I have seen and worked the first two parts mentioned in the applications section. My goal eventually is to implement the third part now.
References:
https://www.math.cuhk.edu.hk/~lmlui/dct.pdf