This project combines YOLOv5, , with DeepSORT, an advanced object tracking algorithm, on the NVIDIA Jetson Nano platform. By leveraging TensorRT for optimization, this implementation in C++ ensures high-performance, real-time object tracking suitable for a range of applications including surveillance, autonomous vehicles, and crowd monitoring.
- Features
- Prerequisites
- Installation
- Usage
- Examples-and-Demos
- Benchmarking
- Contributing
- Acknowledgements
- Contact
- Additional-Notes
- Real-Time Object Detection with YOLOv5: Achieving high accuracy in various lighting and scene conditions.
- Optimized Performance with TensorRT: Significantly improved inference times on Jetson Nano.
- Robust C++ Implementation: Ensuring high-speed operation essential for embedded systems.
- Advanced Object Tracking with DeepSORT: Providing smooth and consistent object tracking capabilities.
- NVIDIA Jetson Nano Developer Kit with JetPack 4.5 (or later)
- TensorRT: 8.x
- CUDA Toolkit 10.2
- cuDNN 8.2
- Python 3
- C++17 Compiler
- 4GB swap memory
- Tested on Ubuntu 18.04
- OpenCV: 8.8.0-dev with CUDA
- USB camera or Raspberry Pi Camera Module v2
- Choose the model n/s/m/l/x/n6/s6/m6/l6/x6 from command line arguments.
- Input shape defined in yololayer.h
- Number of classes defined in yololayer.h, DO NOT FORGET TO ADAPT THIS, If using your own model
- INT8/FP16/FP32 can be selected by the macro in yolov5.cpp, INT8 need more steps, pls follow
How to Runfirst and then go theINT8 Quantizationbelow - GPU id can be selected by the macro in yolov5.cpp
- NMS thresh in yolov5.cpp
- BBox confidence thresh in yolov5.cpp
- Batch size in yolov5.cpp
- Generate .wts from pytorch with .pt or download .wts from model zoo
git clone -b v7.0 https://github.com/ultralytics/yolov5.git
git clone https://github.com/quandang246/Object-Tracking-on-Jetson-Nano-Integrating-YOLOv5-and-DeepSORT-with-TensorRT-in-Cpp
cd yolov5/
wget https://github.com/ultralytics/yolov5/releases/download/v7.0/yolov5s.pt
cp [PATH-TO-Object-Tracking-on-Jetson-Nano-Integrating-YOLOv5-and-DeepSORT-with-TensorRT-in-Cpp]/yolov5/gen_wts.py .
// Or simply copy your gen_wts.py file into the yolov5 folder of this repository: https://github.com/ultralytics/yolov5.git.
python gen_wts.py -w yolov5s.pt -o yolov5s.wts
# A file 'yolov5s.wts' will be generated.
- build tensorrtx/yolov5 and run
cd {Object-Tracking-on-Jetson-Nano-Integrating-YOLOv5-and-DeepSORT-with-TensorRT-in-Cpp}/yolov5/
// update CLASS_NUM in yololayer.h if your model is trained on custom dataset
mkdir build
cd build
cp {ultralytics}/yolov5/yolov5s.wts {Object-Tracking-on-Jetson-Nano-Integrating-YOLOv5-and-DeepSORT-with-TensorRT-in-Cpp}/yolov5/build
// Or simply copy your yolov5s.wts file that has been generated into the yolov5/build folder
cmake ..
make
sudo ./yolov5 -s [.wts] [.engine] [n/s/m/l/x/n6/s6/m6/l6/x6 or c/c6 gd gw]  // serialize model to plan file
sudo ./yolov5 -d [.engine] [image folder]  // deserialize and run inference, the images in [image folder] will be processed.
// For example yolov5s
sudo ./yolov5 -s yolov5s.wts yolov5s.engine s
sudo ./yolov5 -d yolov5s.engine ../samples
// For example Custom model with depth_multiple=0.17, width_multiple=0.25 in yolov5.yaml
sudo ./yolov5 -s yolov5_custom.wts yolov5.engine c 0.17 0.25
sudo ./yolov5 -d yolov5.engine ../samples
-
check the images generated
-
optional, load and run the tensorrt model in python
// install python-tensorrt, pycuda, etc.
// ensure the yolov5s.engine and libmyplugins.so have been built
python yolov5_trt.py

// Another version of python script, which is using CUDA Python instead of pycuda.
python yolov5_trt_cuda_python.py
-
Prepare calibration images, you can randomly select 1000s images from your train set. For coco, you can also download my calibration images
coco_calibfrom GoogleDrive or BaiduPan pwd: a9wh -
unzip it in yolov5/build
-
set the macro
USE_INT8in yolov5.cpp and make -
serialize the model and test
Step by step:
- Create the ground-truth files (follow tutorial from https://github.com/Cartucho/mAP#create-the-ground-truth-files)
- Copy the ground-truth files into the folder input/ground-truth/
- The results of yolov5 with automatically save in detection-resutls (so you need to run ### Usage-YOLOv5 first)
- Run the code:
python3 main.py
Optional (if you want to see the animation):
- Insert the images into the folder input/images-optional/
- Create a separate ground-truth text file for each image.
- Use matching names for the files (e.g. image: "image_1.jpg", ground-truth: "image_1.txt").
- In these files, each line should be in the following format:
<class_name> <left> <top> <right> <bottom> [<difficult>] - The
difficultparameter is optional, use it if you want the calculation to ignore a specific detection. - E.g. "image_1.txt":
tvmonitor 2 10 173 238
book 439 157 556 241
book 437 246 518 351 difficult
pottedplant 272 190 316 259
- Create a separate detection-results text file for each image.
- Use matching names for the files (e.g. image: "image_1.jpg", detection-results: "image_1.txt").
- In these files, each line should be in the following format:
<class_name> <confidence> <left> <top> <right> <bottom> - E.g. "image_1.txt":
tvmonitor 0.471781 0 13 174 244
cup 0.414941 274 226 301 265
book 0.460851 429 219 528 247
chair 0.292345 0 199 88 436
- Achieved 10~13 FPS on Jetson Nano (detection-only )
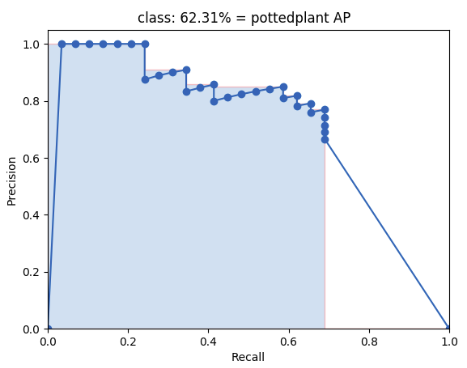
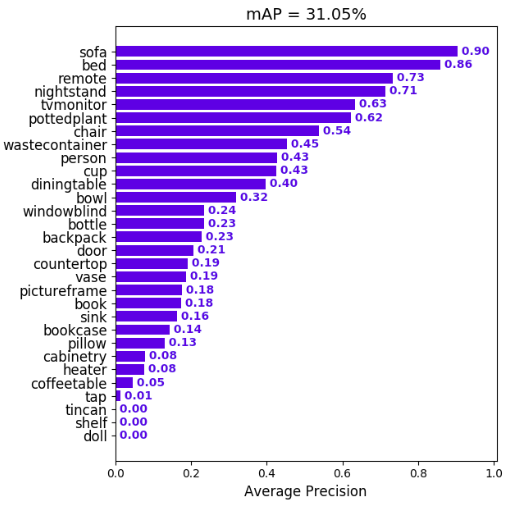
- mAP50: % in VOC (20 classes) datasets.
- YOLOv5: https://github.com/wang-xinyu/tensorrtx/tree/master/yolov5
- mAP: https://github.com/Cartucho/mAP
- NVIDIA Jetson Nano Community
For questions or support, contact us at [[email protected]].
- This project is under active development, and we plan to add more features.


