
Tamiya Androino 1.0 is a simple Arduino project to control a DC motor over bluetooth. You can simply control your own Tamiya to go forward, backward and stop, by using Android phone. Watch the video below (click here) to see its action, then follow the instructions below to build your own Tamiya Androino!

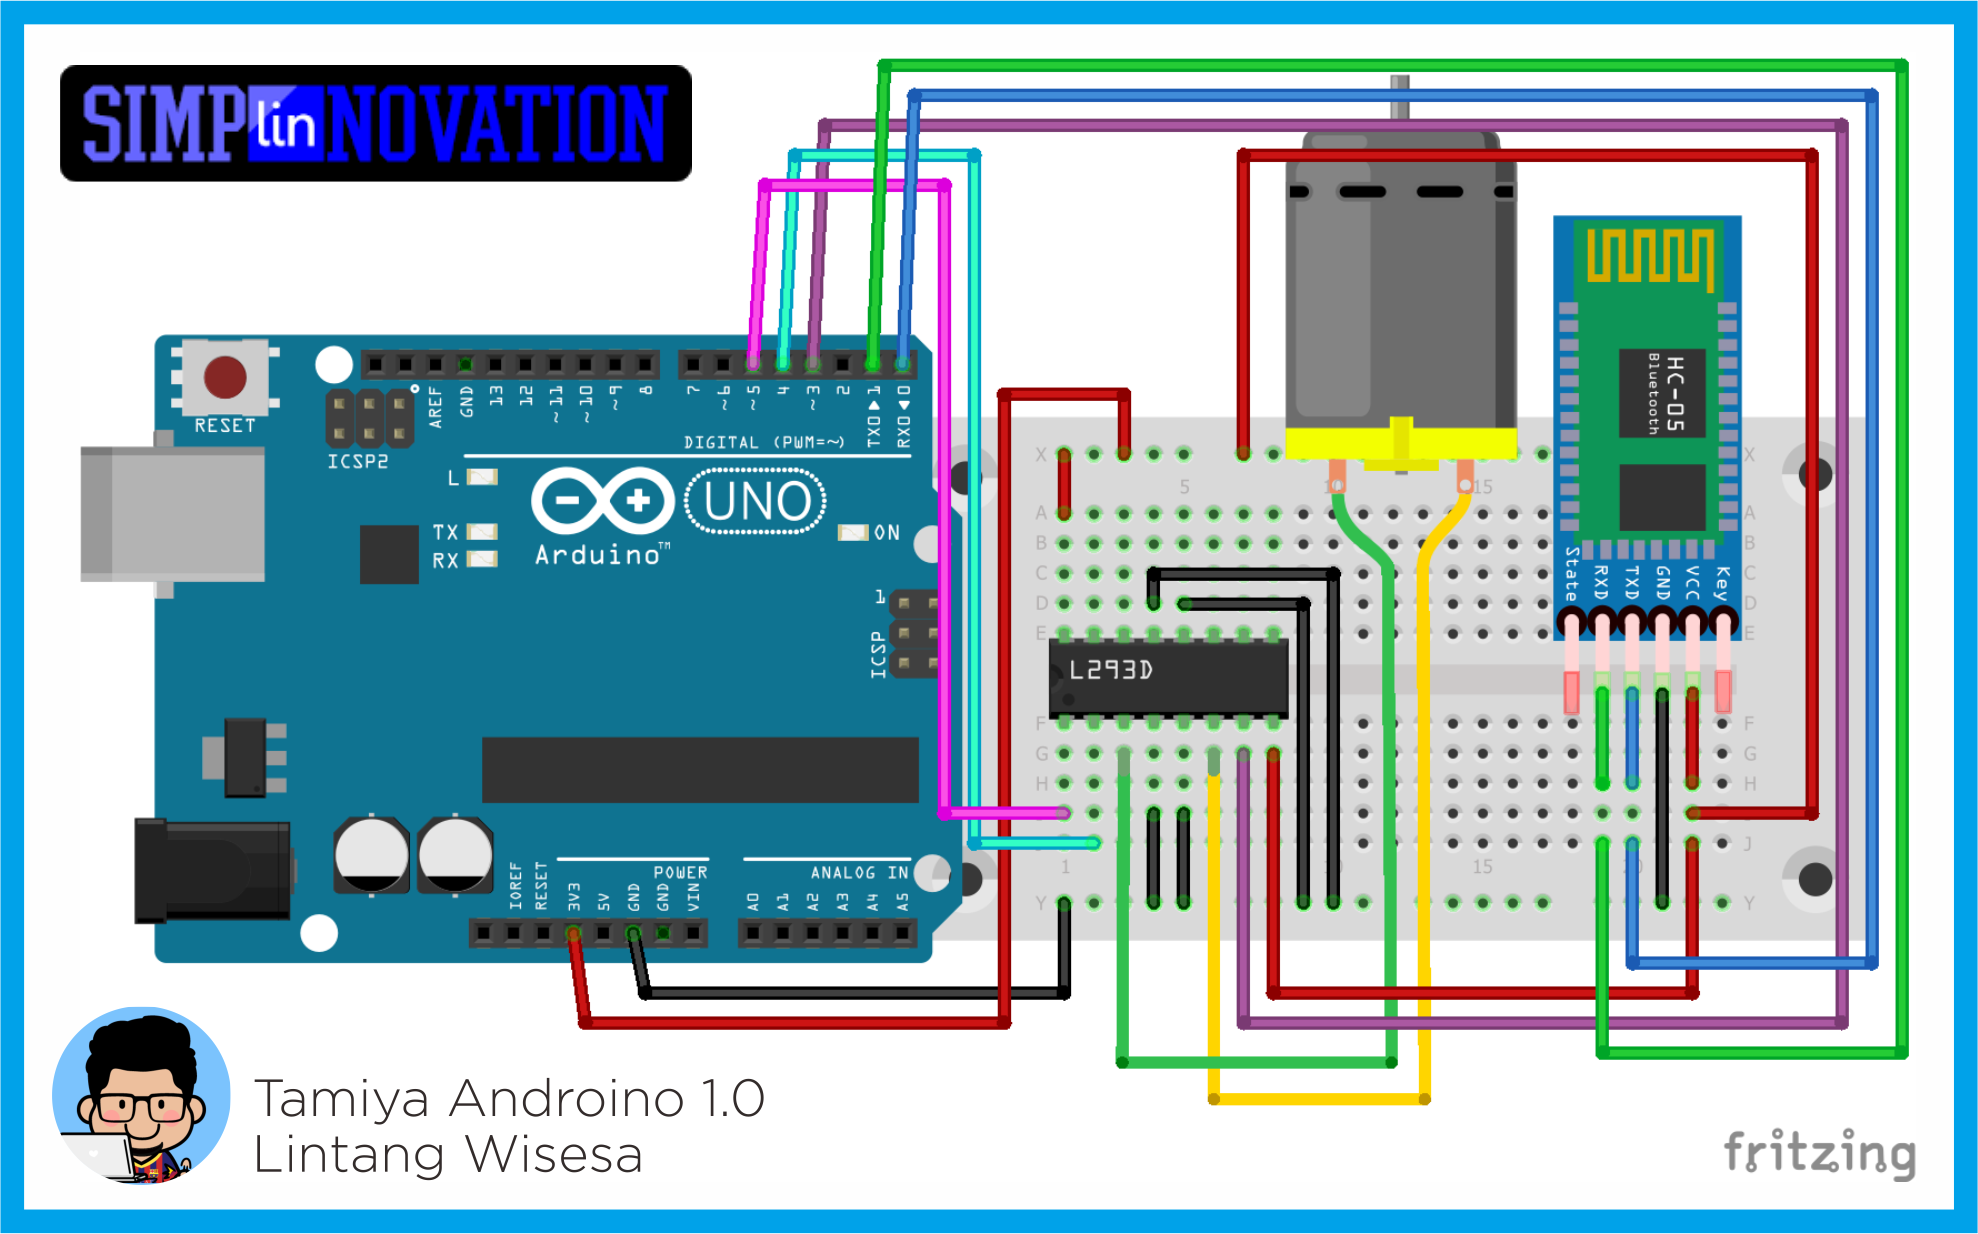
To build this project, you need the following items:
- 1 Arduino Uno board
- 1 Arduino proto board shield (or any breadboard)
- 1 Motor driver IC L293D
- 1 Bluetooth HC-05 module
- 1 DC motor
- 1 set 4WD Tamiya, just use its chassis, gears & tires.
- some jumper wires
- Arduino IDE (download here)
- Lin Bluetooth SPP Android App (I've attached its .apk in this repo), or
- Blueterm Android App (download here or you can easily get its .apk that I've attached in this repo)
Gather your parts then follow the schematics below.
You need to remove the RX and TX wires from Arduino, before uploading the sketch to your Arduino board. Copy sketch below to your Arduino IDE. Make sure you have chosen the right option for Board and Port under Tools menu, then upload to your Arduino board.
int motorPin1 = 3; // pin 2 on L293D
int motorPin2 = 4; // pin 7 on L293D
int enablePin = 5; // pin 1 on L293D
int state;
int flag = 0;

void setup() {
    pinMode(motorPin1, OUTPUT);
    pinMode(motorPin2, OUTPUT);
    pinMode(enablePin, OUTPUT);

    digitalWrite(enablePin, HIGH);
    Serial.begin(9600);
}

void loop() {
    if(Serial.available() > 0){
        state = Serial.read();
        flag=0;
    }

    if (state == '0') {
        digitalWrite(motorPin1, LOW);
        digitalWrite(motorPin2, LOW);
        if(flag == 0){
            Serial.println("Tamiya Androino STOP");
            flag=1;
        }
    }

    else if (state == '1') {
        digitalWrite(motorPin1, LOW);
        digitalWrite(motorPin2, HIGH);
        if(flag == 0){
            Serial.println("Tamiya Androino MUNDUR");
            flag=1;
        }
    }

    else if (state == '2') {
        digitalWrite(motorPin1, HIGH);
        digitalWrite(motorPin2, LOW);
        if(flag == 0){
            Serial.println("Tamiya Androino MAJU");
            flag=1;
        }
    }
}- After uploading process is done, reconnect TX & RX from Bluetooth module to RX & TX on Arduino board then restart it.
- Open LIN Bluetooth SPP App or Blueterm App, then connect to your Bluetooth module. If the Bluetooth module asks for a password, by default it's '1234' (except you have changed it!).
- Here are the simple rules in Tamiya Androino 1.0 project:
- It will stop when we send '0'
- It will go backward when we send '1'
- It will go forward when we send '2'
Lintang Wisesa 💌 [email protected]
Facebook | Twitter | Google+ | Youtube | :octocat: GitHub | Hackster