Software documentation
This document wants to provide details about the code of mig-t.
- High-Level view
- Input parsing
- Intercepted message processing
- Test Execution
- Module
- All the classes
- Unit tests
- The result (error types, session, applicable)
- How to compile the code
- How to debug
mig-t is an extension of Burp Suite, it uses Burp's proxy and Burp's GUI via the APIs provided by Burp. Burp APIs are simply callbacks and libraries available to the developer; they will be treated later in this document. mig-t relies on threads for its execution, firstly to avoid the Burp interface from freezing and then to allow parallel execution of different parts of the code. The logic of mig-t can be divided into three main blocks:
- Main process
- Test execution thread
- Session execution thread
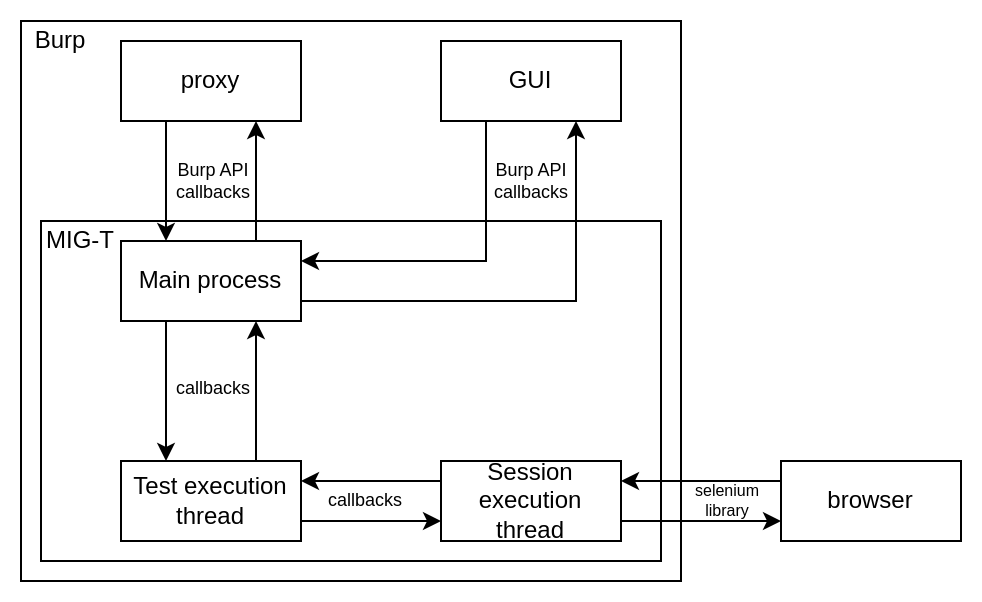
There is a frequent exchange of data between these threads; this is all done via coordinated callbacks. The idea is that the main process launches the test execution thread, and the latter launches the session thread on demand.
The order of execution of the threads is the following: More details will be provided later.

The main process is responsible for managing the state and communication with the Burp's proxy and Burp's GUI. This is done via some callbacks registered by the first callback,'registerExtenderCallbacks()'. The more relevant is processProxyMessage() which will be called whenever a message is intercepted by the proxy. The main process also manages all the inputs of mig-t, such as the test in JSON format and the session. It is also responsible for parsing the message definitions and the configuration from the respective files. The Main process also launches and monitors the execution of the tests.
The test execution thread is a thread launched by the main process. It is responsible for correctly executing the tests and launching the needed session threads depending on which session is needed by each test. The execution of the tests differs depending on whether they are passive or active. More details later.
This thread is responsible for executing the given session actions via the Selenium driver. It is responsible for managing the actions on the browser and the possible errors.
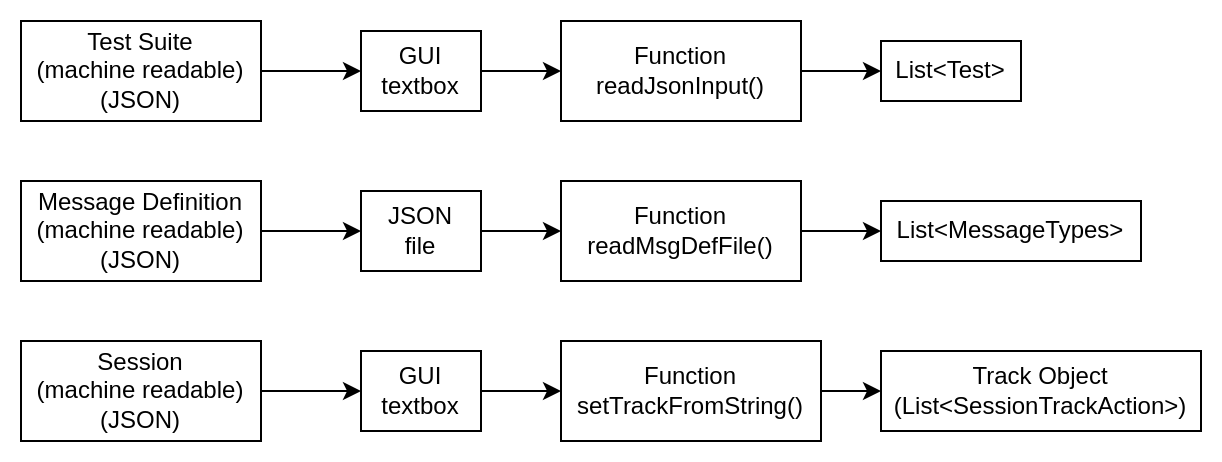
The inputs mig-t has to parse are:
- Test suite (JSON)
- Message definition file (JSON)
- Session (Custom selenium pseudocode)
- Config file (JSON)
Each of the inputs will be parsed in the Main Process by a specific function. Each parsed input will be allocated to a specific object:
- Test suite -> TestSuite Object (contains a list of Test Objects)
- Message definition file -> MessageDefinition Object
- Session -> Track Object (List of SessionTrackActions)
- Config file -> constants in Main process (Main class)
The following schema resumes the steps carried out by mig-t to parse the inputs.
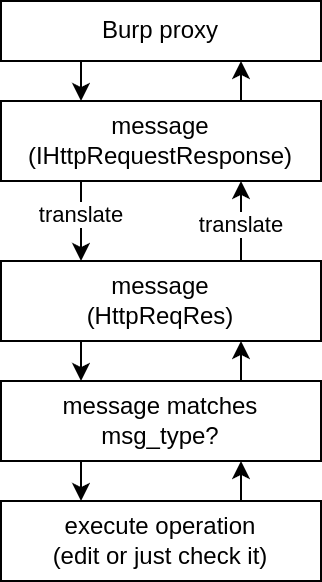
Upon receiving a message into the callback, the intercepted message will be of type IHttpRequestResponse, but the first thing done is to parse it with the custom class (HTTPReqRes). This has been done for multiple reasons, one of which is the ease of editing it during the processing of a test.
| message translation diagram | message processing schema |
|---|---|
 |
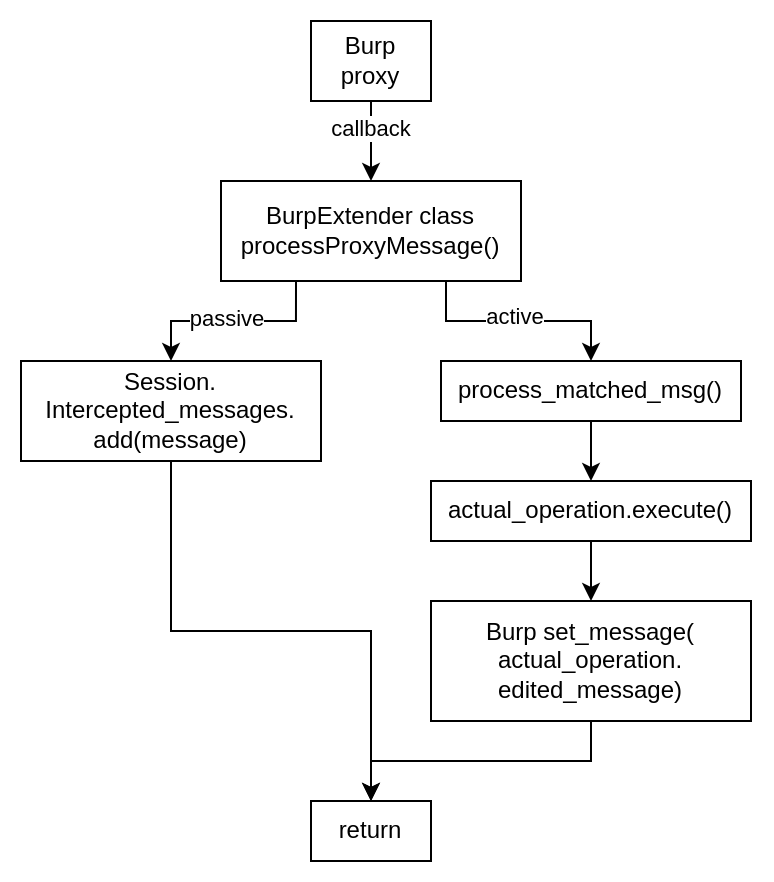 |
The intercepted and parsed messages will then be treated differently based on the type of test; if passive, the message will be just saved into a list of intercepted messages in the session. If it is active, instead, the function process_matched_message() is called, which will execute the actual operation giving the intercepted message to it. After the operation is complete, the proxy calls setRequest or setResponse to reassign the edited message returned from the operation execution to the IHttpRequestResponse Object and replace it.
After the test suite JSON is parsed, a list of Tests objects will be available to be executed. Based on the type of test (active or passive), the execution will differ. The main difference is that passive tests do not need to edit the intercepted messages, so the session can be executed just once for all the tests. Differently, the actives could edit the messages, so an execution of the session is necessary for each test.
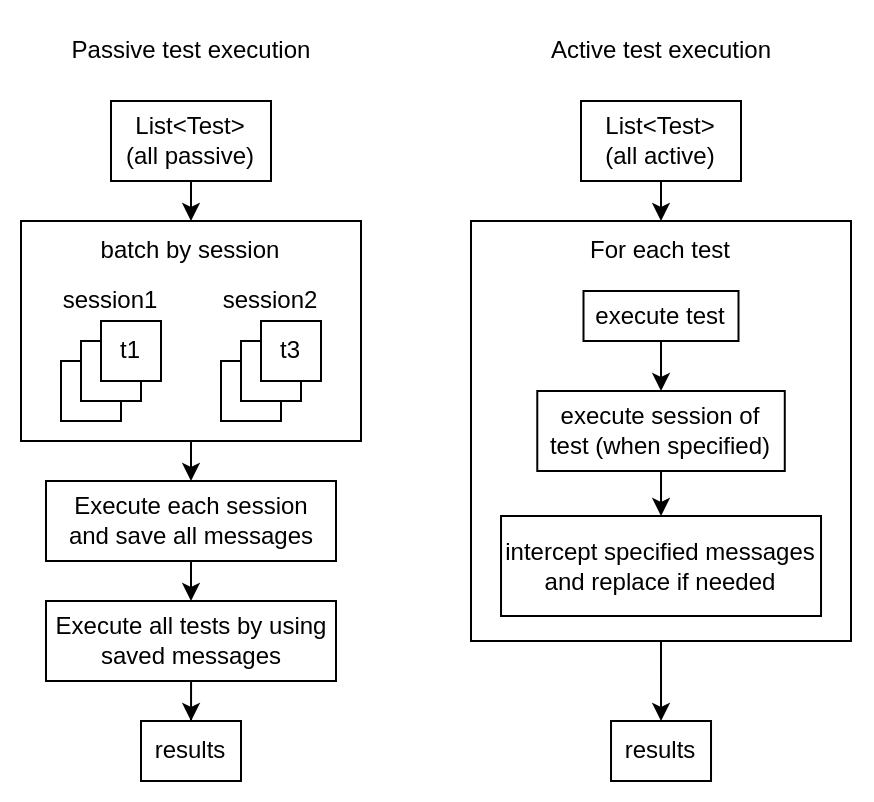
From the list of tests, all the passive ones will be selected and batched by the session in which they need to work. After this, each session of each batch is executed, and all the intercepted messages will be saved. After this, execute each test over the saved message of the given session.
In the active test execution, a list of all the active tests will be made from the list of all tests. Then, each test will be executed one at a time. Each test Operation will be executed, and one of the operations will specify which session to start and when. When an Operation that intercepts and edits a message is executed, the operation will first intercept the message, then edit it, and then substitute it for the original via the proxy.
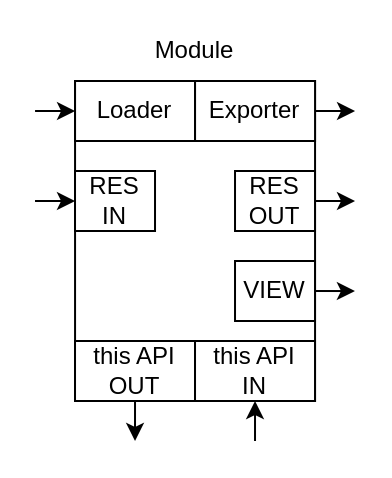
MIG-T tests are based on Operations, there are multiple types of operations that are defined in the language. Almost each Operation is associated with and parsed from the JSON into a module in the code. The structure of a module can be seen in the picture below.
| Module components | Module functions |
|---|---|
 |
 |
Each component of the module has a corresponding function in the code, as can be seen in the right picture. The class that defines an empty module is the class Module. Each of the other modules should extend the Module class.
Note: the method view is still to be developed.
Each module should expose an API, which is a set of data that will be available to other modules. To give an example, the Main Operation, which will have its own module Operation exposes an API defined by the class Operation_API, which contains the intercepted message of that Operation, properly divided in header, body, and URL. That API will be given to other modules that can be connected to the Main Operation module, for example, the Check module, which will use that API to access the message to verify its content. Each API is extended from the class API, which defines a general API.
It is not explicit in the picture, but the Module has its own Java constructor, which should contain a way to instantiate the module from the JSON definition of the language. This means that the constructor has to take in input a JSON object, which represents the language definition of it, and should set all its settings accordingly. Assuming that there are no settings to import from the module, this is not required.
The loader and the exporter are used to respectively load and export the API of another module. The exporter should return the API to the preceding module in the same format as it was received at the loader. The "format" of an API is defined by its class, for example, the Operation_API class.
The setResult() method is used to assign the result of a successive module to this one. The result of that module will update the result of this module accordingly; this is usually used to propagate the result from child modules to the root up to the test. The idea is that one module executing another one will hereditate its result. The getResult() function is just used to get the result of the module.
get and set API methods are used by other modules to access the API published by this module. The getAPI() method should return to the caller an API object that can be read and edited and then returned to the setAPI() method, which will have to update the module with the updated data.
| decode and check | decode and edit | recursive decode and edit |
|---|---|---|
 |
 |
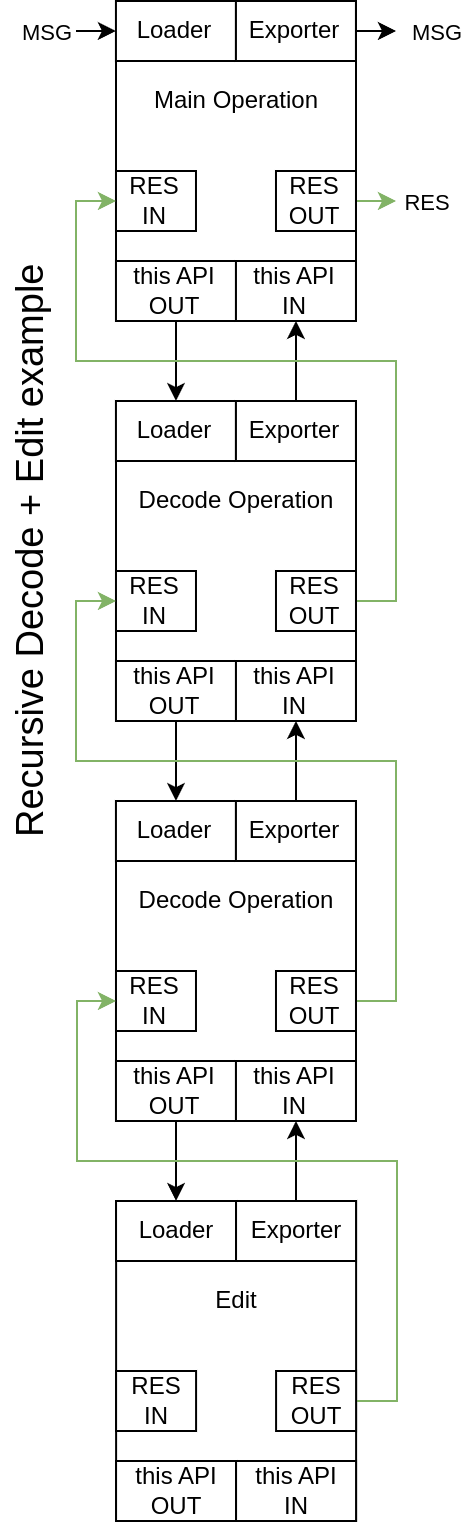 |
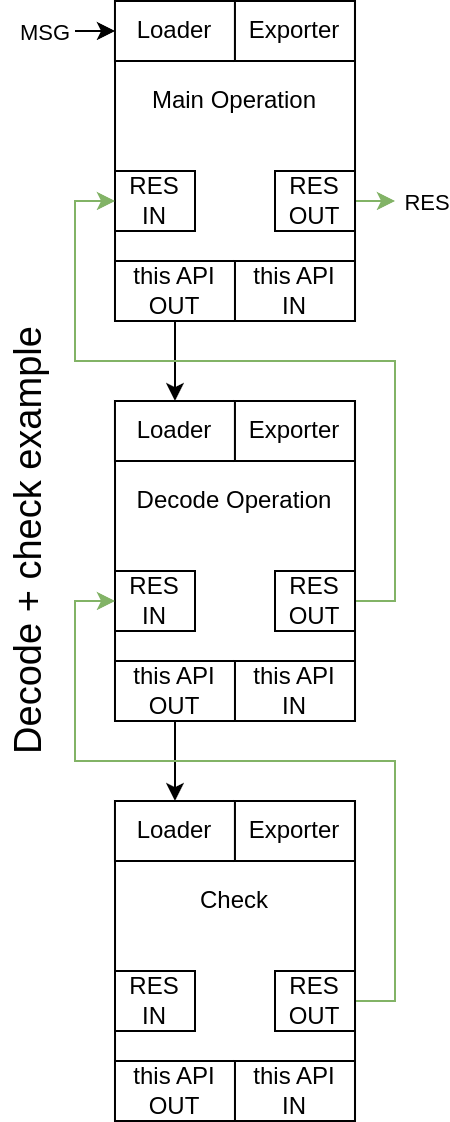
The first example is the easiest; it represents a test with a single operation that aims at intercepting a message (MSG), decoding its content (i.e., a JWT from a url parameter), checking the decoded content (i.e. checking that a string is present in the JWT), and returning true if it is found and false otherwise.
In the image above, you can see how this is done from the module's viewpoint. The first is the Main Operation, which intercepts the message (MSG), parses it, and makes it available through his API to the Decode module through the API OUT (getApi()) method. The Decode module loads the Main operation API and accesses the given section to take the content to be decoded and decode it, also putting it in his API object. The Check module will access the API object of the Decode module, accessing the section it needs to check of the JWT and checking the content. After this, the result of the Check module is read by the Decode module, which will call the getResult() method. The Decode module will "AND" his result with the one of the Check. The Main module will do the same, accessing the result of the decode operation, which will comprehend the Check RES and the Decode RES. If all the modules had a positive result, the main operation would return a positive result when the test asked for it, so the test would pass.
In this example, the API is not edited, so it is not returned to the previous module
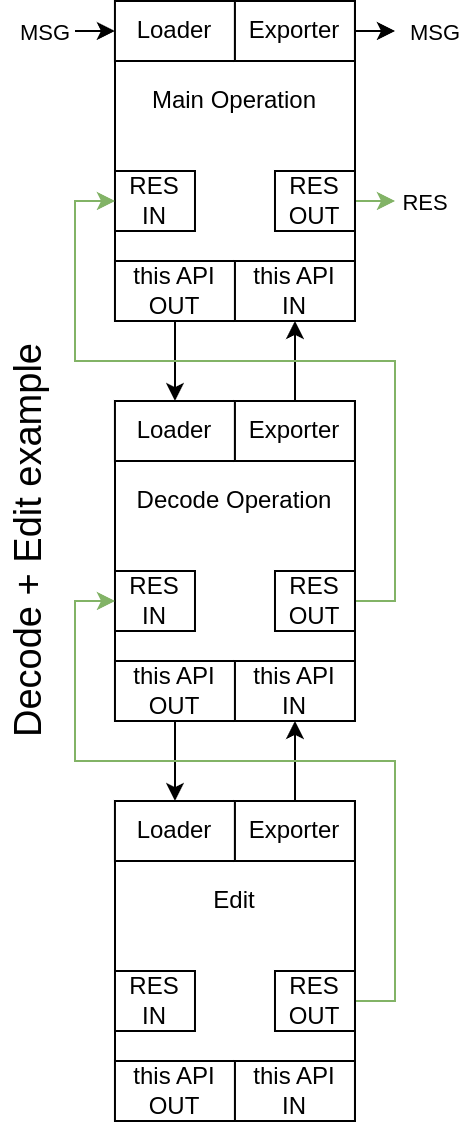
This example is similar to the previous, but instead of a Check module, an Edit module is added, which allows to edit the decoded JWT (i.e. editing a value). You can see that this time the Edit module returns the Decode API after it has edited its content to the Decode module via its Exporter and the setAPI() method of the Decode module. The Decode module will then take the edited JWT sections and rebuild them as they were originally, and then put them back where they were in the Main Operation API, which will be returned to the Main module. The main Module will rebuild the edited message and give it back to the proxy.
The result is always passed through the modules. The results also contain information about whether each module succeeded in doing what it was asked to do.
This example deals with a specific case in which a JWE contains a JWT in his payload. You can see that two decode modules are executed one after the other; this is to first decode the JWE and then the JWT. Finally, an edit operation edits the content of the JWT. This example shows the power of the APIs, which allow to correctly handle each piece of content and reposition it in the right spot when rebuilding or re-encoding.
The last example is about the verification of the JWT parameter at_hash which is a hash of a token in OAuth. The module structure is just the Main Operation, and the At_Hash operation.
The constructor of the class is empty because it does not need any settings.
public At_Hash() {}You can find the loader() method, which is responsible for loading the Operation_API and accessing the needed JWT from the body of the response message that has been intercepted.
@Override
public void loader(API api) {
    if (!(api instanceof Operation_API)) {
        throw new RuntimeException("Tried to load an api not supported in At_Hash module");
    }
    imported_api = api;
}
Here, a check is done on the api object, which has to be of type Operation_API, because this module cannot take any other APIs. Then the api is saved into the imported_api variable, which is an already-available variable from the class Module used for this purpose.
Then there is the execute() method, which is the one used to execute the module. This function contains all the things done by the module. We are not interested in the details, so I will omit most of the code.
@Override
    public void execute() {
      // ...

      // this means that all the steps that precedes the check were accomplished correctly
      applicable = true;

      // check previous value is equal to at_hash
      result = at_hash_generated.equals(at_hash);
    }
In the execute function, the applicable and result variables are set. The result variable says if the given check succeeded or not; in this case, a hash of a value is generated, and it has to be equal to some value. The applicable variable tells if the execution of the module succeeded; in this case, all the values needed by the check have been found. This is done to differentiate the result of the test from the fact that the execution of the module failed for other reasons.
Where possible, unit tests have been written; each class having unit tests has a corresponding test class inside the test folder.
It is the class called by Burp and contains all the Burp callbacks.
- It instantiates the GUI and sets its callbacks.
- It has the proxy callbacks
This class is basically the Main thread.
The main class defines the UI of mig-t and contains all the callbacks of the UI. From here, the execution threads spawn. The input is also read by this class.
It stores a test. It contains the sessions needed and some string variables to store information about the test, the result, and the operations.
Stores a list of tests.
These two classes extend the Java Runnable class, which means they can be run in a thread. Each class is responsible for running the tests; one is for the actives and another for the passives. The execution of the test differs from active to passive, as stated in test execution. Each class will then execute other threads on-demand to run the session by running the ExecuteTrack class. These classes communicate important updates via the ExecuteActiveListener and ExecutePassiveListener, which can be used by the caller (Main class) to react accordingly.
This class also extends the Java Runnable class. It is responsible for executing a session. It is started from the Execute Passive or Execute Actives classes. It communicates important events by using the callbacks in the ExecuteTrackListener class, which are used by the callers to receive async updates from the ExecuteTrack class.
This class is used to store an intercepted message request and response. It also has methods to edit the content of a message.
The EditOperation class is a module that is used to edit the content of messages or other sources, for example, JWTs. It originally was called the MessageOperation class, which is still present but just for legacy purposes and will be removed in the future.
These two classes are the ones that are extended by new modules and APIs for modules.
The JWT class is a helper class used to parse JWT and JWE from a string and rebuild it.
Used to represent a marker in the session, so to mark a sessionTrackAction.
Stores a messageType, which is an Object that identifies a specific message.
The operation class stores the main Operation module. With its Operation_API API
It is an exception thrown if there is an error that is related to how the test is written.
It represents a session and stores:
- a Track object, which contains the list of SessionTrackAction
- a port, which identifies the proxy port where to execute the browser
- a list of HTTPReqRes Objects, that store all the messages of the session
- An object storing the ExecuteTrack object, which is the thread that will be executed to execute the session
It is a class storing the action of the session, for example, open | https://google.com.
This class stores a session operation, which is a specific operation to do actions on the session. For more details see here
This class is not yet a module; it should be, and it will be changed in the future.
Contains a set of useful functions used in mig-t. Details of every function can be found in the description of the functions in the code.
It stores a list of SessionTrackActions, it basically stores a complete set of actions defined in a session.
This class stores a variable defined in the mig-t JSON language.
It is a utility class used to parse and edit XML content; in the past, it has been used to manage SAML content.
This class represents the decode module; based on the settings passed via the JSON, it decodes and re-encodes content.
This class represents a check module; based on the setting, it imports an API and does some checks on the content.
This is a quite difficult topic, the result of a test can be defined by means of different inputs. The components that contibute to the final result are:
- The session execution (optional): can be correctly executed or not correctly executed
- The session asserts: they are defined inside the session, used to verify browser contents. A session assert can have a positive result or negative result
- The operations results: they can pass or fail. But they can also be applicable or not applicable.
The previous components are combined to form the result of the test, the session execution can be omitted if the test result is set properly. The components are combined with an AND operator.
The idea is to differentiate an error in the execution of the test from a correct execution of the test but a failed result.
For example, if your test wants to verify that a jwt in the body of a message contains a specific value, but mig-t intercepts a message which has an empty body, what should be the result of the test? The possibilities are:
- Treat the test as failed, because that message should contain the JWT in the body, and the fact it does not have it makes the test fail
- Treat the test as not applicable: it was not possible to check the vaule inside the JWT, the result of the test cannot be correctly determined. This could happen because of many reasons, such as, wrong message selected, error in the server, wrong session, ...
Mig-t uses the second approach. For more info see this section
mig-t code is based on Maven; all the dependencies are defined in the pom.xml file that can be found in the root of the project. Here is a list of the dependencies:
- org.json:json:20231013
- com.nimbusds:nimbus-jose-jwt:9.38-rc3
- org.bouncycastle:bcpkix-jdk15on:1.70
- com.google.code.gson:gson:2.10.1
- org.seleniumhq.selenium:selenium-java:4.16.1
- org.apache.santuario:xmlsec:4.0.1
- com.sun.xml.security:xml-security-impl:1.0
- org.junit.jupiter:junit-jupiter-engine:5.10.1 (test)
- com.jayway.jsonpath:json-path:2.9.0
- net.minidev:json-smart:2.5.0
- org.apache.httpcomponents:httpclient:4.5.14
- org.apache.httpcomponents:httpcore:4.4.16
- com.networknt:json-schema-validator:1.2.0
- org.apache.commons:commons-text:1.11.0
Refer to the main readme in the root of the repo.
Debugging is very useful in finding bugs in mig-t, as there are part of the code that are difficult to cover with unit-tests, for example the session execution. Depending on the IDE you are using, the process on how to setup debugging differs. The main idea is that you should launch the Burp jar from the IDE, or attach to the Burp process from the IDE. Following some links on the most common IDEs documentation about debugging: