DumbDisplay MakeCode Extension is a simple tool to extend your Micro:bit screen to your Android phone via Micro:bit (V1) built-in Bluetooth LE or USB Serial.
| Micro:bit | Turtle | LEDs + LCD |
|---|---|---|
 |
 |
 |
You explode your creativity with a little help from this extension, and use DumbDisplay to realize an enhanced Micro:bit virtual screen on your Android phone.
You can install the free DumbDisplay app (v0.3.2 or later) from Android Play Store -- https://play.google.com/store/apps/details?id=nobody.trevorlee.dumbdisplay
The app can accept connection via
- Bluetooth LE -- which is relatively slow (and memory hungry)
- USB (OTG) -- which is faster, but requires a cable and an adaptor (OTG)
In summary, this extension allows you to use DumbDisplay as a screen in place of the Micro:bit built-in screen
- customizable screen size
- customizable LED color
- many screen-related MakeCode Core-like commands
- can mix with a Turtle layer using many Turtle-like commands
- can create other types of layers like LED Grid layer and LCD layer
For example, you can take advantage of your phone high-resolution screen to render drawings from your Micro:bit with Turtle-like operations.
You can also make use of DumbDisplay LED Grid / LCD layers for showing your experiment results, without the need to actualy attach real LEDs and/or LCD to your Micro:bit.
Your program can be interactivity; your drawings on the different layers can be according to Micro:bit different input mechanisms like
- push of buttont
- temperature
- compass direct
- etc
There should be many ways you can use DumbDisplay as a tool to realize your creativity.
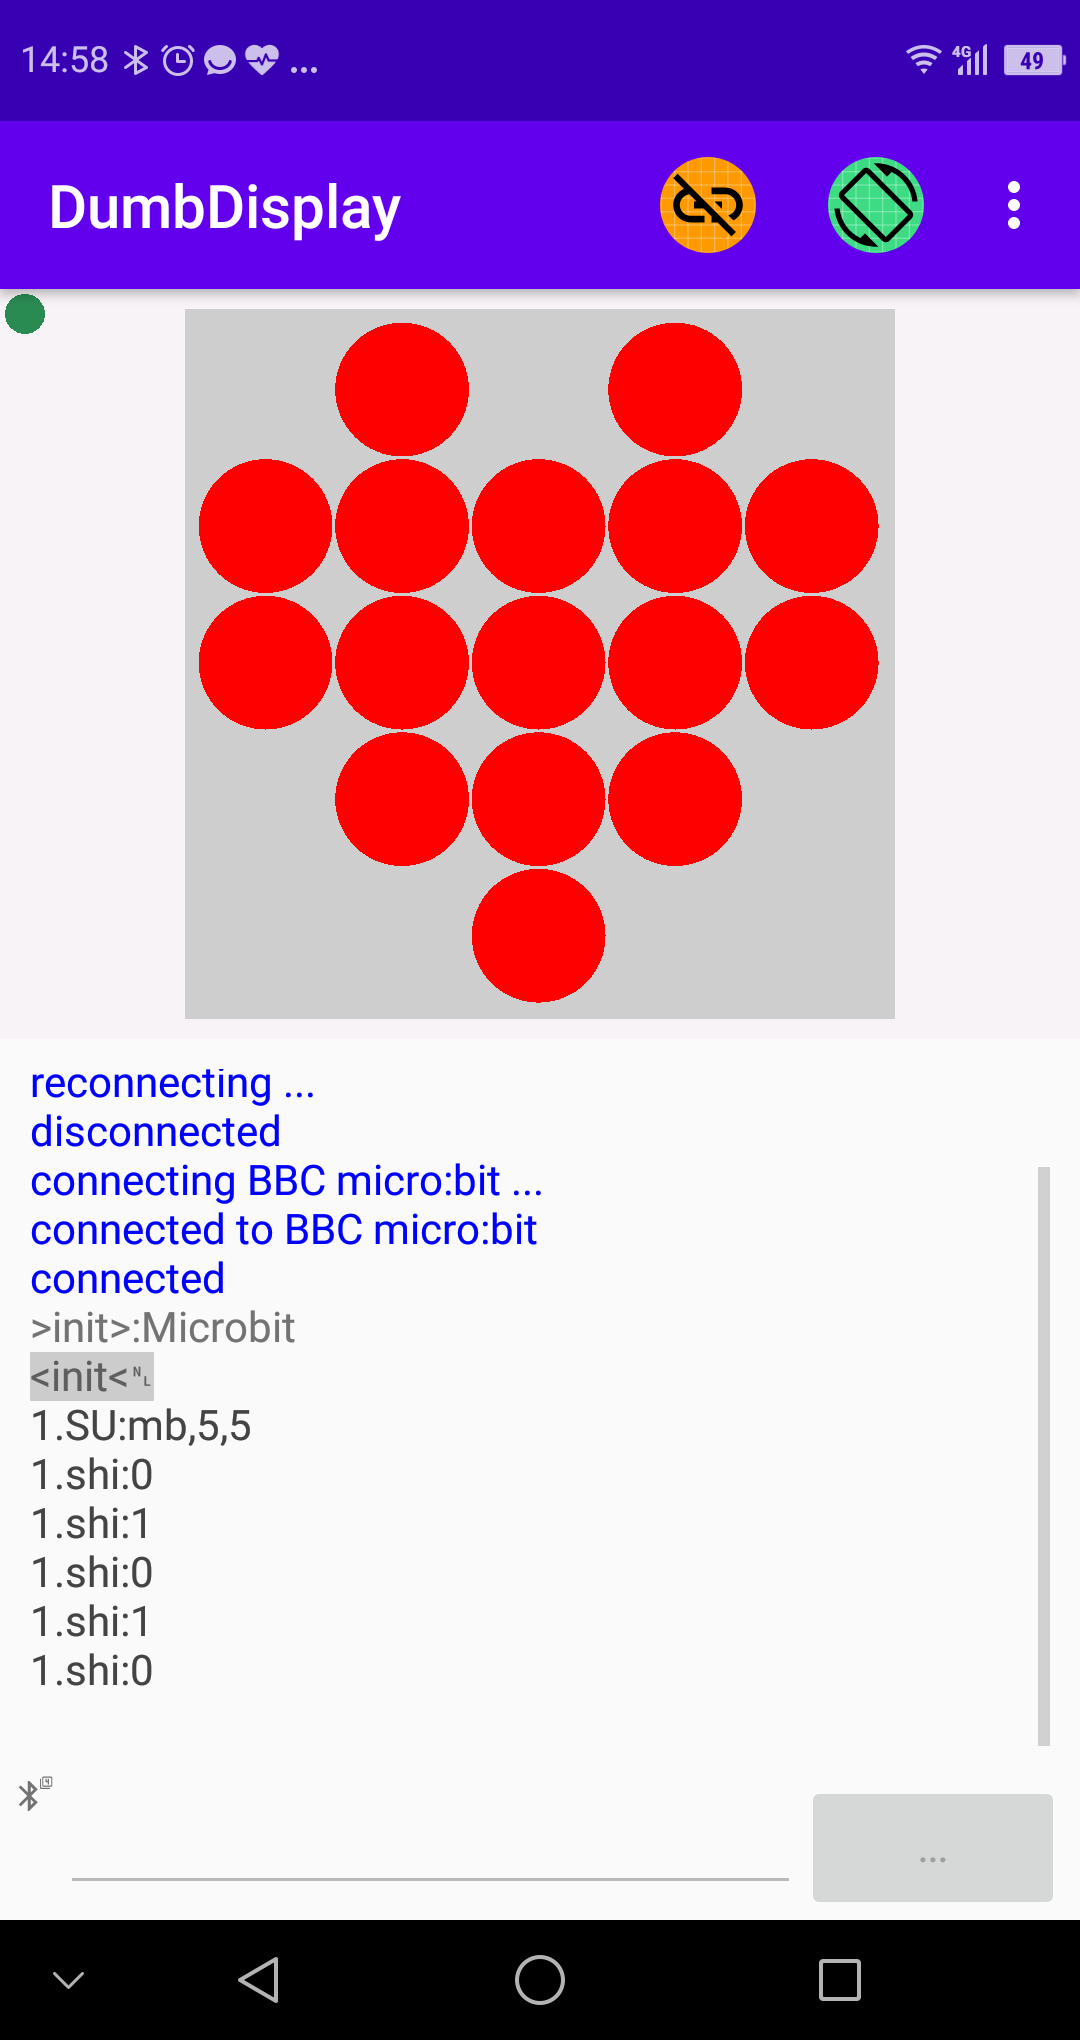
To start with, you should setup DumbDisplay (DD) like
// set a Micro:bit layer of size (5, 5)
ddmb.setup(5, 5)
- DumbDisplayMB
ddmb.setup(15, 9)-- setup a DD screen layer similar to Micro:bit screen but with size 15x9 - DumbDisplayMB
ddmb.setupLikeLocal()-- setup a DD screen layer similar to Micro:bit screen; additionally, most DumbDisplayMB commands will be replicated to Micro:bit internal screen - DumbDisplayTurtle
ddturtle.setup(300, 200)-- setup a DD screen layer with size 300x200 - notes:
- you can have 1 DumbDisplayMB screen layer + 1 DumbDisplayTurtle screen layer at the same time; the layer you setup first will be on top over the other layer
- setting up will wait for connection to DumbDisplay Android app; therefore, make sure your phone is ready to accept connection (Bluetooth or USB Serial)
- at any time, if you want to start again, press the reset button on the back of your Micro:bit
| 1. Micro:bit | 2. Turtle | 3. LEDs + LCD | 4. "Bar Meter" | 5. Manual "pin" layers |
|---|---|---|---|---|
 |
 |
 |
 |
 |
Then you can program something more interesting, like
// setup a Micro:bit layer of size (5, 5)
ddmb.setup(5, 5)
basic.forever(function () {
    // draw a heart icon to Micro:bit layer
    ddmb.showIcon(IconNames.Heart)
    basic.pause(1000)
    // draw a small heart icon to Micro:bit layer
    ddmb.showIcon(IconNames.SmallHeart)
})
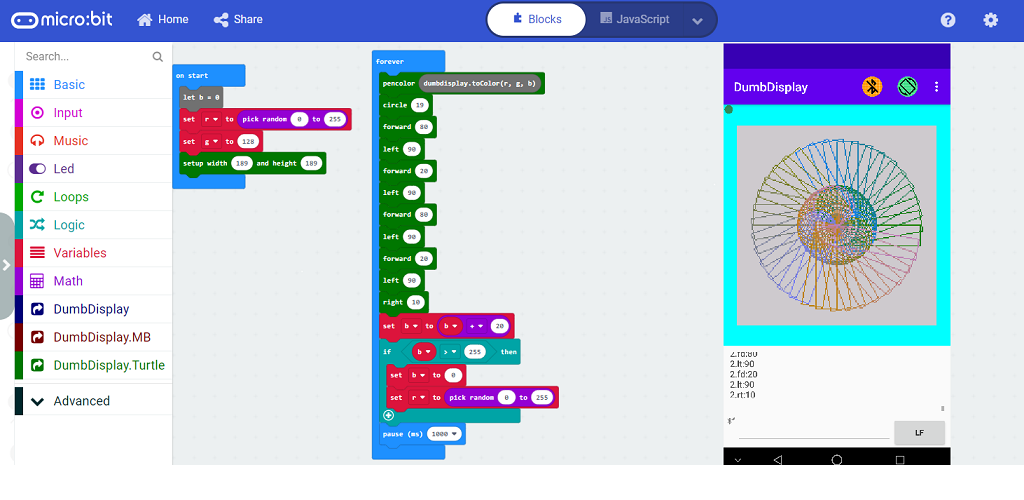
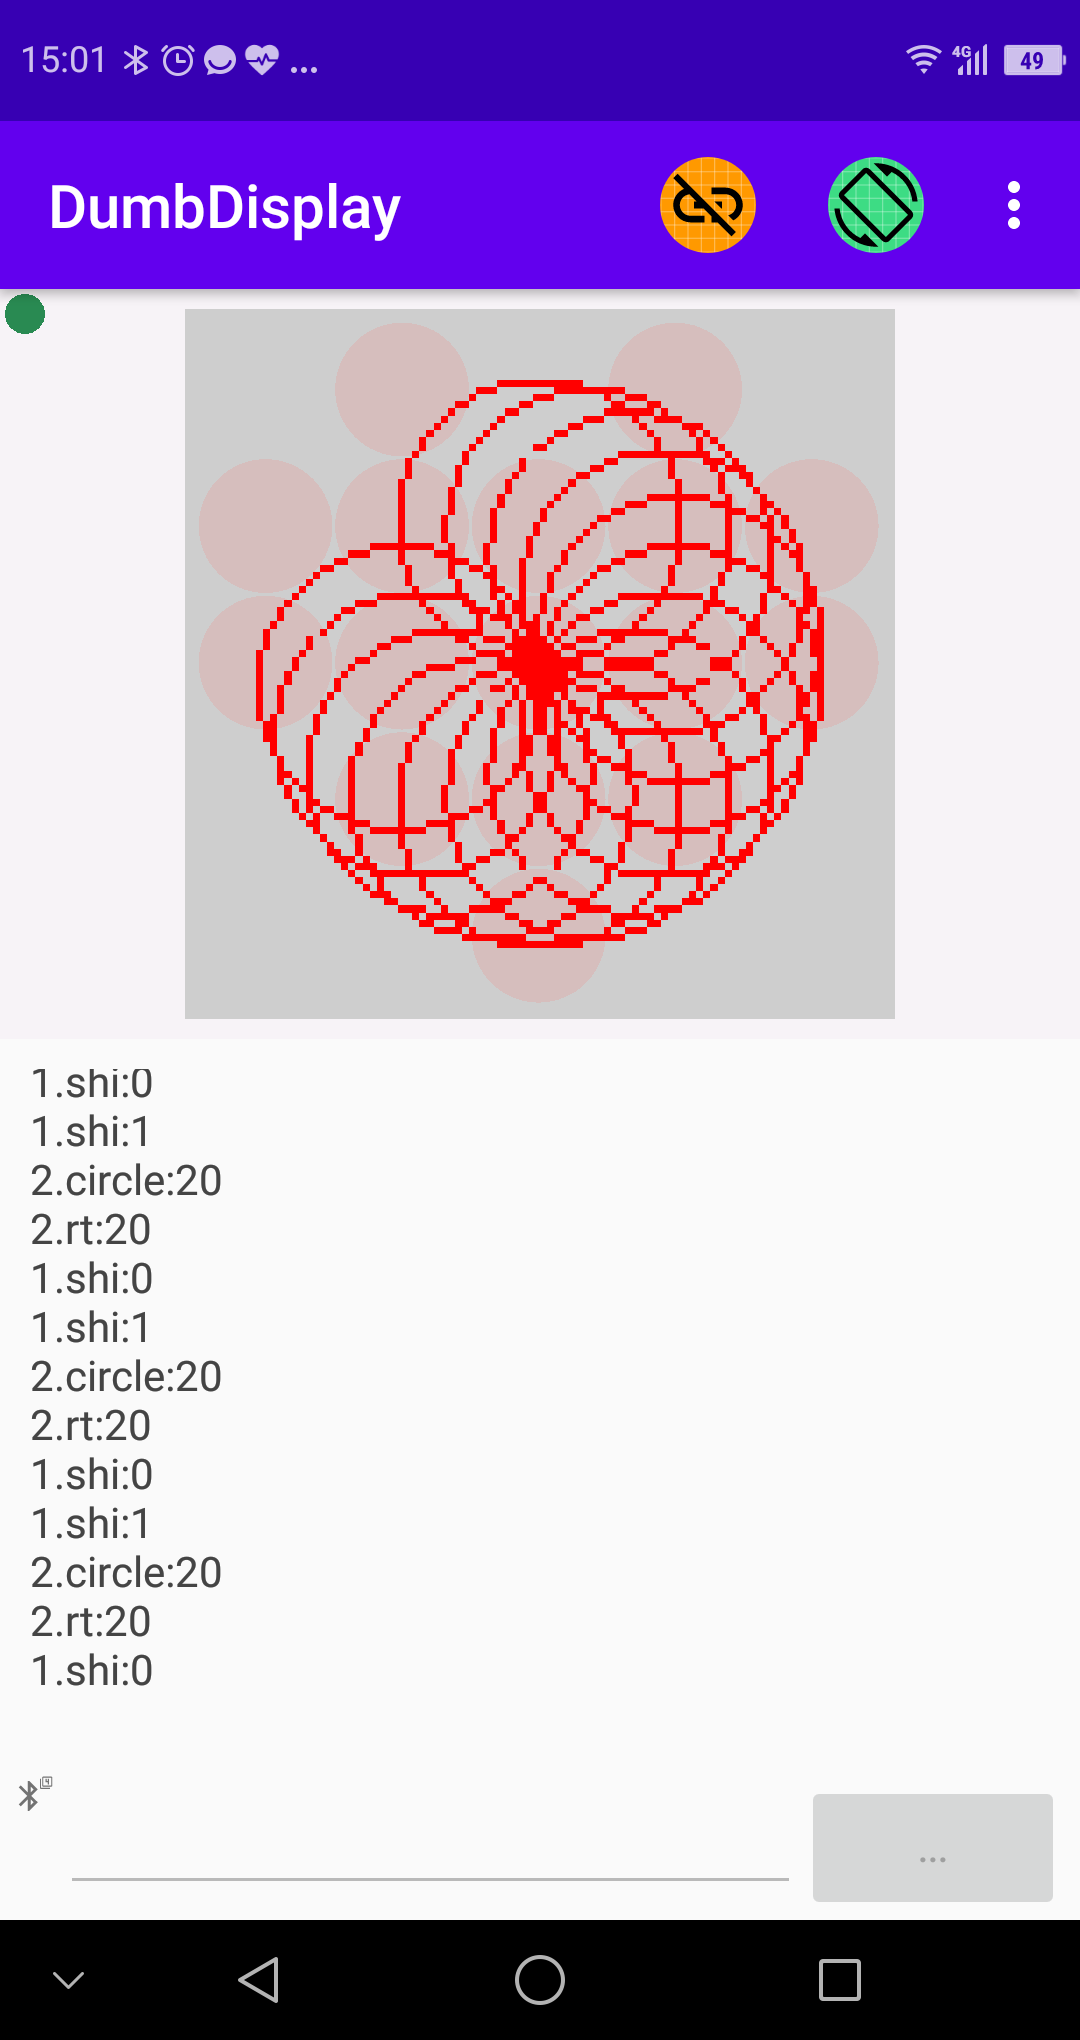
Screenshot 2 -- showing drawings rendered by Turtle-like operations (with Micro:bit icons as background)
You can use Turtle-like operations to draw something interesting, like
// setup a Turtle layer of size (100, 100)
ddturtle.setup(100, 100)
// setup a Micro:bit layer of size (5, 5)
ddmb.setup(5, 5)

// set Micro:bit layer opacity to 20 (of 255)
ddmb.layer().layerOpacity(20)

basic.forever(function () {
    // turtle draws a circle
    ddturtle.circle(20)
    // turtle turns right 20
    ddturtle.right(20)
    // draw a heart icon to Micro:bit layer
    ddmb.showIcon(IconNames.Heart)
    // pause a second
    basic.pause(1000)
    // draw a small heart icon to Micro:bit layer
    ddmb.showIcon(IconNames.SmallHeart)
    basic.pause(1000)
})
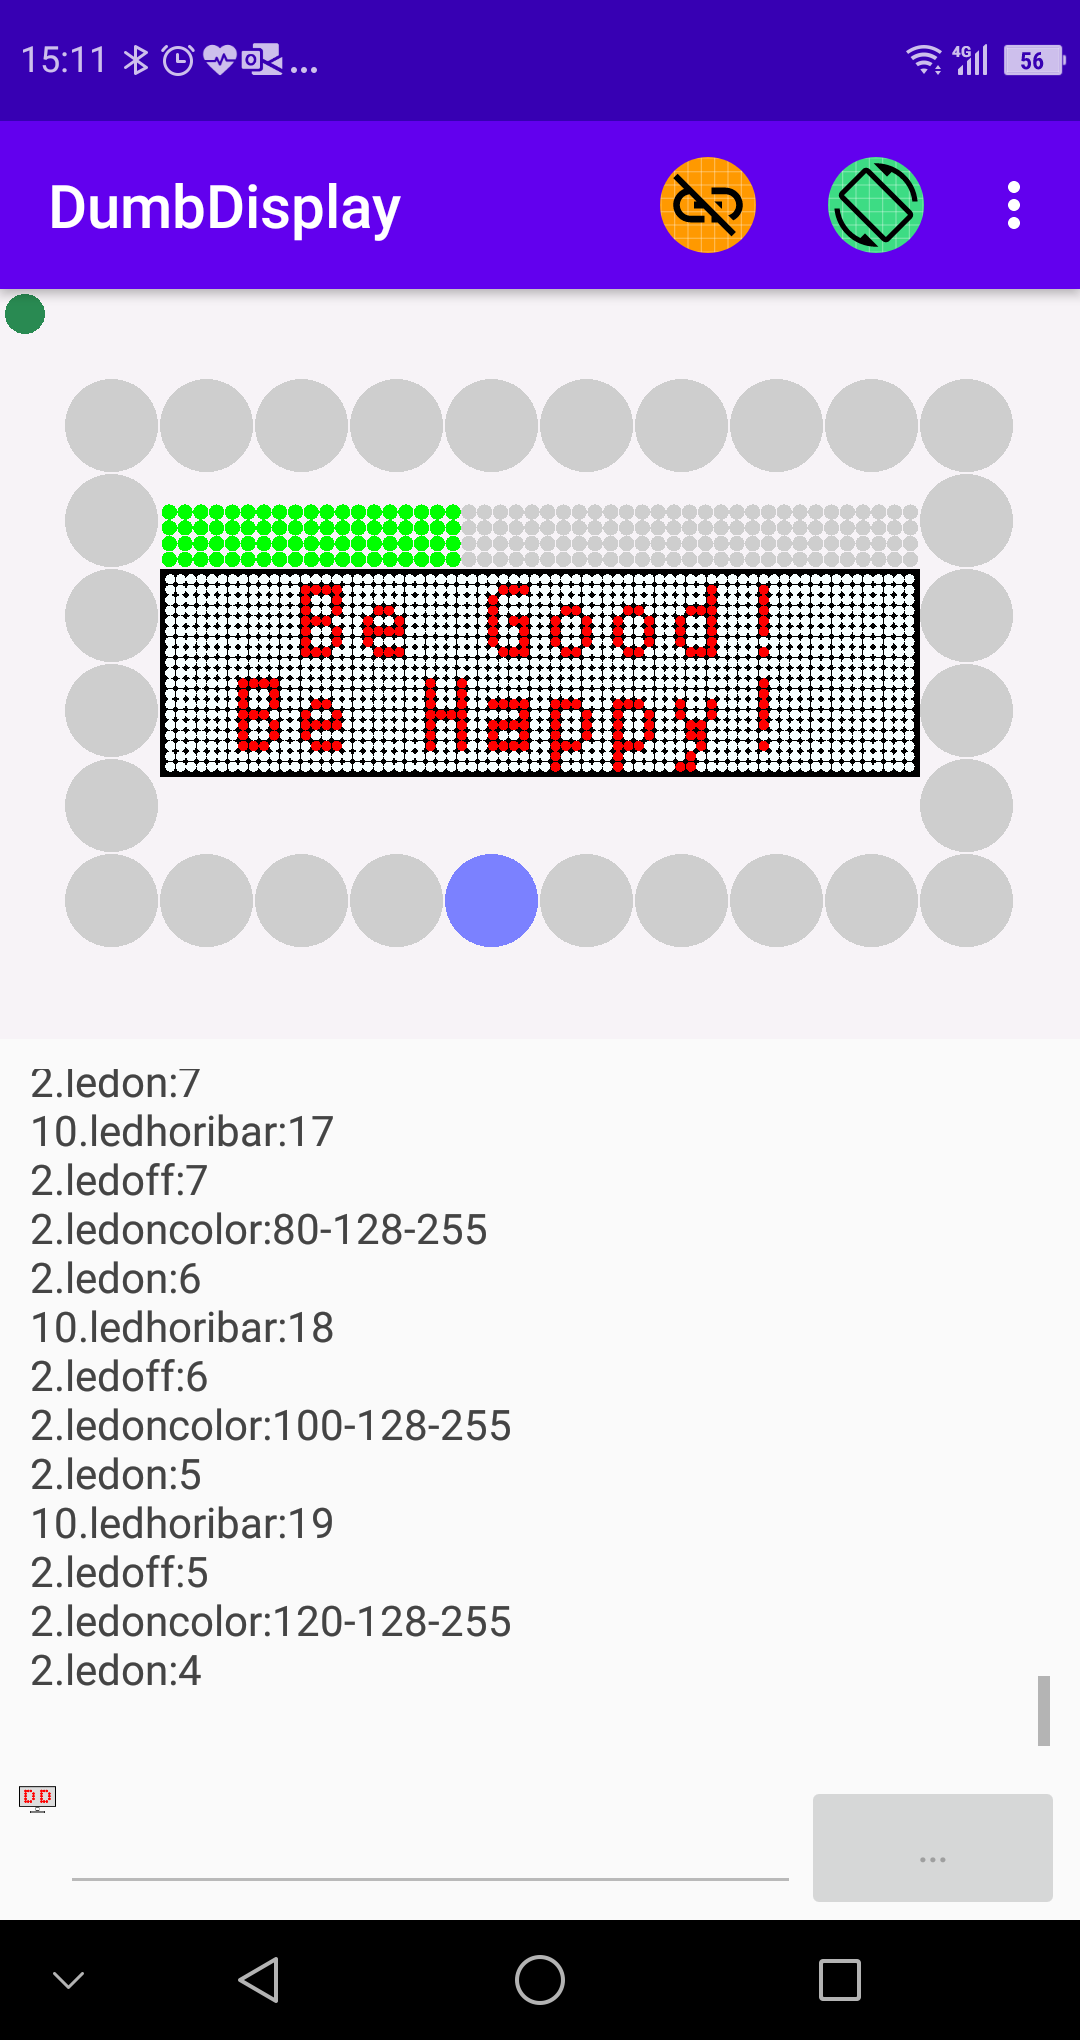
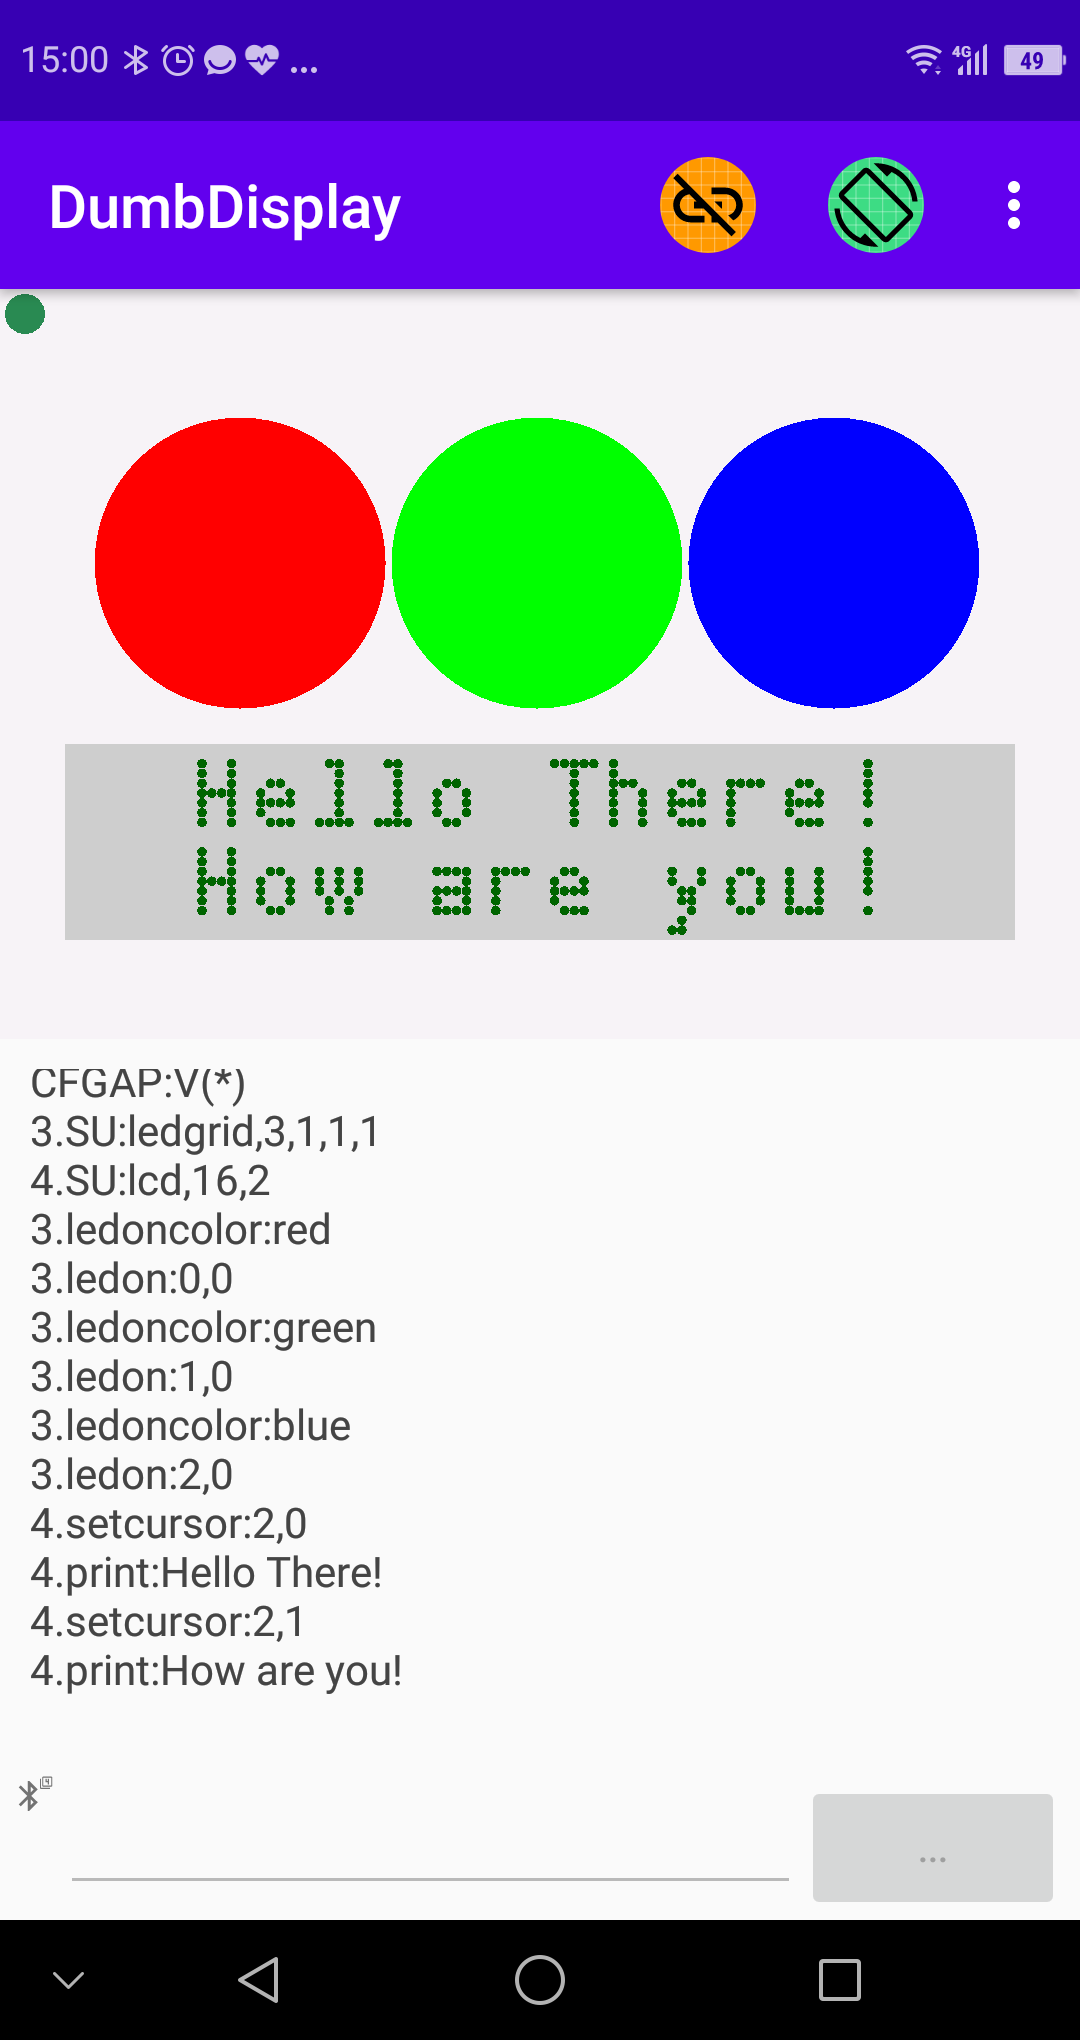
By making use of LED / LCD layers, you can show experiment result values in various ways, like
// configure to "auto pin (layout) layers" in the vertical direction
dumbdisplay.configAutoPinLayers(AutoPinDirection.Vertical)

// create a LED layer
let ledLayer = dumbdisplay.setupLedGridLayer(3, 1)
// create a LCD layer
let lcdLayer = dumbdisplay.setupLcdLayer()

// turn on LEDs
ledLayer.ledOnColor("red")
ledLayer.ledOn(0, 0)
ledLayer.ledOnColor("green")
ledLayer.ledOn(1, 0)
ledLayer.ledOnColor("blue")
ledLayer.ledOn(2, 0)

// print messages to LCD
lcdLayer.setCursor(2, 0)
lcdLayer.print("Hello There!")
lcdLayer.setCursor(2, 1)
lcdLayer.print("How are you!")
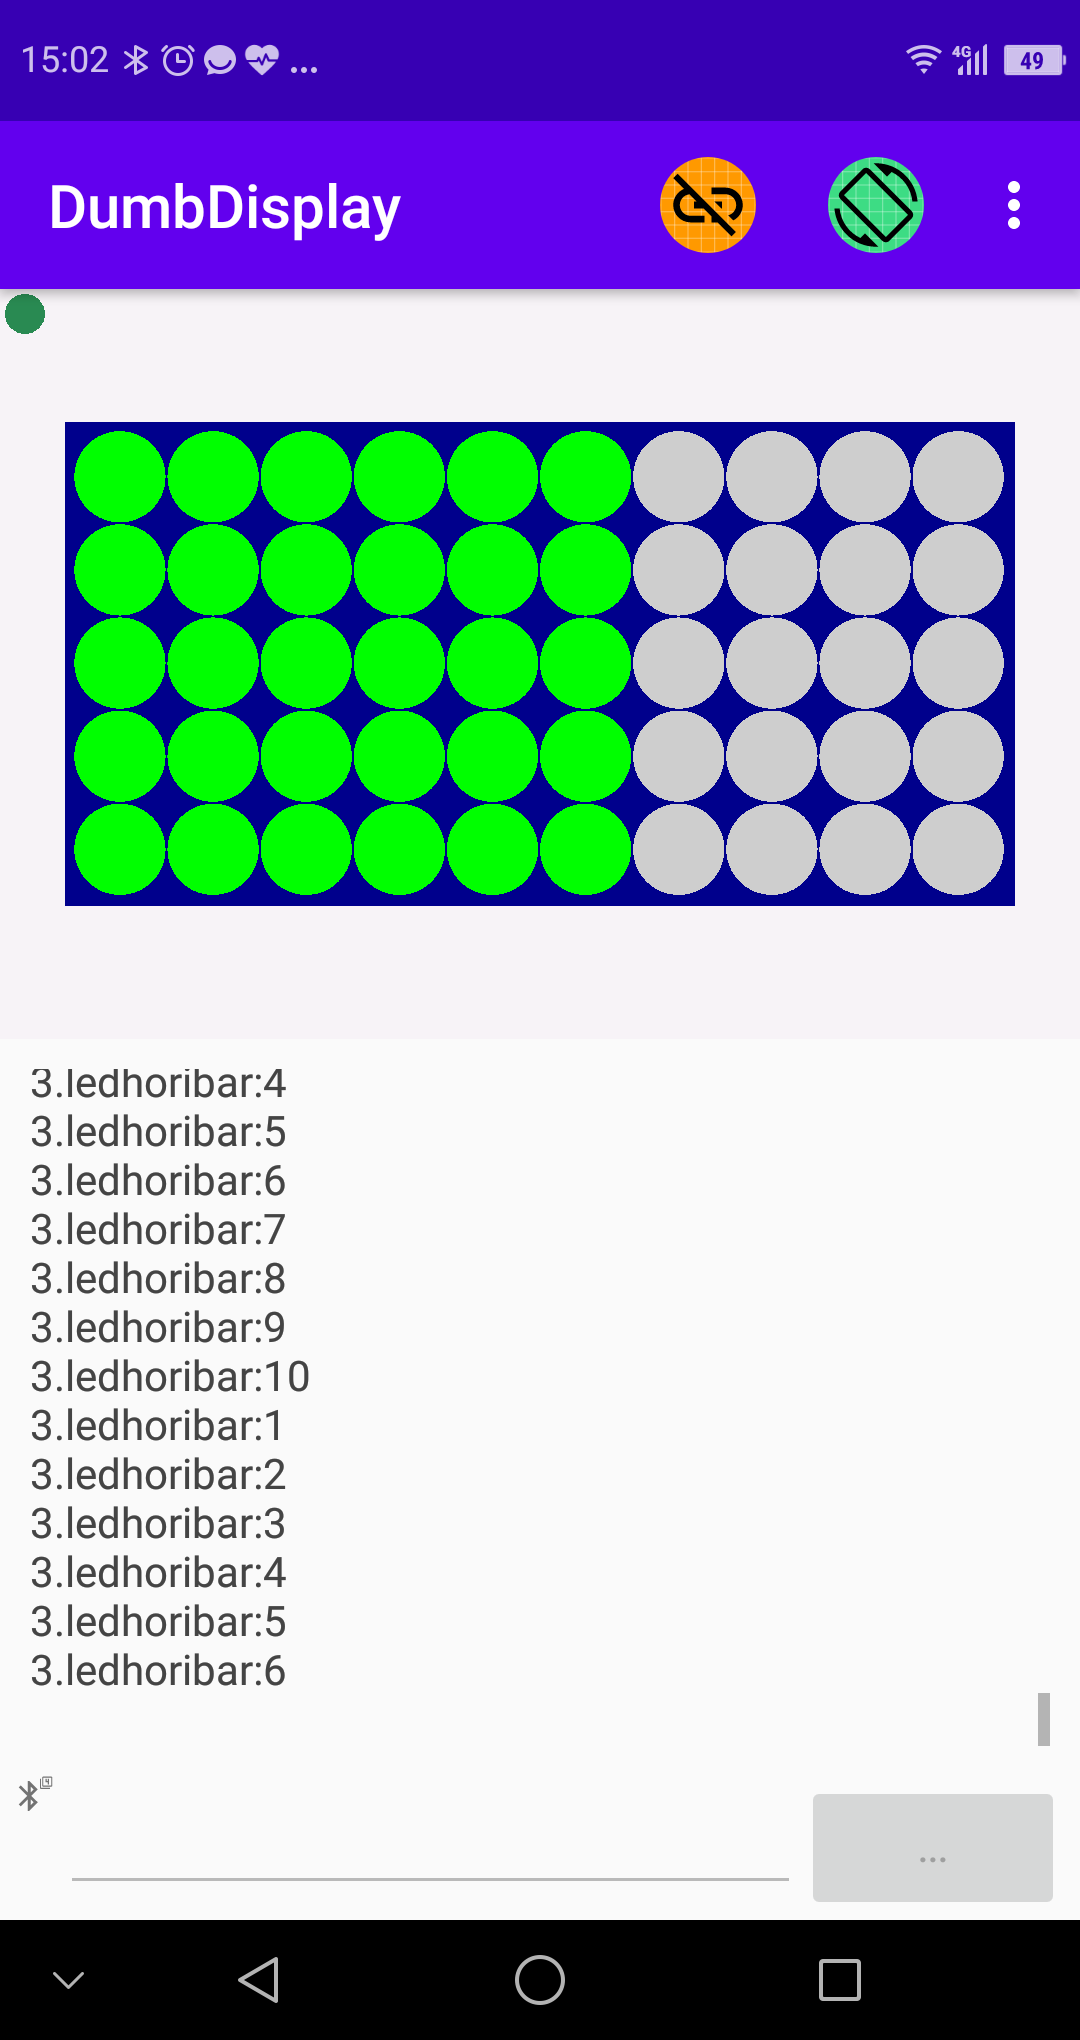
In fact, you can use the LED grid layer as some sort of "Bar Meter" that shows meter values, like
// create a LED layer of size 10 by 1 (with sub-led size 1 by 5)
let horiBarMeter = dumbdisplay.setupLedGridLayer(10, 1, 1, 5)

// set colors
horiBarMeter.layerBackgroundColor("darkblue")
horiBarMeter.ledOnColor("green")
horiBarMeter.ledOffColor("lightgray")

// loop show bar of different values
basic.forever(function () {
    for (let c = 1; c <= 10; c++) {
        horiBarMeter.ledBar(c)
        basic.pause(200)
    }
})
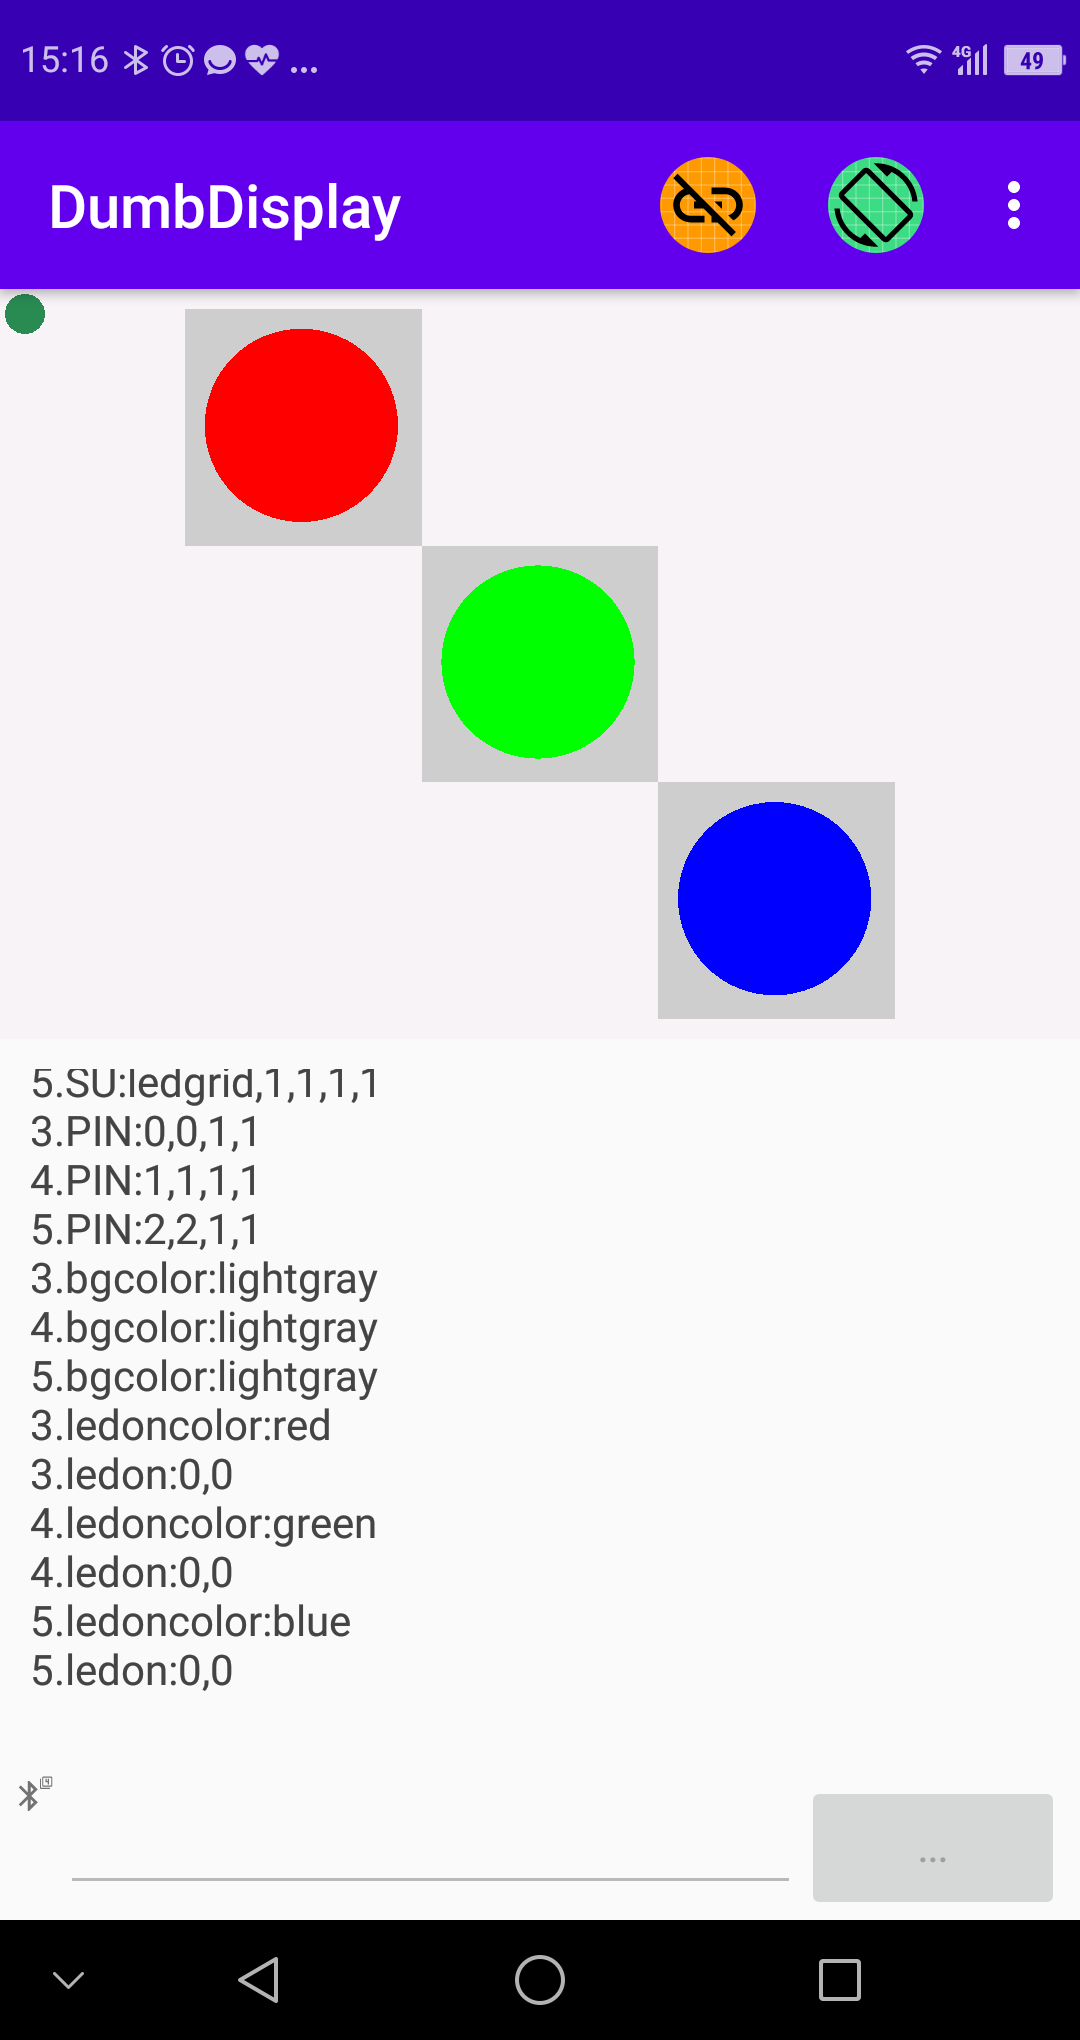
You can fine tune how different layers be "pinned", like
// configure the imaginary "pin frame" to be 3 units x 3 units
dumbdisplay.configPinLayers(3, 3)

// create 3 LED layers
let ledLayer1 = dumbdisplay.setupLedGridLayer()
let ledLayer2 = dumbdisplay.setupLedGridLayer()
let ledLayer3 = dumbdisplay.setupLedGridLayer()

// pin LED layer 1 to position (0, 0) with size (1, 1)
dumbdisplay.pinLayer(ledLayer1, 0, 0, 1, 1)
// pin LED layer 2 to position (1, 1) with size (1, 1)
dumbdisplay.pinLayer(ledLayer2, 1, 1, 1, 1)
// pin LED layer 3 to position (2, 2) with size (1, 1)
dumbdisplay.pinLayer(ledLayer3, 2, 2, 1, 1)

// turn on LEDs
ledLayer1.layerBackgroundColor("lightgray")
ledLayer2.layerBackgroundColor("lightgray")
ledLayer3.layerBackgroundColor("lightgray")
ledLayer1.ledOnColor("red")
ledLayer1.ledOn()
ledLayer2.ledOnColor("green")
ledLayer2.ledOn()
ledLayer3.ledOnColor("blue")
ledLayer3.ledOn()
You largely do not need to use DumpDisplay package. Instead, you will mostly use DD.MB and/or DD.Turtle to render drawings on the corresponding layers.
DD.MB:
showIcon(name: IconNames)-- similar toBasicshowArrow(name: ArrowNames)-- similar toBasicshowString(str: string)-- similar toBasicshowNumber(num: number)-- similar toBasicclearScreen()-- similar to Basicplot(x: number, y: number)-- similary toLedunplot(x: number, y: number)-- similar toLedtoggle(x: number, y: number)-- similar toLedshowLeds(leds: string)-- similar toLedledColorNum(color: number)-- set the color of the LEDs with a color numberledColor(color: string)-- set the color of the LEDs with a normal color name like "green", or a hex number (starting with "#")createImage(leds: string)/showImage(offset: number)/scrollImage(offset: number, interval: number)-- similar to Imageslayer()-- return the layer object to be used for some functions of DumbDisplay- notes:
- unless "setup like local", which will replicate most commands to local Micro:bit, the DumbDisplayMB commands will be brief; in other words, you get to control the timing how long something is shown. For example, the text "Hello World!" can take a little while for
basic.showString()to finish (since it will scroll the text),ddmb.showString()virtual takes no time to finish; you usebasic.pause()to allow time for the string to scroll in DD virtual screen on your phone. showLeds()/createImage()input is a string -- an "image literal" or a normal string; if it is a normal string, some similar format should be followed- char
#-- ON - char
.-- OFF - char
|-- end of row - e.g.
.####.||||#....#represents 5 rows, with 1st row being.####.and last row being#....#
- char
- unless "setup like local", which will replicate most commands to local Micro:bit, the DumbDisplayMB commands will be brief; in other words, you get to control the timing how long something is shown. For example, the text "Hello World!" can take a little while for
DD.Turtle:
forward(distance: number)-- move forwardbackward(distance: number)-- move backwardright(angle: number)-- turn rightleft(angle: number)-- turn leftsetHeading(angle: number)-- set heading directionhome()-- move to home (center of screen)goto(x: number, y: number)-- go to a position of the screencircle(radius: number)-- draw a circlecenteredCircle(radius: number)-- draw a circle with current position being the centerrectangle(width: number, height: number)-- draw a rectangle- it is similar to
   forward(width)
   left(90)
   forward(height)
   left(90)
   forward(width)
   left(90)
   forward(height)
   left(90)
- it is similar to
centeredRectangle(width: number, height: number)-- draw a rectangle with current position being the centertriangle(side1: number, angle: number, side2: number)-- draw a triangle given SAS (side1, angle, side2)isoscelesTriangle(side: number, angle: number)-- draw an isosceles triangle given side and anglepolygon(side: number, vertexCount: number)-- draw a polygon given side and number of verticescenteredPolygon(radius: number, vertexCount: number)-- draw a polygon with current position being the center (and surrounding an imaginary circle)dot(size: number)-- draw a dot (with certain pen size)dotOfColorNum(size: number, color: number)-- draw a dot (with certain pen size and pen color number)dotOfColor(size: number, color: string)-- draw a dot (with certain pen size and pen color name like "green")write(text: string)-- write textdrawText(text: string)-- draw text (in the heading direction)penup()-- pen uppendown()-- pen downpenSize(size: number)-- set pen sizepenColorNum(color: number)-- set pen color with color numberpenColor(color: string)-- set pen color with color name like "green", or a hex number (starting with "#")fillColorNum(color: number)-- set fill with color numberfillColor(color: string)-- set fill color with color name like "green", or a hex number (starting with "#")bgColorNum(color: number)-- set background color with color numberbgColor(color: string)-- set background color with color name like "green", or a hex number (starting with "#")beginFill()endFill()clear()-- clear the screenjumpHome()-- move to home (center of screen) without drawingjumpTo(x: number, y: number)-- go to a position on screen without drawingpenFilled(fillPen: boolean)-- set whether pen filled (with fill color); note that when pen filled, drawn shape will be filledpenTextSize(size: number)-- set the size of text (the default pen text size depends on your phone setting)layer()-- return the layer object -- "Layer" object have some common operations (refer to DDLayer below)
DumbDisplay:
connect(enableBluetooth: boolean = true, enableSerial: boolean = true)-- explicitly wait for connection, at the same time you also have an opportunity to override some default settingsenableBluetooth-- set to false so that Bluetooth is not used (defaul to true) ; this will leave more memory for your programenableSerial-- set to false so that Serial is not used (defaul to true), and you can freely make use of Serial
configPinLayers(xUnitCount: number = 100, yUnitCount: number = 100)-- configure the size of the virtual "pin frame" for pinning the layers (refer to pinLayer() below)configAutoPinLayers(direction: AutoPinDirection)-- configure to auto pin layers in either horizontal or vertical directionsetupLedGridLayer(numCols: number = 1, numRows: number = 1, numSubCols: number = 1, numSubRows: number = 1)-- setup and create a LED Grid layer have numCols x numRows LEDs (with each LED composed of numSubCols by numSubRows sub-leds)- note that sub-leds can make a LED looks rectangular ( like a bar)
setupLcdLayer(numCols: number = 16, numRows: number = 2)-- setup and create a LCD layer capable of displaying numRows rows of numCols characterspinLayer(layer: ddlayers.DDLayer, uLeft: number, uTop: number, uWidth: number, uHeight: number)-- pin a layer on the virtual "pin frame" at position (uLeft, uTop) with size (uWidth x uHeight)
transparent; 255 being total opaque)removeLayer(layer: Layer)-- remove a layer; yes, you can setup the layer againwriteComment(msg: string)-- write out some "comment", in a way that will not be harmful to the DD operations.writeSerial(msg: string)-- write out some "comment" to the serial port (without affecting DD operations)toColor(r: number, g: number, b: number)-- a helper operation that turns RGB into color name that you can use, say to set LED color- in fact, the "color name" is simply the combine of the 3 RBG numbers -- e.g. R 100, B 0, G 200, will become "100-0-200"
DDLayer -- "layer" operations (all layer objects including applicable to Micro:bit layer and Turtle layer):
layerVisible(visible: boolean)-- set whether a layer is visible or notlayerOpacity(opacity: number)-- set the opacity of a layer (0 to 255)layerBackgroundColorNum(color: number)-- set the background color of a layer with color numberlayerBackgroundColor(color: number)-- set the background color of a layer with color name like "green", or a hex number (starting with "#")layerNoBackgroundColor()-- set the background of a layer to no color (i.e. transparent)layerClear()-- clear the layer
on top of DDLayer, additional LedGridLayer operations:
ledOn(x: number = 0, y: number = 0)-- turn LED onledOff(x: number = 0, y: number = 0)-- turn LED offledToggle(x: number = 0, y: number = 0)-- toggle LED on / offledBar(count: number)-- treat the LED Grid as a bar-meter, turning on a bar of count LEDsledOnColorNum(color: number)-- set the LED on color with color numberledOnColor(color: string)-- set the LED on color with color nameledOffColorNum(color: number)-- set the LED off color with color numberledOffColor(color: string)-- set the LED off color with color name
on top of DDLayer, additional LcdLayer operations:
setCursor(x: number, y: number)-- set cursor position; (0, 0) to start withprint(text: string)-- print text to cursor positionhome()-- set cursor to (0, 0)cursor()-- show cursor on the LCDnoCursor()-- no show cursor on the LCDautoscroll()-- auto scroll when print textnoAutoscroll()-- no auto scroll when print textdisplay()-- LCD will displaynoDisplay()-- LCD will not displayscrollDisplayLeft()-- scroll LCD leftscrollDisplayRight()-- scroll LCD rightwriteLine(line: string, y: number = 0)-- write text as a line to row y (note that the row will be erased first)pixelColorNum(color: number)-- set the color of the LCD pixels with color numberpixelColor(color: string)-- set the color of the LCD pixels with color namebgPixelColorNum(color: number)-- set the color of the LCD "background / off" pixels with color numberbgPixelColor(color: string)-- set the color of the LCD "background / off" pixels with color namenoBgPixelColor()-- set the LCD "background / off" pixels to no color (i.e. not show)
A reminder -- DumbDisplay will make use of both your Micro:bit Bluetooth and USB Serial, therefore you should not be making use of them for your own purposes. However, if you really need to use any one of them, you can call DumbDisplay.connect() explicitly, and set to disallow DumbDisplay to use Bluetooth or USB Serial.
Greeting from the author Trevor Lee:
Be good! Be happy! Peace be with you! Jesus loves you!
PXT/microbit
MIT