(Updated Nov 22, 2017)
I've gather informations and created this article for sysadmin who're using CentOS or Enterprise Linux. Because most of these linux branches have a long term support, f_cking stable and secured (SELinux). However, most libraries and applications that preinstalled are obsolete. So this article will guide you to build a perfect web server with modern applications (HTTP/2 support).
Please read: This article compatible with RedHat Enterprise Linux 7.x, except some repository links need to change upon vendors and processor architecture of your hardware.
ANNOUCEMENT
CentOS/RedHat 7.4 the openssl package has been updated to upstream version 1.0.2k, which provides a number of enhancements, new features, and bug fixes, including:
- Added support for the Datagram Transport Layer Security TLS (DTLS) protocol version 1.2.
- Added support for the automatic elliptic curve selection for the ECDHE key exchange in TLS.
- Added support for the Application-Layer Protocol Negotiation (ALPN). -- YESSSSSSS!!!
- Added Cryptographic Message Syntax (CMS) support for the following schemes: RSA-PSS, RSA-OAEP, ECDH, and X9.42 DH.

Reference from https://access.redhat.com/documentation/en-us/red_hat_enterprise_linux/7/html-single/7.4_release_notes/index
The new CentOS 7 server has to be customized before it can be put into use as a production system. In this article, will help you to increase the security and usability of your server with the lastest stable packages and will give you a solid foundation for subsequent actions.
A newly activated CentOS 7 server, preferably setup with SSH keys. Log into the server as root with your server-ip-address.
ssh -l root xx.xx.xxx.xxx
or
ssh root@SERVER_IP_ADDRESS
To view current ip of server in CentOS
# For minimal install
ip addr
or
ifconfig
Complete the login process by accepting the warning about host authenticity, if it appears, then providing your root authentication (password or private key). If it is your first time logging into the server, with a password, you will also be prompted to change the root password.
The root user is the administrative user in a Linux environment that has very broad privileges. Because of the heightened privileges of the root account, you are actually discouraged from using it on a regular basis. This is because part of the power inherent with the root account is the ability to make very destructive changes, even by accident.
The next step is to set up an alternative user account with a reduced scope of influence for day-to-day work. We'll teach you how to gain increased privileges during the times when you need them.
For security reasons, it is not advisable to be performing daily computing tasks using the root account. Instead, it is recommended to create a standard user account that will be using sudo to gain administrative privileges. For this tutorial, assume that we're creating a user named joe. To create the user account, type:
adduser example
Set a password for the new user. You'll be prompted to input and confirm a password.
passwd example
Add the new user to the wheel group so that it can assume root privileges using sudo.
gpasswd -a example wheel
Finally, open another terminal on your local machine and use the following command to add your SSH key to the new user's home directory on the remote server. You will be prompted to authenticate before the SSH key is installed.
ssh-copy-id example@server-ip-address
After the key has been installed, log into the server using the new user account.
ssh -l example server-ip-address
If the login is successful, you may close the other terminal. From now on, all commands will be preceded with sudo.
Since you can now log in as a standard user using SSH keys, a good security practice is to configure SSH so that the root login and password authentication are both disallowed. Both settings have to be configured in the SSH daemon's configuration file. So, open it using nano.
sudo nano /etc/ssh/sshd_config
Look for the PermitRootLogin line, uncomment it and set the value to no.
PermitRootLogin no
Do the same for the PasswordAuthentication line, which should be uncommented already:
PasswordAuthentication no
Save and close the file. To apply the new settings, reload SSH.
sudo systemctl reload sshd
The next step is to adjust the localization settings for your server and configure the Network Time Protocol (NTP) synchronization.
The first step will ensure that your server is operating under the correct time zone. The second step will configure your system to synchronize its system clock to the standard time maintained by a global network of NTP servers. This will help prevent some inconsistent behavior that can arise from out-of-sync clocks.
Our first step is to set our server's timezone. This is a very simple procedure that can be accomplished using the timedatectl command:
First, take a look at the available timezones by typing:
sudo timedatectl list-timezones
Grep possible Asian timezones
sudo timedatectl list-timezones | grep Asia
This will give you a list of the timezones available for your server. When you find the region/timezone setting that is correct for your server, set it by typing:
sudo timedatectl set-timezone region/timezone
For instance, to set it to United States eastern time, you can type:
sudo timedatectl set-timezone America/New_York
Your system will be updated to use the selected timezone. You can confirm this by typing:
sudo timedatectl
Now that you have your timezone set, we should configure NTP. This will allow your computer to stay in sync with other servers, leading to more predictability in operations that rely on having the correct time.
For NTP synchronization, we will use a service called ntp, which we can install from CentOS's default repositories:
sudo yum install ntp
Next, you need to start the service for this session. We will also enable the service so that it is automatically started each time the server boots:
sudo systemctl start ntpd
sudo systemctl enable ntpd
Your server will now automatically correct its system clock to align with the global servers.
Type the date command or the ls command:
date
ls -l /etc/localtime
By default, the active firewall application on a newly activated CentOS 7 server is FirewallD. Though it is a good replacement for IPTables, many security applications still do not have support for it. So if you'll be using any of those applications, like OSSEC HIDS, it's best to disable/uninstall FirewallD.
Let's start by disabling/uninstalling FirewallD:
sudo yum remove -y firewalld
Now, let's install/activate IPTables.
sudo yum install -y iptables-services
sudo systemctl start iptables
Configure IPTables to start automatically at boot time.
sudo systemctl enable iptables
IPTables on CentOS 7 comes with a default set of rules, which you can view with the following command.
sudo iptables -L -n
The output will resemble:
Chain INPUT (policy ACCEPT)
target prot opt source destination
ACCEPT all -- 0.0.0.0/0 0.0.0.0/0 state RELATED,ESTABLISHED
ACCEPT icmp -- 0.0.0.0/0 0.0.0.0/0
ACCEPT all -- 0.0.0.0/0 0.0.0.0/0
ACCEPT tcp -- 0.0.0.0/0 0.0.0.0/0 state NEW tcp dpt:22
REJECT all -- 0.0.0.0/0 0.0.0.0/0 reject-with icmp-host-prohibited
Chain FORWARD (policy ACCEPT)
target prot opt source destination
REJECT all -- 0.0.0.0/0 0.0.0.0/0 reject-with icmp-host-prohibited
Chain OUTPUT (policy ACCEPT) target prot opt source destination
You can see that one of those rules allows SSH traffic, so your SSH session is safe. Because those rules are runtime rules and will be lost on reboot, it's best to save them to a file using:
sudo /usr/libexec/iptables/iptables.init save
That command will save the rules to the /etc/sysconfig/iptables file. You can edit the rules anytime by changing this file with your favorite text editor.
Since you'll most likely be going to use your new server to host some websites at some point, you'll have to add new rules to the firewall to allow HTTP and HTTPS traffic. To accomplish that, open the IPTables file:
sudo nano /etc/sysconfig/iptables
Just after or before the SSH rule, add the rules for HTTP (port 80) and HTTPS (port 443) traffic, so that that portion of the file appears as shown in the code block below.
-A INPUT -p tcp -m state --state NEW -m tcp --dport 22 -j ACCEPT
-A INPUT -p tcp -m state --state NEW -m tcp --dport 80 -j ACCEPT
-A INPUT -p tcp -m state --state NEW -m tcp --dport 443 -j ACCEPT
-A INPUT -j REJECT --reject-with icmp-host-prohibited
Save and close the file, then reload IPTables.
sudo systemctl reload iptables
With the above step completed, your CentOS 7 server should now be reasonably secure and be ready for use in production.
In default centos server is not fully optimized to make full use of available hardware. This means it might fail under high load. So we need to config the sysctl.conf file for optimization.
- Open sysctl.conf file
sudo vi /etc/sysctl.conf
- Edit file as following configuration
# Increase number of incoming connections
net.core.somaxconn = 250000

# Increase the maximum amount of option memory buffers
net.core.optmem_max = 25165824

# Increase Linux auto tuning TCP buffer limits
# min, default, and max number of bytes to use
# set max to at least 4MB, or higher if you use very high BDP paths
net.core.rmem_default = 8388608
net.core.rmem_max = 16777216
net.core.wmem_max = 16777216
net.core.netdev_max_backlog = 65536

# Decrease the time default value for tcp_fin_timeout connection
net.ipv4.tcp_fin_timeout = 15

# Number of times SYNACKs for passive TCP connection.
net.ipv4.tcp_synack_retries = 2
net.ipv4.tcp_syn_retries = 2

# Decrease the time default value for connections to keep alive
net.ipv4.tcp_keepalive_time = 300
net.ipv4.tcp_keepalive_probes = 5
net.ipv4.tcp_keepalive_intvl = 15

# Enable timestamps as defined in RFC1323:
net.ipv4.tcp_timestamps = 1

# Allowed local port range
net.ipv4.ip_local_port_range = 2000 65000

# Turn on window scaling which can enlarge the transfer window:
net.ipv4.tcp_window_scaling = 1

# Limit syn backlog to prevent overflow
net.ipv4.tcp_max_syn_backlog = 30000

# Avoid a smurf attack
net.ipv4.icmp_echo_ignore_broadcasts = 1

# Turn on protection for bad icmp error messages
net.ipv4.icmp_ignore_bogus_error_responses = 1

# Turn on syncookies for SYN flood attack protection
net.ipv4.tcp_syncookies = 1

# Protect Against TCP Time-Wait
net.ipv4.tcp_rfc1337 = 1

# Turn on and log spoofed, source routed, and redirect packets
net.ipv4.conf.all.log_martians = 1
net.ipv4.conf.default.log_martians = 1

# No source routed packets here
net.ipv4.conf.all.accept_source_route = 0
net.ipv4.conf.default.accept_source_route = 0

# Turn on reverse path filtering
net.ipv4.conf.all.rp_filter = 1

# Make sure no one can alter the routing tables
net.ipv4.conf.all.accept_redirects = 0
net.ipv4.conf.default.accept_redirects = 0
net.ipv4.conf.all.secure_redirects = 0
net.ipv4.conf.default.secure_redirects = 0

# Don't act as a router
net.ipv4.ip_forward = 0
net.ipv4.conf.all.send_redirects = 0
net.ipv4.conf.default.send_redirects = 0

# Turn on execshild protection
kernel.randomize_va_space = 2

# Optimization for port usefor LBs Increase system file descriptor limit
fs.file-max = 65535

# Allow for more PIDs (to reduce rollover problems); may break some programs 32768
kernel.pid_max = 65536

# Increase TCP max buffer size setable using setsockopt()
net.ipv4.tcp_rmem = 4096 87380 16777216
net.ipv4.tcp_wmem = 4096 87380 16777216

# Increase the tcp-time-wait buckets pool size to prevent simple DOS attacks
net.ipv4.tcp_max_tw_buckets = 1440000
net.ipv4.tcp_tw_recycle = 1
net.ipv4.tcp_tw_reuse = 1

# !! Disable ipv6 for security (!! Optional if you're using ipv6 !!)
net.ipv6.conf.all.disable_ipv6= 1
- Reload the systemctl file
sysctl -p
To update installed packages
sudo yum -y update
To upgrade installed packages
sudo yum -y upgrade
Yum-utils is a collection of utilities and plugins extending and supplementing yum in different ways. It included in the base repo (which is enabled by default). However if you install as minimal you have to install it manually by typing.
sudo yum -y install yum-utils
Read more about yum-utils https://www.if-not-true-then-false.com/2012/delete-remove-old-kernels-on-fedora-centos-red-hat-rhel/ http://www.tecmint.com/linux-yum-package-management-with-yum-utils/
How do I install the extra repositories such as Fedora EPEL repo on a Red Hat Enterprise Linux server version 7.x or CentOS Linux server version 7.x?
You can easily install various packages by configuring a CentOS 7.x or RHEL 7.x system to use Fedora EPEL repos and third party packages. Please note that these packages are not officially supported by either CentOS or Red Hat, but provides many popular packages and apps.
The following instructions assumes that you are running command as root user on a CentOS/RHEL 7.x system and want to use use Fedora Epel repos.
Install Epel repo using the following command:
sudo yum -y install epel-release
Refresh repo by typing the following commad:
yum repolist
The command is as follows to download epel release for CentOS and RHEL 7.x using wget command:
cd /tmp
wget https://dl.fedoraproject.org/pub/epel/epel-release-latest-7.noarch.rpm
sudo rpm -Uvh epel-release-latest-7*.rpm
Refresh repo by typing the following commad:
yum repolist
To list all available packages under a repo called epel
sudo yum --disablerepo="*" --enablerepo="epel" list available
Example: Search and install htop package from epel repo on a CentOS/RHEL 7.x
sudo yum search htop
sudo yum info htop
sudo yum install htop
And, there you have it, a larger number of packages to install from EPEL repo on a CentOS and Red Hat Enterprise Linux (RHEL) version 7.x.
OpenSSL is a software library to be used in applications that need to secure communications against eavesdropping or need to ascertain the identity of the party at the other end. It has found wide use in internet web servers, serving a majority of all web sites.
Application-Layer Protocol Negotiation (ALPN) is a Transport Layer Security (TLS) extension for application layer protocol negotiation. ALPN allows the application layer to negotiate which protocol should be performed over a secure connection in a manner which avoids additional round trips and which is independent of the application layer protocols. It is used by HTTP/2.
Due to TLS False Start was disabled in Google Chrome from version 20 (2012) onward except for websites with the earlier Next Protocol Negotiation (NPN) extension. NPN was replaced with a reworked version, ALPN. On July 11, 2014, ALPN was published as RFC 7301.
As of May 2016, approximately 8% of the world’s websites are accessible over HTTP/2. These websites all use SSL/TLS, because browsers that support HTTP/2 only upgrade the connection to the new standard if SSL/TLS is also in use. The vast majority of sites – those running NGINX and LiteSpeed – depend on OpenSSL’s implementation of NPN or ALPN to upgrade to HTTP/2.
OpenSSL added ALPN support on January 2015, in version 1.0.2. Versions 1.0.1 and earlier do not support ALPN.
Unlike a standalone web server like NGINX, OpenSSL is a core operating system library that is used by many of the packages shipped as part of a modern Linux operating system. To ensure the operating system is stable and reliable, OS distributors do not make major updates to packages such as OpenSSL during the lifetime of each release. They do backport critical OpenSSL patches to their supported versions of OpenSSL to protect their users against OpenSSL vulnerabilities. They do not backport new features, particularly those which change the ABI of essential shared libraries.
The table summarizes operating system support for ALPN and NPN.
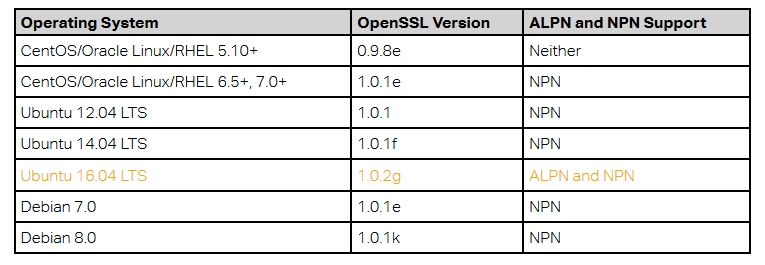
As you can see, only Ubuntu 16.04 LTS supports ALPN. This means that if you’re running your website on any other major operating system, the OpenSSL version shipped with the operating system does not support ALPN and Chrome users will be downgraded to HTTP/1.1
So to enable HTTP/2 on ALPN in chrome browser you need to be sure that you have already installed *OpenSSL that supported ALPN which is version >= 1.0.2.
According to https://en.wikipedia.org/wiki/OpenSSL#Major_version_releases
RedHat/CentOS 7.4 now supported Application-Layer Protocol Negotiation (ALPN)
In CentOS/RedHat 7.4 the openssl package has been updated to upstream version 1.0.2k, which provides a number of enhancements, new features, and bug fixes, including:
- Added support for the Datagram Transport Layer Security TLS (DTLS) protocol version 1.2.
- Added support for the automatic elliptic curve selection for the ECDHE key exchange in TLS.
- Added support for the Application-Layer Protocol Negotiation (ALPN).
- Added Cryptographic Message Syntax (CMS) support for the following schemes: RSA-PSS, RSA-OAEP, ECDH, and X9.42 DH.

Reference from https://access.redhat.com/documentation/en-us/red_hat_enterprise_linux/7/html-single/7.4_release_notes/index
To update your linux kernel just use command
sudo yum upgrade
To compile openssl from source you need to install compiler and required libraries to build nginx.
sudo yum groupinstall 'Development Tools'
sudo yum -y install gcc gcc-c++ make unzip autoconf automake zlib-devel pcre-devel openssl-devel zlib-devel pam-devel
1). Verify the current openssl version by command
openssl version
OpenSSL 1.0.1e-fips 11 Feb 2013
2). To view the lastest openssl package from base repository
yum info openssl
3). Download the latest version of OpenSSL, do as follows:
cd /usr/local/src/
wget https://www.openssl.org/source/openssl-1.1.0-latest.tar.gz
tar -zxf openssl-1.1.0-latest.tar.gz
Note:
- If you want to install other version you can download it from https://www.openssl.org/source/
- We will use latest openssl version 1.1.x from official website.
4). Go to the source directory, then generate a config file with the following commands
cd openssl-1.1.0g
./config
Alphabet suffix 'l' of openssl version number depends on release of openssl.
5). Compile the source, test and then install the package (need root permission)
make
make test
make install
Note: This will take a while depending on CPU capacity. If your CPU has more than 1 core you can added suffix -j4 for using 4 cores to compile the source code.
For example: make -j4 to use all 4 cores to compile the source code.
6). Move old openssl installed version to the root folder for backup or you can delete it
mv /usr/bin/openssl /root/
7). Create a symbolic link
ln -s /usr/local/bin/openssl /usr/bin/openssl
8). Verify the OpenSSL version
openssl version
OpenSSL 1.1.0g  2 Nov 2017
!! Done. Easy right let continue the next package ? !!
Compiling NGINX from the sources provides you with more flexibility: you can add particular NGINX modules or 3rd party modules and apply latest security patches.
NGINX consists of modules. The set of modules as well as other build options are configured with the ./configure script.
The following list are modules built by Default. So you're not need to configure it out. However, you can disable it by including it to the configure script with the --without- prefix.
http_charset_module Adds the specified charset to the “Content-Type” response header field, can convert data from one charset to another.
http_gzip_module Compresses responses using the gzip method, helping to reduce the size of transmitted data by half or more.
http_ssi_module Processes SSI (Server Side Includes) commands in responses passing through it.
http_userid_module Sets cookies suitable for client identification.
http_access_module Limits access to certain client addresses.
http_auth_basic_module Limits access to resources by validating the user name and password using the HTTP Basic Authentication protocol.
http_autoindex_module Processes requests ending with the slash character (‘/’) and produces a directory listing.
http_geo_module Creates variables with values depending on the client IP address.
http_map_module Creates variables whose values depend on values of other variables.
http_split_clients_module Creates variables suitable for A/B testing, also known as split testing.
http_referer_module Blocks access to a site for requests with invalid values in the Referer header field.
http_rewrite_module Changes the request URI using regular expressions and return redirects; conditionally selects configurations. Requires the PCRE library.
http_proxy_module Passes requests to another server.
http_fastcgi_module Passes requests to a FastCGI server
http_uwsgi_module Passes requests to a uwsgi server.
http_scgi_module Passes requests to an SCGI server.d
http_memcached_module Obtains responses from a memcached server.
http_limit_conn_module Limits the number of connections per the defined key, in particular, the number of connections from a single IP address.
http_limit_req_module Limits the request processing rate per a defined key, in particular, the processing rate of requests coming from a single IP address.
http_empty_gif_module Emits single-pixel transparent GIF.
http_browser_module Creates variables whose values depend on the value of the “User-Agent” request header field.
http_upstream_hash_module Enables the hash load balancing method.
http_upstream_ip_hash_module Enables the IP hash load balancing method.
http_upstream_least_conn_module Enables the least_conn load balancing method.
http_upstream_keepalive_module Enables keepalive connections.
http_upstream_zone_module Enables the shared memory zone.
Some NGINX modules are not built by default. You will need to enable them manually by adding to the ./configure command. The mail, stream, geoip, image_filter, perl and xslt modules can be compiled as dynamic. See Dynamic Modules for details.
--with-threads Enables NGINX to use thread pools. See Thread Pools in NGINX Boost Performance 9x! blog post for details.
--with-file-aio Enables asynchronous I/O. (Suggest if you're working with I/O)
--with-ipv6 Enables IPv6 support. (Very Recommended !!)
--with-http_ssl_module Provides support for HTTPS. Requires an SSL library such as OpenSSL. (Very Recommended !!)
--with-http_v2_module Provides support for HTTP/2. (Very Recommended !!)
--with-http_realip_module Changes the client address to the one sent in the specified header field.
--with-http_addition_module Adds text before and after a response.
--with-http_xslt_module or --with-http_xslt_module=dynamic Transforms XML responses using one or more XSLT stylesheets. The module requires the Libxml2 and XSLT libraries. The module can also be compiled as dynamic.
--with-http_image_filter_module or --with-http_image_filter_module=dynamic Transforms images in JPEG, GIF, and PNG formats. The module requires the LibGD library. The module can also be compiled as dynamic.
--with-http_geoip_module or --with-http_geoip_module=dynamic Allows creating variables whose values depend on the client IP address. The module uses MaxMind GeoIP databases. The module can also be compiled as dynamic.
--with-http_sub_module Modifies a response by replacing one specified string by another.
--with-http_dav_module Intended for file management automation via the WebDAV protocol.
--with-http_flv_module . Provides pseudo-streaming server-side support for Flash Video (FLV) files.
--with-mp4_module Provides pseudo-streaming server-side support for MP4 files.
--with-http_gunzip_module Decompresses responses with Content-Encoding: gzip for clients that do not support zip encoding method.
--with-http_gzip_static_module Allows sending precompressed files with the *.gz filename extension instead of regular files.
--with-http_auth_request_module Implements client authorization based on the result of a subrequest.
--with-http_random_index_module Processes requests ending with the slash character (‘/’) and picks a random file in a directory to serve as an index file.
--with-http_secure_link_module Used to check authenticity of requested links, protect resources from unauthorized access, and limit link lifetime.
--with-http_slice_module Allows splitting a request into subrequests, each subrequest returns a certain range of response. Provides more effective caching of large files.
--with-http_degradation_module Allows returning an error when a memory size exceeds the defined value.
--with-http_stub_status_module Provides access to basic status information.
--with-http_perl_module or --with-http_perl_module=dynamic . Used to implement location and variable handlers in Perl and insert Perl calls into SSI. Requires the PERL library. The module can also be compiled as dynamic.
--with-mail or --with-mail=dynamic Enables mail proxy functionality. See the ngx_mail_core_module reference for the list of directives. The module can also be compiled as dynamic.
--with-mail_ssl_module Provides support for a mail proxy server to work with the SSL/TLS protocol. Requires an SSL library such as OpenSSL.
--with-stream or --with-stream=dynamic Enables the TCP proxy functionality. The module can also be compiled as dynamic.
--with-stream_ssl_module Provides support for a stream proxy server to work with the SSL/TLS protocol. Requires an SSL library such as OpenSSL.
--with-google_perftools_module Allows using Google Performance tools library.
--with-cpp_test_module --with-debug Enables the debugging log.
NGINX 3rd Party Modules (Optional if you think your configure is too mainstream, want to tweak more)
ngx_brotli module - An open source data compression library introducing by Google, based on a modern variant of the LZ77 algorithm, Huffman coding and 2nd order context modeling. (By default nginx bundle with gzip compression library)
Brotli performance https://www.opencpu.org/posts/brotli-benchmarks/
Installing nginx brotli module https://github.com/google/ngx_brotli
git clone https://github.com/google/ngx_brotli.git
cd /usr/local/src/ngx_brotli
git submodule update --init
ngx_pagespeed - Speeds up your site and reduces page load time by automatically applying web performance best practices to pages and associated assets (CSS, JavaScript, images) without requiring you to modify your existing content or workflow.
Rewrites webpages and associated assets to reduce latency and bandwidth
Installing page speed module https://developers.google.com/speed/pagespeed/module/build_ngx_pagespeed_from_source
View more NGINX 3rd Party Modules: https://www.nginx.com/resources/wiki/modules/
Read more about extending nginx https://www.nginx.com/resources/wiki/extending/
Read more about dynamic modules https://www.nginx.com/blog/dynamic-modules-nginx-1-9-11/
NGINX Open Source is available in 2 versions:
The mainline version This version includes the latest features and bugfixes and is always up-to-date. It is reliable, but it may include some experimental modules, and it may also have some number of new bugs.
The stable version This version doesn’t have new features, but includes critical bug fixes that are always backported to the mainline version. The stable version is recommended for production servers.
!! Before we getting start you need to verify that you have already installed openssl with ALPN support
openssl version
The openssl version must be 1.0.2 or higher.
To compile nginx from source you need to install compiler and required libraries to build nginx.
1.1 Need to install epel repo for additional libraries, if not install by typing
sudo yum install -y epel-release
1.2 Then update the os environment
sudo yum update
1.3 Install the compiler
sudo yum groupinstall 'Development Tools'
sudo yum -y install autoconf automake bind-utils wget curl unzip gcc-c++ pcre-devel zlib-devel libtool make nmap-netcat ntp pam-devel
Prior to compiling NGINX from the sources, it is necessary to install its dependencies:
2.1 Install PCRE library (January 11, 2017) The PCRE library required by NGINX Core and Rewrite modules and provides support for regular expressions:
cd /usr/local/src
wget https://ftp.pcre.org/pub/pcre/pcre-8.41.tar.gz
tar -zxf pcre-8.41.tar.gz
cd pcre-8.41
./configure
make
sudo make install
2.2 Install ZLIB library (January 15, 2017) The zlib library required by NGINX Gzip module for headers compression:
cd /usr/local/src
wget https://zlib.net/zlib-1.2.11.tar.gz
tar -zxf zlib-1.2.11.tar.gz
cd zlib-1.2.11
./configure
make
sudo make install
2.3 Install OpenSSL library (lastest or >= 1.0.2) The OpenSSL library required by NGINX SSL modules to support the HTTPS protocol:
Please see the OpenSSL (with ALPN support) section
cd /usr/local/src
wget https://nginx.org/download/nginx-1.12.2.tar.gz
tar zxf nginx-1.12.2.tar.gz
cd nginx-1.12.2
Other version please see https://nginx.org/en/download.html
3.1 Config the nginx for built
NOTE!! Please change the library version to your current library path version. For example

--with-pcre=/usr/local/src/pcre-8.41 \
--with-zlib=/usr/local/src/zlib-1.2.11 \
--with-openssl=/usr/local/src/openssl-1.1.0g \
First, we'll set prefix to /etc/nginx for our nginx installation path.
Next, set sbin path to /usr/sbin/nginx for storing our nginx process.
Next, set modules path to /usr/lib64/nginx/modules for storing our ngnx modules.
Next, set conf path to /etc/nginx/nginx.conf for storing our default global nginx config file.
Next, set error log path to /var/log/nginx/error.log for storing our error log file location.
Next, set http log path to /var/log/nginx/access.log for storing our http log file location.
Next, set pid path to /var/run/nginx.pid to set the name for main process ID file.
Next, set lock path to /var/run/nginx.lock to set the name for Nginx lock file.
Next, set http-client-body-temp path to /var/cache/nginx/client_temp for storing client temporary cache.
Next, set http-proxy-temp path to /var/cache/nginx/proxy_temp for storing temporary proxy.
Next, set http-fastcgi-temp path to /var/cache/nginx/fastcgi_temp for storing fastcgi cache. (commonly used in PHP)
Next, set http-uwsgi-temp path to /var/cache/nginx/uwsgi_temp for storing uwsgi cache.
Next, set http-scgi-temp path to /var/cache/nginx/scgi_temp for storing scgi cache.
Next, set user as nginx.
Next, set group as nginx.
Next, set pcre (required library) path to /usr/local/src/pcre-8.41 that where you downloaded source to.
Next, set zlib (required library) path to /usr/local/src/zlib-1.2.11 that where you downloaded source to.
Next, set openssl (required library) path to /usr/local/src/openssl-1.1.0g that where you downloaded source to.
Next, add ssl http module for enables used SSL/TLS (https) in nginx. (VERY recommeded I love HTTPS !!)
Next, add http_v2 module for enables used http2 in nginx. (Required http_ssl_module !!!)
Next, add http_realip_module to change the client address to the one sent in the specified header field. Next, add threads, file-aio for enables NGINX to use thread pools, asynchronous I/O.
Next, add addition_module for adds text before and after a response.
Next, add sub_module to modifies a response by replacing one specified string by another.
Next, add dav_module to intend for file management automation via the WebDAV protocol.
Next, add flv_module to provide pseudo-streaming server-side support for Flash Video (FLV) files.
Next, add mp4_module to provide pseudo-streaming server-side support for MP4 files.
Next, add gunzip_module for decompresses responses with Content-Encoding: gzip for clients that do not support zip encoding method.
Next, add gzip_static_module for allows sending precompressed files with the *.gz filename extension instead of regular files.
Next, add auth_request_module to implement client authorization based on the result of a subrequest.
Next, add random_index_module for processes requests ending with the slash character (‘/’) and picks a random file in a directory to serve as an index file.
Next, add secure_link_module for used to check authenticity of requested links, protect resources from unauthorized access, and limit link lifetime.
Next, add slice_module for allows splitting a request into subrequests, each subrequest returns a certain range of response. Provides more effective caching of large files.
Next, add degradation_module for allows returning an error when a memory size exceeds the defined value.
Next, add stub_status_module to provides access to basic status information.
Next, add mail module to enable mail proxy functionality. (OPTIONAL)
Next, add mail_ssl_module to provide support for a mail proxy server to work with the SSL/TLS protocol. (OPTIONAL) (Requires an SSL library such as OpenSSL.)
Next, add stream module to enable the TCP proxy functionality. (OPTIONAL)
Next, add stream_ssl_module to provide support for a stream proxy server to work with the SSL/TLS protocol. (OPTIONAL) (Requires an SSL library such as OpenSSL.)
NOTE: Someone ask WHERE IS ipv6 module? according to the changes with nginx 1.11.5 (11 Oct 2016) now this configure option was removed and IPv6 support is configured by default automatically.
./configure \
--prefix=/etc/nginx \
--sbin-path=/usr/sbin/nginx \
--modules-path=/usr/lib64/nginx/modules \
--conf-path=/etc/nginx/nginx.conf \
--error-log-path=/var/log/nginx/error.log \
--http-log-path=/var/log/nginx/access.log \
--pid-path=/var/run/nginx.pid \
--lock-path=/var/run/nginx.lock \
--http-client-body-temp-path=/var/cache/nginx/client_temp \
--http-proxy-temp-path=/var/cache/nginx/proxy_temp \
--http-fastcgi-temp-path=/var/cache/nginx/fastcgi_temp \
--http-uwsgi-temp-path=/var/cache/nginx/uwsgi_temp \
--http-scgi-temp-path=/var/cache/nginx/scgi_temp \
--user=nginx \
--group=nginx \
--with-pcre-jit \
--with-ld-opt="-lrt" \
--with-pcre=/usr/local/src/pcre-8.41 \
--with-zlib=/usr/local/src/zlib-1.2.11 \
--with-openssl=/usr/local/src/openssl-1.1.0g \
--with-http_ssl_module \
--with-http_v2_module \
--with-http_realip_module \
--with-threads \
--with-file-aio \
--with-http_addition_module \
--with-http_sub_module \
--with-http_dav_module \
--with-http_flv_module \
--with-http_mp4_module \
--with-http_gunzip_module \
--with-http_gzip_static_module \
--with-http_auth_request_module \
--with-http_random_index_module \
--with-http_secure_link_module \
--with-http_slice_module \
--with-http_degradation_module \
--with-http_stub_status_module \
--with-mail \
--with-mail_ssl_module \
--with-stream \
--with-stream_ssl_module \
--with-stream_realip_module \
--add-module=/usr/local/src/ngx_brotli
3.2 Compile and install the build:
sudo make && sudo make install
3.3 After the installation process has finished with success add nginx system user (with /etc/nginx/ as his home directory and with no valid shell), the user that Nginx will run as by issuing the following command.
useradd -d /etc/nginx/ -s /sbin/nologin nginx
3.4 Change user in nginx configure file
vi /etc/nginx/nginx.conf
# Then change the user from nobody to nginx, then save and exit.

user nginx;
3.5 Config the firewall
systemctl enable firewalld.service
firewall-cmd --permanent --zone=public --add-service=http
firewall-cmd --permanent --zone=public --add-service=https
systemctl restart firewalld.service
3.5 start nginx service by using below command
/usr/sbin/nginx -c /etc/nginx/nginx.conf
3.6 check nginx process
ps -ef|grep nginx
3.7 to stop nginx service using below command
kill -9 PID-Of-Nginx
3.8 add nginx as systemd service by create a file "nginx.service" in /lib/systemd/system/nginx.service then copy below into the file
[Unit]
Description=The nginx HTTP and reverse proxy server
After=syslog.target network.target remote-fs.target nss-lookup.target

[Service]
Type=forking
PIDFile=/run/nginx.pid
ExecStartPre=/usr/sbin/nginx -t -c  /etc/nginx/nginx.conf
ExecStart=/usr/sbin/nginx -c /etc/nginx/nginx.conf
ExecReload=/bin/kill -s HUP $MAINPID
# Sleep for 1 second to give PassengerAgent a chance to clean up.
# Use TERM instead of QUIT to prevent Nginx from leaving stale Unix socket and failing the next start (https://trac.nginx.org/nginx/ticket/753)
ExecStop=/bin/kill -s TERM $MAINPID ; /bin/sleep 1
PrivateTmp=true

[Install]
WantedBy=multi-user.target
~
3.9 then reload the system files
systemctl daemon-reload
3.10 create startup script
sudo ln -s /usr/local/nginx/sbin/nginx /usr/sbin/nginx
sudo nano /etc/init.d/nginx then copy script below
#!/bin/sh
#
# nginx - this script starts and stops the nginx daemon
#
# chkconfig:   - 85 15
# description:  NGINX is an HTTP(S) server, HTTP(S) reverse \
#               proxy and IMAP/POP3 proxy server
# processname: nginx
# config:      /etc/nginx/nginx.conf
# config:      /etc/sysconfig/nginx
# pidfile:     /var/run/nginx.pid

# Source function library.
. /etc/rc.d/init.d/functions

# Source networking configuration.
. /etc/sysconfig/network

# Check that networking is up.
[ "$NETWORKING" = "no" ] && exit 0

nginx="/usr/sbin/nginx"
prog=$(basename $nginx)

NGINX_CONF_FILE="/etc/nginx/nginx.conf"

[ -f /etc/sysconfig/nginx ] && . /etc/sysconfig/nginx

lockfile=/var/lock/subsys/nginx

make_dirs() {
   # make required directories
   user=`$nginx -V 2>&1 | grep "configure arguments:" | sed 's/[^*]*--user=\([^ ]*\).*/\1/g' -`
   if [ -z "`grep $user /etc/passwd`" ]; then
       useradd -M -s /bin/nologin $user
   fi
   options=`$nginx -V 2>&1 | grep 'configure arguments:'`
   for opt in $options; do
       if [ `echo $opt | grep '.*-temp-path'` ]; then
           value=`echo $opt | cut -d "=" -f 2`
           if [ ! -d "$value" ]; then
               # echo "creating" $value
               mkdir -p $value && chown -R $user $value
           fi
       fi
   done
}

start() {
    [ -x $nginx ] || exit 5
    [ -f $NGINX_CONF_FILE ] || exit 6
    make_dirs
    echo -n $"Starting $prog: "
    daemon $nginx -c $NGINX_CONF_FILE
    retval=$?
    echo
    [ $retval -eq 0 ] && touch $lockfile
    return $retval
}

stop() {
    echo -n $"Stopping $prog: "
    killproc $prog -QUIT
    retval=$?
    echo
    [ $retval -eq 0 ] && rm -f $lockfile
    return $retval
}

restart() {
    configtest || return $?
    stop
    sleep 1
    start
}

reload() {
    configtest || return $?
    echo -n $"Reloading $prog: "
    killproc $nginx -HUP
    RETVAL=$?
    echo
}

force_reload() {
    restart
}

configtest() {
  $nginx -t -c $NGINX_CONF_FILE
}

rh_status() {
    status $prog
}

rh_status_q() {
    rh_status >/dev/null 2>&1
}

case "$1" in
    start)
        rh_status_q && exit 0
        $1
        ;;
    stop)
        rh_status_q || exit 0
        $1
        ;;
    restart|configtest)
        $1
        ;;
    reload)
        rh_status_q || exit 7
        $1
        ;;
    force-reload)
        force_reload
        ;;
    status)
        rh_status
        ;;
    condrestart|try-restart)
        rh_status_q || exit 0
            ;;
    *)
        echo $"Usage: $0 {start|stop|status|restart|condrestart|try-restart|reload|force-reload|configtest}"
        exit 2
esac
3.11 set permission to make this script be executable
chmod +x /etc/init.d/nginx
sudo systemctl enable nginx
3.12 To make sure that Nginx starts and stops every time with the Droplet, add it to the default runlevels with the command:
sudo chkconfig nginx on
sudo service nginx restart
3.13 Finally, to verify nginx version and opensssl that built by type**
nginx -V
and it will show
nginx version: nginx/1.12.2
built by gcc 4.8.5 20150623 (Red Hat 4.8.5-11) (GCC)
built with OpenSSL 1.1.0g  2 Nov 2017
TLS SNI support enabled
configure arguments: --prefix=/etc/nginx --sbin-path=/usr/sbin/nginx --modules-path=/usr/lib64/nginx/modules --conf-path=/etc/nginx/nginx.conf --error-log-path=/var/log/nginx/error.log --http-log-path=/var/log/nginx/access.log --pid-path=/var/run/nginx.pid --lock-path=/var/run/nginx.lock --http-client-body-temp-path=/var/cache/nginx/client_temp --http-proxy-temp-path=/var/cache/nginx/proxy_temp --http-fastcgi-temp-path=/var/cache/nginx/fastcgi_temp --http-uwsgi-temp-path=/var/cache/nginx/uwsgi_temp --http-scgi-temp-path=/var/cache/nginx/scgi_temp --user=nginx --group=nginx --with-pcre-jit --with-ld-opt=-lrt --with-pcre=/usr/local/src/pcre-8.41 --with-zlib=/usr/local/src/zlib-1.2.11 --with-openssl=/usr/local/src/openssl-1.1.0f --with-http_ssl_module --with-http_v2_module --with-http_realip_module --with-threads --with-file-aio --with-http_addition_module --with-http_sub_module --with-http_dav_module --with-http_flv_module --with-http_mp4_module --with-http_gunzip_module --with-http_gzip_static_module --with-http_auth_request_module --with-http_random_index_module --with-http_secure_link_module --with-http_slice_module --with-http_degradation_module --with-http_stub_status_module --with-mail --with-mail_ssl_module --with-stream --with-stream_ssl_module --with-stream_realip_module --add-module=/usr/local/src/ngx_brotli
3.14 Start nginx
sudo systemctl start nginx
If you see this error
nginx: [emerg] mkdir() "/var/cache/nginx/client_temp" failed (2: No such file or directory)
Then manually create the file /var/cache/nginx/client_temp.
sudo mkdir /var/cache/nginx
sudo touch /var/cache/nginx/client_temp
NOTE: If you want to install speedtest module (By Google) you must installed following libraries
gcc
gcc-c++
pcre-devel
zlib-devel
make
unzip
openssl-devel
libaio-devel
glibc
glibc-devel
glibc-headers
libevent
linux-vdso.so.1
libpthread.so.0
libcrypt.so.1
libstdc++.so.6
librt.so.1
libm.so.6
libpcre.so.0
libssl.so.10
libcrypto.so.10
libdl.so.2
libz.so.1
libgcc_s.so.1
libc.so.6
/lib64/ld-linux-x86-64.so.2
libfreebl3.so
libgssapi_krb5.so.2
libkrb5.so.3
libcom_err.so.2
libk5crypto.so.3
libkrb5support.so.0
libkeyutils.so.1
libresolv.so.2
libselinux.so.1
For using http2 you need to have certificate (SSL) installed
#1. Go to nginx global file directory
sudo su
cd /etc/nginx/
vi nginx.conf
#2. Config the file as below
user  nginx;
worker_processes auto;
worker_rlimit_nofile 100000;
pid   /var/run/nginx.pid;
error_log /var/log/nginx/error.log crit;

events {
    worker_connections 250000;
    use epoll;
    multi_accept on;
}


http {
    sendfile on;
    tcp_nopush on;
    tcp_nodelay on;
    types_hash_max_size 2048;
    server_tokens off;

    reset_timedout_connection on;
    server_name_in_redirect off;
    keepalive_requests           100000;
    keepalive_timeout            60s;
    send_timeout                 30s;
    #fastcgi for PHP
    #fastcgi_read_timeout 300;

    ##
    # OpenFile Cache Settings
    ##
    open_file_cache max=1000 inactive=20s;
    open_file_cache_valid 30s;
    open_file_cache_min_uses 2;
    open_file_cache_errors off;

    ##
    # Limit request per IP (DDoS prevention)
    ##
    limit_conn_zone $binary_remote_addr zone=conn_limit_per_ip:10m;
    limit_req_zone $binary_remote_addr zone=req_limit_per_ip:10m rate=5r/s;
    limit_req_status 403;

    ##
    # Buffer Limit Settings
    ##
    client_header_buffer_size    1k;
    client_body_buffer_size      128k;
    client_max_body_size         10m;
    client_header_timeout        30s;
    client_body_timeout          30s;
    large_client_header_buffers  4 256k;
    output_buffers               1 32k;
    postpone_output              1460;

    include mime.types;
    default_type application/octet-stream;

    ##
    # Logging Settings
    ##
    log_format main      '$remote_addr - $remote_user [$time_local]  '
      '"$request" $status $bytes_sent '
      '"$http_referer" "$http_user_agent" '
  	  '"$gzip_ratio" "$http_x_forwarded_for"';
    log_format compression '$remote_addr - $remote_user [$time_local] ' '"$request" $status $body_bytes_sent ' '"$http_referer" "$http_user_agent" "$gzip_ratio"';
    access_log /var/log/nginx/access.log;
    error_log /var/log/nginx/error.log;
    access_log off;
    log_not_found off;

    ##
    # Brotli Settings
    ##
    brotli on;
    brotli_static on;
    brotli_min_length 1000;
    brotli_buffers 32 8k;
    brotli_comp_level 6;
    brotli_types text/plain text/css text/javascript text/xml font/opentype application/javascript application/x-javascript application/json application/xml application/xml+rss application/ecmascript image/svg+xml;

    ##
    # Proxy Cache Settings
    ##
    proxy_cache one;
    proxy_cache_min_uses 3;
    proxy_cache_revalidate on;
    proxy_cache_bypass  $http_cache_control;
    proxy_cache_path /var/nginx/cache levels=1:2 keys_zone=one:10m inactive=60m max_size=512m use_temp_path=off;
    proxy_cache_key "$host$request_uri$cookie_user";
    proxy_cache_use_stale error timeout updating http_500 http_502 http_503 http_504;
    proxy_cache_valid any 1m;

    ##
    # Gzip Settings
    ##
    #gzip on;
    #gzip_buffers                16 8k;
    #gzip_comp_level                 6;
    #gzip_disable              "msie6";
    #gzip_http_version             1.1;
    #gzip_vary                      on;
    #gzip_min_length              1000;
    #gzip_proxied                  any;
    #gzip_types text/plain text/css text/javascript text/xml application/javascript application/x-javascript application/json application/xml application/xml+rss application/ecmascript image/svg+xml;

    ##
    # Virtual Host Configs for multiple sites
    ##
    server_names_hash_bucket_size 64;
    include sites-enabled/*;
}
#3. Save and test nginx config then restart nginx service
nginx -t
systemctl restart nginx.service
#4. Go to sites-available and create the following file to build a block hosting
cd sites-available/
vi <domainname>.conf
#5. Config file as below
server {
    listen 80 default_server;
    listen [::]:80 default_server;
    server_name <your-domain-name> www.<your-domain-name>;
    return 301 https://$host$request_uri;
}

server {
    listen 443 ssl http2;
    listen [::]:443 ssl http2;
    server_name <your-domain-name>;

    root /var/www/<web-folder-name>/html;
    index index.html;
    charset utf-8;

    access_log  off;
    error_log   /var/log/nginx.error_log error;

    error_page  404     /404.html;
    error_page  403     /403.html;
    error_page  500 502 503 504 /50x.html;

    location / {
        limit_conn conn_limit_per_ip 10;
        limit_req zone=req_limit_per_ip burst=10 nodelay;
        try_files $uri $uri/ =404;
    }

    # If you using as proxy server
    #  location / {
    #         include proxy_params;
    #         add_header X-Proxy-Cache $upstream_cache_status;
    #         proxy_pass         http://127.0.0.1:9000;
    #         proxy_redirect     off;
    #         proxy_set_header   Host             $host;
    #         proxy_set_header   X-Real-IP        $remote_addr;
    #         proxy_set_header   X-Forwarded-For  $proxy_add_x_forwarded_for;
    #         proxy_connect_timeout      60;
    #         proxy_send_timeout         60;
    #         proxy_read_timeout         60;
    #         proxy_buffer_size          4k;
    #         proxy_buffers              4 32k;
    #         proxy_busy_buffers_size    64k;
    #         proxy_temp_file_write_size 64k;
    #         proxy_temp_path            /etc/nginx/proxy_temp;
    #         limit_conn conn_limit_per_ip 10;
    #         limit_req zone=req_limit_per_ip burst=10 nodelay;
    #     }

    # cache.appcache, your document html and data
    location ~* \.(?:manifest|appcache|html?|xml|json)$ {
        expires -1;
        access_log off;
    }

    # Feed
    location ~* \.(?:rss|atom)$ {
        expires 1h;
        access_log off;
        add_header Cache-Control "public";
    }

    # Media: images, icons, video, audio, HTC
    location ~* \.(?:jpg|jpeg|gif|png|ico|cur|gz|svg|svgz|mp4|ogg|ogv|webm|htc|pdf)$ {
        expires 30d;
        access_log off;
        add_header Cache-Control "public";
    }

    # CSS and Javascript
    location ~* \.(?:css|js)$ {
        expires 1d;
        access_log off;
        add_header Cache-Control "public";
    }

    # Deny scripts inside writable directories
    location ~* /(img|cache|media|logs|tmp|image|images)/.*.(php|pl|py|jsp|asp|sh|cgi)$ {
        return 403;
    }

    # certs sent to the client in SERVER HELLO are concatenated in ssl_certificat
    ssl_certificate /etc/ssl/<yourweb-ssl-folder>/cert.crt;
    ssl_certificate_key /etc/ssl/<yourweb-ssl-folder>/privkey.key;
    ssl_trusted_certificate /etc/ssl/<yourweb-ssl-folder>/trustchain.crt;
    ssl_session_timeout 10m;
    ssl_session_cache shared:SSL:10m;
    ssl_session_tickets off;

    # Diffie-Hellman parameter for D    HE ciphersuites, recommended 4096 bits
    ssl_dhparam  /etc/ssl/<yourweb-ssl-folder>/dhparam.pem;

    # ssl key exchanges
    ssl_protocols TLSv1.2;
    ssl_ecdh_curve secp384r1;
    ssl_ciphers 'ECDHE-ECDSA-AES256-GCM-SHA384:ECDHE-RSA-AES256-GCM-SHA384:ECDHE-ECDSA-CHACHA20-POLY1305:ECDHE-RSA-CHACHA20-POLY1305:ECDHE-ECDSA-AES128-GCM-SHA256:ECDHE-RSA-AES128-GCM-SHA256:ECDHE-ECDSA-AES256-SHA384:ECDHE-RSA-AES256-SHA384:ECDHE-ECDSA-AES128-SHA256:ECDHE-RSA-AES128-SHA256';
    ssl_prefer_server_ciphers on;

    # OCSP Stapling - fetch OCSP records from URL in ssl_certificate and cache them
    ssl_stapling on;
    ssl_stapling_verify on;

    # Security Header
    add_header Pragma no-cache;
    add_header Cache-Control "max-age=0, no-cache, no-store, must-revalidate";
    add_header Strict-Transport-Security "max-age=31536000; includeSubdomains; preload";
    add_header Referrer-Policy no-referrer, strict-origin-when-cross-origin;
    add_header X-Content-Type-Options nosniff;
    add_header X-Frame-Options SAMEORIGIN;
    add_header X-XSS-Protection "1; mode=block";
    add_header Content-Security-Policy upgrade-insecure-requests;
    # Please add you own resource to this custom CSP!! and delete the line upper.
    #add_header Content-Security-Policy "default-src 'self'; script-src 'self' 'unsafe-inline' https://cdnjs.cloudflare.com https://www.google-analytics.com https://www.gstatic.com/ https://www.google.com/recaptcha/; img-src 'self' data: https://www.google-analytics.com https://www.google.com; style-src 'self' 'unsafe-inline' https://fonts.googleapis.com https://cdnjs.cloudflare.com https://www.google.com/recaptcha/; font-src 'self'; child-src https://www.gstatic.com https://www.facebook.com https://s-static.ak.facebook.com; frame-src https://www.google.com/recaptcha/; object-src 'none';";

    # Google DNS to resolve domain
    resolver 8.8.8.8 8.8.4.4 valid=360s ipv6=off;
    resolver_timeout 5s;
}
Read more about configuration https://mozilla.github.io/server-side-tls/ssl-config-generator/
#6. Enable config file
cd /etc/nginx/sites-enabled/
ls -s /etc/nginx/sites-available/<domainname>.conf /etc/nginx/sites-enabled/
#7. Save and test nginx config then restart nginx service
nginx -t
systemctl restart nginx.service
#8. Test the result
https://www.ssllabs.com/ https://observatory.mozilla.org/
Read more about 7 Tips for Faster HTTP/2 Performance https://www.nginx.com/blog/7-tips-for-faster-http2-performance/
After setting up the bare minimum configuration for a new server, there are some additional steps that are highly recommended in most cases.
In this guide, we will be focusing on configuring some optional but recommended components. This will involve setting our system up with a firewall and a swap file.
Firewalls provide a basic level of security for your server. These applications are responsible for denying traffic to every port on your server with exceptions for ports/services you have approved. CentOS ships with a firewall called firewalld. A tool called firewall-cmd can be used to configure your firewall policies. Our basic strategy will be to lock down everything that we do not have a good reason to keep open.
The firewalld service has the ability to make modifications without dropping current connections, so we can turn it on before creating our exceptions:
sudo systemctl start firewalld
Now that the service is up and running, we can use the firewall-cmd utility to get and set policy information for the firewall. The firewalld application uses the concept of "zones" to label the trustworthiness of the other hosts on a network. This labelling gives us the ability to assign different rules depending on how much we trust a network.
In this guide, we will only be adjusting the policies for the default zone. When we reload our firewall, this will be the zone applied to our interfaces. We should start by adding exceptions to our firewall for approved services. The most essential of these is SSH, since we need to retain remote administrative access to the server.
You can enable the service by name (eg ssh-daemon) by typing:
sudo firewall-cmd --permanent --add-service=ssh
or disable it by typing:
sudo firewall-cmd --permanent --remove-service=ssh
or enable custom port by typing:
sudo firewall-cmd --permanent --add-port=4200/tcp
This is the bare minimum needed to retain administrative access to the server. If you plan on running additional services, you need to open the firewall for those as well.
If you plan on running a conventional HTTP web server, you will need to enable the http service:
sudo firewall-cmd --permanent --add-service=http
If you plan to run a web server with SSL/TLS enabled, you should allow traffic for https as well:
sudo firewall-cmd --permanent --add-service=https
If you need SMTP email enabled, you can type:
sudo firewall-cmd --permanent --add-service=smtp
To see any additional services that you can enable by name, type:
sudo firewall-cmd --get-services
When you are finished, you can see the list of the exceptions that will be implemented by typing:
sudo firewall-cmd --permanent --list-all
When you are ready to implement the changes, reload the firewall:
sudo firewall-cmd --reload
If, after testing, everything works as expected, you should make sure the firewall will be started at boot:
sudo systemctl enable firewalld
Remember that you will have to explicitly open the firewall (with services or ports) for any additional services that you may configure later.