Created: February 20, 2024
This guide provides detailed steps to install NVIDIA CUDA on a Windows environment using Windows Subsystem for Linux 2 (WSL2) and Miniconda.
Requirements:
- NVIDIA Graphics Card
- Ensure your system is updated to the latest version through Windows Update
Steps:
- Install WSL2
- Install Miniconda in WSL
- Install Graphics Card Drivers
- Install RAPIDS
- Install VS Code Extensions in WSL
- Verify CUDA in VS Code
- References
To perform the correct installation of WSL, follow these detailed steps. Alternatively, you can refer to the Manual installation steps for older versions of WSL in the official Microsoft documentation, which serves as the basis for this point in the guide.
Enable WSL
Open PowerShell as an administrator and run the following command to enable the WSL features:
dism.exe /online /enable-feature /featurename:Microsoft-Windows-Subsystem-Linux /all /norestartEnable Virtual Machine feature
Open PowerShell as an administrator and run the following command to enable virtualization features:
dism.exe /online /enable-feature /featurename:VirtualMachinePlatform /all /norestartProceed to restart the computer.
Download the Linux kernel update package
In the official Microsoft documentation Manual installation steps for older versions of WSL navigate to the section to download the latest version of the Linux kernel and subsequently execute it:

Set WSL 2 as default version
Open PowerShell and execute the following command to set WSL2 as default version:
wsl --set-default-version 2If you have already installed WSL with an earlier version (WSL1), you must update it to version 2
Install Linux distribution
Open Microsoft Store and install the Ubuntu Linux distribution, which generally has the most updated version.

Open the Ubuntu terminal, create a user account and set a password.
Update the Linux distribution package
In the Ubuntu terminal, execute the following command to update the WSL packages:
sudo apt update && upgradeor
sudo apt update && sudo apt upgradeEnter the password established earlier.
Install Neofetch (Optional)
In the Ubuntu terminal, install Neofetch to view the distribution features with the following command:
sudo apt install neofetchTo view the features, type neofetch in the terminal.
Download Miniconda
Visit the Latest Miniconda installer links by Python version section on the official Conda website.
To determine the Python version used by your OS, open the Ubuntu terminal and excute the following command:
python3 --versionIn this guide, we assume an OS with Python 3.10 and an X64 architecture. Download the corresponding file for your system; in our example, we downloaded the Miniconda3 Linux 64-bit file.

Installation
Navigate to the folder where you downloaded the file using the Ubuntu terminal and execute the following command, considering the file name:
chmod +x ./Miniconda3-py310_23.11.0-2-Linux-x86_64.shNext, run the file with the following command:
./Miniconda3-py310_23.11.0-2-Linux-x86_64.shPress Enter to begin. You can read the end-user license agreement or skip it by pressing q. Then, accept the license by typing yes.
Installation directory
Set the default directory using the following command:
{HOME}/.miniconda3After installing the base environment, press Enter to complete the installation.
Return to the base directory with the command:
cdThen run:
nano -wc .bashrcScroll to the end by pressing Ctrl + down, press Enter, and type:
export PATH=${PATH}:${HOME}/.miniconda3/binExit the editor by pressing Ctrl + x and type yes.
Verify Miniconda installation
Run the following commands:
source .bashrcThen, execute:
conda update condaIf no errors are returned, the installation has been successful. At this point, Miniconda should check for updates; if there are any, type y to proceed with the update.
Conda
Run the following command:
conda config --set auto_activate_base falseExit the terminal with the command:
exitOpen a new Ubuntu terminal and execute the command:
conda initMiniconda has now been installed and configured.
Visit the official NVIDIA website in the NVIDIA Driver Downloads and fill in the fields with the corresponding grapichs card and OS information. In this guide, we used an NVIDIA GeForce GTX 1650 Ti graphics card.

Download the driver and run the file to install it on the Windows OS.
Note: the user needs to have a compatible NVIDIA GPU to perform these steps.
Install NVIDIA Drivers in WSL
Open the Ubuntu terminal and run the following command to update the packages:
sudo apt update && upgradeThen, install the drivers according to the version. In this example, we installed version 545:
sudo apt install nvidia-driver-545To verify that the installation was successful, run the following command:
nvidia-smiYou should see the information corresponding to the installed drivers.

Visit the RAPIDS Installation Guide in the Install RAPIDS section and copy the command. In this example, we've selected specific packages like cuDF and cuML, and the virtual environment name was set as cuda
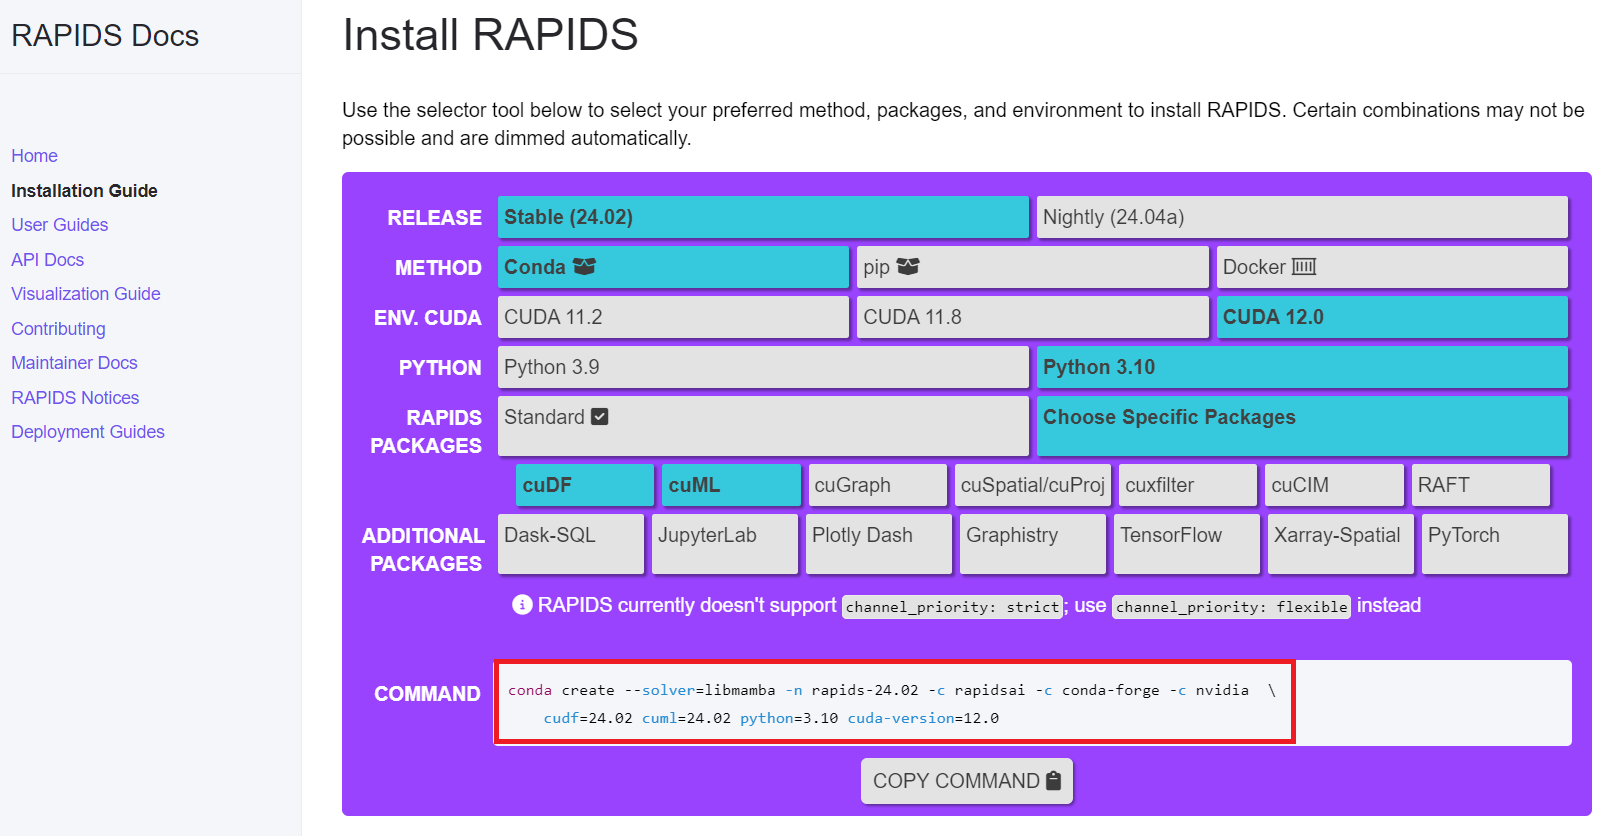
Use the following command as an example:
conda create --solver=libmamba -n cuda -c rapidsai -c conda-forge -c nvidia  \
    cudf=24.02 cuml=24.02 python=3.10 cuda-version=12.0
Virtual Environment
Activate the virtual environment cuda (or whatever you name it) and run the following command to verify that CUDA libraries are installed:
conda listAdditional Libraries
Install Pytorch:
conda install -c pytorch pytorchThen, install ipykernel or any additional libraries you may need:
conda install -c ipykernelIn the Ubuntu terminal, open VS Code with the following command:
code .It'll be installed within WSL, and once the IDE is open, make sure to have the following extensions installed:


Finally, ensure that you can use CUDA. Open a Jupyter Notebook in VS Code and execute the following code:
import torch

torch.cuda.is_available()
If the result is True, it means that CUDA is available and ready to be used. Congratulations!
- Craigloewen-Msft. Manual installation steps for older versions of WSL. Microsoft Learn. https://learn.microsoft.com/en-us/windows/wsl/install-manual. Published 20 de noviembre de 2023.
- TrujilloSoft. WSL 2: Instalar Linux en Windows 11. YouTube. marzo 2023. https://www.youtube.com/watch?v=6U2caEujxZ4.
- The Strawberry Data Scientist. Miniconda installation guide (Ubuntu 22.04 LTS). YouTube. agosto 2023. https://www.youtube.com/watch?v=KkEoaPgeuCc.
- Download the latest official NVIDIA drivers. https://www.nvidia.es/Download/index.aspx?lang=en.
- Installation Guide - RAPIDS Docs. RAPIDS Docs. https://docs.rapids.ai/install?_gl=1*1l55d5n*_ga*MjAzMzQ4OTI2Ni4xNzA4MjA5MzI0*_ga_RKXFW6CM42*MTcwODIwOTMyNC4xLjEuMTcwODIxMDEzMy42MC4wLjA.#selector.
- RomanAcademy. How to Install NVIDIA Drivers on Ubuntu 22.04 LTS - RomanAcademy - Medium. Medium. https://roman-academy.medium.com/how-to-install-nvidia-drivers-on-ubuntu-22-04-lts-6186e2f66749. Published noviembre 7, 2022.
- Python Simplified. CUDA Simply Explained - GPU vs CPU Parallel Computing for Beginners. YouTube. diciembre 2021. https://www.youtube.com/watch?v=r9IqwpMR9TE.