-
Notifications
You must be signed in to change notification settings - Fork 39
POTA Activations
What follows is an introduction on how to use QLog to activate a park. This is a guideline only - you may wish to customize different aspects of your workflow once QLog becomes familiar to you.
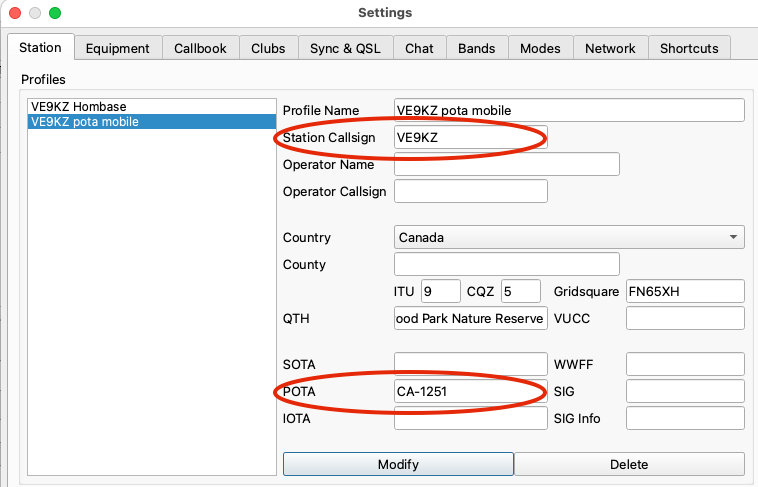
The station profile in use during an activation should define which station callsign and park number(s) will be logged for your contacts. Since POTA is typically a mobile operation, it is likely that you will have a mobile station profile defined separately from your base shack station profile. As you activate different parks, update the POTA reference in your mobile station profile to the ID of the current park. This field accepts a comma separated list of park IDs if you are doing multiple activations at once (2fer, 3fer, etc).
If you are a club station rotating through multiple operators during the activation (always exchanging just the club's station callsign over the air), update the operator callsign accordingly throughout the activation in the station profile.
If you are activating with a friend and exchanging multiple callsigns over the air (multiple contacts per remote station) you should not log these multiple contacts in the same QLog instance. Your friend should log their own contacts in their own logging program.
The only requirement for logging a contact is to enter in the remote station's callsign. If you need to log a park to park contact, use the QSO's POTA field (comma separated list of park IDs can be used if the remote station is activating multiple parks at the same time).
The example below sets up a basic POTA activity configuration.
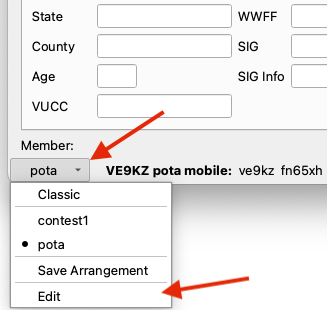
Navigate to the Activity Editor to start the configuration process:
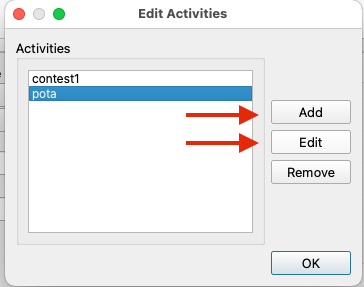
You will be creating a new activity configuration for POTA (or updating an existing one):
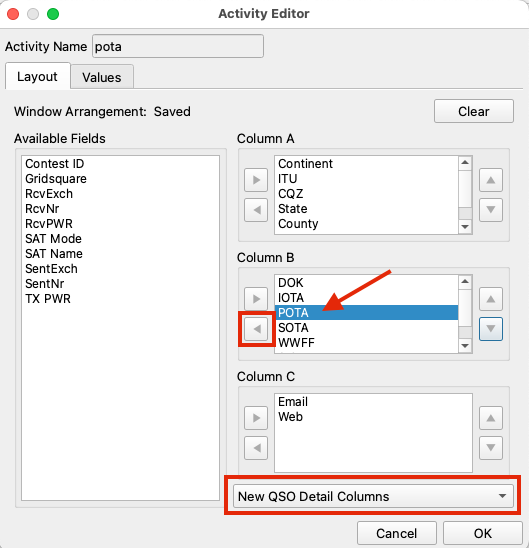
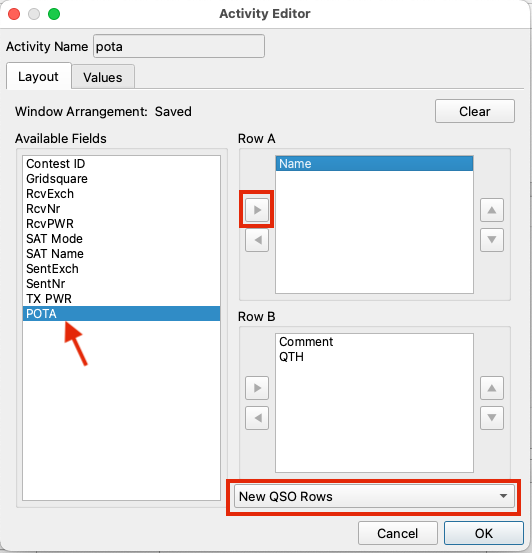
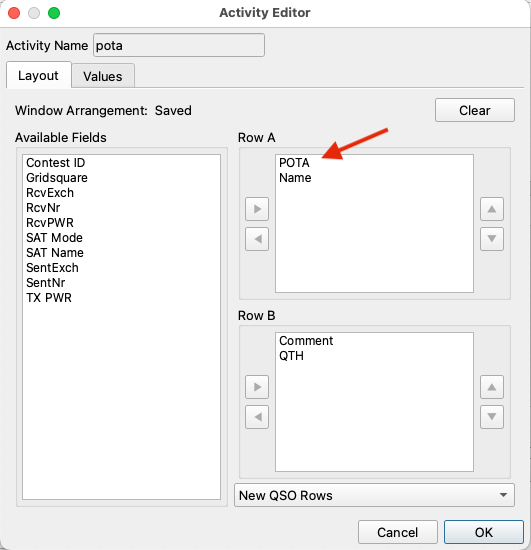
Use the Layout UI to pull fields in and out of the QSO field rows and the details columns. Use the bottom right drop-down to change which UI area you are configuring fields for. For POTA, you really only need to have the POTA field easy to access in the top row for park to park contacts. By default, the POTA field is assigned to the Details Columns UI area so you will need to remove it from that section and assign it to a row. You may also wish to add other fields to the top rows as demonstrated here (comment, name, etc) if this is information you normally exchange. All fields can be accessed in the details tab (if you put them there) but the top rows are easy to focus/tab to for fast data entry.
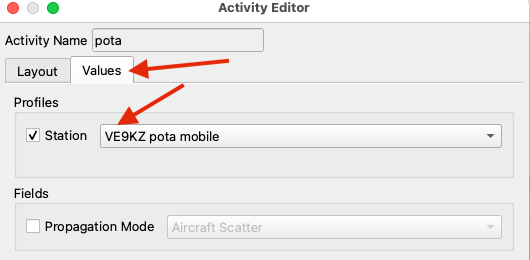
Your mobile station profile should also be assigned to this activity using the Values tab:
The above example configuration results in a simple field entry area that looks like this:
Nothing special here. Following on from the example configuration above: enter the remote station's callsign and press tab to focus the signal report fields, then tab again to the POTA field and other fields. If you'd like to focus directly to the POTA field after entering the callsign, press space. Pressing enter at any time or clicking on Save will save the contact to your log database.
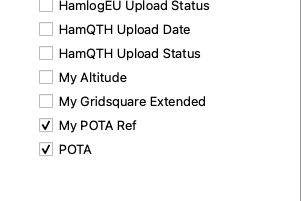
You may wish to add POTA and My POTA Ref to the log history columns for better visibility on park to park contacts and to differentiate between POTA vs other contacts in your log. This can be done by right clicking on the column headers, allowing you to choose new columns to show or remove columns currently visible.
The POTA.app website upload process requires ADIF exports of QSOs to adhere to a variety of requirements. QLog has a POTA specific export type for generating these files. The details of the requirements can be found on the pota.app documentation website, but at a high level:
- Each park ID requires it's own separate ADIF log file.
- For park-to-park logs, each remote park ID requires it's own log record.
- POTA park information must be stored in the ADIF sig fields.
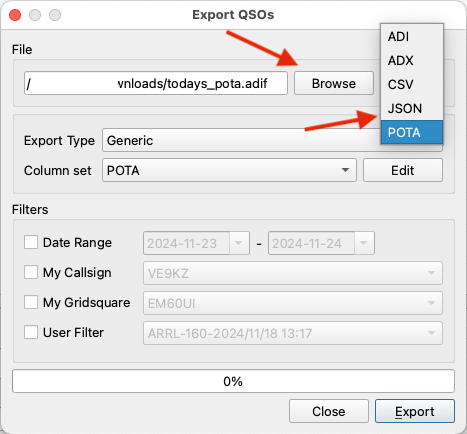
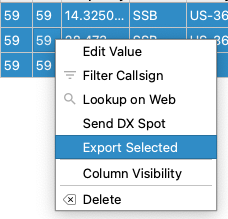
The POTA export type in QLog takes care of the transformation steps needed, allowing for easy upload to the pota.app website. To export your POTA logs, you may highlight / select all of the QSOs you want to export in the log history window, then right click and choose Export. Alternatively you may activate the Export feature from the Menu (Logbook > Export) and apply a filter to target your POTA logs.
Within the Export window, use Browse to define your main export file name. Change the export type to "POTA" and set your log filters if necessary. Click on Export at the bottom to start the export process.
Selecting the POTA export type will auto-set the Column set to POTA. Do not change this value.
QLog will split each park's contacts into specific files named correctly for import into the pota.app website.
The POTA Formatter exports selected QSOs that are POTA-related, meaning they have the POTA fields filled in. The exported QSOs are then sorted into two groups:
- Hunter Export This includes QSOs that do not have the "My POTA" field filled in but were conducted with a POTA station.
-
Activator Export
This export is necessary for reporting as a POTA activator. Each POTA location is exported to a separate file, as required by the POTA ADIF specifications. For example, if a station with callsign
VE9KZactivated parksCA-5166andCA-5085as a 2-fer (the station profile had the POTA field set toCA-5166,CA-5085), 2 park files would be generated:[email protected]and[email protected].
The export process generates multiple files:
- The primary file, selected by the user, will contain the Hunter Export QSOs.
- If any QSOs are exported as activator, these files will be created in the same directory but will have different file names to distinguish the POTA reference (more Submitting Logs to POTA)
The exported park specific ADIF files are named appropriately so the pota.app import meta data fields should automatically be populated when you upload the files. The pota.app website will not be explained here, please refer to the introduction material on the activator documentation website (there is a video overview). There may be odd cases where you need to manually set what state you were in if the information cannot be inferred.
POTA fields are not required for POTA hunters for pota.app tracking, so it's logging as usual as a hunter - it is the activators uploading the POTA contacts which assigns credit. Still, as a hunter you may wish to log the POTA field to note which park(s) you had contacted. POTA can be added as a top level row field (as described above) if hunting is the main objective of your session. Otherwise, the POTA field is available in the Details tab when needed.
