Microsoft Visual Studio 6 Project Settings
You are here: Home → Documentation → Windows information page → Tutorials → Microsoft Visual Studio 6 Project Settings
This tutorial guides you through setting up your Visual Studio project to work with Coin3D.
It is recommended that you familiarize yourself with SoWin before continuing, you can find a good introduction on the index page of the SoWin API Documentation.
When you create an application using SoWin, you can either have SoWin create the main application window for you, or you can embed one of the SoWin viewer components in your own application.
In the SoWin documentation you can find a simple example on how to create a SoWin based viewer and let SoWin set up the main application window. This is a short tutorial showing how to set up a Visual C++ 6.0 project for such an application.
If you want your application to have a more standard 2D user interface, with menus, buttons, etc, you will want to use SoWin's embedding capabilities. A tutorial for how to embed a SoWinExaminerViewer in a MFC MDI window can be found here.
This tutorial assumes that you have installed Coin, SoWin and simage.
Go to File - New Project, and choose to create a "Win32 Console Application". Create an empty project.
To be able to use the Coin3D libraries you have to adjust the project settings: open Project - Settings. You can choose if you would like to change the settings for
- Win32 Release
- Win32 Debug
- All Configurations
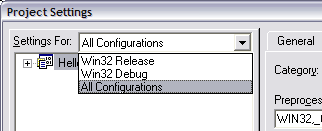
To change settings for all configurations, choose "All configurations"
from the drop down list.
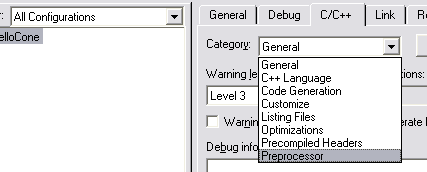
C/C++ - Preprocessor Settings
Open the C/C++ tab and choose "Preprocessor Settings":
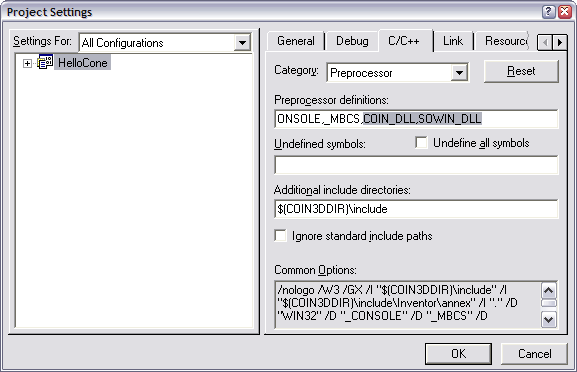
Add "COIN_DLL,SOWIN_DLL" to the preprocessor definitions.
Add "$(COIN3DDIR)\include" to the additional include directories:
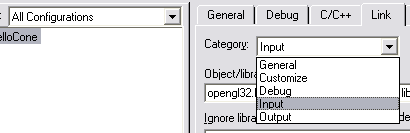
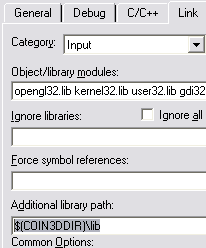
We need to tell Visual Studio where to find the Coin3D libraries. In the Link tab, choose Category "Input" and add $(COIN3DDIR)\lib to the Additional library path field:
This requires that you have registered the COIN3DDIR environment variable, the value is the path to your Coin3D installation. Most probably you have done this during the installation, if you have not, then you can add the variable manually.
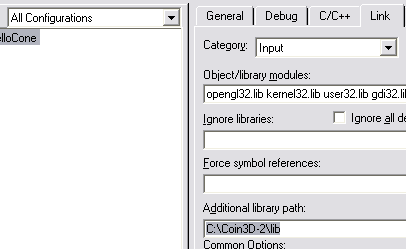
If you do not want to do that, you can also use the absolute path to your Coin3D installation instead:
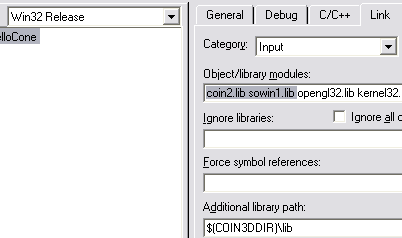
In the link tab, add "coin2.lib sowin1.lib" to the Object/library modules:
There is no need to specifically include the simage library. Coin will look for a simage DLL when it first needs it (e.g. if it encounters a texture node). If a simage library is found, it is loaded into the address space of the application process running the mainloop using the LoadLibrary Win32 function. If it cannot find simage, Coin will continue working just fine, but it will obviously not be able to load textures.
If you want to use some functions in the simage library directly, you should add simage1.lib to the list of library modules.
Note that the release versions of these libraries (sowin1.dll, coin2.dll, simage1.dll) have been compiled against the multithreaded DLL version of the C runtime library (MSVCRT.DLL). It is recommended that you do not mix different versions of the C runtime library.
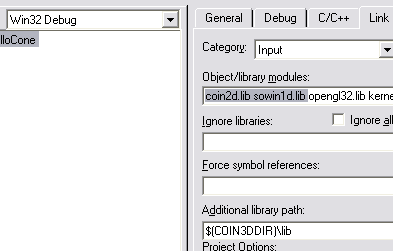
In the link tab, add "coin2d.lib sowin1d.lib" to the Object/library modules:
Note that the debug versions of these libraries (sowin1d.dll, coin2d.dll, simage1d.dll) have been compiled against the debug multithreaded DLL version of the C runtime library (MSVCRTD.DLL).