2. First Steps
M2M offers a fully-featured example design including a demo-core to experiment with. This allows you to get started and learn more about M2M without the need of a MiSTer core.
The demo-core outputs a 4:3 720x576 @ 50 Hz (aka PAL) video signal via the VGA port of the MEGA65 and a 16:9 1280x720 @ 50 Hz (aka 720p) video signal via HDMI. Audio output works via the 3.5mm audio-out and via HDMI as well. On HDMI, the signal can be changed to 60 Hz if there are compatibility issues with the 50 Hz.
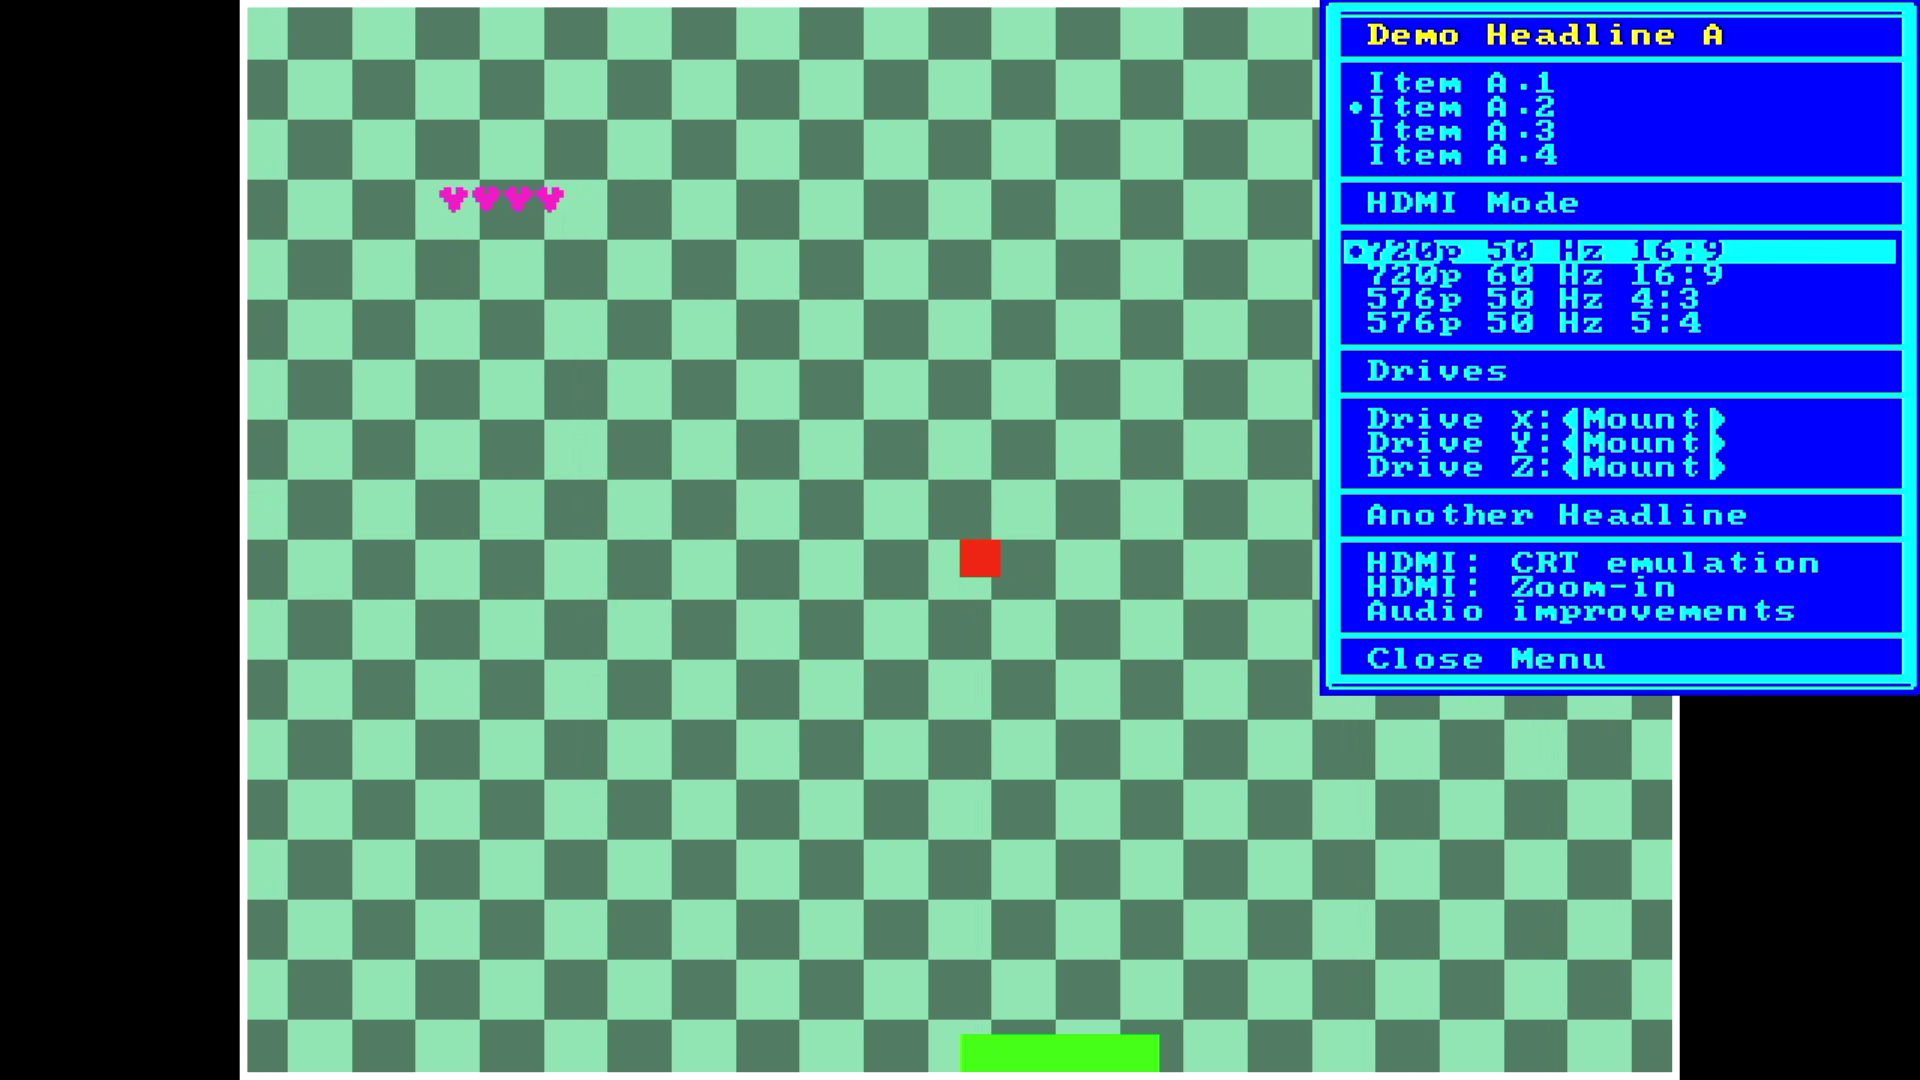
Have a look at the following screenshot. This is what the demo-core looks like on HDMI while the on-screen-menu is open because the Help key was pressed:
Let's get started and build this demo core, so that we can learn more about how M2M works and what services it provides to you.
You can also watch this section as a video tutorial on YouTube.
-
You need to have a GitHub account. If you do not have one, yet, click here to learn how to get one. The free tier is absolutely OK and sufficient.
-
You need to have a unixoid terminal/shell that includes the "usual suspects" for development such as the GNU compiler toolchain including
gccandmake. You also needgitandbash, etc. Obviously most Linux versions work out-of-the-box. MacOS works fine, too after you installed missing tools using a package manager such as HomeBrew. For Windows we recommend to use the Windows Subsystem for Linux. -
You need Vivado version 2022.2 (or newer), which runs on Linux and on Windows. The free version of Vivado is sufficient. Make sure that you install the "Full Product Installation". This tutorial video on YouTube might be helpful for you when it comes to installing Vivado.
-
You need a MEGA65
R3(or newer), i.e. either a DevKit version (R3) or the commercially available version (R3A). We plan to support the older pre-release seriesR2, too at a later stage. -
Optionally - but highly recommended - you need a JTAG adapter for the MEGA65, because otherwise you will need to manually convert each bitstream version you build into a
.corfile, copy it on a SD card and flash it. In contrast, when you use a JTAG adapter, Vivado's hardware manager and/or them65tool can directly transfer the bitstream via USB. Your workflow is 100x faster.
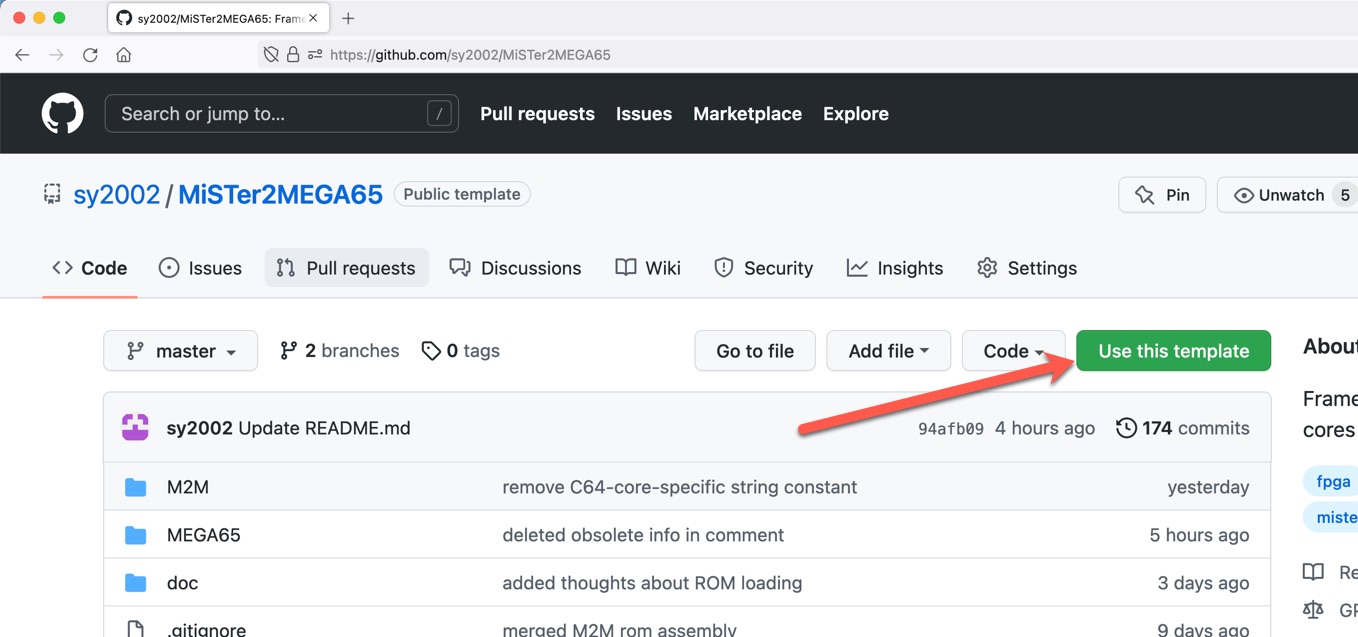
Use GitHub's
templating functionality
to create a new project based on MiSTer2MEGA65. To do so, navigate to
MiSTer2MEGA65's GitHub page
and press the green Use this template button as shown in this screenshot:
After that, walk through the project creation wizard as described in
this GitHub help page
and use the following name for your project, so that you are consistent
with the next steps described in the tutorial: MyFirstM2M
Right now, the new project MyFirstM2M is only availble online, on GitHub.
You need to clone it for being able to work with it locally.
MiSTer2MEGA65 contains sub-modules, so make sure that you do not "just" clone
but also initialize the submodules afterwards. Make sure to replace
<your-github-username> with your GitHub user name before executing the
commands in your terminal window:
git clone https://github.com/<your-github-username>/MyFirstM2M.git
cd MyFirstM2M
git submodule update --init --recursive
git remote add upstream https://github.com/sy2002/MiSTer2MEGA65.git
The last line, which adds the original MiSTer2MEGA65 repository as a remote
called upstream is not strictly necessary for the tutorials. You might
also omit it. It is needed for "real" projects, because it gives you the
opportunity to upgrade your local M2M version with a newer one.
Make sure that the QNICE development framework and the QNICE's "operating system" called "Monitor" is available to MiSTer2MEGA65. You can build it using the following commands:
cd M2M/QNICE/tools/
./make-toolchain.sh
Answer all questions that you are being asked while the QNICE tool chain
is being built by pressing Enter. You can check the success of
the process by checking if the Monitor is available as .rom file:
ls -l ../monitor/monitor.rom
-
Go to the folder
CORE/m2m-romand build the M2M firmware:cd ../../../CORE/m2m-rom ./make_rom.sh -
Go to the folder
COREand open Vivado there. This makes sure that the project-specific subfolders that Vivado will create are located in the right M2M subfolder.
cd ..
vivado
-
Chose the right project file for your MEGA65 revision. M2M strives to support
R2andR3(and newer), but at the time of writing this onlyR3(and newer) are supported:Open
CORE-R3.xprin Vivado. -
Create the bitstream.
While doing so, Vivado will create multiple folders following the pattern
CORE-R3.*inside yourCOREfolder. This is OK, you can ignore them and.gitignoreis also set-up to ignore them.The bitstream file will be located in
CORE/CORE-R3.runs/impl_1/CORE_R3.bit.
-
If you have a JTAG connector installed in your MEGA65, you can now either use Vivado's hardware manager directly after the bitstream has been built or the "M65 tool" to run the bitstream on your MEGA65.
-
Using Vivado's hardware manager is highly recommended while doing this tutorial, because it is the fastest and easiest way to move forward. Later, you might prefer command line tools such as the "M65 tool".
-
Without a JTAG connector, you need to convert the bitstream, which is a
.bitfile, into a.corfile and use MEGA65's No Scroll boot menu to flash the core. Use "bit2core" for that.
The GitHub repository mega65-tools contains among other things two tools that are relevant in the M2M context:
- The "M65 tool" is also known as
m65. It is a swiss army knife of tools for automated actions to perform on MEGA65 hardware. -
bit2corewhich is used to convert.bitfiles into.corfiles.
You can download the most recent binaries for your platform here. If you are on a Mac, you might need to proactively allow the system to run these unsigned binaries.
The README.md of the MEGA65 tools GitHub repository also contains detaild build instructions in case you want to build the tools for yourself.
You might want to consider putting m65 and bit2core into a folder where
your shell has search-path access to.
There are multiple ways to run a bitstream using m65. For "alternative
cores", i.e. the cores that we are creating using M2M, the -q option is
the right one to use:
m65 -q name-of-your-bitstream.bit
This will auto-detect your MEGA65 that needs to be connected via JTAG and
USB with your computer, transfer the bitstream and immediately run it. While
Vivado's hardware manager is nice, m65 is fast.
Therefore, if you have a working JTAG connection to your MEGA65, we recommend
to create a file called load_bitstream.sh and put it into the user space
main folder CORE. There is already an entry CORE/load_bitstream.sh
in M2M's .gitignore.
Here is an example file from sy2002's C64MEGA65 local folder:
#!/usr/bin/env bash
../../mega65-tools/bin/m65.osx -q CORE-R3.runs/impl_1/CORE_R3.bitMEGA65's core loader that is activated using the No Scroll
mechanism expects an own file format. Use bit2core to convert .bit
bitstreams into MEGA65 .cor core files.
The built-in help of bit2core is great, so we won't discuss all options
here. In case you wanted to convert the "First Steps" core that we created
during the course of this tutorial into a .cor file and assuming that you
are in the folder CORE, here is how you can do that:
bit2core mega65r3 CORE-R3.runs/impl_1/CORE_R3.bit MyFirstM2M V1 mfm2m.cor
You will receive a warning that talks about bit2core not being able to
distinguish between multiple MEGA65 targets, but this is OK. After you
successfully ran this command, you will have mfm2m.cor and from here you
can install the .cor on the MEGA65. Learn more about how to do this
on the
Alternative MEGA65 cores
website or by watching this great
Tutorial on YouTube.
The demo-core is provided by M2M so that you can play with M2M, experiment and
learn without the need of a MiSTer core. It is not meant to be understood how
it works. Of course you can go to the folder M2M/vhdl/democore and read
through the source code. But the idea is that you treat the demo-core as a
black-box, just like you (in most cases) would treat the MiSTer core as a
black-box and then start working with it inside M2M's defined structure of
files that are accessible to you in CORE/vhdl.
After the core starts, you will see a welcome screen. Read it and then press Space to continue. Now you will hear a siren via the 3.5mm audio-out and via HDMI audio. And you will see a "BreakOut" set-up on your screen, i.e. a "ball", a "paddle" and something to hit.
One of the basic ideas of M2M video output is: Output a truly "retro" signal on the VGA. That means use the original core's aspect ratio (very often this is 4:3) and go as close to the original core's resolution as you can without sacrificing support on VGA displays. It might be that you need to use M2M's built-in scan-doubler or other mechanisms to actually achieve this, but this is for a later stage. Our demo-core outputs PAL, so this is a nice example of such a "retro" resolution on VGA. On HDMI, on the other hand, M2M outputs a standardized 720p 16:9 image that is a pixel-perfect scaled representation of the original core's output.
So we are catching two birds with one stone: Convenience on modern HDMI displays while still offering a "retro experience" via VGA.
Use the arrow keys and/or a joystick in port #1 to control the paddle. M2M debounces the joystick ports for you and provides an easy to use keyboard abstraction.
Play BreakOut! :-)
Press the Help key while the core is running to open the On-Screen-Menu (aka OSM and also dubbed "Help menu" or "Options menu"). You can close the menu while it is open by either pressing Help again or by choosing the menu item "Close Menu".
Play around with the menu a bit. Use Return to select menu items. Use Space to unmount a drive that has been mounted before. You will notice that the M2M framework is providing some interesting features:
-
Multi-select and single-select menu items: Multi-select in the M2M context means that you can select one option out of multiple options. The example in the demo-core is called "Item A.1", "Item, A.2", ... And "single-select" in the M2M context means that these are menu-items that are either ON or OFF. An example in the demo-core is the menu item "HDMI: CRT emulation". (We are aware that in other frameworks or contexts outside of M2M multi-select and single-select might mean something else.)
-
Make sure that at least one FAT32 formatted SD card is in your MEGA65 and then choose any of the three "Drive X", "Drive Y" or "Drive Z" virtual drive mounting menu items. You can now browse the SD card and "mount" any file as a "disk image". (Obviously, you are not mounting anything; this is just a demo of the file browser and virtual drive mounting system.)
-
Switching HDMI output between 50 Hz and 60 Hz
-
Play with the CRT emulation (video filter), audio improvements (audio filters) and the Zoom-in feature.
Now that you have gotten a first glimpse of what M2M can do, it's time to
go one level deeper and to understand the basic structure. There are two
basic "realms" or "spaces": The framework space (M2M space) and the core
space ("your" space). The M2M space is located in the folder M2M and the
core space is in the folder CORE.
When porting a MiSTer core, you would create a Git submodule as a
subdirectory of CORE for example CORE/MyCore_MiSTer and make sure it
links to the MiSTer fork you have created. But in this "First Steps"
tutorial, there is no MiSTer core. Just the demo core, which is part of
the framework.
As a rule of thumb: Do not modify anything in the framework space, only
modify what is really needed to make it run when it comes to the original
MiSTer core and actually do your work in the core space's CORE
folder.
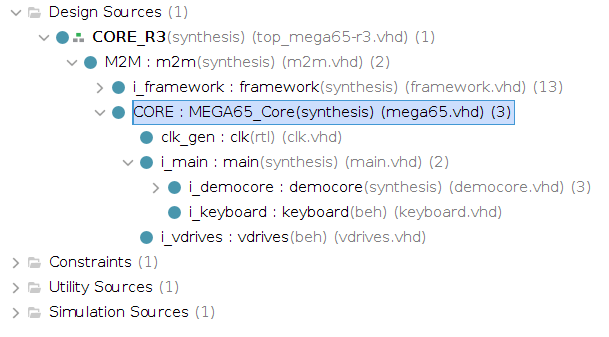
Let's have a look at the hierarchical structure now. The following is a
screenshot from Vivado's source explorer. The source explorer nicely shows
the separation of the framework space and the user space: The framework is
contained in i_framework; we collapsed the branch for a better overview.
And the user space is represented by the following files:
- top_mega65-r3.vhd: CORE_R3
- mega65.vhd: CORE
- clk.vhd: clk_gen
- main.vhd: i_main
- keyboard.vhd: i_keyboard
Two other important user space files that are not visible in this
screenshot are CORE/vhdl/globals.vhd and CORE/vhdl/config.vhd.
As a user of M2M, you can and should ignore all files other than the ones mentioned in the user space list above: You would normally never touch them.
The next sections walk you quickly through the user space files and explain how they interact. For a more thorough description please have a look at the Reference Guide: Each of the following user space files has its own chapter there.
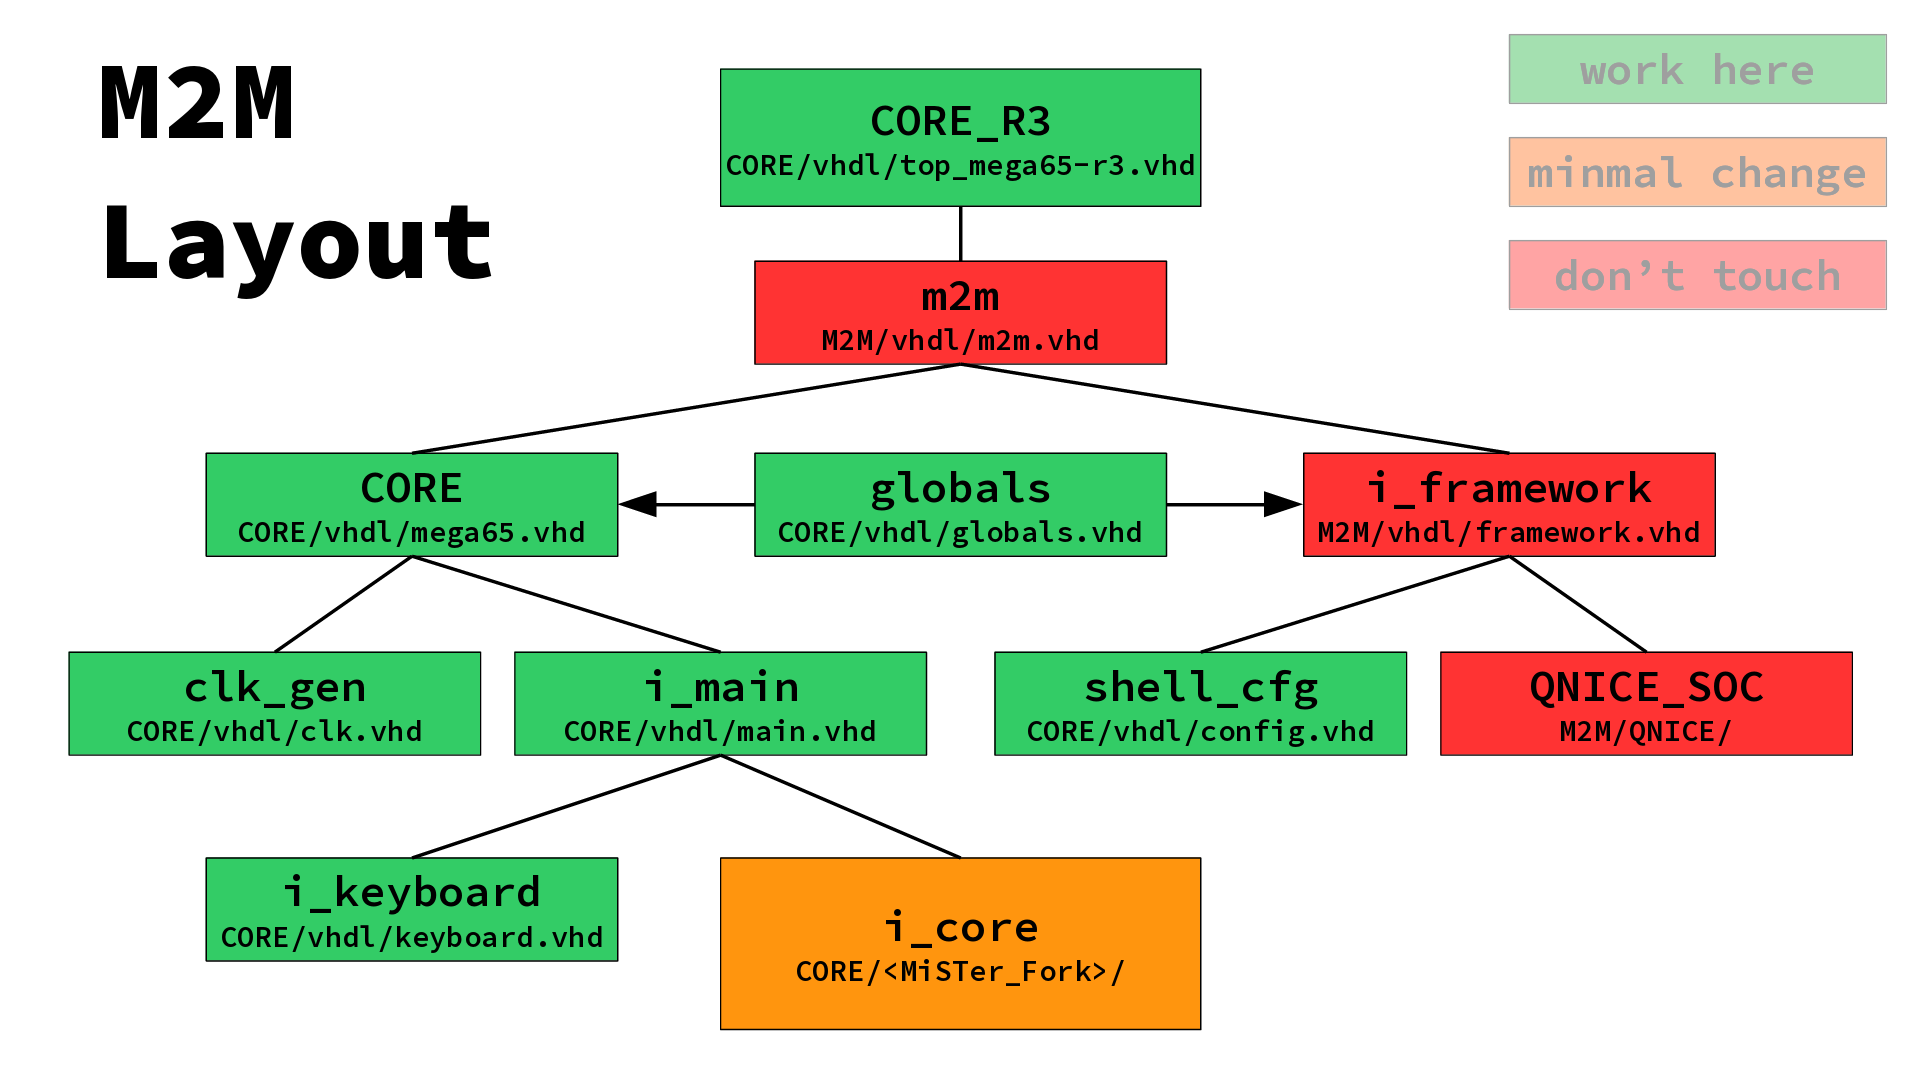
Top file of the whole machine.
M2M supports multiple MEGA65 machine architectures. Right now R2
machines (pre-series models), R3 machines ("DevKits") and R3A machines
(first commercially available machines) are supported. Since R3and R3A are
nearly identical, M2M just denotes them as R3.
For each architecture, M2M provides three files in user space:
-
Vivado project: In our case this is
CORE/CORE-R3.xpr. The project file contains all references necessary to work with M2M and/or the core in the Vivado IDE and everything necessary to make a bitstream. In particular, it links to the two other files that are machine architecture dependent. -
Constraints file: For our demo/walk-through this is
CORE/CORE-R3.xdc. The constraints file is highly machine dependent and contains all the I/O mappings as well as definitions for successful timing closure. -
Top file: For
R3this isCORE/vhdl/top_mega65-r3.vhd. The top file instantiates the whole machine and contains machine architecture dependent settings and modules.
The main module that the top file is instantiating is M2M. This module
instantiates i_framework which contains everything that the framework
needs to operate, including QNICE, the analog and digital rendering
pipeline and the HyperRAM controller. The i_framework module also
contains glue logic. The second module that M2M instantiates is
mega65.vhd, where your actual core lives in.
It is fair to say that mega65.vhd is the "top file of the user space", as
the following things are happening here:
- Instantiation of the wrapper of the MiSTer core
main.vhd - Instantiation of all clock-domain-crossing hardware such as core-specific RAMs, ROMs and other devices
- Implementation of device-specific logic
- Implementation of the logic that reacts to on-screen-menu items, such as the real-time configuration of audio and video settings
In our first steps demo/example, not a lot of sophisticated stuff is
happening: main.vhd is instantiated and there is no core-specific RAM, ROM
or device (other than i_vdrives). As we will cover the implementation of
the logic that reacts to on-screen-menu items during the
"Hello World" Tutorial,
we will not go deeper here.
The topic of virtual drives is quite complex, which is why i_vdrives is
not covered here, either, but in its own chapter Virtual Drives.
The MiSTer core you are porting has very specific clocking needs. Some cores
are happy with one clock, some cores need multiple clocks. Put all of them
in CORE/vhdl/clk.vhd and make sure that you also implement the necessary
clock-domain-crossing for each clock when it comes to reset generation.
The standard version of clk.vhd supports one clock, and therefore also
one reset. Feel free to add more output signals.
We are wrapping the MiSTer core in main.vhd. The power of the M2M
framework becomes visible, when you look at the output ports of main.vhd:
The core just needs to output some retro video signal and signed 16-bit
PCM audio and the framework does all the magic necessary to transform this
into HDMI (incl. an 48 kHz sampled audio stream) and to a pulse density
modulated stream for the 3.5mm audio out.
If you look at how everything is structured in main.vhd, then you will
quickly notice that the MiSTer core can peacefully live in its own little
bubble and clocking domain and whatnot without ever knowing anything about
the MEGA65 it is running on and without ever knowing about screen overlays
(for example for the on-screen-menu), SD cards and so on.
At least two modules need to be instantiated in main.vhd:
- MiSTer core: In our case, this is
i_democore - Keyboard:
i_keyboardinkeyboard.vhd
In practice, you will very likely instantiate more modules (for example
additional glue-logic for the MiSTer core) and you will also add more
input/output ports to main.vhd. But this is absolutely OK and meant to
be like this.
M2M provides you with a very simple interface to the MEGA65 keyboard so that
you are able to implement whatever mapping and logic the core needs.
keyboard.vhd runs in the same clock-domain as the core, so that you can
directly wire the output of your own keyboard mapper to MiSTer's keyboard
input.
In our example, the demo core expects a std_logic_vector that has one
active-low bit per key on the MEGA65's keyboard:
keyboard_n_i : in std_logic_vector(79 downto 0);Therefore the whole logic of keyboard.vhd boils down to creating 80
flip-flops (i.e. a 80-bit register) and keeping them updated:
   example_n_o <= key_pressed_n;

   keyboard_state : process(clk_main_i)
   begin
      if rising_edge(clk_main_i) then
         key_pressed_n(key_num_i) <= key_pressed_n_i;
      end if;
end process;The
Shell
is highly versatile and a lot of details of how it behaves and what services
it shall offer to the users can be configured. You are doing this in
config.vhd.
Vivado will synthesize config.vhd into a ROM that can be read by the
QNICE firmware and by the Shell. As long as you "just" would like to use the
Shell (instead of writing your own firmware from scratch), you do not need
to understand how the underlying mechanisms work. In this case just stick
with the comments in config.vhd and do not touch any part of the file
that is marked with "DO NOT TOUCH".
The "Hello World" Tutorial will - among other
things - show you how you can use config.vhd to create new menu items for
the on-screen-menu (Help menu) and how to change the Welcome
Screen's standard behavior.
The things that you will need to change in globals.vhd are these:
- Precise speed of your MiSTer core's clock(s) in Hertz
- The DX and DY "retro" resolution of the core (remember: this is what will be output on the VGA port; HDMI will always be auto-scaled to 720p)
- Virtual drives and/or ROMs
- Audio filters (if any)
All of this is beyond the scope of our small first demo tour through M2M.
We highly encourage you to follow the track and continue with the "Hello World" Tutorial from here.