2. First Steps
M2M offers a fully-featured example design including a demo-core to experiment with. This allows you to get started and learn more about M2M without the need of a MiSTer core.
The demo-core outputs a 4:3 720x576 @ 50 Hz (aka PAL) video signal via the VGA port of the MEGA65 and a 16:9 1280x720 @ 50 Hz (aka 720p) video signal via HDMI. Audio output works via the 3.5mm audio-out and via HDMI as well. On HDMI, the signal can be changed to 60 Hz if there are compatibility issues with the 50 Hz.
Have a look at the following screenshot. This is what the demo-core looks like on HDMI while the on-screen-menu is open because the Help key was pressed:
[@lydon: Please use your HDMI grabber to make a screenshot of the M2M democore while it runs "breakout" and while the Help menu is open (topmost item selected) and send it to me via Skype, so that I can add it here.]
Let's get started and build this demo core, so that we can learn more about how M2M works and what services it provides to you.
Clone the M2M GitHub repository and rename it. For a real project you would fork it, but for the purpose of getting started: Let's make it nice and easy.
MiSTer2MEGA65 contains sub-modules, so make sure that you do not "just" clone but also initialize the submodules afterwards:
git clone https://github.com/sy2002/MiSTer2MEGA65.git
mv MiSTer2MEGA65 MyFirstM2M
cd MyFirstM2M
git submodule update --init --recursive
Make sure that the QNICE development framework and the QNICE's "operating system" called "Monitor" is available to MiSTer2MEGA65. You can build it using the following commands:
cd M2M/QNICE/tools/
./make-toolchain.sh
Answer all questions that you are being asked while the QNICE tool chain
is being built by pressing Enter. You can check the success of
the process by checking if the Monitor is available as .rom file:
ls -l ../monitor/monitor.rom
-
Go to the folder
MEGA65/m2m-romand build the M2M firmware:cd ../../../MEGA65/m2m-rom ./make_rom.sh -
Go to the folder
MEGA65and open Vivado there. This makes sure that the project-specific subfolders that Vivado will create are located in the right M2M subfolder.
cd ..
vivado
-
Chose the right project file for your MEGA65 revision. M2M strives to support
R2andR3(and newer), but at the time of writing this onlyR3(and newer) are supported:Open
MEGA65-R3.xprin Vivado. -
Create the bitstream.
While doing so, Vivado will create multiple folders following the pattern
MEGA65-R3.*inside yourMEGA65folder. This is OK, you can ignore them and.gitignoreis also set-up to ignore them.The bitstream file will be located in
MEGA65/MEGA65-R3.runs/impl_1/MEGA65_R3.bit.
-
If you have a JTAG connector installed in your MEGA65, you can now either use Vivado's hardware manager directly after the bitstream has been built or the "M65 tool" to run the bitstream on your MEGA65.
-
Using Vivado's hardware manager is highly recommended while doing this tutorial, because it is the fastest and easiest way to move forward. Later, you might prefer command line tools such as the "M65 tool".
-
Without a JTAG connector, you need to convert the bitstream, which is a
.bitfile, into a.corfile and use MEGA65's No Scroll boot menu to flash the core.
@TODO: Describe how to get and how to build the m65 and the bit2core tool.
The demo-core is provided by M2M so that you can play with M2M, experiment and
learn without the need of a MiSTer core. It is not meant to be understood how
it works. Of course you can go to the folder M2M/vhdl/democore and read
through the source code. But the idea is that you treat the demo-core as a
black-box, just like you (in most cases) would treat the MiSTer core as a
black-box and then start working with it inside M2M's defined structure of
files that are accessible to you in MEGA65/vhdl.
After the core starts, you will see a welcome screen. Read it and then press Space to continue. Now you will hear a siren via the 3.5mm audio-out and via HDMI audio. And you will see a "BreakOut" set-up on your screen, i.e. a "ball", a "paddle" and something to hit.
One of the basic ideas of M2M video output is: Output a truly "retro" signal on the VGA. That means use the original core's aspect ratio (very often this is 4:3) and go as close to the original core's resolution as you can without sacrificing support on VGA displays. It might be that you need to use M2M's built-in scan-doubler or other mechanisms to actually achieve this, but this is for a later stage. Our demo-core outputs PAL, so this is a nice example of such a "retro" resolution on VGA. On HDMI, on the other hand, M2M outputs a standardized 720p 16:9 image that is a pixel-perfect scaled representation of the original core's output.
So we are catching two birds with one stone: Convenience on modern HDMI displays while still offering a "retro experience" via VGA.
Use the arrow keys and/or a joystick in port #1 to control the paddle. M2M debounces the joystick ports for you and provides an easy to use keyboard abstraction.
Play BreakOut! :-)
Press the Help key while the core is running to open the On-Screen-Menu (aka OSM and also dubbed "Help menu" or "Options menu"). You can close the menu while it is open by either pressing Help again or by choosing the menu item "Close Menu".
Play around with the menu a bit. Use Return to select menu items. Use Space to unmount a drive that has been mounted before. You will notice that the M2M framework is providing some interesting features:
-
Multi-select and single-select menu items: Multi-select in the M2M context means that you can select one option out of multiple options. The example in the demo-core is called "Item A.1", "Item, A.2", ... And "single-select" in the M2M context means that these are menu-items that are either ON or OFF. An example in the demo-core is the menu item "HDMI: CRT emulation". (We are aware that in other frameworks or contexts outside of M2M multi-select and single-select might mean something else.)
-
Make sure that at least one FAT32 formatted SD card is in your MEGA65 and then choose any of the three "Drive X", "Drive Y" or "Drive Z" virtual drive mounting menu items. You can now browse the SD card and "mount" any file as a "disk image". (Obviously, you are not mounting anything; this is just a demo of the file browser and virtual drive mounting system.)
-
Switching HDMI output between 50 Hz and 60 Hz
-
Play with the CRT emulation (video filter), audio improvements (audio filters) and the Zoom-in feature.
Now that you have gotton a first glimpse of what M2M can do, it's time to
go one level deeper and to understand the basic structure. There are two
basic "realms" or "spaces": The framework space (M2M space) and the core
space ("your" space). The M2M space is located in the folder M2M and the
core space is split into two folders:
-
The folder you chose to add the original MiSTer core to (as a Git submodule). In this "First Steps" tutorial, there is no MiSTer core but a demo core, which is part of the framework.
-
User space mail folder:
MEGA65
As a rule of thumb: Do not modify anything in the framework space, only
modify what is really needed to make it run when it comes to the original
MiSTer core and actually do your work in the core space's MEGA65
folder.
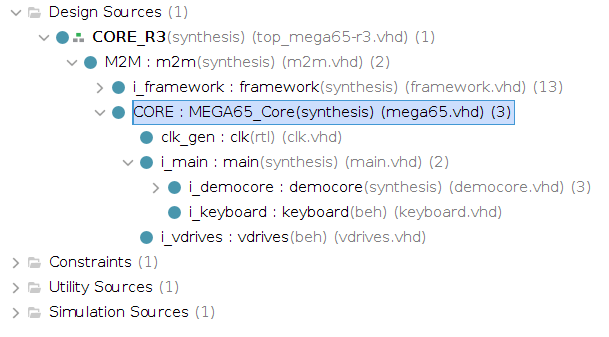
Let's have a look at the hierarchical structure now. The following is a screenshot from Vivado's source explorer. Unfortunatelly the source explorer cannot display the framework space and the user space separately, so please focus your attention on the following files:
- top_mega65-r3.vhd: mega65_r3
- config.vhd: shell_cfg
- mega65.vhd: MEGA65
- clk.vhd: clk_gen
- main.vhd: i_main
Another important file, that is not visible in this screenshot is
MEGA65/vhdl/globals.vhd.