-
Notifications
You must be signed in to change notification settings - Fork 128
Mode 7 Clock Modification
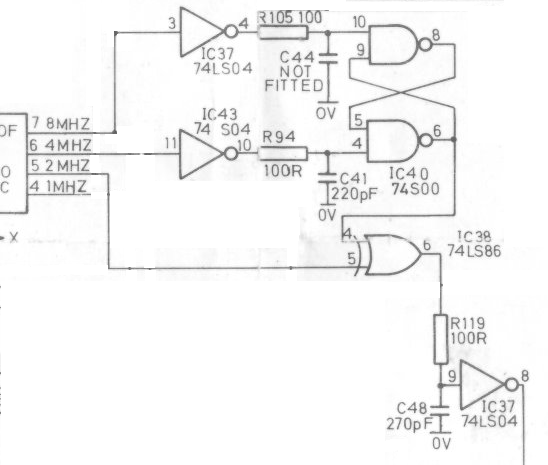
Mode 7 is the most difficult source to sample as the 6 Mhz teletext pixel clock is generated in an unusual way from the 16 Mhz master crystal which involves resistor/capacitor filters and this results in the pixel clock being very asymmetric with the amount of asymmetry varying from machine to machine.

If you only get problems with certain combinations of foreground & background colours you should always try running the Auto calibration with those being displayed. Again manual adjustment should also be tried and there are additional adjustable phases A-F to cope with the asymmetry. Finally try manually setting the clock multiplier to x16 before calibration or manual adjustment but that might not work as it overclocks the CPLD so you could end up with a blank screen, streaking or a very noisy image.
If you are unable to completely resolve any mode 7 noise issues by making the above adjustments then the only option is to adjust the values of the resistors/capacitors in the 6Mhz clock circuit to make the clock more symmetric.
The most likely cause of the clock asymmetry is the final RC filter made up of C48 (270pF) and R119 (100R), which significantly loads the TTL gate driving the filter. Because of the way TTL drivers work, this load delays the rising edge more than it delays the falling edge, which narrows positive going pulses. You can clearly see this effect in the below scope photo:
The upper trace is the pixel data (from the green channel) and the lower trace is the 6MHz clock. Note the uneven spacing of the clock edges are (both edges are used). In effect, the pixels in a character end up different widths, making them harder to sample.
The recommended way to fix this is to reduce the value of C48. This process is somewhat trial and error. On some Model B's you can remove C48 completely. On others you can safely reduce it to 100pF, but going below that results in a black screen in Mode 7.
What I've done on my own systems is to socket C48 so that it's easy to experiment with different capacitor values without risking damage to the PCB through repeated desoldering.
The parts required are:
- some SIL socket strip Farnell 2839818
- a selection of small value ceramic capacitors (47pF, 68pF, 100pF, 150pF, 220pF) with a 5mm (or 5.08mm) lead pitch Farnell various
The steps involved are:
- disconnect the keyboard and power cables
- unscrew and remove the main PCB from the case
- carefully desolder C48 (located 7cm to the right of the 6502)
- clean out the holes with solder braid (and clean the legs of C48)
- solder in a couple of single sockets cut from the piece of SIL socket strip
- place C48 back in the socket
- replace the main PCB back in the case
- replace the keyboard and power cables
- power on and check everything is working as before
Here's a photo of the result:
Now it's easy to try different values for C48, starting with 100pF. You'll need to power off the system then swap the capacitor. Power the system back up, let things stablize for a few minutes, then run an autocalibration on RGBtoHDMI.
The most challenging characters to display accurately are the ones with single pixel wide features:
$ * 4 K M N ^ k m r ¼ ¾
Here's a test program to generate a challenging calibration screen:
10 MODE 7
20 FOR A=1 TO 80
30 PRINT "$*4KMN^kmr¼¾";
40 NEXT

A more comprehensive test program is available as an ssd image here:
https://raw.githubusercontent.com/wiki/hoglet67/RGBtoHDMI/images/Mode7_Calibration.zip
Here's a second scope photo after making this modification
Compared to before the change, the clock edges are much more unformly spaced, making the pixels easier to sample.
The same modification should be possible on a Master 128, but this has not been verified by ourselves.
The components numbers involved are C30 (100pF) and R59 (150R).
The teletext clock on the Master 128 is typically better anyway, because the Master uses a smaller C and a larger R than the Model B. This presents less of the load, hence the clock suffers less asymmetry.
Construction (current designs)
- Bill of Materials (12-Bit Board)
- Bill of Materials (12-Bit Extender)
- Bill of Materials (Analog Board)
- Bill of Materials (TTL Buffer Boards)
- Bill of Materials (Pi Zero)
- Cables
- Assembled boards for sale
Construction (older designs)
- Bill of Materials (6/8-Bit Board)
- Bill of Materials (6-Bit Board)
- Bill of Materials (3-Bit Board)
- Bill of Materials (Atom Board)
- Assembly Notes (Atom Board)
- CPLD Programming
User Documentation


